Cirkit Designer Logo
Cirkit Designer
Your all-in-one circuit design IDE
Home / 
Component Documentation

How to Use DISJUNTOR RESIDUAL: Examples, Pinouts, and Specs

Image of DISJUNTOR RESIDUAL
Cirkit Designer LogoDesign with DISJUNTOR RESIDUAL in Cirkit Designer

Introduction

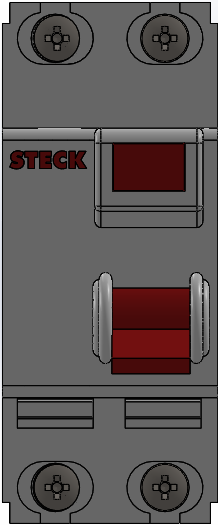
The DISJUNTOR RESIDUAL by STECK is a residual current device (RCD) designed to enhance electrical safety by detecting imbalances in electrical current. When an imbalance is detected, the device quickly disconnects the circuit, preventing potential electric shocks and reducing the risk of electrical fires. This component is essential in residential, commercial, and industrial electrical systems where safety is a priority.

Explore Projects Built with DISJUNTOR RESIDUAL

Use Cirkit Designer to design, explore, and prototype these projects online. Some projects support real-time simulation. Click "Open Project" to start designing instantly!
Solar and Wind Energy Harvesting System with Charge Controller and Inverter
Image of bolito: A project utilizing DISJUNTOR RESIDUAL in a practical application
This circuit is designed for a renewable energy system that integrates solar and wind power generation. It includes a solar and wind charge controller connected to a solar panel and a lantern vertical wind turbine for energy harvesting, a 12V 200Ah battery for energy storage, and a dump load for excess energy dissipation. The system also features a 12V inverter to convert stored DC power to AC, powering an outlet and a wireless charger for end-use applications.
Cirkit Designer LogoOpen Project in Cirkit Designer
Arduino-Controlled Servo with Light Sensing
Image of Servo: A project utilizing DISJUNTOR RESIDUAL in a practical application
This circuit features an Arduino UNO microcontroller interfaced with two photocells (LDRs) and a servo motor. The photocells are connected to analog inputs A0 and A1, and their average light intensity reading is used to control the position of the servo motor connected to digital pin D9. The circuit is powered by a pair of 18650 Li-ion batteries, which are also connected to a TP4056 charging module that can be charged via a solar cell, providing a renewable energy source for the system.
Cirkit Designer LogoOpen Project in Cirkit Designer
Arduino Nano-Based Tractor Brake and Clutch Control System with BTS7960 Motor Drivers
Image of IDP Project: A project utilizing DISJUNTOR RESIDUAL in a practical application
This circuit is designed to control the brake and clutch systems of a tractor using force-sensing resistors (FSRs) and potentiometers to measure input forces and positions. An Arduino Nano processes these inputs and drives linear actuators via BTS7960 motor drivers to assist in pedal operation when the force exceeds a set threshold.
Cirkit Designer LogoOpen Project in Cirkit Designer
Arduino UNO Controlled 4-Digit 7-Segment Display with DS3231 RTC Integration
Image of jam digital: A project utilizing DISJUNTOR RESIDUAL in a practical application
This circuit features an Arduino UNO microcontroller connected to a DS3231 RTC for timekeeping and a 4-digit 7-segment display for showing the time. The RTC communicates with the Arduino over I2C, while the display is controlled by the Arduino through current-limiting resistors, with the actual display logic to be provided in the microcontroller's code.
Cirkit Designer LogoOpen Project in Cirkit Designer

Explore Projects Built with DISJUNTOR RESIDUAL

Use Cirkit Designer to design, explore, and prototype these projects online. Some projects support real-time simulation. Click "Open Project" to start designing instantly!
Image of bolito: A project utilizing DISJUNTOR RESIDUAL in a practical application
Solar and Wind Energy Harvesting System with Charge Controller and Inverter
This circuit is designed for a renewable energy system that integrates solar and wind power generation. It includes a solar and wind charge controller connected to a solar panel and a lantern vertical wind turbine for energy harvesting, a 12V 200Ah battery for energy storage, and a dump load for excess energy dissipation. The system also features a 12V inverter to convert stored DC power to AC, powering an outlet and a wireless charger for end-use applications.
Cirkit Designer LogoOpen Project in Cirkit Designer
Image of Servo: A project utilizing DISJUNTOR RESIDUAL in a practical application
Arduino-Controlled Servo with Light Sensing
This circuit features an Arduino UNO microcontroller interfaced with two photocells (LDRs) and a servo motor. The photocells are connected to analog inputs A0 and A1, and their average light intensity reading is used to control the position of the servo motor connected to digital pin D9. The circuit is powered by a pair of 18650 Li-ion batteries, which are also connected to a TP4056 charging module that can be charged via a solar cell, providing a renewable energy source for the system.
Cirkit Designer LogoOpen Project in Cirkit Designer
Image of IDP Project: A project utilizing DISJUNTOR RESIDUAL in a practical application
Arduino Nano-Based Tractor Brake and Clutch Control System with BTS7960 Motor Drivers
This circuit is designed to control the brake and clutch systems of a tractor using force-sensing resistors (FSRs) and potentiometers to measure input forces and positions. An Arduino Nano processes these inputs and drives linear actuators via BTS7960 motor drivers to assist in pedal operation when the force exceeds a set threshold.
Cirkit Designer LogoOpen Project in Cirkit Designer
Image of jam digital: A project utilizing DISJUNTOR RESIDUAL in a practical application
Arduino UNO Controlled 4-Digit 7-Segment Display with DS3231 RTC Integration
This circuit features an Arduino UNO microcontroller connected to a DS3231 RTC for timekeeping and a 4-digit 7-segment display for showing the time. The RTC communicates with the Arduino over I2C, while the display is controlled by the Arduino through current-limiting resistors, with the actual display logic to be provided in the microcontroller's code.
Cirkit Designer LogoOpen Project in Cirkit Designer

Common Applications and Use Cases

  • Protection against electric shocks caused by ground faults.
  • Prevention of electrical fires due to leakage currents.
  • Use in residential electrical panels to safeguard household appliances and occupants.
  • Industrial and commercial applications to ensure compliance with safety standards.
  • Integration into circuits with high moisture exposure, such as bathrooms or outdoor installations.

Technical Specifications

The following table outlines the key technical specifications of the DISJUNTOR RESIDUAL:

Parameter Value
Manufacturer STECK
Rated Voltage (Un) 230V AC / 400V AC
Rated Current (In) 16A, 25A, 32A, 40A, 63A (varies by model)
Rated Residual Current (IΔn) 30mA, 100mA, 300mA
Frequency 50/60 Hz
Breaking Capacity 6 kA
Number of Poles 2P (single-phase) or 4P (three-phase)
Operating Temperature -5°C to +40°C
Mounting DIN rail (35mm)
Standards Compliance IEC 61008-1, IEC 61008-2-1

Pin Configuration and Descriptions

The DISJUNTOR RESIDUAL has input and output terminals for connecting to the electrical circuit. The table below describes the terminal configuration:

Terminal Description
L (Line In) Connects to the live input from the power source.
N (Neutral In) Connects to the neutral input from the power source.
L (Line Out) Connects to the live output to the load.
N (Neutral Out) Connects to the neutral output to the load.

For three-phase models (4P), additional terminals are provided for the extra phases.

Usage Instructions

How to Use the Component in a Circuit

  1. Mounting the Device: Secure the DISJUNTOR RESIDUAL onto a standard 35mm DIN rail in the electrical panel.
  2. Wiring:
    • Connect the live (L) and neutral (N) input terminals to the power source.
    • Connect the live (L) and neutral (N) output terminals to the load (e.g., appliances or circuits).
    • For three-phase models, ensure all phase connections are properly wired.
  3. Testing:
    • Use the built-in test button to verify the functionality of the device. Pressing the test button should trip the breaker, indicating proper operation.
  4. Power On: Once all connections are secure, switch on the power supply. The device will monitor the circuit for residual current imbalances.

Important Considerations and Best Practices

  • Ensure the rated current and residual current sensitivity (IΔn) match the requirements of your circuit.
  • Regularly test the device using the test button to confirm it is functioning correctly.
  • Avoid overloading the device beyond its rated current capacity.
  • Install the device in a dry, well-ventilated location to prevent moisture-related issues.
  • For circuits with high leakage currents (e.g., industrial equipment), select a model with a higher residual current rating (e.g., 100mA or 300mA).

Arduino Integration

The DISJUNTOR RESIDUAL is not directly compatible with Arduino or other microcontrollers, as it is a high-voltage safety device. However, it can be used in conjunction with Arduino-based monitoring systems by integrating current sensors or relays to detect the state of the circuit.

Troubleshooting and FAQs

Common Issues Users Might Face

  1. Device Does Not Trip During Testing:

    • Cause: Faulty internal mechanism or improper wiring.
    • Solution: Verify the wiring connections and ensure the test button is functional. Replace the device if necessary.
  2. Frequent Tripping:

    • Cause: Leakage current in the circuit exceeds the residual current rating.
    • Solution: Inspect the circuit for faulty appliances or damaged insulation. Consider using a device with a higher residual current rating if appropriate.
  3. Device Does Not Reset After Tripping:

    • Cause: Persistent fault in the circuit or damaged device.
    • Solution: Check the circuit for faults and resolve them before attempting to reset. Replace the device if it remains unresponsive.
  4. Overheating:

    • Cause: Overloading or poor ventilation.
    • Solution: Ensure the device is not overloaded and is installed in a well-ventilated area.

FAQs

Q1: Can the DISJUNTOR RESIDUAL protect against overcurrent?
A1: No, the device is designed to detect residual currents (leakage currents). For overcurrent protection, use a circuit breaker in conjunction with the RCD.

Q2: How often should I test the device?
A2: It is recommended to test the device monthly using the test button to ensure proper functionality.

Q3: Can I use the device in outdoor installations?
A3: Yes, but ensure it is installed in a weatherproof enclosure to protect it from moisture and environmental factors.

Q4: What happens if the device trips frequently?
A4: Frequent tripping indicates a potential fault in the circuit. Inspect the wiring and connected appliances for issues.