Cirkit Designer Logo
Cirkit Designer
Your all-in-one circuit design IDE
Home / 
Component Documentation

How to Use DFRobot EC Sensor: Examples, Pinouts, and Specs

Image of DFRobot EC Sensor
Cirkit Designer LogoDesign with DFRobot EC Sensor in Cirkit Designer

Introduction

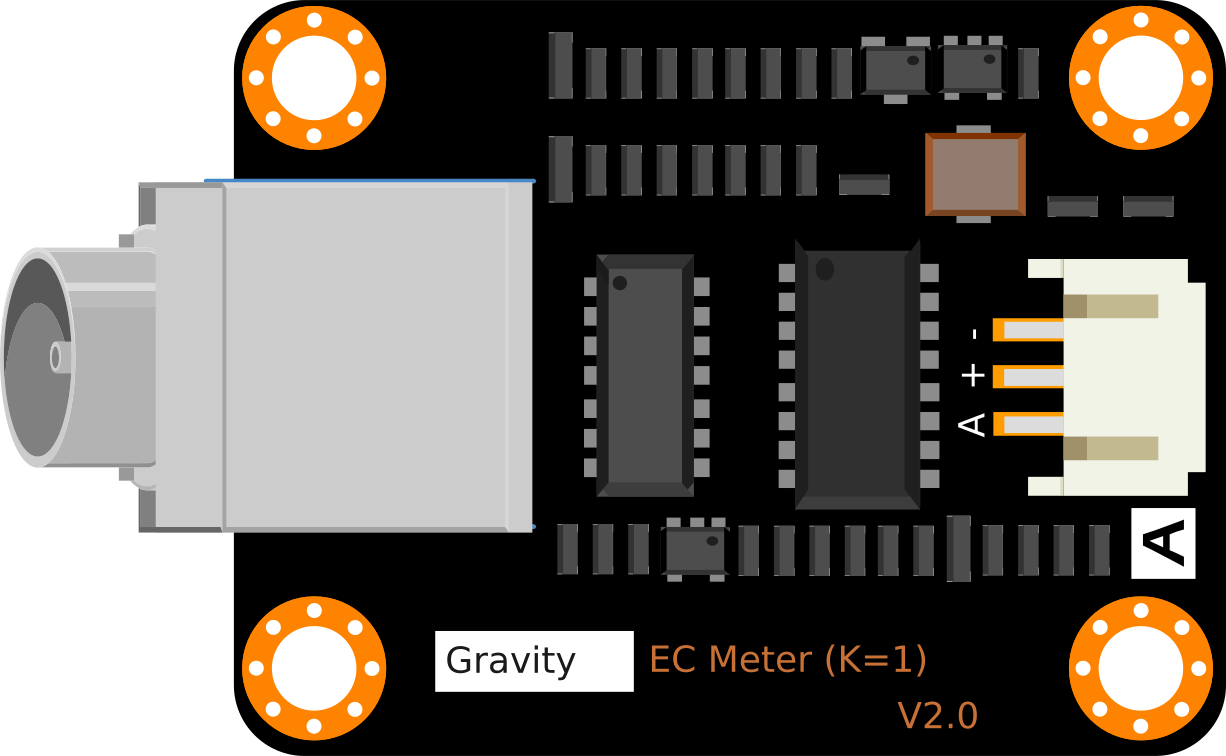
The DFRobot EC Sensor is a specialized device designed to measure the electrical conductivity (EC) of a solution. Electrical conductivity is a key parameter in determining the concentration of dissolved salts or nutrients in a liquid. This sensor is widely used in applications such as hydroponics, aquaculture, and environmental monitoring, where maintaining optimal nutrient levels is critical for plant growth or aquatic life.

By providing accurate and reliable EC measurements, the DFRobot EC Sensor helps users monitor and control the quality of their solutions, ensuring optimal conditions for their specific applications.

Explore Projects Built with DFRobot EC Sensor

Use Cirkit Designer to design, explore, and prototype these projects online. Some projects support real-time simulation. Click "Open Project" to start designing instantly!
Arduino UNO-Based Battery-Powered Robotic System with Ultrasonic Sensors and Magnetometer
Image of Autonomous Mobile robot v1: A project utilizing DFRobot EC Sensor in a practical application
This circuit is a sensor-based robotic system controlled by an Arduino UNO. It includes three HC-SR04 ultrasonic sensors for distance measurement, a QMC5883L magnetometer for orientation detection, and an L298N motor driver to control two DC motors, all powered by a Li-ion 18650 battery.
Cirkit Designer LogoOpen Project in Cirkit Designer
ESP32 CAM and Ultrasonic Sensor-Based Wi-Fi Controlled Robotic Vehicle
Image of Mitra: A project utilizing DFRobot EC Sensor in a practical application
This circuit is a robotic system that uses an ESP32 CAM for image processing, multiple IR sensors for obstacle detection, and an HC-SR04 ultrasonic sensor for distance measurement. The system is controlled by a DRIVER SHIELD L293D, which also drives several DC motors and motorized wheels, powered by a 12V battery with a rocker switch and battery indicator for power management.
Cirkit Designer LogoOpen Project in Cirkit Designer
ESP32-Controlled Obstacle Avoidance Robot with L298N Motor Driver and HC-SR04 Sensors
Image of Robot TUDONG: A project utilizing DFRobot EC Sensor in a practical application
This circuit is designed for a robot with obstacle avoidance capabilities, utilizing three HC-SR04 ultrasonic sensors for detecting obstacles in front, left, and right directions. An ESP32 microcontroller processes the distance data from the sensors and controls the movement of the robot through an L298N DC motor driver, which in turn drives two gearmotors attached to the robot's wheels. The robot can move forward, backward, and turn left or right based on sensor inputs to navigate around obstacles.
Cirkit Designer LogoOpen Project in Cirkit Designer
Arduino Mega and ESP32 Powered Robotic Controller with Distance Sensing and Line Tracking
Image of PID Line Following Robot (Removing Second BB): A project utilizing DFRobot EC Sensor in a practical application
This circuit is designed for a mobile robot with environmental sensing and precise motor control. It features dual microcontroller architecture for complex tasks, integrating motion control, distance measurement, and surface detection, all powered by a rechargeable battery system with power management.
Cirkit Designer LogoOpen Project in Cirkit Designer

Explore Projects Built with DFRobot EC Sensor

Use Cirkit Designer to design, explore, and prototype these projects online. Some projects support real-time simulation. Click "Open Project" to start designing instantly!
Image of Autonomous Mobile robot v1: A project utilizing DFRobot EC Sensor in a practical application
Arduino UNO-Based Battery-Powered Robotic System with Ultrasonic Sensors and Magnetometer
This circuit is a sensor-based robotic system controlled by an Arduino UNO. It includes three HC-SR04 ultrasonic sensors for distance measurement, a QMC5883L magnetometer for orientation detection, and an L298N motor driver to control two DC motors, all powered by a Li-ion 18650 battery.
Cirkit Designer LogoOpen Project in Cirkit Designer
Image of Mitra: A project utilizing DFRobot EC Sensor in a practical application
ESP32 CAM and Ultrasonic Sensor-Based Wi-Fi Controlled Robotic Vehicle
This circuit is a robotic system that uses an ESP32 CAM for image processing, multiple IR sensors for obstacle detection, and an HC-SR04 ultrasonic sensor for distance measurement. The system is controlled by a DRIVER SHIELD L293D, which also drives several DC motors and motorized wheels, powered by a 12V battery with a rocker switch and battery indicator for power management.
Cirkit Designer LogoOpen Project in Cirkit Designer
Image of Robot TUDONG: A project utilizing DFRobot EC Sensor in a practical application
ESP32-Controlled Obstacle Avoidance Robot with L298N Motor Driver and HC-SR04 Sensors
This circuit is designed for a robot with obstacle avoidance capabilities, utilizing three HC-SR04 ultrasonic sensors for detecting obstacles in front, left, and right directions. An ESP32 microcontroller processes the distance data from the sensors and controls the movement of the robot through an L298N DC motor driver, which in turn drives two gearmotors attached to the robot's wheels. The robot can move forward, backward, and turn left or right based on sensor inputs to navigate around obstacles.
Cirkit Designer LogoOpen Project in Cirkit Designer
Image of PID Line Following Robot (Removing Second BB): A project utilizing DFRobot EC Sensor in a practical application
Arduino Mega and ESP32 Powered Robotic Controller with Distance Sensing and Line Tracking
This circuit is designed for a mobile robot with environmental sensing and precise motor control. It features dual microcontroller architecture for complex tasks, integrating motion control, distance measurement, and surface detection, all powered by a rechargeable battery system with power management.
Cirkit Designer LogoOpen Project in Cirkit Designer

Technical Specifications

  • Model: DFRobot EC Sensor
  • Measurement Range: 0–20 mS/cm
  • Accuracy: ±5% F.S. (Full Scale)
  • Operating Voltage: 3.3V–5.5V
  • Output Signal: Analog voltage
  • Temperature Compensation: Supported (requires an external temperature sensor)
  • Operating Temperature: 0°C–60°C
  • Connector Type: BNC
  • Dimensions: 42mm x 32mm (PCB)

Pin Configuration and Descriptions

The DFRobot EC Sensor module has a 3-pin interface for connecting to a microcontroller. The pinout is as follows:

Pin Name Description
1 VCC Power supply input (3.3V–5.5V)
2 GND Ground connection
3 AOUT Analog output signal (proportional to EC)

Usage Instructions

Connecting the Sensor

  1. Power Supply: Connect the VCC pin to a 3.3V or 5V power source and the GND pin to the ground of your microcontroller.
  2. Signal Output: Connect the AOUT pin to an analog input pin on your microcontroller (e.g., Arduino UNO's A0 pin).
  3. Probe Connection: Attach the EC probe to the BNC connector on the module.
  4. Temperature Compensation: For accurate readings, connect a temperature sensor (e.g., DFRobot DS18B20) to the microcontroller and implement temperature compensation in your code.

Sample Arduino Code

Below is an example of how to use the DFRobot EC Sensor with an Arduino UNO. This code reads the analog signal from the sensor and converts it into an EC value.

// Include necessary libraries
#include <Wire.h>

// Define the analog pin connected to the EC sensor
const int ecPin = A0;

// Calibration constants (adjust based on your calibration process)
const float voltageToEC = 5.0 / 1023.0; // Convert ADC value to voltage
const float calibrationFactor = 1.0;   // Adjust based on calibration

void setup() {
  Serial.begin(9600); // Initialize serial communication
  pinMode(ecPin, INPUT); // Set EC pin as input
}

void loop() {
  // Read the analog value from the EC sensor
  int rawValue = analogRead(ecPin);

  // Convert the raw ADC value to voltage
  float voltage = rawValue * voltageToEC;

  // Calculate the EC value (mS/cm) using the calibration factor
  float ecValue = voltage * calibrationFactor;

  // Print the EC value to the Serial Monitor
  Serial.print("EC Value: ");
  Serial.print(ecValue);
  Serial.println(" mS/cm");

  delay(1000); // Wait 1 second before the next reading
}

Best Practices

  • Calibration: Calibrate the sensor using standard EC solutions to ensure accurate readings.
  • Temperature Compensation: Use a temperature sensor to account for temperature variations, as EC readings are temperature-dependent.
  • Cleaning: Regularly clean the EC probe with distilled water to prevent residue buildup, which can affect accuracy.
  • Avoid Air Bubbles: Ensure the probe is fully submerged in the solution without air bubbles around the sensing area.

Troubleshooting and FAQs

Common Issues and Solutions

  1. Inaccurate Readings

    • Cause: The sensor is not calibrated.
    • Solution: Calibrate the sensor using a standard EC solution.
  2. Fluctuating Readings

    • Cause: Air bubbles around the probe or unstable power supply.
    • Solution: Ensure the probe is fully submerged without air bubbles and use a stable power source.
  3. No Output Signal

    • Cause: Incorrect wiring or damaged probe.
    • Solution: Verify the wiring and check the probe for physical damage.
  4. Temperature Compensation Not Working

    • Cause: Temperature sensor not connected or incorrect compensation formula.
    • Solution: Connect a compatible temperature sensor and implement the correct compensation formula in your code.

FAQs

Q: Can I use the DFRobot EC Sensor with a 3.3V microcontroller?
A: Yes, the sensor supports an operating voltage range of 3.3V–5.5V, making it compatible with 3.3V microcontrollers like the ESP32.

Q: How often should I calibrate the sensor?
A: It is recommended to calibrate the sensor every 2–4 weeks or whenever you notice a drift in readings.

Q: Can the sensor be used in seawater?
A: Yes, the sensor can measure EC in seawater, but ensure the EC value is within the sensor's measurement range (0–20 mS/cm).

Q: What is the lifespan of the EC probe?
A: The probe typically lasts 1–2 years, depending on usage and maintenance. Regular cleaning can extend its lifespan.

By following this documentation, you can effectively integrate and use the DFRobot EC Sensor in your projects.