Cirkit Designer Logo
Cirkit Designer
Your all-in-one circuit design IDE
Home / 
Component Documentation

How to Use Solenoid Valve 12V: Examples, Pinouts, and Specs

Image of Solenoid Valve 12V
Cirkit Designer LogoDesign with Solenoid Valve 12V in Cirkit Designer

Introduction

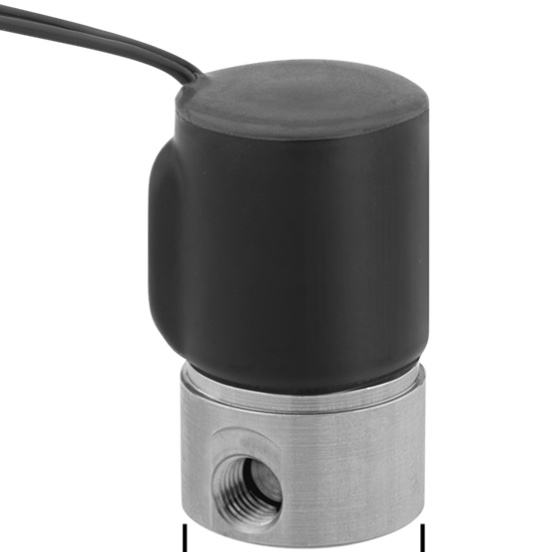
A 12V solenoid valve is an electromechanical device designed to control the flow of liquid or gas in a system. It operates by using an electric current to generate a magnetic field, which in turn moves a plunger to open or close the valve. Solenoid valves are widely used in applications such as irrigation systems, automatic faucets, and pneumatic or hydraulic systems.

Explore Projects Built with Solenoid Valve 12V

Use Cirkit Designer to design, explore, and prototype these projects online. Some projects support real-time simulation. Click "Open Project" to start designing instantly!
Arduino-Controlled RFM95 Pneumatic Solenoid Valve System
Image of Lorawan valve: A project utilizing Solenoid Valve 12V in a practical application
This circuit controls a 12v pneumatic solenoid valve using an Arduino Pro Mini microcontroller. The Arduino toggles the solenoid valve on and off with a 1-second interval, as programmed in the embedded code. A TIP120 Darlington transistor is used to switch the higher current required by the solenoid, and a 1N4007 diode provides back EMF protection. Additionally, an RFM95 module is interfaced with the Arduino for potential wireless communication capabilities.
Cirkit Designer LogoOpen Project in Cirkit Designer
ESP32-Based Wi-Fi Controlled Solenoid Valve with Relay
Image of fyp: A project utilizing Solenoid Valve 12V in a practical application
This circuit uses an ESP32 microcontroller to control a 12V relay, which in turn operates a plastic solenoid valve. The ESP32 toggles the relay on and off every second, allowing the solenoid valve to open and close accordingly.
Cirkit Designer LogoOpen Project in Cirkit Designer
12V Battery-Powered Water Pump and Solenoid Valve Control Circuit with Timer Switch
Image of para sa tangkal: A project utilizing Solenoid Valve 12V in a practical application
This circuit consists of a water pump and a plastic solenoid valve, both of which are controlled by a timer switch. The timer switch is powered by a 12V battery and is responsible for providing power to the pump and valve at timed intervals. There is no microcontroller code involved, indicating that the timing functions are likely handled by the timer switch hardware.
Cirkit Designer LogoOpen Project in Cirkit Designer
ESP32-Controlled Pneumatic Solenoid Valve with MOSFET Switching
Image of ESPooky32: A project utilizing Solenoid Valve 12V in a practical application
This circuit uses an ESP32 microcontroller to control a 12V pneumatic solenoid valve via an IRFZ44N MOSFET as a switch. The ESP32 outputs a control signal through a 220-ohm resistor to the gate of the MOSFET, which in turn controls the power to the solenoid valve from a 12V power supply. A 10k-ohm resistor provides a pull-down for the MOSFET gate to ensure it remains off when not driven by the ESP32.
Cirkit Designer LogoOpen Project in Cirkit Designer

Explore Projects Built with Solenoid Valve 12V

Use Cirkit Designer to design, explore, and prototype these projects online. Some projects support real-time simulation. Click "Open Project" to start designing instantly!
Image of Lorawan valve: A project utilizing Solenoid Valve 12V in a practical application
Arduino-Controlled RFM95 Pneumatic Solenoid Valve System
This circuit controls a 12v pneumatic solenoid valve using an Arduino Pro Mini microcontroller. The Arduino toggles the solenoid valve on and off with a 1-second interval, as programmed in the embedded code. A TIP120 Darlington transistor is used to switch the higher current required by the solenoid, and a 1N4007 diode provides back EMF protection. Additionally, an RFM95 module is interfaced with the Arduino for potential wireless communication capabilities.
Cirkit Designer LogoOpen Project in Cirkit Designer
Image of fyp: A project utilizing Solenoid Valve 12V in a practical application
ESP32-Based Wi-Fi Controlled Solenoid Valve with Relay
This circuit uses an ESP32 microcontroller to control a 12V relay, which in turn operates a plastic solenoid valve. The ESP32 toggles the relay on and off every second, allowing the solenoid valve to open and close accordingly.
Cirkit Designer LogoOpen Project in Cirkit Designer
Image of para sa tangkal: A project utilizing Solenoid Valve 12V in a practical application
12V Battery-Powered Water Pump and Solenoid Valve Control Circuit with Timer Switch
This circuit consists of a water pump and a plastic solenoid valve, both of which are controlled by a timer switch. The timer switch is powered by a 12V battery and is responsible for providing power to the pump and valve at timed intervals. There is no microcontroller code involved, indicating that the timing functions are likely handled by the timer switch hardware.
Cirkit Designer LogoOpen Project in Cirkit Designer
Image of ESPooky32: A project utilizing Solenoid Valve 12V in a practical application
ESP32-Controlled Pneumatic Solenoid Valve with MOSFET Switching
This circuit uses an ESP32 microcontroller to control a 12V pneumatic solenoid valve via an IRFZ44N MOSFET as a switch. The ESP32 outputs a control signal through a 220-ohm resistor to the gate of the MOSFET, which in turn controls the power to the solenoid valve from a 12V power supply. A 10k-ohm resistor provides a pull-down for the MOSFET gate to ensure it remains off when not driven by the ESP32.
Cirkit Designer LogoOpen Project in Cirkit Designer

Common Applications and Use Cases

  • Automated irrigation systems
  • Fluid control in HVAC systems
  • Pneumatic or hydraulic controls
  • Medical devices for fluid regulation
  • Automatic dispensing systems

Technical Specifications

Key Technical Details

  • Operating Voltage: 12V DC
  • Current Rating: Typically ranges from 200mA to 500mA
  • Pressure Range: Suitable for low to medium pressure applications
  • Seal Material: Commonly NBR (Nitrile Butadiene Rubber), Viton, or EPDM
  • Body Material: Brass, stainless steel, or plastic
  • Temperature Range: Varies with seal and body material, often -5°C to 80°C
  • Response Time: Typically less than 100 ms

Pin Configuration and Descriptions

Pin Number Description Notes
1 Positive Voltage (V+) Connect to 12V power supply
2 Ground (GND) Connect to system ground

Usage Instructions

How to Use the Component in a Circuit

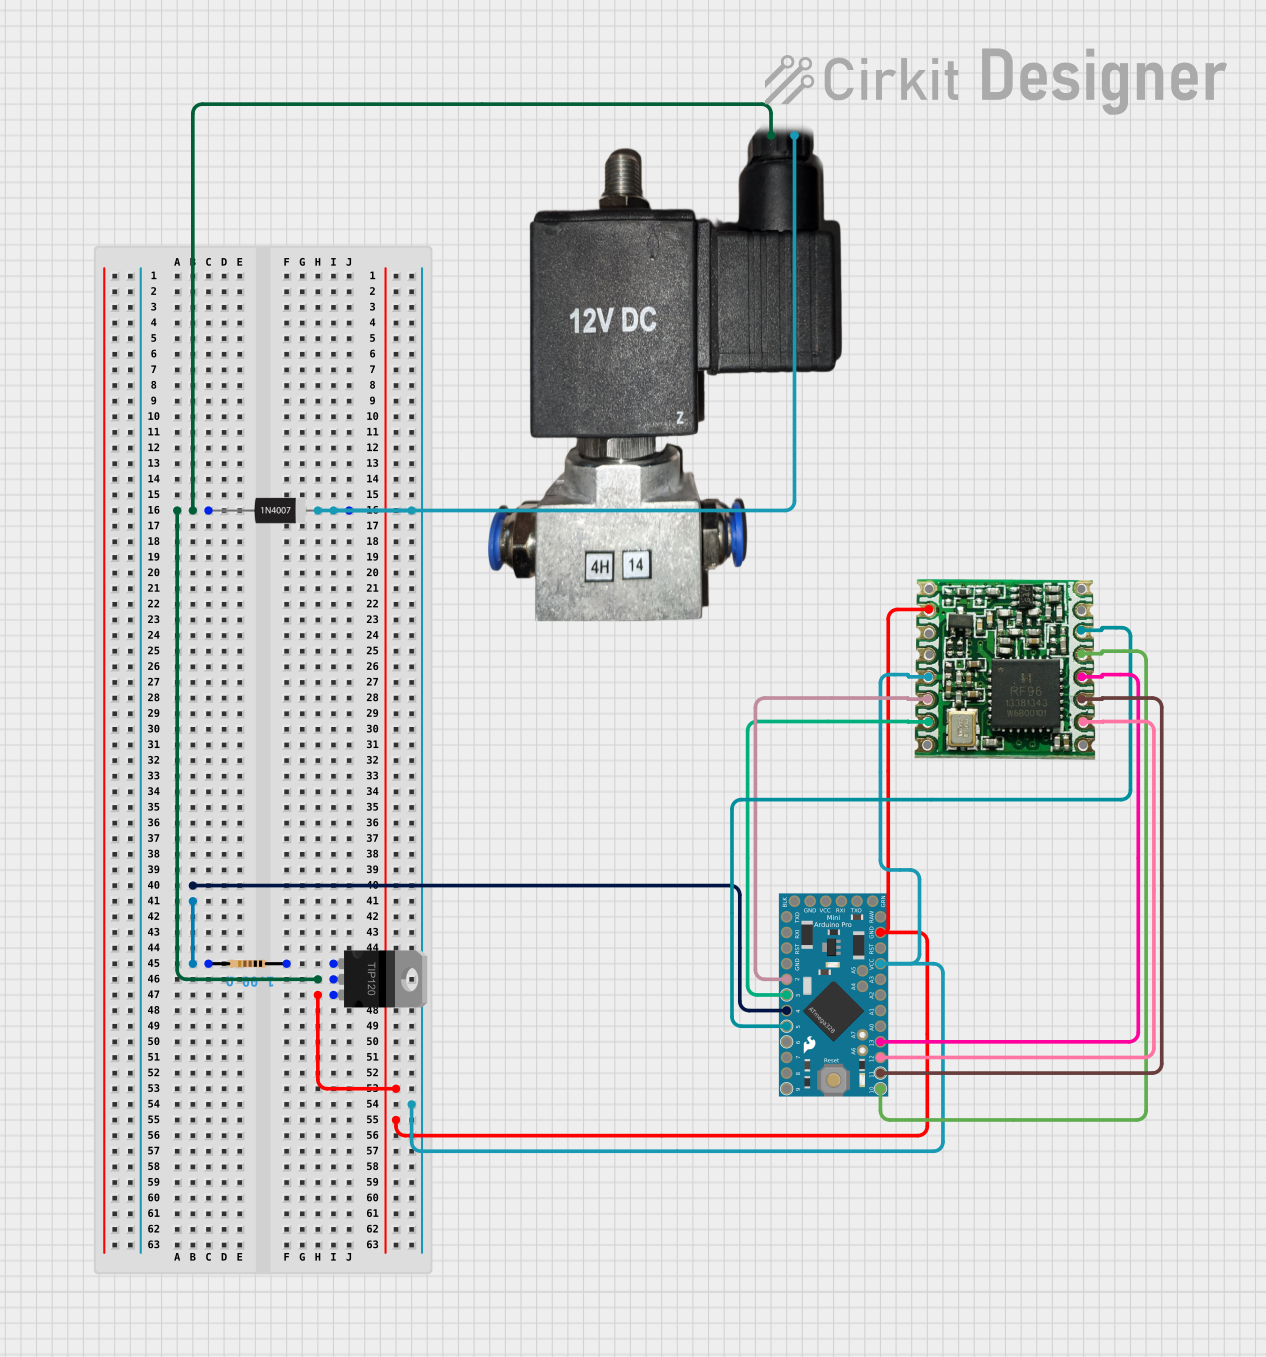
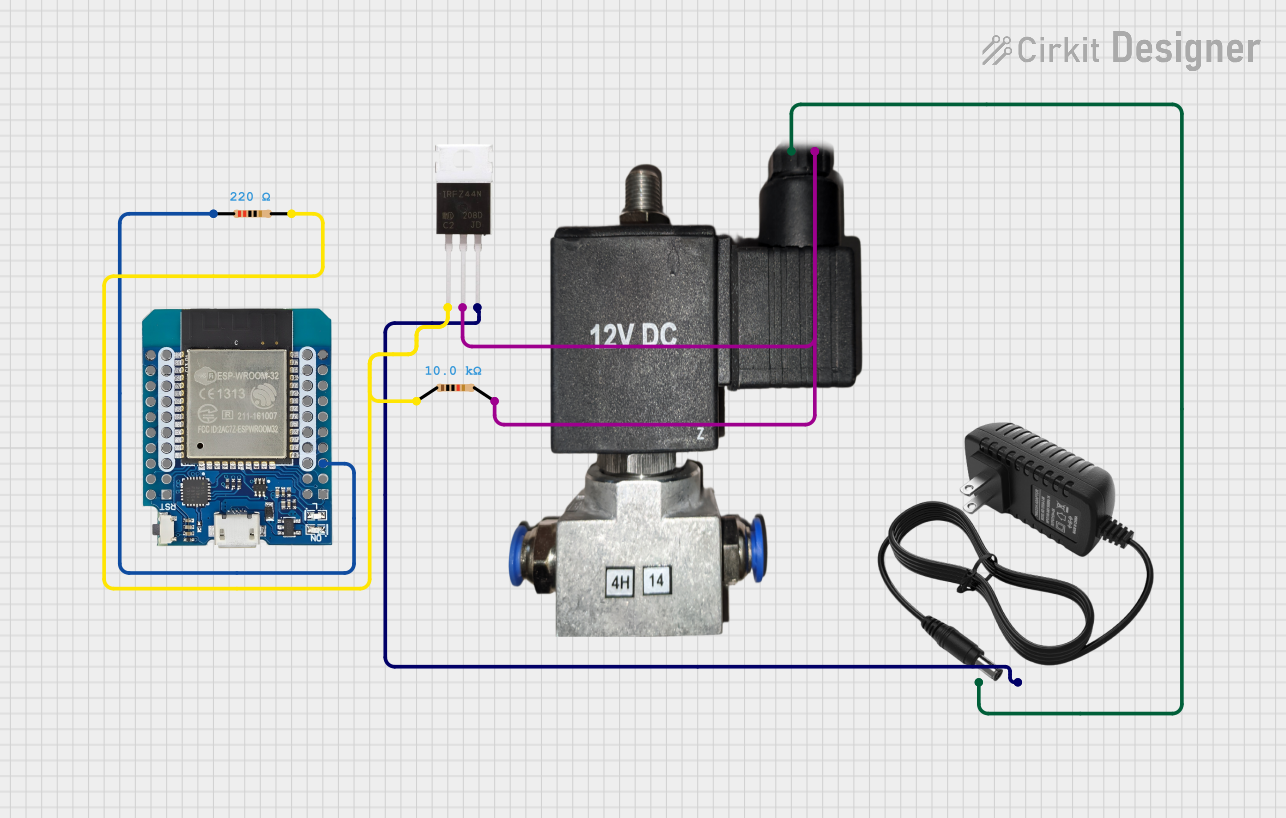
  1. Power Supply: Ensure that a 12V DC power supply is available and capable of supplying the necessary current.
  2. Wiring: Connect the positive terminal of the power supply to the V+ pin of the solenoid valve. Connect the ground terminal of the power supply to the GND pin.
  3. Control Signal: Use a relay or a transistor to switch the solenoid valve on and off. This can be controlled by a microcontroller like an Arduino UNO.
  4. Safety: Include a flyback diode across the solenoid coil to prevent voltage spikes when the solenoid is turned off.

Important Considerations and Best Practices

  • Voltage Matching: Ensure that the solenoid valve is rated for 12V operation.
  • Current Capacity: Verify that the power supply and control circuit can handle the current drawn by the solenoid.
  • Heat Dissipation: Solenoid valves can generate heat; ensure adequate ventilation and consider heat sinks if necessary.
  • Waterproofing: If the valve is used in a wet environment, ensure that the electrical connections are waterproof.

Example Arduino UNO Code

// Define the solenoid valve control pin
const int solenoidPin = 7;

void setup() {
  // Set the solenoid pin as an output
  pinMode(solenoidPin, OUTPUT);
}

void loop() {
  // Open the solenoid valve
  digitalWrite(solenoidPin, HIGH);
  delay(1000); // Keep the valve open for 1 second

  // Close the solenoid valve
  digitalWrite(solenoidPin, LOW);
  delay(1000); // Keep the valve closed for 1 second
}

Troubleshooting and FAQs

Common Issues Users Might Face

  • Valve Does Not Actuate: Check the power supply and wiring connections. Ensure the control signal is being sent.
  • Insufficient Flow: Verify that the valve is the correct size for the application and that there are no obstructions.
  • Overheating: Ensure the duty cycle is not too high for the solenoid's rating.

Solutions and Tips for Troubleshooting

  • Check Voltage: Use a multimeter to ensure the solenoid is receiving 12V.
  • Listen for Clicking: A healthy solenoid valve should make a distinct clicking sound when actuated.
  • Reduce Duty Cycle: If overheating, reduce the time the solenoid is energized or increase the off time.

FAQs

Q: Can I control the solenoid valve with a PWM signal? A: Yes, but ensure the solenoid is rated for PWM control and that the frequency is appropriate.

Q: How long can I continuously power the solenoid valve? A: This depends on the duty cycle rating of the valve. Continuous operation may lead to overheating and should be avoided unless the valve is rated for it.

Q: Can the solenoid valve be used with any liquid or gas? A: The compatibility depends on the materials used in the valve. Check the manufacturer's specifications for compatibility with specific fluids.