Cirkit Designer Logo
Cirkit Designer
Your all-in-one circuit design IDE
Home / 
Component Documentation

How to Use XIAO ESP32C3: Examples, Pinouts, and Specs

Image of XIAO ESP32C3
Cirkit Designer LogoDesign with XIAO ESP32C3 in Cirkit Designer

Introduction

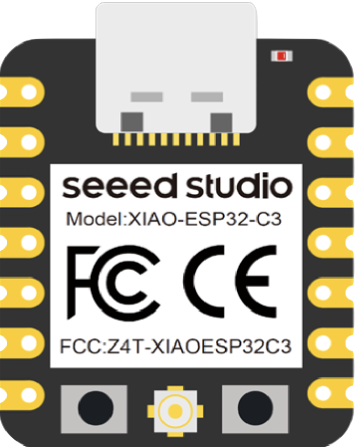
The XIAO ESP32C3 is a compact microcontroller board developed by Seeed. It is powered by the ESP32-C3 chip, which integrates Wi-Fi and Bluetooth Low Energy (BLE) capabilities. This board is designed for Internet of Things (IoT) applications, wearable devices, and rapid prototyping. Its small form factor and low power consumption make it ideal for space-constrained projects.

Explore Projects Built with XIAO ESP32C3

Use Cirkit Designer to design, explore, and prototype these projects online. Some projects support real-time simulation. Click "Open Project" to start designing instantly!
Xiao ESP32 C3 and Adafruit RFM9x LoRa Radio Communication Module
Image of LoRa: A project utilizing XIAO ESP32C3 in a practical application
This circuit connects a Xiao ESP32 C3 microcontroller to an Adafruit RFM9x LoRa Radio module. The ESP32 C3 provides power to the LoRa module and interfaces with it using SPI communication (SCK, MISO, MOSI, CS) and control lines (RST, DIO0). This setup is likely intended for wireless communication using LoRa technology, with the ESP32 handling data processing and network protocol tasks.
Cirkit Designer LogoOpen Project in Cirkit Designer
Xiao ESP32 C3 Based Temperature and Humidity Monitoring System
Image of DHT-11: A project utilizing XIAO ESP32C3 in a practical application
This circuit features a Xiao ESP32 C3 microcontroller connected to a DHT11 Humidity and Temperature Sensor. The ESP32 C3 provides power to the DHT11 sensor through its VUSB pin and receives data from the sensor's DATA pin via the ESP32's D2 pin. The circuit is designed to measure environmental temperature and humidity, with the microcontroller processing and potentially communicating the sensor data.
Cirkit Designer LogoOpen Project in Cirkit Designer
ESP32C3 and LoRa-Enabled Environmental Sensing Node
Image of temperature_KA: A project utilizing XIAO ESP32C3 in a practical application
This circuit features an ESP32C3 Supermini microcontroller connected to a LORA_RA02 module and a DHT11 temperature and humidity sensor. The ESP32C3 handles communication with the LORA module via SPI (using GPIO05, GPIO06, GPIO10, and GPIO04 for MISO, MOSI, NSS, and SCK respectively) and GPIO01 and GPIO02 for additional control signals. The DHT11 sensor is interfaced through GPIO03 for data reading, and all components share a common power supply through the 3.3V and GND pins.
Cirkit Designer LogoOpen Project in Cirkit Designer
Wi-Fi Controlled Transistor Array with XIAO ESP32C3
Image of resisto: A project utilizing XIAO ESP32C3 in a practical application
This circuit features an XIAO ESP32C3 microcontroller interfaced with multiple PNP transistors and resistors to control various outputs. The microcontroller's GPIO pins are connected to the bases of the transistors through resistors, allowing it to switch the transistors on and off, while capacitors are used for filtering and stabilization.
Cirkit Designer LogoOpen Project in Cirkit Designer

Explore Projects Built with XIAO ESP32C3

Use Cirkit Designer to design, explore, and prototype these projects online. Some projects support real-time simulation. Click "Open Project" to start designing instantly!
Image of LoRa: A project utilizing XIAO ESP32C3 in a practical application
Xiao ESP32 C3 and Adafruit RFM9x LoRa Radio Communication Module
This circuit connects a Xiao ESP32 C3 microcontroller to an Adafruit RFM9x LoRa Radio module. The ESP32 C3 provides power to the LoRa module and interfaces with it using SPI communication (SCK, MISO, MOSI, CS) and control lines (RST, DIO0). This setup is likely intended for wireless communication using LoRa technology, with the ESP32 handling data processing and network protocol tasks.
Cirkit Designer LogoOpen Project in Cirkit Designer
Image of DHT-11: A project utilizing XIAO ESP32C3 in a practical application
Xiao ESP32 C3 Based Temperature and Humidity Monitoring System
This circuit features a Xiao ESP32 C3 microcontroller connected to a DHT11 Humidity and Temperature Sensor. The ESP32 C3 provides power to the DHT11 sensor through its VUSB pin and receives data from the sensor's DATA pin via the ESP32's D2 pin. The circuit is designed to measure environmental temperature and humidity, with the microcontroller processing and potentially communicating the sensor data.
Cirkit Designer LogoOpen Project in Cirkit Designer
Image of temperature_KA: A project utilizing XIAO ESP32C3 in a practical application
ESP32C3 and LoRa-Enabled Environmental Sensing Node
This circuit features an ESP32C3 Supermini microcontroller connected to a LORA_RA02 module and a DHT11 temperature and humidity sensor. The ESP32C3 handles communication with the LORA module via SPI (using GPIO05, GPIO06, GPIO10, and GPIO04 for MISO, MOSI, NSS, and SCK respectively) and GPIO01 and GPIO02 for additional control signals. The DHT11 sensor is interfaced through GPIO03 for data reading, and all components share a common power supply through the 3.3V and GND pins.
Cirkit Designer LogoOpen Project in Cirkit Designer
Image of resisto: A project utilizing XIAO ESP32C3 in a practical application
Wi-Fi Controlled Transistor Array with XIAO ESP32C3
This circuit features an XIAO ESP32C3 microcontroller interfaced with multiple PNP transistors and resistors to control various outputs. The microcontroller's GPIO pins are connected to the bases of the transistors through resistors, allowing it to switch the transistors on and off, while capacitors are used for filtering and stabilization.
Cirkit Designer LogoOpen Project in Cirkit Designer

Common Applications

  • IoT devices and smart home systems
  • Wearable technology
  • Wireless sensor networks
  • Prototyping for Bluetooth and Wi-Fi-enabled projects
  • Robotics and automation systems

Technical Specifications

The following table outlines the key technical details of the XIAO ESP32C3:

Specification Details
Microcontroller ESP32-C3 RISC-V single-core processor
Clock Speed Up to 160 MHz
Flash Memory 4 MB
SRAM 400 KB
Wireless Connectivity Wi-Fi 802.11 b/g/n (2.4 GHz), Bluetooth 5.0 LE
Operating Voltage 3.3V
Input Voltage Range 5V (via USB-C)
GPIO Pins 11 (including ADC, PWM, I2C, SPI, UART)
ADC Resolution 12-bit
Dimensions 21 x 17.5 mm
Power Consumption Ultra-low power consumption in deep sleep mode
USB Interface USB-C (supports programming and power supply)
Operating Temperature -40°C to 85°C

Pin Configuration and Descriptions

The XIAO ESP32C3 features a total of 11 GPIO pins, which are multifunctional. Below is the pinout description:

Pin Name Function
1 3V3 3.3V power output
2 GND Ground
3 D0 GPIO0, ADC, PWM, UART RX
4 D1 GPIO1, ADC, PWM, UART TX
5 D2 GPIO2, ADC, PWM
6 D3 GPIO3, ADC, PWM
7 D4 GPIO4, ADC, PWM
8 D5 GPIO5, ADC, PWM
9 D6 GPIO6, ADC, PWM
10 D7 GPIO7, ADC, PWM
11 RST Reset pin

Usage Instructions

How to Use the XIAO ESP32C3 in a Circuit

  1. Powering the Board:

    • Use a USB-C cable to connect the board to a power source (e.g., a computer or USB adapter).
    • Alternatively, supply 3.3V directly to the 3V3 pin.
  2. Programming the Board:

    • Install the Arduino IDE and add the ESP32 board package.
    • Select "Seeed XIAO ESP32C3" as the board in the Arduino IDE.
    • Connect the board via USB-C and upload your code.
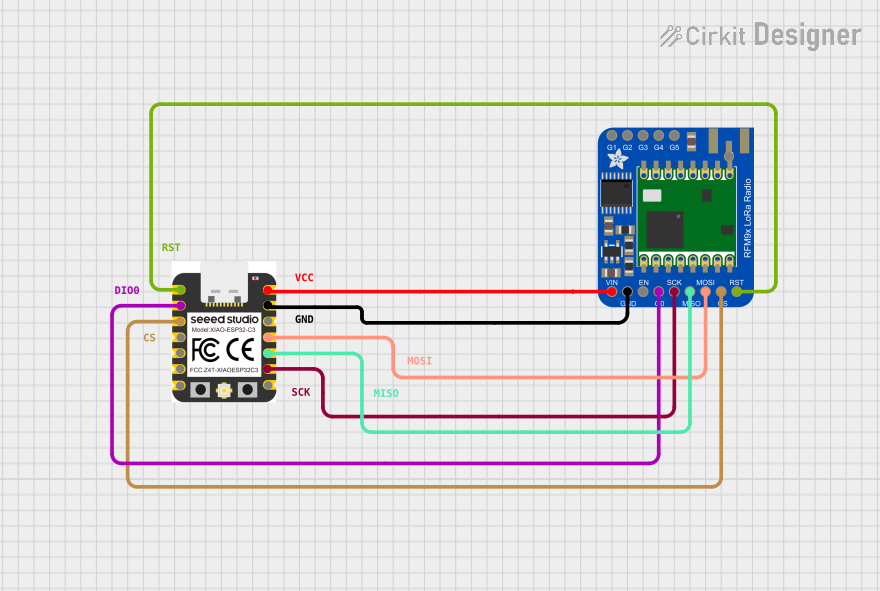
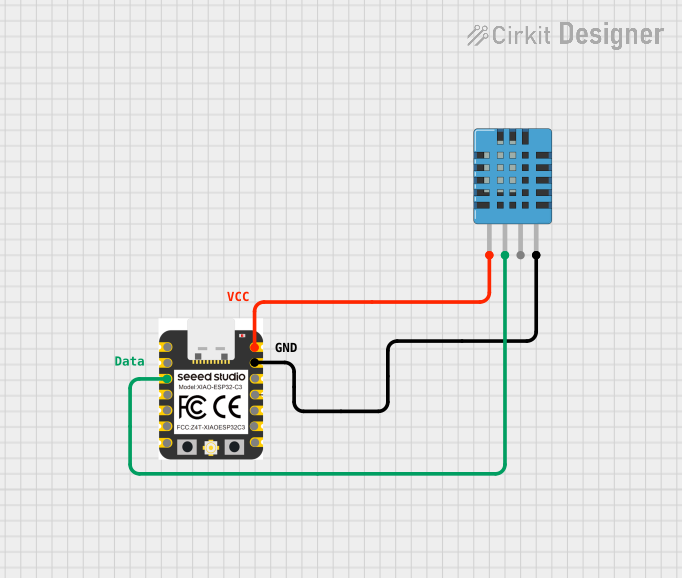
  3. Connecting Peripherals:

    • Use the GPIO pins to connect sensors, actuators, or other peripherals.
    • Ensure the voltage levels of connected devices are compatible with the 3.3V logic of the board.

Important Considerations

  • Voltage Levels: The GPIO pins operate at 3.3V. Avoid connecting 5V devices directly to the pins without a level shifter.
  • Power Supply: If powering the board via the 3V3 pin, ensure the power source is stable and capable of supplying sufficient current.
  • Deep Sleep Mode: Utilize the deep sleep mode for battery-powered applications to minimize power consumption.

Example Code for Arduino IDE

The following example demonstrates how to blink an LED connected to GPIO2:

// Define the GPIO pin for the LED
const int ledPin = 2;

void setup() {
  // Initialize the LED pin as an output
  pinMode(ledPin, OUTPUT);
}

void loop() {
  // Turn the LED on
  digitalWrite(ledPin, HIGH);
  delay(1000); // Wait for 1 second

  // Turn the LED off
  digitalWrite(ledPin, LOW);
  delay(1000); // Wait for 1 second
}

Example Code for Wi-Fi Connection

The following example demonstrates how to connect the XIAO ESP32C3 to a Wi-Fi network:

#include <WiFi.h>

// Replace with your network credentials
const char* ssid = "Your_SSID";
const char* password = "Your_PASSWORD";

void setup() {
  // Start the serial communication
  Serial.begin(115200);

  // Connect to Wi-Fi
  Serial.print("Connecting to Wi-Fi");
  WiFi.begin(ssid, password);

  // Wait until connected
  while (WiFi.status() != WL_CONNECTED) {
    delay(500);
    Serial.print(".");
  }

  // Print the IP address once connected
  Serial.println("\nConnected to Wi-Fi!");
  Serial.print("IP Address: ");
  Serial.println(WiFi.localIP());
}

void loop() {
  // Add your main code here
}

Troubleshooting and FAQs

Common Issues

  1. The board is not detected by the computer:

    • Ensure the USB-C cable supports data transfer (not just charging).
    • Check if the correct drivers are installed for the ESP32-C3.
  2. Upload errors in Arduino IDE:

    • Verify that the correct board and port are selected in the Arduino IDE.
    • Press the reset button on the board before uploading the code.
  3. Wi-Fi connection fails:

    • Double-check the SSID and password.
    • Ensure the Wi-Fi network operates on the 2.4 GHz band (not 5 GHz).

Solutions and Tips

  • Debugging: Use the Serial Monitor in the Arduino IDE to print debug messages and identify issues.
  • Firmware Updates: Ensure the board's firmware is up to date for optimal performance.
  • Power Supply: Use a stable power source to avoid unexpected resets or malfunctions.

By following this documentation, you can effectively utilize the XIAO ESP32C3 for your IoT and prototyping projects.