Cirkit Designer Logo
Cirkit Designer
Your all-in-one circuit design IDE
Home / 
Component Documentation

How to Use DPS310: Examples, Pinouts, and Specs

Image of DPS310
Cirkit Designer LogoDesign with DPS310 in Cirkit Designer

Introduction

The DPS310 is a digital barometric pressure sensor that provides high-precision measurements of atmospheric pressure and temperature. It is designed for low-power operation and features a small form factor, making it ideal for portable and battery-powered devices. The DPS310 is commonly used in applications such as weather monitoring, altitude measurement, and environmental sensing. Its high accuracy and digital interface make it a versatile choice for a wide range of projects.

Explore Projects Built with DPS310

Use Cirkit Designer to design, explore, and prototype these projects online. Some projects support real-time simulation. Click "Open Project" to start designing instantly!
ESP32-Powered Wi-Fi Controlled Robotic Car with OLED Display and Ultrasonic Sensor
Image of playbot: A project utilizing DPS310 in a practical application
This circuit is a battery-powered system featuring an ESP32 microcontroller that controls an OLED display, a motor driver for two hobby motors, an ultrasonic sensor for distance measurement, and a DFPlayer Mini for audio output through a loudspeaker. The TP4056 module manages battery charging, and a step-up boost converter provides a stable 5V supply to the components.
Cirkit Designer LogoOpen Project in Cirkit Designer
ESP32-Based Wi-Fi Controlled Laser Shooting Game with OLED Display
Image of 123: A project utilizing DPS310 in a practical application
This circuit is a laser shooting game controlled by a PS3 controller, featuring an ESP32 microcontroller, two photosensitive sensors for light detection, and a motor driver to control two DC motors. The game includes an OLED display for score visualization, and a MOSFET to control an LED bulb, with power supplied by a 12V battery and regulated by a DC-DC step-down converter.
Cirkit Designer LogoOpen Project in Cirkit Designer
ESP32-Based Environmental Monitoring System with Nokia 5110 LCD and Multiple Sensors
Image of MONITORING STATION WATER QUALITY : A project utilizing DPS310 in a practical application
This circuit is a solar-powered environmental monitoring system that uses an ESP32 microcontroller to interface with various sensors (temperature, turbidity, TDS, pH, dissolved oxygen, electrical conductivity, and ORP) and a GPS module. The system charges a 18650 Li-Ion battery via a TP4056 module connected to a solar panel, and displays data on a Nokia 5110 LCD.
Cirkit Designer LogoOpen Project in Cirkit Designer
ESP32C3 and SIM800L Powered Smart Energy Monitor with OLED Display and Wi-Fi Connectivity
Image of SERVER: A project utilizing DPS310 in a practical application
This circuit is a power monitoring system that uses an ESP32C3 microcontroller to collect power usage data from slave devices via WiFi and SMS. The collected data is displayed on a 0.96" OLED screen, and the system is powered by an AC-DC converter module. Additionally, the circuit includes a SIM800L GSM module for SMS communication and LEDs for status indication.
Cirkit Designer LogoOpen Project in Cirkit Designer

Explore Projects Built with DPS310

Use Cirkit Designer to design, explore, and prototype these projects online. Some projects support real-time simulation. Click "Open Project" to start designing instantly!
Image of playbot: A project utilizing DPS310 in a practical application
ESP32-Powered Wi-Fi Controlled Robotic Car with OLED Display and Ultrasonic Sensor
This circuit is a battery-powered system featuring an ESP32 microcontroller that controls an OLED display, a motor driver for two hobby motors, an ultrasonic sensor for distance measurement, and a DFPlayer Mini for audio output through a loudspeaker. The TP4056 module manages battery charging, and a step-up boost converter provides a stable 5V supply to the components.
Cirkit Designer LogoOpen Project in Cirkit Designer
Image of 123: A project utilizing DPS310 in a practical application
ESP32-Based Wi-Fi Controlled Laser Shooting Game with OLED Display
This circuit is a laser shooting game controlled by a PS3 controller, featuring an ESP32 microcontroller, two photosensitive sensors for light detection, and a motor driver to control two DC motors. The game includes an OLED display for score visualization, and a MOSFET to control an LED bulb, with power supplied by a 12V battery and regulated by a DC-DC step-down converter.
Cirkit Designer LogoOpen Project in Cirkit Designer
Image of MONITORING STATION WATER QUALITY : A project utilizing DPS310 in a practical application
ESP32-Based Environmental Monitoring System with Nokia 5110 LCD and Multiple Sensors
This circuit is a solar-powered environmental monitoring system that uses an ESP32 microcontroller to interface with various sensors (temperature, turbidity, TDS, pH, dissolved oxygen, electrical conductivity, and ORP) and a GPS module. The system charges a 18650 Li-Ion battery via a TP4056 module connected to a solar panel, and displays data on a Nokia 5110 LCD.
Cirkit Designer LogoOpen Project in Cirkit Designer
Image of SERVER: A project utilizing DPS310 in a practical application
ESP32C3 and SIM800L Powered Smart Energy Monitor with OLED Display and Wi-Fi Connectivity
This circuit is a power monitoring system that uses an ESP32C3 microcontroller to collect power usage data from slave devices via WiFi and SMS. The collected data is displayed on a 0.96" OLED screen, and the system is powered by an AC-DC converter module. Additionally, the circuit includes a SIM800L GSM module for SMS communication and LEDs for status indication.
Cirkit Designer LogoOpen Project in Cirkit Designer

Technical Specifications

  • Pressure Measurement Range: 300 hPa to 1200 hPa (equivalent to -500 m to 9000 m altitude)
  • Temperature Measurement Range: -40°C to +85°C
  • Pressure Accuracy: ±0.005 hPa (high-precision mode)
  • Temperature Accuracy: ±0.5°C
  • Operating Voltage: 1.7 V to 3.6 V
  • Interface: I²C (up to 3.4 MHz) and SPI (up to 20 MHz)
  • Current Consumption:
    • Standby: 1.8 µA
    • Measurement: 1.7 µA (1 Hz pressure and temperature)
  • Package: 8-pin LGA, 2.0 mm × 2.5 mm × 1.0 mm

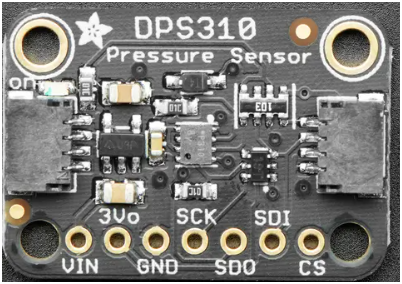
Pin Configuration and Descriptions

The DPS310 has 8 pins, as described in the table below:

Pin Name Description
1 GND Ground
2 VDD Supply voltage (1.7 V to 3.6 V)
3 SCL I²C clock line / SPI clock input
4 SDA I²C data line / SPI data input/output
5 CSB Chip select for SPI (active low) / I²C address bit
6 PS Protocol select: High = I²C, Low = SPI
7 INT Interrupt output (optional)
8 GND Ground

Usage Instructions

How to Use the DPS310 in a Circuit

  1. Power Supply: Connect the VDD pin to a 1.7 V to 3.6 V power source and the GND pins to ground.
  2. Communication Protocol:
    • For I²C: Connect the SCL and SDA pins to the corresponding I²C lines on your microcontroller. Use pull-up resistors (typically 4.7 kΩ) on both lines.
    • For SPI: Connect the SCL, SDA, and CSB pins to the SPI clock, data, and chip select lines, respectively. Set the PS pin to LOW for SPI mode.
  3. Interrupt (Optional): If needed, connect the INT pin to a GPIO pin on your microcontroller to handle interrupts.
  4. Initialization: Configure the DPS310 using the appropriate library or commands to set the measurement mode, sampling rate, and other parameters.

Important Considerations and Best Practices

  • Power Supply Stability: Ensure a stable power supply to avoid measurement errors.
  • I²C Pull-Up Resistors: Use appropriate pull-up resistors on the I²C lines to ensure reliable communication.
  • Temperature Compensation: The DPS310 includes built-in temperature compensation, but ensure proper initialization for accurate readings.
  • Placement: Avoid placing the sensor near heat sources or in areas with high airflow, as this can affect measurements.

Example Code for Arduino UNO

Below is an example of how to use the DPS310 with an Arduino UNO via I²C:

#include <Wire.h>
#include <Adafruit_Sensor.h>
#include <Adafruit_DPS310.h>

// Create an instance of the DPS310 sensor
Adafruit_DPS310 dps310;

void setup() {
  Serial.begin(9600);
  while (!Serial); // Wait for Serial Monitor to open

  // Initialize I²C communication
  if (!dps310.begin_I2C()) {
    Serial.println("Failed to find DPS310 sensor!");
    while (1); // Halt execution if sensor is not found
  }

  Serial.println("DPS310 sensor initialized.");
}

void loop() {
  // Read pressure in hPa
  float pressure = dps310.readPressure();
  // Read temperature in °C
  float temperature = dps310.readTemperature();

  // Print the readings to the Serial Monitor
  Serial.print("Pressure: ");
  Serial.print(pressure);
  Serial.println(" hPa");

  Serial.print("Temperature: ");
  Serial.print(temperature);
  Serial.println(" °C");

  delay(1000); // Wait 1 second before the next reading
}

Troubleshooting and FAQs

Common Issues

  1. Sensor Not Detected:

    • Cause: Incorrect wiring or communication protocol mismatch.
    • Solution: Double-check the wiring and ensure the PS pin is set correctly for I²C or SPI mode.
  2. Inaccurate Readings:

    • Cause: Improper initialization or environmental factors (e.g., heat sources).
    • Solution: Verify the initialization code and ensure the sensor is placed in a stable environment.
  3. I²C Communication Errors:

    • Cause: Missing or incorrect pull-up resistors on the I²C lines.
    • Solution: Add 4.7 kΩ pull-up resistors to the SCL and SDA lines.

FAQs

  • Q: Can the DPS310 measure altitude directly?
    A: The DPS310 provides pressure readings, which can be converted to altitude using the barometric formula. Many libraries include this functionality.

  • Q: What is the maximum I²C clock speed supported?
    A: The DPS310 supports I²C clock speeds up to 3.4 MHz.

  • Q: Can the DPS310 operate in high-humidity environments?
    A: While the DPS310 is robust, prolonged exposure to high humidity may affect its performance. Consider using a protective enclosure in such environments.