Cirkit Designer Logo
Cirkit Designer
Your all-in-one circuit design IDE
Home / 
Component Documentation

How to Use WeMOS ESP8266: Examples, Pinouts, and Specs

Image of WeMOS ESP8266
Cirkit Designer LogoDesign with WeMOS ESP8266 in Cirkit Designer

Introduction

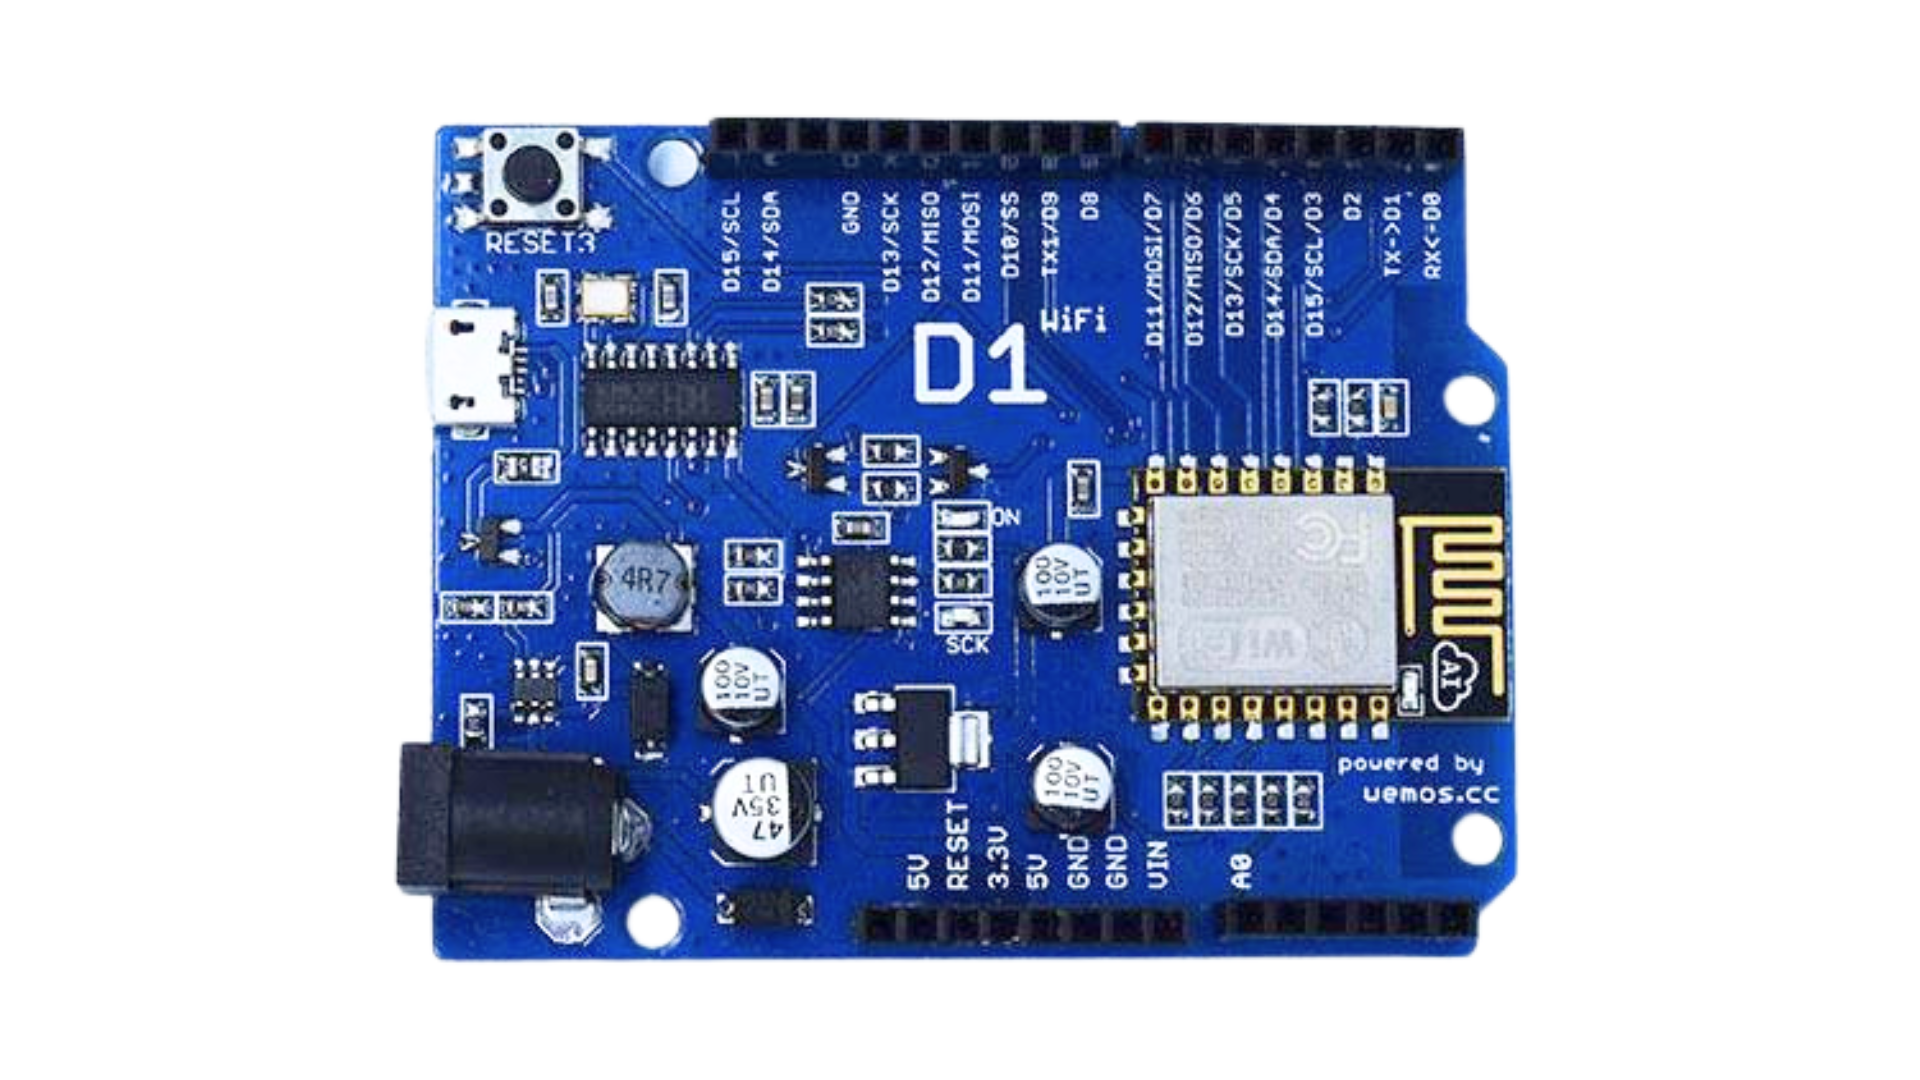
The WeMOS ESP8266 development board is a versatile and cost-effective platform based on the ESP8266 WiFi module. It is widely used for building Internet of Things (IoT) projects due to its ability to easily connect to WiFi networks and its support for various programming environments, including the Arduino IDE. Common applications include home automation, sensor networks, and DIY electronics projects.

Explore Projects Built with WeMOS ESP8266

Use Cirkit Designer to design, explore, and prototype these projects online. Some projects support real-time simulation. Click "Open Project" to start designing instantly!
ESP8266-Based Smart Irrigation System with Solar Power and Environmental Monitoring
Image of CHEM: A project utilizing WeMOS ESP8266 in a practical application
This circuit features an ESP8266 microcontroller as the central processing unit, interfacing with a variety of sensors and devices. It includes a DHT11 humidity and temperature sensor, a 16x2 I2C LCD for display, an RTC module for real-time clock functionality, and a soil moisture sensor for detecting water levels in soil. Additionally, the circuit controls a relay module connected to a water pump, which can be powered by a solar panel, indicating a potential application in automated plant watering systems.
Cirkit Designer LogoOpen Project in Cirkit Designer
Wi-Fi Enabled Soil Moisture Monitoring and Water Pump Control System
Image of Agriculture: A project utilizing WeMOS ESP8266 in a practical application
This circuit features an ESP8266 NodeMCU microcontroller connected to various peripherals. An LCD Display is interfaced via I2C for user interaction, while a DHT11 sensor provides temperature and humidity readings. A relay controls a water pump, possibly for an automated watering system, and a pushbutton is included for user input. Soil moisture is monitored with a YL-83 module connected to a YL-69 probe.
Cirkit Designer LogoOpen Project in Cirkit Designer
ESP8266 NodeMCU Controlled Smart Relay with IR and Temperature Sensing
Image of Home automation: A project utilizing WeMOS ESP8266 in a practical application
This circuit features an ESP8266 NodeMCU microcontroller connected to a 4-channel relay module, a DHT11 temperature and humidity sensor, a VS1838B infrared receiver, and two pushbuttons. The ESP8266 controls the relay channels via its digital pins D0, D1, and D2, reads temperature and humidity data from the DHT11 sensor connected to pin D3, receives IR signals through the VS1838B connected to pin D5, and monitors the state of the pushbuttons connected to pins D6 and D7. The entire circuit is powered by a series connection of two 18650 Li-ion batteries, with common ground and power distribution to all components.
Cirkit Designer LogoOpen Project in Cirkit Designer
ESP8266 NodeMCU-Based Environmental Monitoring and Control System with GPS Tracking
Image of draft1: A project utilizing WeMOS ESP8266 in a practical application
This circuit features an ESP8266 NodeMCU microcontroller interfaced with a DHT11 temperature and humidity sensor, a soil moisture module, a water level sensor, and a GPS NEO 6M module. The ESP8266 controls a relay to power a water pump based on sensor readings, likely for an automated plant watering system. The system is powered by a combination of 3xAA batteries and a 9V battery, with the 9V battery specifically used for the water pump through the relay.
Cirkit Designer LogoOpen Project in Cirkit Designer

Explore Projects Built with WeMOS ESP8266

Use Cirkit Designer to design, explore, and prototype these projects online. Some projects support real-time simulation. Click "Open Project" to start designing instantly!
Image of CHEM: A project utilizing WeMOS ESP8266 in a practical application
ESP8266-Based Smart Irrigation System with Solar Power and Environmental Monitoring
This circuit features an ESP8266 microcontroller as the central processing unit, interfacing with a variety of sensors and devices. It includes a DHT11 humidity and temperature sensor, a 16x2 I2C LCD for display, an RTC module for real-time clock functionality, and a soil moisture sensor for detecting water levels in soil. Additionally, the circuit controls a relay module connected to a water pump, which can be powered by a solar panel, indicating a potential application in automated plant watering systems.
Cirkit Designer LogoOpen Project in Cirkit Designer
Image of Agriculture: A project utilizing WeMOS ESP8266 in a practical application
Wi-Fi Enabled Soil Moisture Monitoring and Water Pump Control System
This circuit features an ESP8266 NodeMCU microcontroller connected to various peripherals. An LCD Display is interfaced via I2C for user interaction, while a DHT11 sensor provides temperature and humidity readings. A relay controls a water pump, possibly for an automated watering system, and a pushbutton is included for user input. Soil moisture is monitored with a YL-83 module connected to a YL-69 probe.
Cirkit Designer LogoOpen Project in Cirkit Designer
Image of Home automation: A project utilizing WeMOS ESP8266 in a practical application
ESP8266 NodeMCU Controlled Smart Relay with IR and Temperature Sensing
This circuit features an ESP8266 NodeMCU microcontroller connected to a 4-channel relay module, a DHT11 temperature and humidity sensor, a VS1838B infrared receiver, and two pushbuttons. The ESP8266 controls the relay channels via its digital pins D0, D1, and D2, reads temperature and humidity data from the DHT11 sensor connected to pin D3, receives IR signals through the VS1838B connected to pin D5, and monitors the state of the pushbuttons connected to pins D6 and D7. The entire circuit is powered by a series connection of two 18650 Li-ion batteries, with common ground and power distribution to all components.
Cirkit Designer LogoOpen Project in Cirkit Designer
Image of draft1: A project utilizing WeMOS ESP8266 in a practical application
ESP8266 NodeMCU-Based Environmental Monitoring and Control System with GPS Tracking
This circuit features an ESP8266 NodeMCU microcontroller interfaced with a DHT11 temperature and humidity sensor, a soil moisture module, a water level sensor, and a GPS NEO 6M module. The ESP8266 controls a relay to power a water pump based on sensor readings, likely for an automated plant watering system. The system is powered by a combination of 3xAA batteries and a 9V battery, with the 9V battery specifically used for the water pump through the relay.
Cirkit Designer LogoOpen Project in Cirkit Designer

Technical Specifications

Key Technical Details

  • Microcontroller: ESP8266
  • Operating Voltage: 3.3V
  • Digital I/O Pins: 11, all pins have interrupt/pwm/I2C/one-wire supported (except D0)
  • Analog Input Pins: 1 (Max input: 3.2V)
  • Clock Speed: 80MHz/160MHz
  • Flash Memory: 4MB
  • WiFi Protocol: 802.11 b/g/n
  • WiFi Range: 50-100m

Pin Configuration and Descriptions

Pin Function Description
TX TXD Serial transmission
RX RXD Serial reception
A0 ADC Analog input, max 3.2V input
D0-D8 GPIO General Purpose Input/Output
G GND Ground
5V VCC 5V power input
3V3 3.3V 3.3V power input
RST RESET Reset pin

Usage Instructions

Connecting to a Circuit

  1. Powering the Board: The WeMOS ESP8266 can be powered via USB or through the 5V and GND pins. Ensure that the power supply is stable and within the recommended voltage range.

  2. Programming: The board can be programmed using the Arduino IDE. Before programming, select the correct board (WeMOS D1 R2 & mini) and port from the Tools menu.

  3. Connecting to WiFi: Use the ESP8266WiFi library included with the Arduino IDE to connect to WiFi networks.

  4. GPIO Pins: The digital pins can be used as input or output. Use pinMode(), digitalWrite(), and digitalRead() functions in your code to control them.

Best Practices

  • Always use a 3.3V regulator when connecting sensors or components to the 3V3 pin to prevent damage to the board.
  • Avoid exposing the board to moisture or extreme temperatures.
  • When using WiFi, place the board in a location with a strong signal to ensure a stable connection.

Example Code: Connecting to WiFi

#include <ESP8266WiFi.h>

// Replace with your network credentials
const char* ssid = "your_SSID";
const char* password = "your_PASSWORD";

void setup() {
  Serial.begin(115200); // Start serial communication at 115200 baud
  WiFi.begin(ssid, password); // Connect to WiFi network

  while (WiFi.status() != WL_CONNECTED) { // Wait for the connection to establish
    delay(500);
    Serial.print(".");
  }

  Serial.println("");
  Serial.println("WiFi connected");
  Serial.println("IP address: ");
  Serial.println(WiFi.localIP()); // Print the local IP address
}

void loop() {
  // Your code here
}

Troubleshooting and FAQs

Common Issues

  • Cannot Connect to WiFi: Ensure the SSID and password are correct. Check the signal strength and the board's proximity to the router.
  • Board Not Recognized by Computer: Check the USB cable and port. Ensure the correct drivers are installed.
  • Unexpected Behavior in Circuit: Verify all connections. Ensure power supply is stable and within the recommended range.

Solutions and Tips

  • Reset the Board: If the board is unresponsive, press the RST button to reset it.
  • Firmware Update: Periodically update the firmware to the latest version for improved performance and stability.
  • Serial Monitor: Use the Serial Monitor in the Arduino IDE to debug and monitor the board's output.

FAQs

Q: Can I power the WeMOS ESP8266 with a battery? A: Yes, you can power it with a battery, but ensure the voltage is regulated to 3.3V or 5V.

Q: How many digital pins can be used for PWM? A: All digital pins except D0 support PWM.

Q: What is the maximum current the GPIO pins can handle? A: Each GPIO pin can handle up to 12mA of current.

Q: Can I use the WeMOS ESP8266 as a WiFi repeater? A: Yes, with the appropriate firmware, the ESP8266 can function as a WiFi repeater.

For further assistance, consult the WeMOS ESP8266 community forums and the extensive online resources available for this versatile development board.