How to Use FR120N mosfet board: Examples, Pinouts, and Specs

Introduction
The FR120N MOSFET board is a compact circuit board that integrates the FR120N MOSFET, a high-performance N-channel power MOSFET. This component is widely used for switching and amplifying electronic signals in various applications. With its ability to handle high current and voltage, the FR120N MOSFET board is ideal for power management, motor control, LED drivers, and other high-speed switching applications.
Explore Projects Built with FR120N mosfet board


Explore Projects Built with FR120N mosfet board
Common Applications:
- Motor drivers for robotics and automation
- LED lighting systems
- DC-DC converters and power supplies
- Battery management systems
- High-speed switching circuits
Technical Specifications
Key Technical Details:
- MOSFET Type: N-Channel
- Maximum Drain-Source Voltage (VDS): 100V
- Maximum Continuous Drain Current (ID): 9.7A
- Gate Threshold Voltage (VGS(th)): 2.0V - 4.0V
- Maximum Power Dissipation (PD): 45W
- RDS(on) (Drain-Source On Resistance): 0.12Ω (typical)
- Switching Speed: High-speed switching capability
- Package Type: TO-220 (mounted on the board)
- Board Dimensions: Varies depending on the manufacturer, typically compact
Pin Configuration and Descriptions:
The FR120N MOSFET board typically has three main pins or terminals for interfacing:
| Pin Name | Description |
|---|---|
| Gate (G) | Controls the MOSFET's switching state. A voltage applied here turns the MOSFET on or off. |
| Drain (D) | The main current-carrying terminal. Connect to the load or power source. |
| Source (S) | The return path for current. Connect to ground or the negative terminal of the circuit. |
Some FR120N MOSFET boards may also include additional pins for auxiliary features, such as a VCC pin for powering onboard components like an optocoupler or a pull-down resistor.
Usage Instructions
How to Use the FR120N MOSFET Board in a Circuit:
- Power Supply: Ensure the power supply voltage does not exceed the maximum VDS rating of 100V.
- Gate Drive Voltage: Apply a gate voltage (VGS) between 10V and 15V for optimal switching performance.
- Load Connection: Connect the load (e.g., motor, LED, or other devices) between the Drain (D) and the positive terminal of the power supply.
- Source Connection: Connect the Source (S) to the ground or negative terminal of the power supply.
- Gate Resistor: Use a resistor (typically 10Ω to 100Ω) in series with the Gate to limit inrush current and prevent damage to the MOSFET.
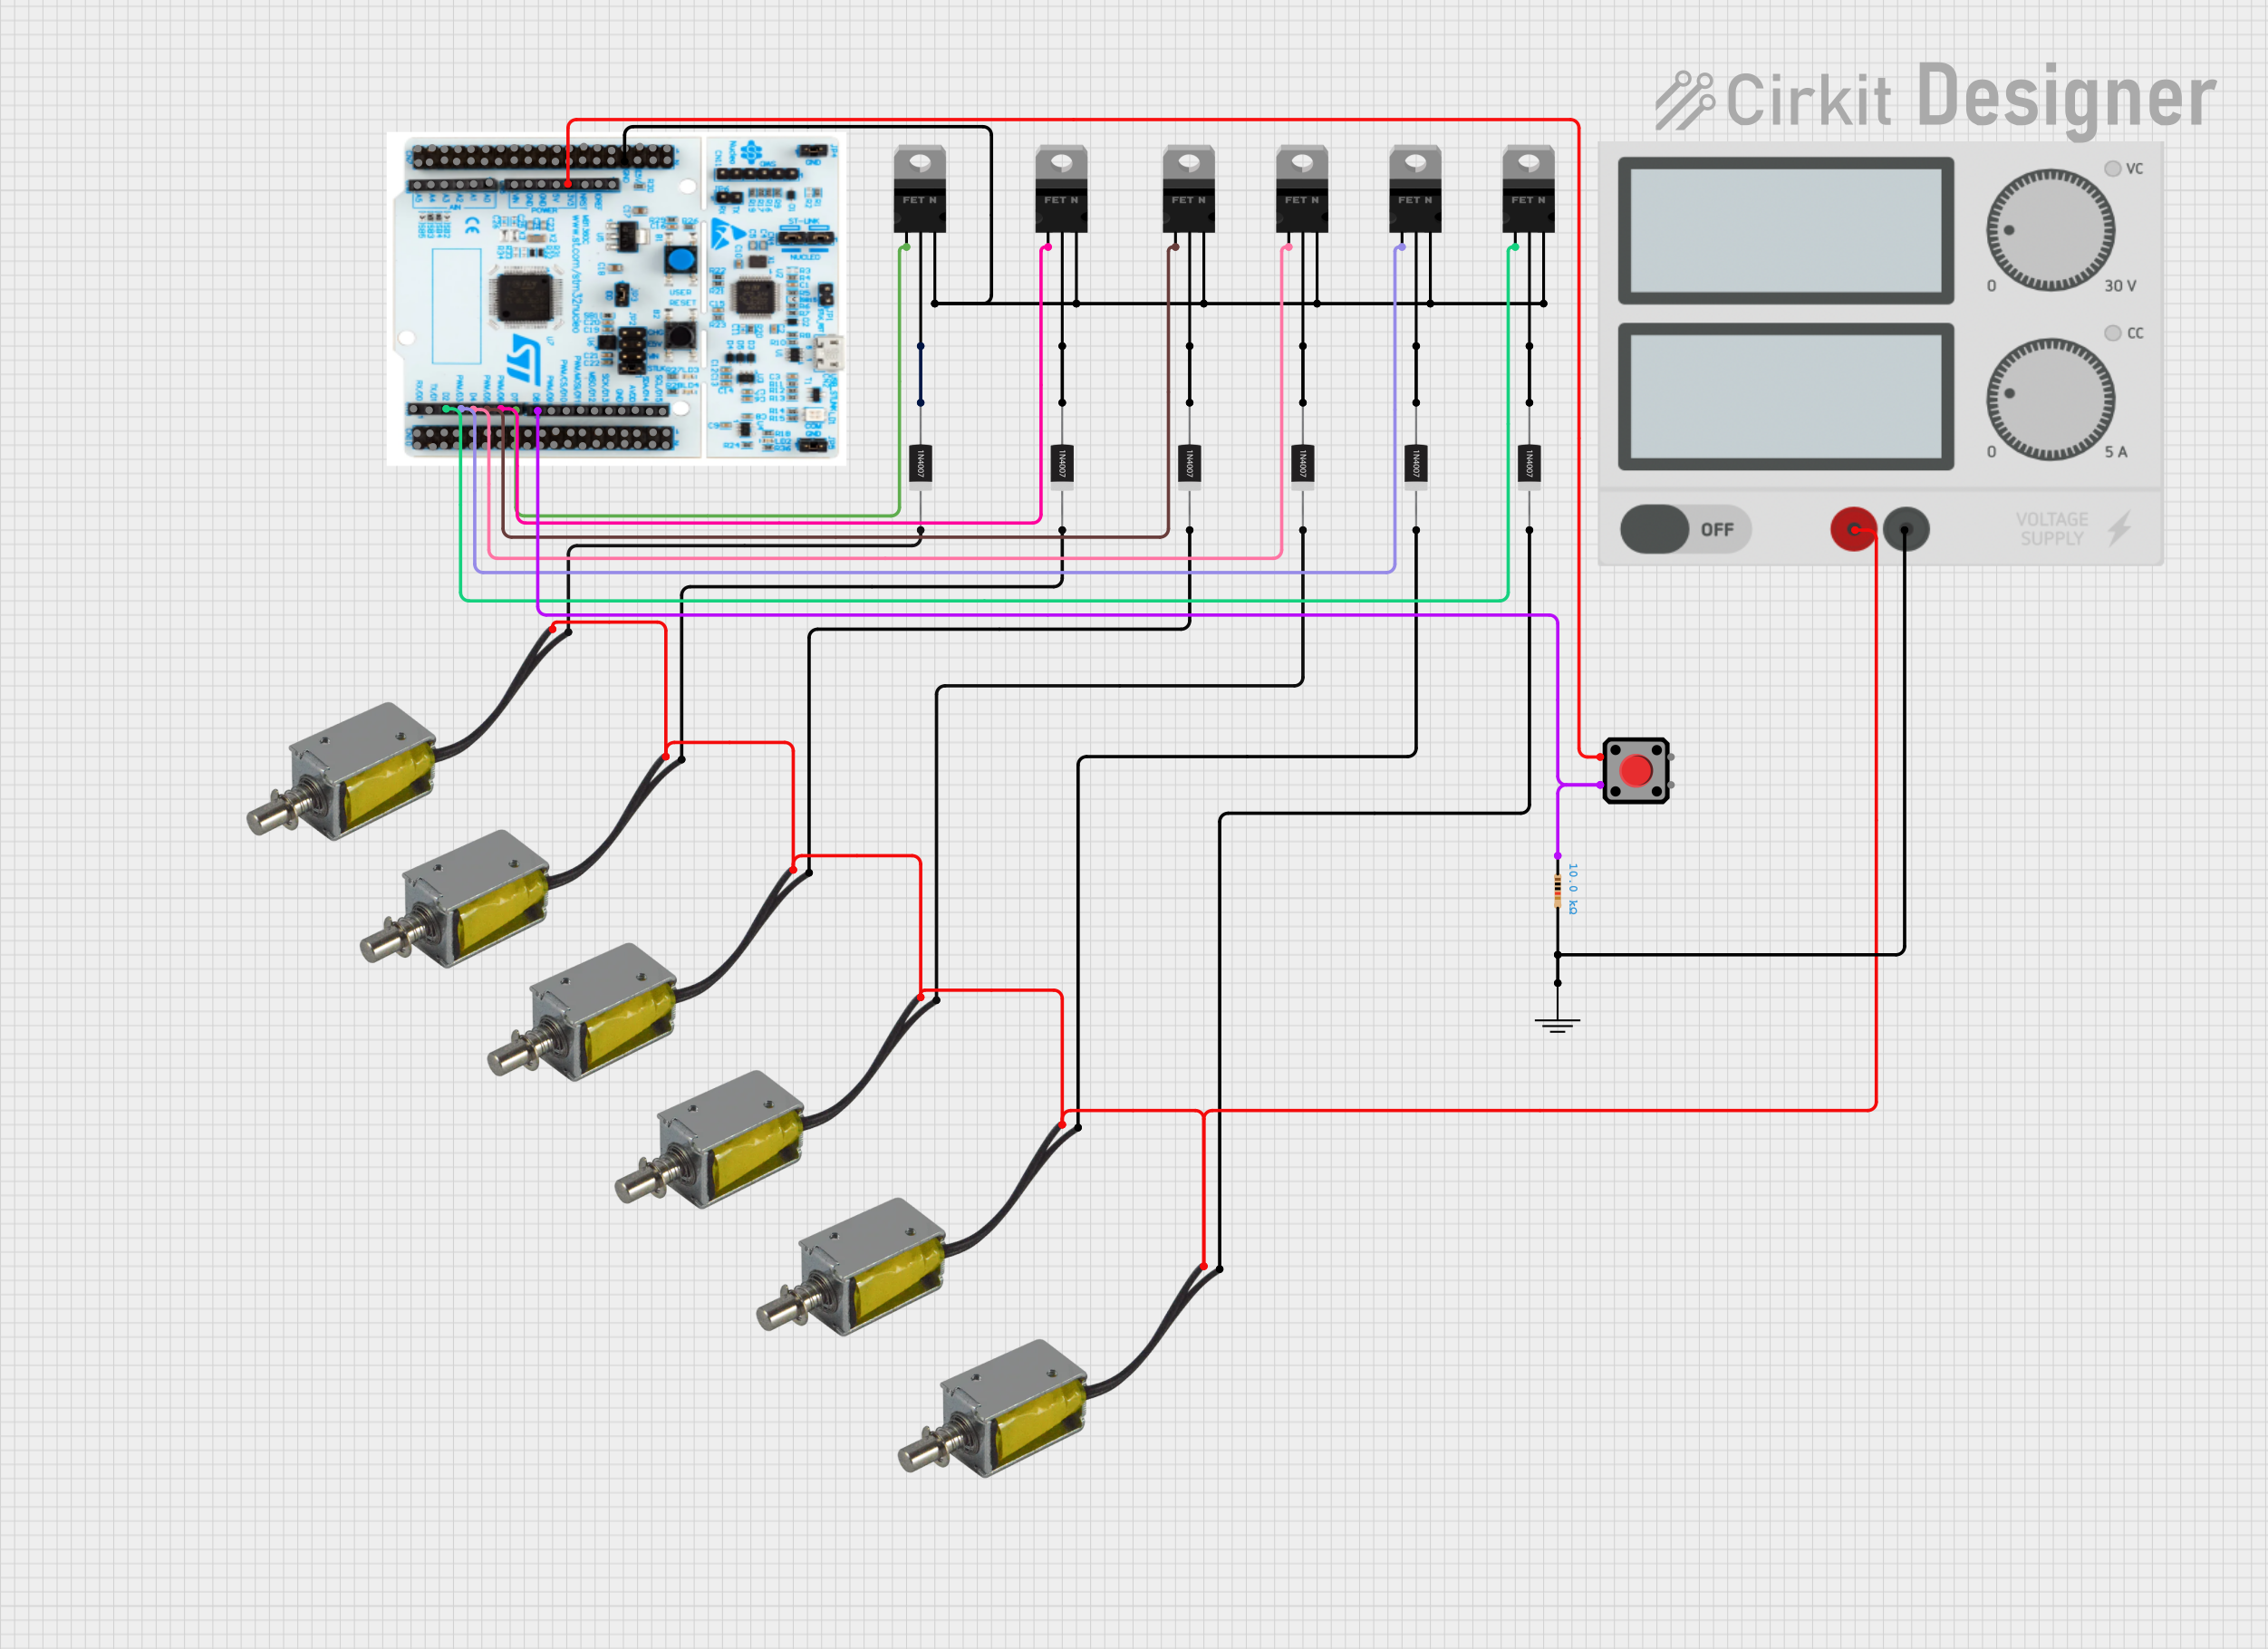
- Flyback Diode: For inductive loads (e.g., motors), add a flyback diode across the load to protect the MOSFET from voltage spikes.
Example Circuit with Arduino UNO:
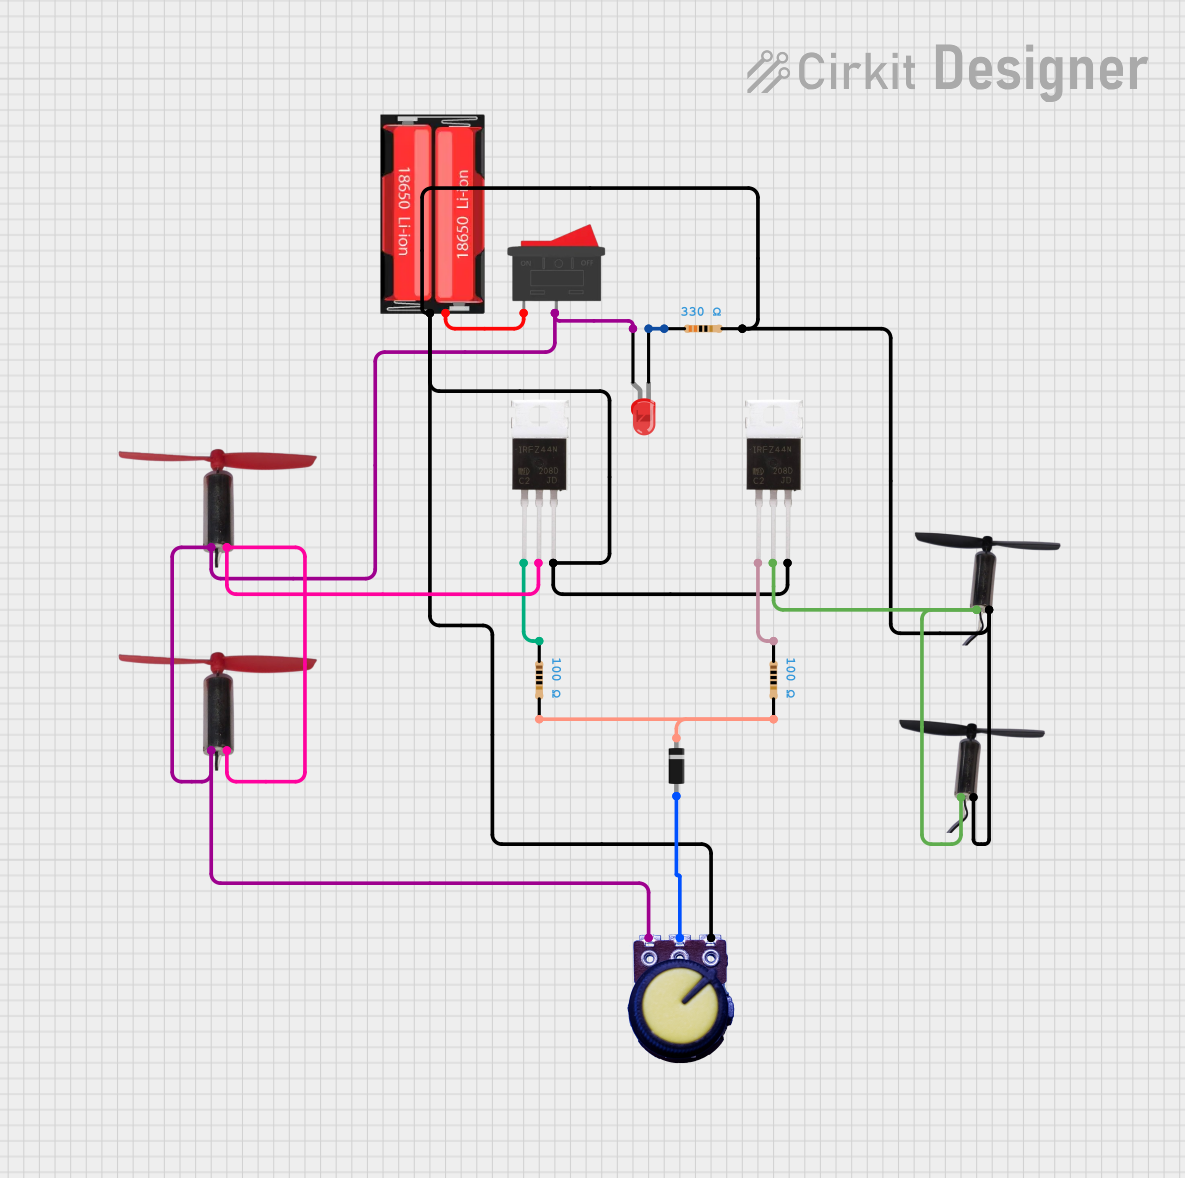
The FR120N MOSFET board can be used with an Arduino UNO to control a DC motor. Below is an example circuit and code:
Circuit Connections:
- Gate (G): Connect to an Arduino digital pin (e.g., D9) through a 100Ω resistor.
- Drain (D): Connect to one terminal of the motor.
- Source (S): Connect to ground.
- Motor: Connect the other terminal to the positive power supply (e.g., 12V).
- Flyback Diode: Place a diode (e.g., 1N4007) across the motor terminals, with the cathode connected to the positive terminal.
Arduino Code:
// Example code to control a DC motor using the FR120N MOSFET board
// Connect the MOSFET Gate to pin 9 of the Arduino through a 100Ω resistor

const int motorPin = 9; // Pin connected to the MOSFET Gate

void setup() {
  pinMode(motorPin, OUTPUT); // Set the motor pin as an output
}

void loop() {
  digitalWrite(motorPin, HIGH); // Turn the motor ON
  delay(2000);                  // Keep the motor ON for 2 seconds
  digitalWrite(motorPin, LOW);  // Turn the motor OFF
  delay(2000);                  // Keep the motor OFF for 2 seconds
}
Important Considerations:
- Heat Dissipation: The FR120N MOSFET can generate heat during operation. Use a heatsink or active cooling if operating at high currents.
- Voltage Spikes: For inductive loads, always use a flyback diode to protect the MOSFET from voltage spikes.
- Gate Drive Voltage: Ensure the gate voltage is within the recommended range to avoid damaging the MOSFET or causing improper switching.
Troubleshooting and FAQs
Common Issues and Solutions:
| Issue | Possible Cause | Solution |
|---|---|---|
| MOSFET does not turn on | Insufficient gate voltage | Ensure the gate voltage is at least 10V for proper switching. |
| MOSFET overheats | High current or inadequate heat dissipation | Use a heatsink or reduce the load current. |
| Load does not operate | Incorrect wiring or damaged MOSFET | Double-check connections and replace the MOSFET if necessary. |
| Voltage spikes damaging the MOSFET | Inductive load without a flyback diode | Add a flyback diode across the load. |
| Arduino pin cannot drive the MOSFET | Gate requires higher current than the Arduino can provide | Use a gate driver circuit to amplify the Arduino's output. |
FAQs:
Can I use the FR120N MOSFET board with a 3.3V microcontroller?
No, the FR120N requires a gate voltage of at least 10V for optimal performance. Use a gate driver circuit to step up the voltage.What is the maximum current the FR120N MOSFET board can handle?
The FR120N can handle up to 9.7A of continuous current, but ensure proper cooling to avoid overheating.Do I need a resistor on the Gate pin?
Yes, a resistor (10Ω to 100Ω) is recommended to limit inrush current and protect the MOSFET.Can I use the FR120N MOSFET board for AC loads?
No, the FR120N is designed for DC applications only. For AC loads, consider using a TRIAC or other suitable components.
By following this documentation, you can effectively integrate the FR120N MOSFET board into your projects and troubleshoot common issues.