Cirkit Designer Logo
Cirkit Designer
Your all-in-one circuit design IDE
Home / 
Component Documentation

How to Use Adafruit OLED FeatherWing: Examples, Pinouts, and Specs

Image of Adafruit OLED FeatherWing
Cirkit Designer LogoDesign with Adafruit OLED FeatherWing in Cirkit Designer

Introduction

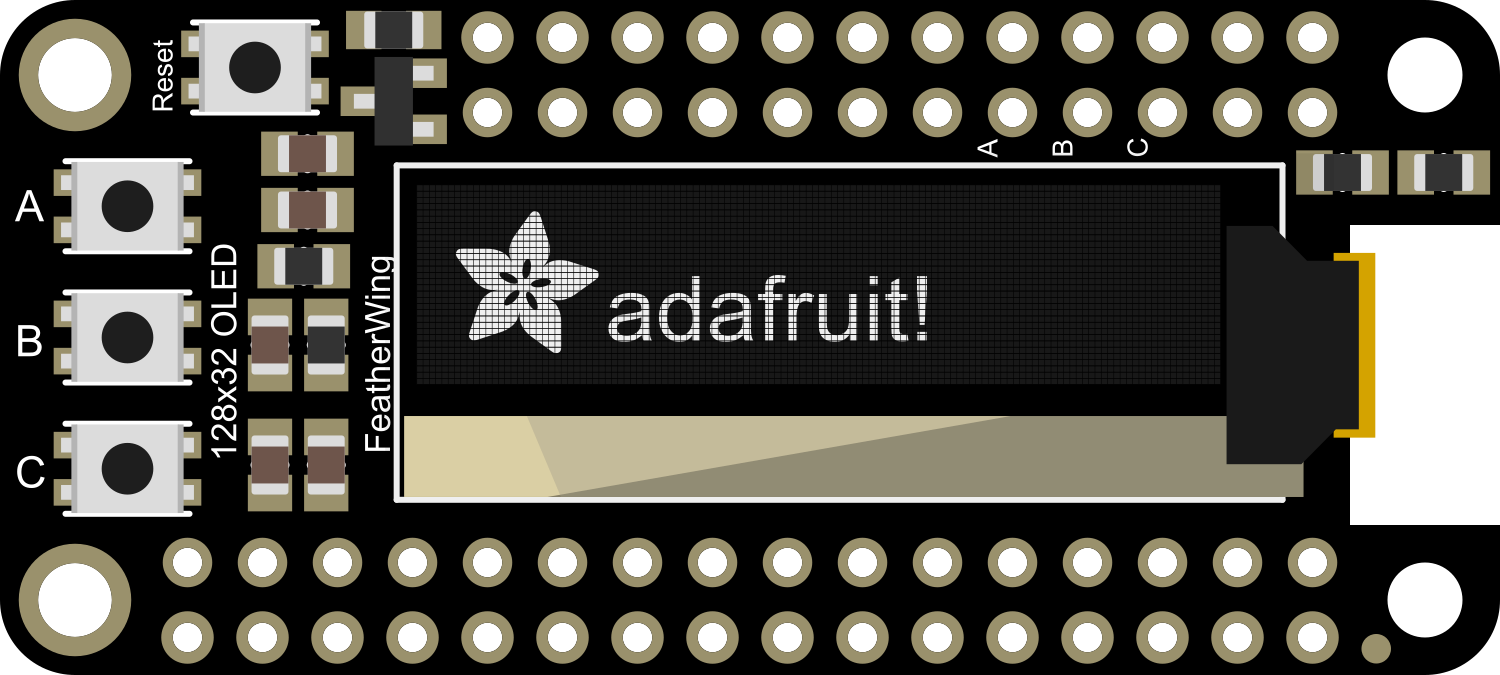
The Adafruit OLED FeatherWing is an add-on board for the Adafruit Feather ecosystem, providing a compact and easy-to-read 128x32 pixel monochrome OLED display. This display is ideal for presenting data, menus, and other visual feedback in a clear and legible format. It is commonly used in wearable devices, portable instruments, and any application where a small display is necessary.

Explore Projects Built with Adafruit OLED FeatherWing

Use Cirkit Designer to design, explore, and prototype these projects online. Some projects support real-time simulation. Click "Open Project" to start designing instantly!
Arduino UNO and OLED FeatherWing Display: Battery-Powered Hello World Project
Image of ARDUINO_SSD1306: A project utilizing Adafruit OLED FeatherWing in a practical application
This circuit consists of an Arduino UNO connected to an Adafruit OLED FeatherWing display via I2C communication (SDA and SCL lines). The Arduino is powered through a Vcc source and provides 3.3V and GND connections to the OLED display. The Arduino runs a program to display 'Hello, World!' on the OLED screen.
Cirkit Designer LogoOpen Project in Cirkit Designer
Arduino UNO-Based Motion Sensor with OLED Display
Image of Acelerometer(1): A project utilizing Adafruit OLED FeatherWing in a practical application
This circuit uses an Arduino UNO to read data from an MPU-6050 accelerometer and gyroscope sensor and display the readings on an Adafruit 128x64 OLED FeatherWing. The Arduino communicates with both the sensor and the display via the I2C protocol, and the code initializes the devices, reads sensor data, and updates the display every 500 milliseconds.
Cirkit Designer LogoOpen Project in Cirkit Designer
Arduino 101 OLED Display Animation Project
Image of wokwi animater test: A project utilizing Adafruit OLED FeatherWing in a practical application
This circuit consists of an Arduino 101 microcontroller connected to a 0.96" OLED display via I2C communication. The Arduino runs a program that initializes the OLED and continuously displays an animated sequence of frames on the screen.
Cirkit Designer LogoOpen Project in Cirkit Designer
ESP32-Based Vibration Feedback System with Quad Alphanumeric Display and ADXL343 Accelerometer
Image of EC444 - Quest 3: A project utilizing Adafruit OLED FeatherWing in a practical application
This circuit features an Adafruit HUZZAH32 ESP32 Feather board as the central microcontroller, which is connected to an Adafruit Quad AlphaNumeric Featherwing display and an Adafruit ADXL343 accelerometer via I2C communication (SCL and SDA lines). The ESP32 controls a vibration motor connected to one of its GPIO pins (A5_IO4) and shares a common power supply (3.3V) and ground (GND) with the other components. The purpose of this circuit is likely to read acceleration data, display information on the alphanumeric display, and provide haptic feedback through the vibration motor.
Cirkit Designer LogoOpen Project in Cirkit Designer

Explore Projects Built with Adafruit OLED FeatherWing

Use Cirkit Designer to design, explore, and prototype these projects online. Some projects support real-time simulation. Click "Open Project" to start designing instantly!
Image of ARDUINO_SSD1306: A project utilizing Adafruit OLED FeatherWing in a practical application
Arduino UNO and OLED FeatherWing Display: Battery-Powered Hello World Project
This circuit consists of an Arduino UNO connected to an Adafruit OLED FeatherWing display via I2C communication (SDA and SCL lines). The Arduino is powered through a Vcc source and provides 3.3V and GND connections to the OLED display. The Arduino runs a program to display 'Hello, World!' on the OLED screen.
Cirkit Designer LogoOpen Project in Cirkit Designer
Image of Acelerometer(1): A project utilizing Adafruit OLED FeatherWing in a practical application
Arduino UNO-Based Motion Sensor with OLED Display
This circuit uses an Arduino UNO to read data from an MPU-6050 accelerometer and gyroscope sensor and display the readings on an Adafruit 128x64 OLED FeatherWing. The Arduino communicates with both the sensor and the display via the I2C protocol, and the code initializes the devices, reads sensor data, and updates the display every 500 milliseconds.
Cirkit Designer LogoOpen Project in Cirkit Designer
Image of wokwi animater test: A project utilizing Adafruit OLED FeatherWing in a practical application
Arduino 101 OLED Display Animation Project
This circuit consists of an Arduino 101 microcontroller connected to a 0.96" OLED display via I2C communication. The Arduino runs a program that initializes the OLED and continuously displays an animated sequence of frames on the screen.
Cirkit Designer LogoOpen Project in Cirkit Designer
Image of EC444 - Quest 3: A project utilizing Adafruit OLED FeatherWing in a practical application
ESP32-Based Vibration Feedback System with Quad Alphanumeric Display and ADXL343 Accelerometer
This circuit features an Adafruit HUZZAH32 ESP32 Feather board as the central microcontroller, which is connected to an Adafruit Quad AlphaNumeric Featherwing display and an Adafruit ADXL343 accelerometer via I2C communication (SCL and SDA lines). The ESP32 controls a vibration motor connected to one of its GPIO pins (A5_IO4) and shares a common power supply (3.3V) and ground (GND) with the other components. The purpose of this circuit is likely to read acceleration data, display information on the alphanumeric display, and provide haptic feedback through the vibration motor.
Cirkit Designer LogoOpen Project in Cirkit Designer

Common Applications and Use Cases

  • Wearable devices
  • Portable instruments
  • User interfaces for small-scale projects
  • Debugging information display
  • Battery monitors
  • Clocks and timers

Technical Specifications

Key Technical Details

  • Display Type: Monochrome OLED
  • Resolution: 128x32 pixels
  • Communication: I2C interface
  • Operating Voltage: 3.3V (compatible with Adafruit Feather boards)
  • Dimensions: 22.8mm x 51mm x 4.6mm

Pin Configuration and Descriptions

Pin Description
GND Ground connection
3V 3.3V power supply
SCL I2C clock line
SDA I2C data line
RST Reset pin (optional use)

Usage Instructions

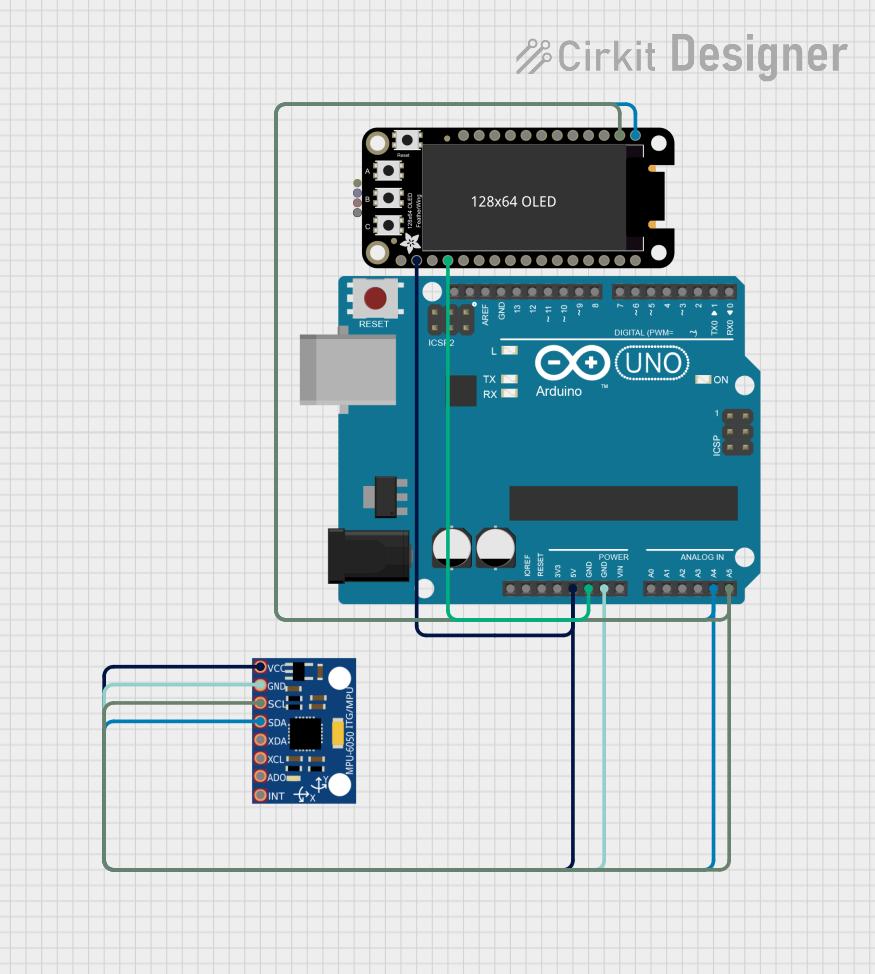
How to Use the Component in a Circuit

  1. Power Connections: Connect the GND pin to the ground of your Feather board and the 3V pin to a 3.3V output.
  2. I2C Connections: Connect the SCL and SDA pins to the corresponding I2C pins on your Feather board.
  3. Reset Pin (Optional): The RST pin can be connected to a digital pin on your Feather board if you wish to control the reset feature programmatically.

Important Considerations and Best Practices

  • Ensure that the I2C address of the OLED FeatherWing does not conflict with other I2C devices in your project.
  • Use pull-up resistors on the I2C lines if they are not already present on your Feather board.
  • Avoid exposing the display to direct sunlight for extended periods to prevent damage.
  • Handle the display with care to avoid physical damage to the screen.

Example Code for Arduino UNO

#include <Wire.h>
#include <Adafruit_GFX.h>
#include <Adafruit_SSD1306.h>

#define SCREEN_WIDTH 128 // OLED display width, in pixels
#define SCREEN_HEIGHT 32 // OLED display height, in pixels
#define OLED_RESET    -1 // Reset pin # (or -1 if sharing Arduino reset pin)

Adafruit_SSD1306 display(SCREEN_WIDTH, SCREEN_HEIGHT, &Wire, OLED_RESET);

void setup() {
  // Initialize with the I2C addr 0x3C (for the 128x32)
  if(!display.begin(SSD1306_I2C_ADDRESS, 0x3C)) {
    Serial.println(F("SSD1306 allocation failed"));
    for(;;); // Don't proceed, loop forever
  }
  display.display();
  delay(2000); // Pause for 2 seconds

  // Clear the buffer
  display.clearDisplay();

  // Draw a single pixel in white
  display.drawPixel(10, 10, WHITE);

  // Show the display buffer on the screen
  display.display();
  delay(2000); // Pause for 2 seconds
}

void loop() {
  // Put your main code here, to run repeatedly:
}

Troubleshooting and FAQs

Common Issues Users Might Face

  • Display Not Powering On: Check the power connections and ensure the 3.3V and GND pins are correctly connected.
  • No Data on Display: Verify that the I2C connections are secure and that the correct I2C address is being used in your code.
  • Garbled or Incomplete Data: Ensure that there are no conflicting devices on the I2C bus and that the display is not damaged.

Solutions and Tips for Troubleshooting

  • Double-check wiring connections for any loose or incorrect connections.
  • Use the Wire library's begin() function to specify the I2C address if it's different from the default.
  • Reset the display using the RST pin if the display is unresponsive.

FAQs

Q: Can I use the OLED FeatherWing with boards other than Adafruit Feather?

A: Yes, as long as the board supports 3.3V logic and has an I2C interface.

Q: How do I control the brightness of the display?

A: You can use the setContrast() function provided by the Adafruit_SSD1306 library to adjust the brightness.

Q: Is it possible to display images on the OLED FeatherWing?

A: Yes, you can display bitmap images using the Adafruit_GFX library functions.

Q: Can I use multiple OLED FeatherWings together?

A: Yes, but you will need to manage different I2C addresses and ensure each display is addressed separately in your code.