How to Use Terminal PCB 3 Pin: Examples, Pinouts, and Specs
Introduction
The Terminal PCB 3 Pin is a compact and reliable connector designed to join wires to a printed circuit board (PCB). It features three pins that provide secure and stable electrical connections, making it an essential component in various electronic projects. This terminal block simplifies the process of connecting external wires to a PCB without the need for soldering, enabling quick and efficient assembly or maintenance.
Explore Projects Built with Terminal PCB 3 Pin
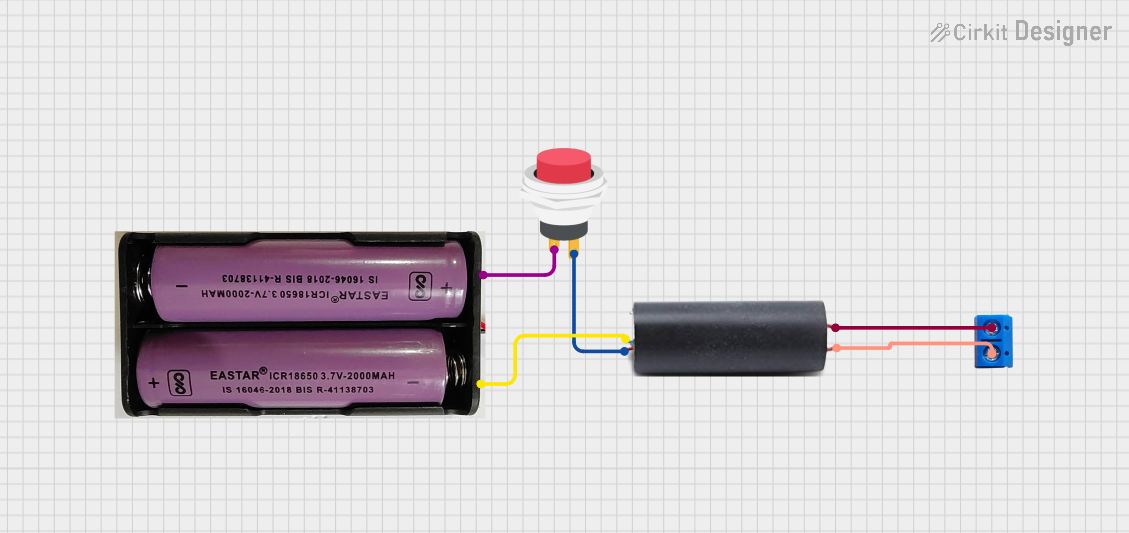


Explore Projects Built with Terminal PCB 3 Pin
Common Applications and Use Cases
- Power supply connections in electronic circuits
- Signal transmission between PCBs and external devices
- Prototyping and testing circuits
- Industrial control systems
- Home automation projects
Technical Specifications
The Terminal PCB 3 Pin is designed to meet the needs of a wide range of applications. Below are its key technical details:
General Specifications
| Parameter | Value |
|---|---|
| Number of Pins | 3 |
| Rated Voltage | 300V AC/DC |
| Rated Current | 10A |
| Wire Gauge Support | 26-12 AWG |
| Operating Temperature | -40°C to +105°C |
| Mounting Type | Through-hole or screw terminal |
| Material | Flame-retardant plastic (UL94-V0) |
Pin Configuration and Descriptions
| Pin Number | Description |
|---|---|
| 1 | Positive terminal (V+) |
| 2 | Negative terminal (V-) |
| 3 | Signal or ground connection |
Usage Instructions
How to Use the Terminal PCB 3 Pin in a Circuit
Mounting the Terminal Block:
- Insert the terminal block into the designated through-hole pads on the PCB.
- Solder the pins securely to the PCB to ensure a stable connection.
Connecting Wires:
- Strip the insulation from the wire ends (approximately 5-7 mm).
- Insert the stripped wire ends into the terminal block's screw clamps.
- Tighten the screws using a small flathead screwdriver to secure the wires.
Testing the Connection:
- Verify the connections using a multimeter to ensure proper continuity.
- Power on the circuit and check for stable operation.
Important Considerations and Best Practices
- Ensure the wire gauge matches the terminal block's supported range (26-12 AWG).
- Avoid overtightening the screws to prevent damage to the wires or the terminal block.
- Use proper insulation to prevent short circuits or accidental contact with other components.
- For high-current applications, double-check the rated current and voltage to avoid overheating.
Example: Connecting to an Arduino UNO
The Terminal PCB 3 Pin can be used to connect external devices, such as sensors or power supplies, to an Arduino UNO. Below is an example of how to use it for a simple LED circuit:
Circuit Setup
- Connect the positive terminal (V+) to the Arduino's 5V pin.
- Connect the negative terminal (V-) to the Arduino's GND pin.
- Use the third pin to connect the signal wire to a digital pin (e.g., D13).
Arduino Code Example
// Example code to control an LED connected via the Terminal PCB 3 Pin
const int ledPin = 13; // Pin connected to the signal terminal of the block

void setup() {
  pinMode(ledPin, OUTPUT); // Set the pin as an output
}

void loop() {
  digitalWrite(ledPin, HIGH); // Turn the LED on
  delay(1000); // Wait for 1 second
  digitalWrite(ledPin, LOW); // Turn the LED off
  delay(1000); // Wait for 1 second
}
Troubleshooting and FAQs
Common Issues and Solutions
Loose Connections:
- Issue: The wires are not securely connected, causing intermittent operation.
- Solution: Ensure the screws are tightened properly and the wires are fully inserted.
Overheating:
- Issue: The terminal block becomes hot during operation.
- Solution: Check that the current and voltage do not exceed the rated specifications. Use thicker wires if necessary.
Signal Interference:
- Issue: Noise or interference in the signal line.
- Solution: Use shielded cables for the signal wire and ensure proper grounding.
Damaged Screws or Terminals:
- Issue: The screws or terminals are stripped or broken.
- Solution: Replace the terminal block and avoid overtightening in the future.
FAQs
Q: Can the Terminal PCB 3 Pin handle AC voltage?
A: Yes, it can handle up to 300V AC, but ensure proper insulation and safety precautions.
Q: Is it reusable?
A: Yes, the terminal block can be reused, but avoid excessive wear on the screws and terminals.
Q: Can it be used for high-frequency signals?
A: While it can transmit signals, it is not ideal for high-frequency applications due to potential signal degradation.
Q: How do I clean the terminal block?
A: Use a soft brush or compressed air to remove dust. Avoid using water or solvents.