Cirkit Designer Logo
Cirkit Designer
Your all-in-one circuit design IDE
Home / 
Component Documentation

How to Use Arducam OV9281 1MP Monochrome Global Shutter Camera Module with M12 Mount lens for Raspberry Pi 5/4/3B+/3: Examples, Pinouts, and Specs

Image of Arducam OV9281 1MP Monochrome Global Shutter Camera Module with M12 Mount lens for Raspberry Pi 5/4/3B+/3
Cirkit Designer LogoDesign with Arducam OV9281 1MP Monochrome Global Shutter Camera Module with M12 Mount lens for Raspberry Pi 5/4/3B+/3 in Cirkit Designer

Introduction

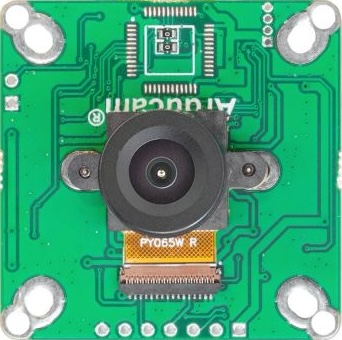
The Arducam OV9281 1MP Monochrome Global Shutter Camera Module (Part ID: B0165) is a high-performance imaging solution designed for Raspberry Pi platforms, including Raspberry Pi 5, 4, 3B+, and 3. It features a 1-megapixel monochrome sensor with global shutter technology, enabling it to capture fast-moving objects without motion artifacts. The module is equipped with an M12 lens mount, allowing users to swap lenses for different field-of-view and focal length requirements.

Explore Projects Built with Arducam OV9281 1MP Monochrome Global Shutter Camera Module with M12 Mount lens for Raspberry Pi 5/4/3B+/3

Use Cirkit Designer to design, explore, and prototype these projects online. Some projects support real-time simulation. Click "Open Project" to start designing instantly!
Raspberry Pi 5 Controlled Surveillance System with Dual Wide-Angle Cameras and Motorized Movement
Image of Armorwalker Circuit: A project utilizing Arducam OV9281 1MP Monochrome Global Shutter Camera Module with M12 Mount lens for Raspberry Pi 5/4/3B+/3 in a practical application
This circuit features a Raspberry Pi 5 as the central controller, interfaced with two wide-angle camera modules for image capture, and a 7-inch display for visual output via HDMI and USB connections. The Raspberry Pi also controls a L298N DC motor driver to operate four 12V geared motors, with direction and speed control facilitated through GPIO pins. Power management is handled by a rocker switch connected to a lithium-ion battery, and solid-state relays are included for additional external device control.
Cirkit Designer LogoOpen Project in Cirkit Designer
Raspberry Pi 4B-Based Multi-Sensor Interface Hub with GPS and GSM
Image of Rocket: A project utilizing Arducam OV9281 1MP Monochrome Global Shutter Camera Module with M12 Mount lens for Raspberry Pi 5/4/3B+/3 in a practical application
This circuit features a Raspberry Pi 4B interfaced with an IMX296 color global shutter camera, a Neo 6M GPS module, an Adafruit BMP388 barometric pressure sensor, an MPU-6050 accelerometer/gyroscope, and a Sim800l GSM module for cellular connectivity. Power management is handled by an MT3608 boost converter, which steps up the voltage from a Lipo battery, with a resettable fuse PTC and a 1N4007 diode for protection. The Adafruit Perma-Proto HAT is used for organizing connections and interfacing the sensors and modules with the Raspberry Pi via I2C and GPIO pins.
Cirkit Designer LogoOpen Project in Cirkit Designer
Raspberry Pi 4B-Based Smart Surveillance System with GPS and Ultrasonic Sensing
Image of VisionTool: A project utilizing Arducam OV9281 1MP Monochrome Global Shutter Camera Module with M12 Mount lens for Raspberry Pi 5/4/3B+/3 in a practical application
This circuit features a Raspberry Pi 4B as the central processing unit, interfacing with an Arducam camera module, an HC-SR04 ultrasonic sensor, a GPS NEO 6M module, and a speaker. The Raspberry Pi manages image capture, distance measurement, GPS data reception, and audio output. Power is supplied to the components from a 2000mAh battery, and the Raspberry Pi facilitates communication and control over the I2C, GPIO, and serial interfaces.
Cirkit Designer LogoOpen Project in Cirkit Designer
Raspberry Pi 5 Controlled Robotic Vehicle with LIDAR and Camera Module
Image of Autonomous Car: A project utilizing Arducam OV9281 1MP Monochrome Global Shutter Camera Module with M12 Mount lens for Raspberry Pi 5/4/3B+/3 in a practical application
This circuit features a Raspberry Pi 5 connected to a camera module and a TF LUNA LIDAR sensor for visual and distance sensing capabilities. A Mini 360 Buck Converter is used to regulate power from a Li-ion battery to the Raspberry Pi and an Adafruit Motor Shield, which controls four DC motors. The Arduino UNO microcontroller appears to be unused in the current configuration.
Cirkit Designer LogoOpen Project in Cirkit Designer

Explore Projects Built with Arducam OV9281 1MP Monochrome Global Shutter Camera Module with M12 Mount lens for Raspberry Pi 5/4/3B+/3

Use Cirkit Designer to design, explore, and prototype these projects online. Some projects support real-time simulation. Click "Open Project" to start designing instantly!
Image of Armorwalker Circuit: A project utilizing Arducam OV9281 1MP Monochrome Global Shutter Camera Module with M12 Mount lens for Raspberry Pi 5/4/3B+/3 in a practical application
Raspberry Pi 5 Controlled Surveillance System with Dual Wide-Angle Cameras and Motorized Movement
This circuit features a Raspberry Pi 5 as the central controller, interfaced with two wide-angle camera modules for image capture, and a 7-inch display for visual output via HDMI and USB connections. The Raspberry Pi also controls a L298N DC motor driver to operate four 12V geared motors, with direction and speed control facilitated through GPIO pins. Power management is handled by a rocker switch connected to a lithium-ion battery, and solid-state relays are included for additional external device control.
Cirkit Designer LogoOpen Project in Cirkit Designer
Image of Rocket: A project utilizing Arducam OV9281 1MP Monochrome Global Shutter Camera Module with M12 Mount lens for Raspberry Pi 5/4/3B+/3 in a practical application
Raspberry Pi 4B-Based Multi-Sensor Interface Hub with GPS and GSM
This circuit features a Raspberry Pi 4B interfaced with an IMX296 color global shutter camera, a Neo 6M GPS module, an Adafruit BMP388 barometric pressure sensor, an MPU-6050 accelerometer/gyroscope, and a Sim800l GSM module for cellular connectivity. Power management is handled by an MT3608 boost converter, which steps up the voltage from a Lipo battery, with a resettable fuse PTC and a 1N4007 diode for protection. The Adafruit Perma-Proto HAT is used for organizing connections and interfacing the sensors and modules with the Raspberry Pi via I2C and GPIO pins.
Cirkit Designer LogoOpen Project in Cirkit Designer
Image of VisionTool: A project utilizing Arducam OV9281 1MP Monochrome Global Shutter Camera Module with M12 Mount lens for Raspberry Pi 5/4/3B+/3 in a practical application
Raspberry Pi 4B-Based Smart Surveillance System with GPS and Ultrasonic Sensing
This circuit features a Raspberry Pi 4B as the central processing unit, interfacing with an Arducam camera module, an HC-SR04 ultrasonic sensor, a GPS NEO 6M module, and a speaker. The Raspberry Pi manages image capture, distance measurement, GPS data reception, and audio output. Power is supplied to the components from a 2000mAh battery, and the Raspberry Pi facilitates communication and control over the I2C, GPIO, and serial interfaces.
Cirkit Designer LogoOpen Project in Cirkit Designer
Image of Autonomous Car: A project utilizing Arducam OV9281 1MP Monochrome Global Shutter Camera Module with M12 Mount lens for Raspberry Pi 5/4/3B+/3 in a practical application
Raspberry Pi 5 Controlled Robotic Vehicle with LIDAR and Camera Module
This circuit features a Raspberry Pi 5 connected to a camera module and a TF LUNA LIDAR sensor for visual and distance sensing capabilities. A Mini 360 Buck Converter is used to regulate power from a Li-ion battery to the Raspberry Pi and an Adafruit Motor Shield, which controls four DC motors. The Arduino UNO microcontroller appears to be unused in the current configuration.
Cirkit Designer LogoOpen Project in Cirkit Designer

Common Applications and Use Cases

  • Machine Vision: Ideal for industrial automation and robotics.
  • High-Speed Imaging: Suitable for capturing fast-moving objects without distortion.
  • Scientific Research: Used in microscopy and other precision imaging applications.
  • Facial Recognition: Effective in security and biometric systems.
  • Line Scanning: Useful in barcode reading and document scanning.

Technical Specifications

Key Technical Details

Parameter Specification
Sensor OV9281 Monochrome CMOS
Resolution 1 Megapixel (1280 x 800)
Shutter Type Global Shutter
Pixel Size 3 µm x 3 µm
Frame Rate Up to 120 fps at full resolution
Lens Mount M12 (interchangeable lens support)
Interface MIPI CSI-2
Power Supply Voltage 3.3V (via Raspberry Pi)
Operating Temperature -30°C to 70°C
Dimensions 38mm x 38mm

Pin Configuration and Descriptions

The Arducam OV9281 connects to the Raspberry Pi via the MIPI CSI-2 interface. Below is the pin configuration for the camera's ribbon cable:

Pin Number Signal Name Description
1 GND Ground
2 3.3V Power Supply
3 I2C_SCL I2C Clock for sensor configuration
4 I2C_SDA I2C Data for sensor configuration
5 MIPI_D0+ MIPI Data Lane 0 Positive
6 MIPI_D0- MIPI Data Lane 0 Negative
7 MIPI_CLK+ MIPI Clock Lane Positive
8 MIPI_CLK- MIPI Clock Lane Negative
9 MIPI_D1+ MIPI Data Lane 1 Positive
10 MIPI_D1- MIPI Data Lane 1 Negative

Usage Instructions

How to Use the Component in a Circuit

  1. Hardware Setup:

    • Connect the camera module to the Raspberry Pi's CSI port using the provided ribbon cable.
    • Ensure the ribbon cable is securely inserted with the correct orientation (contacts facing the CSI port).
    • Mount the camera module securely using screws or a compatible holder.
  2. Software Setup:

    • Install the Raspberry Pi OS and ensure it is up to date.

    • Enable the camera interface in the Raspberry Pi configuration tool:

      sudo raspi-config
      

      Navigate to Interfacing Options > Camera and enable it. Reboot the Raspberry Pi.

    • Install the Arducam driver and software tools:

      sudo apt update
      sudo apt install arducam-config
      
  3. Capture Images and Video:

    • Use the libcamera tools to capture images or video:
      libcamera-still -o image.jpg
      libcamera-vid -o video.h264
      

Important Considerations and Best Practices

  • Lens Selection: Choose an appropriate M12 lens based on your application (e.g., wide-angle for surveillance, telephoto for distant objects).
  • Lighting: Ensure adequate lighting for optimal image quality, as the module does not include an onboard IR filter or illumination.
  • Static Precautions: Handle the module with care to avoid damage from electrostatic discharge (ESD).
  • Cable Management: Avoid bending or twisting the ribbon cable excessively to prevent damage.

Example Code for Raspberry Pi

Below is an example Python script to capture an image using the Arducam OV9281 with the Raspberry Pi:


Import necessary libraries

from picamera2 import Picamera2 import time

Initialize the camera

picam2 = Picamera2()

Configure the camera for still image capture

picam2.configure(picam2.create_still_configuration())

Start the camera

picam2.start() time.sleep(2) # Allow the camera to warm up

Capture an image and save it

picam2.capture_file("capture.jpg") print("Image saved as capture.jpg")

Stop the camera

picam2.stop()


Troubleshooting and FAQs

Common Issues and Solutions

  1. Camera Not Detected:

    • Ensure the ribbon cable is securely connected to the CSI port.
    • Verify that the camera interface is enabled in raspi-config.
    • Check for software updates and install the latest Arducam drivers.
  2. Poor Image Quality:

    • Verify that the lens is clean and properly focused.
    • Ensure adequate lighting in the environment.
    • Adjust exposure and gain settings using the libcamera tools.
  3. Frame Drops or Low Frame Rate:

    • Reduce the resolution or frame rate in the capture settings.
    • Ensure the Raspberry Pi is not overloaded with other tasks.
  4. Image Distortion or Artifacts:

    • Verify that the global shutter mode is enabled (default for OV9281).
    • Check for electrical interference or loose connections.

FAQs

Q: Can I use this camera with platforms other than Raspberry Pi?
A: The OV9281 module is designed for Raspberry Pi, but it may work with other platforms that support MIPI CSI-2. Additional configuration may be required.

Q: Does the camera support color imaging?
A: No, the OV9281 is a monochrome sensor and does not capture color images.

Q: Can I use this camera for night vision?
A: Yes, but you will need an appropriate IR lens and external IR illumination, as the module does not include an IR filter.

Q: How do I change the lens?
A: Unscrew the existing M12 lens and replace it with a compatible M12 lens. Adjust the focus as needed.

Q: What is the maximum cable length supported?
A: The maximum reliable cable length is typically 15-20 cm. Longer cables may cause signal degradation.