Cirkit Designer Logo
Cirkit Designer
Your all-in-one circuit design IDE
Home / 
Component Documentation

How to Use Adafruit Stereo 2.8W Class D Audio Amplifier - I2C Control AGC - TPA2016: Examples, Pinouts, and Specs

Image of Adafruit Stereo 2.8W Class D Audio Amplifier - I2C Control AGC - TPA2016
Cirkit Designer LogoDesign with Adafruit Stereo 2.8W Class D Audio Amplifier - I2C Control AGC - TPA2016 in Cirkit Designer

Introduction

The Adafruit Stereo 2.8W Class D Audio Amplifier with I2C Control AGC, featuring the TPA2016D2 chip, is a sophisticated audio amplification solution designed for projects that require high-quality sound in a compact form factor. This amplifier is capable of delivering up to 2.8 watts per channel into 4-ohm speakers. With its I2C interface, users can digitally control volume and configure the automatic gain control (AGC) settings, making it ideal for a wide range of applications such as DIY speakers, portable audio devices, and interactive installations.

Explore Projects Built with Adafruit Stereo 2.8W Class D Audio Amplifier - I2C Control AGC - TPA2016

Use Cirkit Designer to design, explore, and prototype these projects online. Some projects support real-time simulation. Click "Open Project" to start designing instantly!
Raspberry Pi 5-Based Multi-Channel Audio System
Image of Noise Cancelling Project: A project utilizing Adafruit Stereo 2.8W Class D Audio Amplifier - I2C Control AGC - TPA2016 in a practical application
This circuit is an audio playback system that uses a Raspberry Pi 5 to process digital audio signals. The signals are sent to an I2S DAC and then amplified by PAM8302 amplifiers to drive two loudspeakers, providing stereo sound output.
Cirkit Designer LogoOpen Project in Cirkit Designer
PAM8403 Amplified Piezo Speaker Array with ATTiny Control
Image of mamamo: A project utilizing Adafruit Stereo 2.8W Class D Audio Amplifier - I2C Control AGC - TPA2016 in a practical application
This circuit is an audio amplification system with multiple piezo speakers driven by a PAM8403 amplifier IC. It features an ATtiny microcontroller for potential audio control, powered by a 5V battery with capacitors for stabilization and a trimmer potentiometer for input level adjustment.
Cirkit Designer LogoOpen Project in Cirkit Designer
ESP32-Powered Smart Audio System with Data Logging
Image of Para Smart Speaker 1 Pro: A project utilizing Adafruit Stereo 2.8W Class D Audio Amplifier - I2C Control AGC - TPA2016 in a practical application
This circuit is a sophisticated audio playback and recording system with timekeeping functionality. It features an ESP32 S3 microcontroller for digital signal processing, connected to a DAC, an I2S microphone, an RTC, and a Micro SD card module. The audio output is handled by a 2.1 channel amplifier driving stereo speakers and a subwoofer, with power supplied by a series of 3.7V batteries and regulated by a DC step-down converter.
Cirkit Designer LogoOpen Project in Cirkit Designer
Teensy 4.0 Audio Controller with Adjustable Volume and Power Management
Image of proj2: A project utilizing Adafruit Stereo 2.8W Class D Audio Amplifier - I2C Control AGC - TPA2016 in a practical application
This circuit features a Teensy 4.0 microcontroller interfaced with an audio shield for audio processing, controlled by a potentiometer for volume adjustment. It is powered by an Adafruit PowerBoost 1000C with a toggle switch for power control, and includes a 12-pin FFC converter for additional connectivity options.
Cirkit Designer LogoOpen Project in Cirkit Designer

Explore Projects Built with Adafruit Stereo 2.8W Class D Audio Amplifier - I2C Control AGC - TPA2016

Use Cirkit Designer to design, explore, and prototype these projects online. Some projects support real-time simulation. Click "Open Project" to start designing instantly!
Image of Noise Cancelling Project: A project utilizing Adafruit Stereo 2.8W Class D Audio Amplifier - I2C Control AGC - TPA2016 in a practical application
Raspberry Pi 5-Based Multi-Channel Audio System
This circuit is an audio playback system that uses a Raspberry Pi 5 to process digital audio signals. The signals are sent to an I2S DAC and then amplified by PAM8302 amplifiers to drive two loudspeakers, providing stereo sound output.
Cirkit Designer LogoOpen Project in Cirkit Designer
Image of mamamo: A project utilizing Adafruit Stereo 2.8W Class D Audio Amplifier - I2C Control AGC - TPA2016 in a practical application
PAM8403 Amplified Piezo Speaker Array with ATTiny Control
This circuit is an audio amplification system with multiple piezo speakers driven by a PAM8403 amplifier IC. It features an ATtiny microcontroller for potential audio control, powered by a 5V battery with capacitors for stabilization and a trimmer potentiometer for input level adjustment.
Cirkit Designer LogoOpen Project in Cirkit Designer
Image of Para Smart Speaker 1 Pro: A project utilizing Adafruit Stereo 2.8W Class D Audio Amplifier - I2C Control AGC - TPA2016 in a practical application
ESP32-Powered Smart Audio System with Data Logging
This circuit is a sophisticated audio playback and recording system with timekeeping functionality. It features an ESP32 S3 microcontroller for digital signal processing, connected to a DAC, an I2S microphone, an RTC, and a Micro SD card module. The audio output is handled by a 2.1 channel amplifier driving stereo speakers and a subwoofer, with power supplied by a series of 3.7V batteries and regulated by a DC step-down converter.
Cirkit Designer LogoOpen Project in Cirkit Designer
Image of proj2: A project utilizing Adafruit Stereo 2.8W Class D Audio Amplifier - I2C Control AGC - TPA2016 in a practical application
Teensy 4.0 Audio Controller with Adjustable Volume and Power Management
This circuit features a Teensy 4.0 microcontroller interfaced with an audio shield for audio processing, controlled by a potentiometer for volume adjustment. It is powered by an Adafruit PowerBoost 1000C with a toggle switch for power control, and includes a 12-pin FFC converter for additional connectivity options.
Cirkit Designer LogoOpen Project in Cirkit Designer

Technical Specifications

Key Features

  • Stereo output: 2.8W per channel into 4Ω
  • Class D operation: Highly efficient and low heat generation
  • I2C control interface: Digital volume and AGC configuration
  • Supply voltage: 2.7V to 5.5V
  • PSRR: 77 dB at 217 Hz with AGC disabled
  • THD+N: 0.02% at 1W into 8Ω
  • SNR: 90 dB (typical A-weighted)
  • AGC and compression settings: Adjustable via I2C

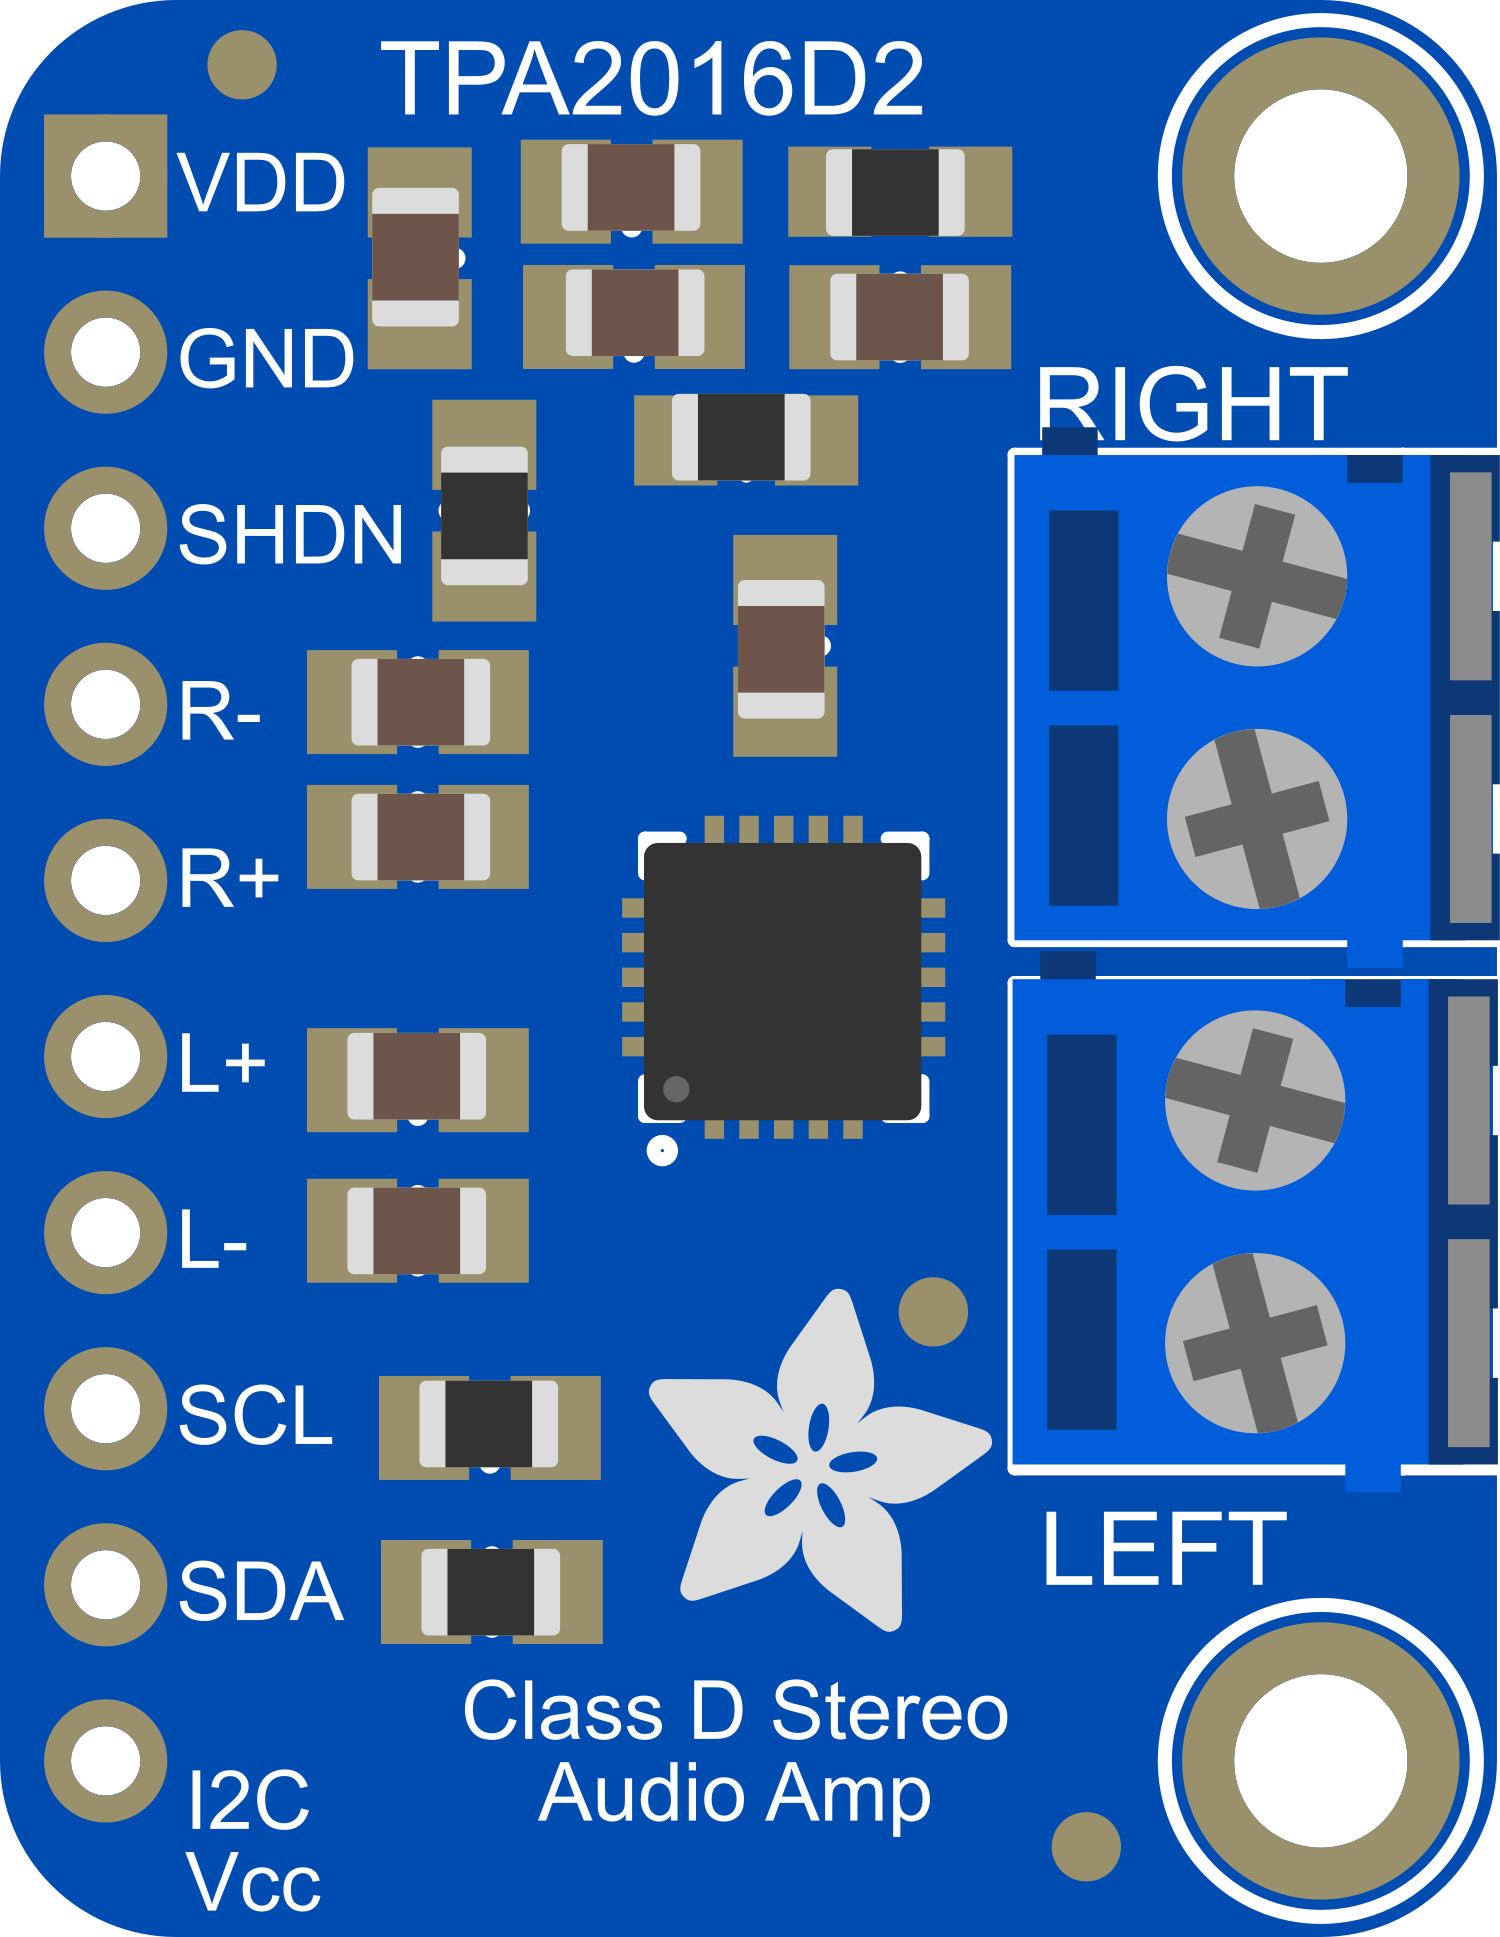
Pin Configuration and Descriptions

Pin Number Name Description
1 Vin Supply voltage (2.7V to 5.5V)
2 GND Ground connection
3 L+ Left channel positive output
4 L- Left channel negative output
5 R+ Right channel positive output
6 R- Right channel negative output
7 SD Shutdown control (active low)
8 GAIN Gain selection input
9 ADR I2C address select
10 SCL I2C clock input
11 SDA I2C data input/output

Usage Instructions

Integration into a Circuit

  1. Power Supply: Connect the Vin pin to a 2.7V to 5.5V power source and the GND pin to the ground.
  2. Speaker Connection: Connect your 4Ω speakers to the L+ and L- for the left channel, and R+ and R- for the right channel.
  3. I2C Communication: Connect the SCL and SDA pins to your microcontroller's I2C clock and data lines, respectively.
  4. Shutdown Control (Optional): Connect the SD pin to a GPIO on your microcontroller if you wish to control the shutdown mode programmatically.

Best Practices

  • Use a decoupling capacitor close to the Vin pin to filter out voltage spikes.
  • Ensure that the speakers are rated for the output power of the amplifier to prevent damage.
  • Keep the audio input signal within the recommended levels to avoid distortion.
  • Use shielded cables for I2C communication to reduce noise pickup.

Example Code for Arduino UNO

#include <Wire.h>
#include <Adafruit_TPA2016.h>

Adafruit_TPA2016 audioamp;

void setup() {
  Wire.begin(); // Join I2C bus
  audioamp.begin(); // Initialize the amplifier

  audioamp.setAGCCompression(TPA2016_AGC_OFF); // Disable AGC
  audioamp.setGain(30); // Set gain to 30dB
}

void loop() {
  // Your code to control the amplifier
}

Troubleshooting and FAQs

Common Issues

  • No Sound Output: Ensure that the speakers are properly connected and the amplifier is powered.
  • Distorted Sound: Check if the input signal level is too high and adjust the gain settings.
  • I2C Communication Failure: Verify the connections to SCL and SDA pins and check for correct pull-up resistors.

FAQs

Q: Can I use 8Ω speakers with this amplifier? A: Yes, but the output power will be lower than with 4Ω speakers.

Q: How do I change the I2C address? A: The I2C address can be changed by connecting the ADR pin to Vin or GND.

Q: What is the default I2C address? A: The default I2C address is 0x58.

Q: Can the amplifier run on a 3.3V supply? A: Yes, the amplifier can operate on a supply voltage as low as 2.7V.

Q: How do I enable the AGC feature? A: AGC can be enabled and configured through the I2C interface using the Adafruit_TPA2016 library.

For further assistance, consult the Adafruit support forums or the detailed datasheet for the TPA2016D2 chip.