Cirkit Designer Logo
Cirkit Designer
Your all-in-one circuit design IDE
Home / 
Component Documentation

How to Use SparkFun Capacitive Touch Slider - CAP1203 (Qwiic): Examples, Pinouts, and Specs

Image of SparkFun Capacitive Touch Slider - CAP1203 (Qwiic)
Cirkit Designer LogoDesign with SparkFun Capacitive Touch Slider - CAP1203 (Qwiic) in Cirkit Designer

Introduction

The SparkFun Capacitive Touch Slider - CAP1203 (Qwiic) is an innovative breakout board featuring the CAP1203, a multiple channel capacitive touch sensor. This component offers a versatile touch interface with three individual touch pads that can also act as a single slider for swipe gestures, as well as three proximity sensors for non-contact detection. It is designed for seamless integration into interactive projects and can be used in applications such as touch interfaces, control panels, and lighting controls. The inclusion of Qwiic connectors simplifies the process of chaining devices and modules in a Qwiic-enabled ecosystem, allowing for rapid prototyping without soldering.

Explore Projects Built with SparkFun Capacitive Touch Slider - CAP1203 (Qwiic)

Use Cirkit Designer to design, explore, and prototype these projects online. Some projects support real-time simulation. Click "Open Project" to start designing instantly!
Capacitive Touch and Ultrasonic Sensor Interface with Adafruit Feather nRF52840 Sense
Image of Senior Design Project: A project utilizing SparkFun Capacitive Touch Slider - CAP1203 (Qwiic) in a practical application
This circuit features an Adafruit Feather nRF52840 Sense microcontroller connected to an ultrasonic sensor for distance measurement and an Adafruit AT42QT1010 capacitive touch sensor for touch input. The ultrasonic sensor's Trigger and Echo pins are interfaced with the microcontroller's digital pins D6 and D9, respectively, to send and receive ultrasonic signals. Additionally, a pressure-sensitive conductive sheet (Velostat) is connected in series with a 10k Ohm resistor to the microcontroller's analog pin A0, likely forming a pressure sensor.
Cirkit Designer LogoOpen Project in Cirkit Designer
Arduino UNO R4 WiFi Capacitive Touch MIDI Controller with Visual Feedback and Sound Playback
Image of 自适应乐器: A project utilizing SparkFun Capacitive Touch Slider - CAP1203 (Qwiic) in a practical application
This circuit is an interactive touch-based MIDI controller and audio player. It uses an Arduino UNO R4 WiFi to interface with an MPR121 capacitive touch sensor for input, a MAX7219 8-digit 7-segment display for visual feedback, and a DFPlayer MINI for audio output through a loudspeaker. The system detects touch inputs, plays corresponding sounds, and sends MIDI notes.
Cirkit Designer LogoOpen Project in Cirkit Designer
Arduino UNO Controlled Interface with TFT Display and Feedback Indicators
Image of Mission Control: A project utilizing SparkFun Capacitive Touch Slider - CAP1203 (Qwiic) in a practical application
This circuit features an Arduino UNO microcontroller connected to a capacitive touch TFT display for user interface, three LEDs for visual feedback, a buzzer for audio alerts, and multiple pushbuttons for user input. It is designed to interact with users through the display and buttons, control visual and audio indicators, and can be customized via the provided code template.
Cirkit Designer LogoOpen Project in Cirkit Designer
Arduino Nano-Based Wireless Input Controller with Joysticks and Sensors
Image of TRANSMITTER: A project utilizing SparkFun Capacitive Touch Slider - CAP1203 (Qwiic) in a practical application
This is a multifunctional interactive device featuring dual-axis control via PS2 joysticks, visual feedback through an OLED display, and wireless communication using an NRF24L01 module. It includes a piezo buzzer for sound, tactile buttons for additional user input, rotary potentiometers for analog control, and an MPU-6050 for motion sensing. The Arduino Nano serves as the central processing unit, coordinating input and output functions, with capacitors for power stability.
Cirkit Designer LogoOpen Project in Cirkit Designer

Explore Projects Built with SparkFun Capacitive Touch Slider - CAP1203 (Qwiic)

Use Cirkit Designer to design, explore, and prototype these projects online. Some projects support real-time simulation. Click "Open Project" to start designing instantly!
Image of Senior Design Project: A project utilizing SparkFun Capacitive Touch Slider - CAP1203 (Qwiic) in a practical application
Capacitive Touch and Ultrasonic Sensor Interface with Adafruit Feather nRF52840 Sense
This circuit features an Adafruit Feather nRF52840 Sense microcontroller connected to an ultrasonic sensor for distance measurement and an Adafruit AT42QT1010 capacitive touch sensor for touch input. The ultrasonic sensor's Trigger and Echo pins are interfaced with the microcontroller's digital pins D6 and D9, respectively, to send and receive ultrasonic signals. Additionally, a pressure-sensitive conductive sheet (Velostat) is connected in series with a 10k Ohm resistor to the microcontroller's analog pin A0, likely forming a pressure sensor.
Cirkit Designer LogoOpen Project in Cirkit Designer
Image of 自适应乐器: A project utilizing SparkFun Capacitive Touch Slider - CAP1203 (Qwiic) in a practical application
Arduino UNO R4 WiFi Capacitive Touch MIDI Controller with Visual Feedback and Sound Playback
This circuit is an interactive touch-based MIDI controller and audio player. It uses an Arduino UNO R4 WiFi to interface with an MPR121 capacitive touch sensor for input, a MAX7219 8-digit 7-segment display for visual feedback, and a DFPlayer MINI for audio output through a loudspeaker. The system detects touch inputs, plays corresponding sounds, and sends MIDI notes.
Cirkit Designer LogoOpen Project in Cirkit Designer
Image of Mission Control: A project utilizing SparkFun Capacitive Touch Slider - CAP1203 (Qwiic) in a practical application
Arduino UNO Controlled Interface with TFT Display and Feedback Indicators
This circuit features an Arduino UNO microcontroller connected to a capacitive touch TFT display for user interface, three LEDs for visual feedback, a buzzer for audio alerts, and multiple pushbuttons for user input. It is designed to interact with users through the display and buttons, control visual and audio indicators, and can be customized via the provided code template.
Cirkit Designer LogoOpen Project in Cirkit Designer
Image of TRANSMITTER: A project utilizing SparkFun Capacitive Touch Slider - CAP1203 (Qwiic) in a practical application
Arduino Nano-Based Wireless Input Controller with Joysticks and Sensors
This is a multifunctional interactive device featuring dual-axis control via PS2 joysticks, visual feedback through an OLED display, and wireless communication using an NRF24L01 module. It includes a piezo buzzer for sound, tactile buttons for additional user input, rotary potentiometers for analog control, and an MPU-6050 for motion sensing. The Arduino Nano serves as the central processing unit, coordinating input and output functions, with capacitors for power stability.
Cirkit Designer LogoOpen Project in Cirkit Designer

Technical Specifications

Key Technical Details

  • Supply Voltage (Vcc): 2.7V - 5.5V
  • Operating Current: 29 µA (typical)
  • Communication Interface: I2C
  • I2C Address: 0x28 (default)
  • Sensitivity: Adjustable via registers
  • Response Time: 160 ms (typical)
  • Number of Channels: 3 capacitive touch pads, 3 proximity sensors
  • Output Type: Digital (capacitive touch status)
  • Dimensions: 1.0" x 0.8"

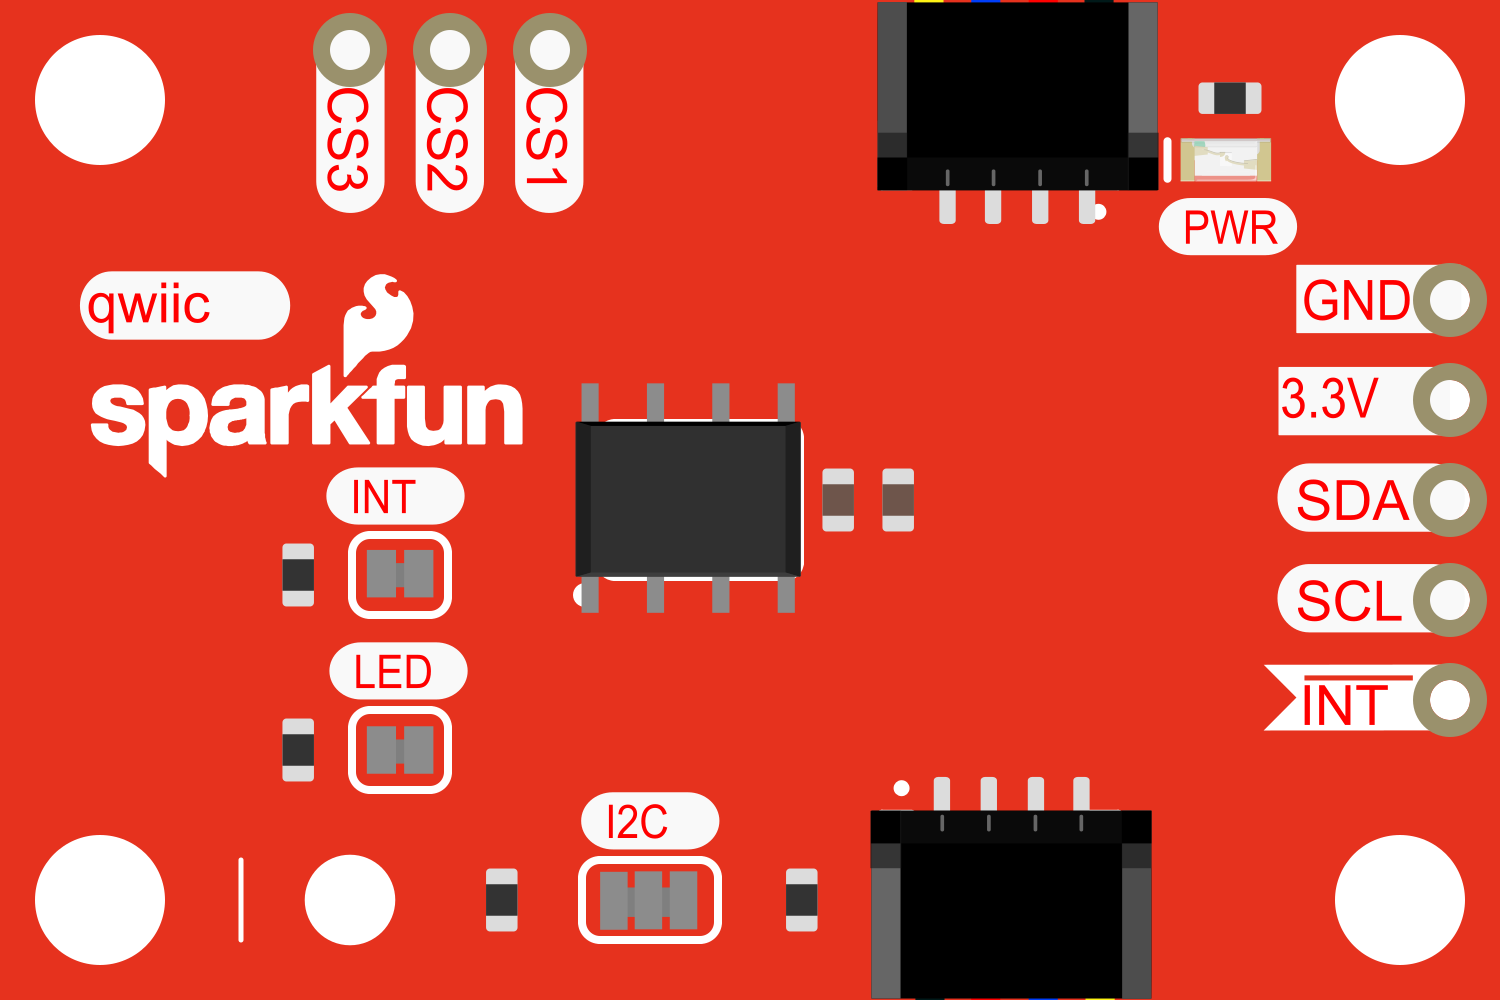
Pin Configuration and Descriptions

Pin Name Description
GND Ground connection
VCC Power supply (2.7V - 5.5V)
SDA I2C Data Line
SCL I2C Clock Line
RST Reset pin (active low)
INT Interrupt output (active low)

Usage Instructions

Integration into a Circuit

  1. Powering the Device: Connect the VCC pin to a 2.7V - 5.5V power supply and the GND pin to the ground.
  2. I2C Communication: Connect the SDA and SCL pins to the corresponding I2C data and clock lines on your microcontroller or Qwiic system.
  3. Reset and Interrupts: The RST pin can be connected to a digital output on your microcontroller if you wish to manually reset the CAP1203. The INT pin can be connected to an interrupt-capable digital input to react to touch events.

Important Considerations and Best Practices

  • Ensure that the power supply is within the specified voltage range to prevent damage.
  • Avoid placing the touch pads close to conductive surfaces to minimize interference.
  • Use the interrupt feature to conserve power by putting your microcontroller in a sleep mode and waking it up on a touch event.
  • Calibrate the sensitivity settings for your particular application environment through the CAP1203 registers.

Example Code for Arduino UNO

#include <Wire.h>

// CAP1203 I2C address
#define CAP1203_ADDR 0x28

// CAP1203 Register Addresses
#define MAIN_CONTROL_REG 0x00
#define SENSOR_INPUT_STATUS_REG 0x03

void setup() {
  Wire.begin(); // Join I2C bus
  Serial.begin(9600); // Start serial communication at 9600 baud
}

void loop() {
  Wire.beginTransmission(CAP1203_ADDR);
  Wire.write(SENSOR_INPUT_STATUS_REG); // Point to the Sensor Input Status Register
  Wire.endTransmission(false);
  Wire.requestFrom(CAP1203_ADDR, 1); // Request 1 byte from the CAP1203
  
  if(Wire.available()) {
    byte status = Wire.read(); // Read touch status
    Serial.print("Touch Status: ");
    Serial.println(status, BIN); // Print the status in binary format
  }
  
  delay(100); // Wait for 100 ms
}

This example initializes the I2C communication and continuously polls the CAP1203 for touch status, which is then printed to the serial monitor in binary format.

Troubleshooting and FAQs

Common Issues

  • No response from the touch pads: Ensure that the I2C connections are correct and that the device is properly powered. Check for soldering issues on the Qwiic connectors if applicable.
  • Intermittent touch detection: This can be caused by electrical noise or improper grounding. Make sure the device is grounded properly and that the touch pads are not too close to other conductive materials.
  • Inaccurate touch detection: Calibrate the sensitivity settings of the CAP1203 to match your application's environment.

Solutions and Tips for Troubleshooting

  • I2C Communication Failure: Use an I2C scanner sketch to confirm that the CAP1203 is detected on the I2C bus.
  • Reset the CAP1203: If the device is unresponsive, try toggling the RST pin to reset the device.
  • Adjust Sensitivity: Use the CAP1203 configuration registers to adjust the sensitivity of the touch detection to your desired level.

FAQs

Q: Can I use the CAP1203 with a 3.3V system? A: Yes, the CAP1203 operates within a 2.7V - 5.5V range, making it compatible with both 3.3V and 5V systems.

Q: How do I change the I2C address of the CAP1203? A: The I2C address of the CAP1203 is fixed and cannot be changed.

Q: Can the CAP1203 detect touch through materials? A: Yes, the CAP1203 can detect touch through non-conductive materials like plastic or glass, depending on the thickness and the sensitivity settings.

Q: How do I use the proximity sensing feature? A: Proximity sensing can be enabled and configured through the CAP1203's registers. It uses the same touch pads to detect the presence of an object without direct contact.

Q: What is the purpose of the Qwiic connector? A: The Qwiic connector is a standard I2C connector that allows for easy daisy-chaining of I2C devices without the need for soldering, simplifying prototyping and design.