How to Use Waveshare 22545 1.51" Transparent Oled Display Driver Board: Examples, Pinouts, and Specs
Introduction
The Waveshare 22545 1.51" Transparent OLED Display Driver Board is a compact and versatile module designed to control a 1.51-inch transparent OLED display. This driver board enables high-resolution graphics and text rendering with low power consumption, making it ideal for applications requiring clear and vibrant visual output. Its transparent OLED technology allows for unique design possibilities, such as see-through displays and creative user interfaces.
Explore Projects Built with Waveshare 22545 1.51" Transparent Oled Display Driver Board


Explore Projects Built with Waveshare 22545 1.51" Transparent Oled Display Driver Board
Common Applications and Use Cases
- Wearable devices and smart accessories
- Transparent display panels for consumer electronics
- Heads-up displays (HUDs) in automotive or aviation
- Industrial control panels and instrumentation
- Creative and artistic display projects
Technical Specifications
The following table outlines the key technical details of the Waveshare 22545 driver board:
| Parameter | Specification |
|---|---|
| Display Type | Transparent OLED |
| Display Size | 1.51 inches |
| Resolution | 128 × 64 pixels |
| Interface | SPI |
| Operating Voltage | 3.3V / 5V |
| Power Consumption | Low power |
| Dimensions | 42.04mm × 27.22mm |
| Operating Temperature | -40°C to 85°C |
Pin Configuration and Descriptions
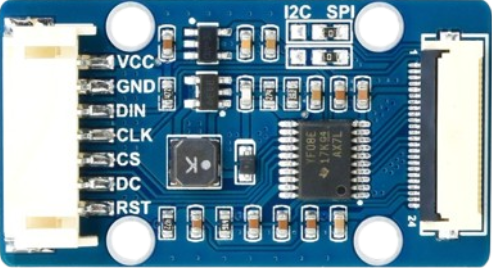
The Waveshare 22545 driver board features a standard pin header for easy integration. The pin configuration is as follows:
| Pin | Name | Description |
|---|---|---|
| 1 | VCC | Power supply input (3.3V or 5V) |
| 2 | GND | Ground |
| 3 | DIN | Data input (SPI MOSI) |
| 4 | CLK | Clock input (SPI SCK) |
| 5 | CS | Chip select (active low) |
| 6 | DC | Data/Command control pin |
| 7 | RST | Reset signal (active low) |
| 8 | BUSY | Busy status indicator (optional) |
Usage Instructions
How to Use the Component in a Circuit
- Power Supply: Connect the
VCCpin to a 3.3V or 5V power source and theGNDpin to ground. - SPI Interface: Connect the
DIN,CLK,CS, andDCpins to the corresponding SPI pins on your microcontroller. - Reset Pin: Connect the
RSTpin to a GPIO pin on your microcontroller for resetting the display. - Busy Pin (Optional): The
BUSYpin can be used to monitor the display's status, but it is not mandatory for basic operation. - Initialization: Use the appropriate initialization sequence for the OLED display, as specified in the datasheet or library.
Important Considerations and Best Practices
- Ensure the power supply voltage matches the display's requirements (3.3V or 5V).
- Use proper pull-up resistors on the SPI lines if required by your microcontroller.
- Avoid exposing the display to direct sunlight for extended periods, as this may degrade the OLED material.
- Handle the transparent OLED display carefully to prevent scratches or damage.
Example Code for Arduino UNO
Below is an example of how to interface the Waveshare 22545 driver board with an Arduino UNO using the SPI interface:
#include <SPI.h>
#include <Adafruit_GFX.h>
#include <Adafruit_SSD1306.h>

// Define OLED display dimensions
#define SCREEN_WIDTH 128
#define SCREEN_HEIGHT 64

// Define pin connections
#define OLED_MOSI 11  // SPI MOSI
#define OLED_CLK  13  // SPI SCK
#define OLED_DC   9   // Data/Command pin
#define OLED_CS   10  // Chip Select
#define OLED_RST  8   // Reset pin

// Create an SSD1306 display object
Adafruit_SSD1306 display(SCREEN_WIDTH, SCREEN_HEIGHT, &SPI, OLED_DC, OLED_RST, OLED_CS);

void setup() {
  // Initialize serial communication for debugging
  Serial.begin(9600);

  // Initialize the OLED display
  if (!display.begin(SSD1306_I2C_ADDRESS, OLED_CS)) {
    Serial.println(F("SSD1306 allocation failed"));
    for (;;); // Halt execution if initialization fails
  }

  // Clear the display buffer
  display.clearDisplay();

  // Display a welcome message
  display.setTextSize(1);      // Set text size
  display.setTextColor(SSD1306_WHITE); // Set text color
  display.setCursor(0, 0);     // Set cursor position
  display.println(F("Waveshare 22545")); // Print text
  display.println(F("Transparent OLED"));
  display.display();           // Update the display
  delay(2000);                 // Pause for 2 seconds
}

void loop() {
  // Example: Draw a rectangle on the display
  display.clearDisplay();      // Clear the display buffer
  display.drawRect(10, 10, 50, 30, SSD1306_WHITE); // Draw a rectangle
  display.display();           // Update the display
  delay(1000);                 // Pause for 1 second
}
Troubleshooting and FAQs
Common Issues and Solutions
Display Not Turning On:
- Verify the power supply voltage (3.3V or 5V) and connections.
- Check the
RSTpin connection and ensure it is properly initialized.
No Output on the Display:
- Ensure the SPI connections (
DIN,CLK,CS,DC) are correct. - Confirm that the initialization sequence in the code matches the display's requirements.
- Ensure the SPI connections (
Flickering or Artifacts:
- Check for loose connections or poor soldering on the pin headers.
- Ensure the SPI clock speed is within the display's supported range.
Busy Pin Not Responding:
- The
BUSYpin is optional and may not be used in all applications. Ensure it is properly configured if needed.
- The
FAQs
Q: Can I use this display with a 5V microcontroller?
A: Yes, the Waveshare 22545 driver board supports both 3.3V and 5V logic levels.
Q: Is there a specific library required for this display?
A: The display is compatible with the Adafruit SSD1306 library, which supports SPI communication.
Q: Can I use this display outdoors?
A: While the display can operate in a wide temperature range, prolonged exposure to direct sunlight may degrade the OLED material.
Q: How do I clean the transparent OLED screen?
A: Use a soft, lint-free cloth to gently wipe the screen. Avoid using abrasive materials or harsh chemicals.