
How to Use MLX90640 BAB: Examples, Pinouts, and Specs
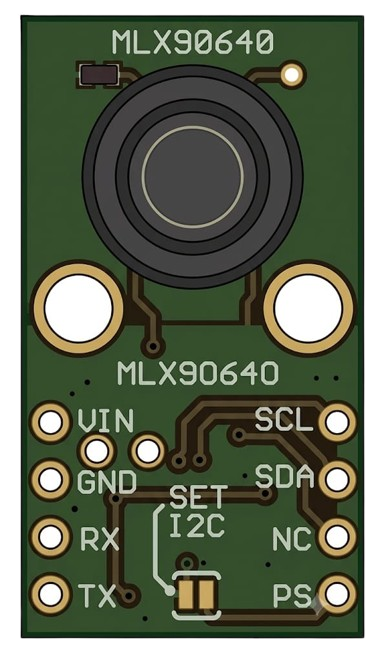
 Design with MLX90640 BAB in Cirkit Designer
Introduction
The MLX90640 BAB is a high-resolution thermal imaging sensor designed to detect temperature variations across a wide field of view. It features a 32x24 pixel infrared (IR) array, enabling precise thermal imaging and non-contact temperature measurement. The sensor communicates via the I2C protocol, making it easy to integrate into microcontroller-based systems. Its compact design and high accuracy make it ideal for applications such as temperature monitoring, thermal imaging cameras, HVAC systems, and industrial process control.
Explore Projects Built with MLX90640 BAB
 Open Project in Cirkit Designer
 Open Project in Cirkit Designer
 Open Project in Cirkit Designer
 Open Project in Cirkit Designer
Explore Projects Built with MLX90640 BAB
Open Project in Cirkit DesignerOpen Project in Cirkit DesignerOpen Project in Cirkit DesignerOpen Project in Cirkit DesignerTechnical Specifications
- Resolution: 32x24 pixels
- Field of View (FoV): 55°x35° (standard version) or 110°x75° (wide-angle version)
- Temperature Range: -40°C to 300°C
- Accuracy: ±1°C (typical, in the range of 0°C to 50°C)
- Communication Interface: I2C (up to 1 MHz)
- Supply Voltage: 3.3V to 3.6V
- Current Consumption: 23mA (typical)
- Refresh Rate: Configurable from 0.5Hz to 64Hz
- Operating Temperature: -40°C to 85°C
- Dimensions: 21mm x 13mm x 2.5mm
Pin Configuration and Descriptions
The MLX90640 BAB module typically has the following pinout:
| Pin | Name | Description |
|---|---|---|
| 1 | VDD | Power supply (3.3V to 3.6V) |
| 2 | GND | Ground |
| 3 | SDA | I2C data line (connect to microcontroller SDA) |
| 4 | SCL | I2C clock line (connect to microcontroller SCL) |
| 5 | NC | Not connected (leave unconnected or floating) |
Usage Instructions
How to Use the MLX90640 BAB in a Circuit
- Power Supply: Connect the VDD pin to a 3.3V power source and the GND pin to ground.
- I2C Communication: Connect the SDA and SCL pins to the corresponding I2C pins on your microcontroller. Use pull-up resistors (typically 4.7kΩ) on both SDA and SCL lines if not already present on the module.
- Initialization: Configure the I2C interface on your microcontroller to communicate with the MLX90640. The default I2C address is 0x33, but it can be changed if needed.
- Data Reading: Use the I2C protocol to read thermal data from the sensor. The data consists of raw pixel values that need to be processed to obtain temperature readings.
Important Considerations and Best Practices
- Power Supply: Ensure a stable 3.3V power supply to avoid communication errors or inaccurate readings.
- Thermal Calibration: The sensor requires calibration data (stored in its EEPROM) to convert raw pixel values into accurate temperature readings. Use the manufacturer's software library for proper calibration.
- Refresh Rate: Choose an appropriate refresh rate based on your application. Higher refresh rates consume more power.
- Field of View: Ensure the sensor's field of view matches your application's requirements. Use the standard or wide-angle version accordingly.
- Ambient Temperature: Avoid exposing the sensor to sudden temperature changes or direct sunlight, as this may affect accuracy.
Example Code for Arduino UNO
Below is an example of how to interface the MLX90640 BAB with an Arduino UNO using the Adafruit MLX90640 library:
#include <Wire.h>
#include <Adafruit_MLX90640.h>

// Create an instance of the MLX90640 object
Adafruit_MLX90640 mlx;

// Define the frame buffer to store thermal data
float frame[768]; // 32x24 = 768 pixels

void setup() {
  Serial.begin(115200);
  Wire.begin();

  // Initialize the MLX90640 sensor
  if (!mlx.begin(0x33)) { // Default I2C address is 0x33
    Serial.println("Failed to find MLX90640 sensor!");
    while (1);
  }

  // Set the refresh rate to 8Hz
  mlx.setMode(MLX90640_CHESS);
  mlx.setRefreshRate(MLX90640_8_HZ);

  Serial.println("MLX90640 initialized successfully!");
}

void loop() {
  // Read thermal data from the sensor
  if (mlx.getFrame(frame) != 0) {
    Serial.println("Failed to read frame data!");
    return;
  }

  // Print the temperature values for each pixel
  for (int i = 0; i < 768; i++) {
    Serial.print(frame[i], 2); // Print temperature with 2 decimal places
    Serial.print(" ");
    if ((i + 1) % 32 == 0) { // New line after every 32 pixels
      Serial.println();
    }
  }

  delay(125); // Delay to match the 8Hz refresh rate
}
Troubleshooting and FAQs
Common Issues
No Communication with the Sensor
- Cause: Incorrect I2C wiring or address mismatch.
- Solution: Verify the SDA and SCL connections. Ensure the I2C address matches the one configured in your code.
Inaccurate Temperature Readings
- Cause: Missing calibration or environmental interference.
- Solution: Use the manufacturer's calibration data and avoid exposing the sensor to direct sunlight or reflective surfaces.
Sensor Overheating
- Cause: Prolonged operation in high-temperature environments.
- Solution: Ensure proper ventilation and avoid exceeding the sensor's operating temperature range.
Frame Data Errors
- Cause: Insufficient I2C clock speed or unstable power supply.
- Solution: Use a higher I2C clock speed (up to 1 MHz) and ensure a stable 3.3V power source.
FAQs
Can the MLX90640 BAB detect human presence?
- Yes, the sensor can detect human presence by identifying temperature variations, but it is not designed for motion detection.
What is the maximum distance for accurate temperature measurement?
- The effective distance depends on the object's size and emissivity. For small objects, the sensor is most accurate within a few meters.
Can I use the MLX90640 BAB with a 5V microcontroller?
- Yes, but you must use a logic level shifter to convert the 5V I2C signals to 3.3V.
How do I change the I2C address of the sensor?
- The I2C address can be changed by modifying the sensor's configuration registers. Refer to the manufacturer's datasheet for details.