
How to Use RS PRO OD4015 Series Axial Fan 5V dc 14.4 m³/h: Examples, Pinouts, and Specs
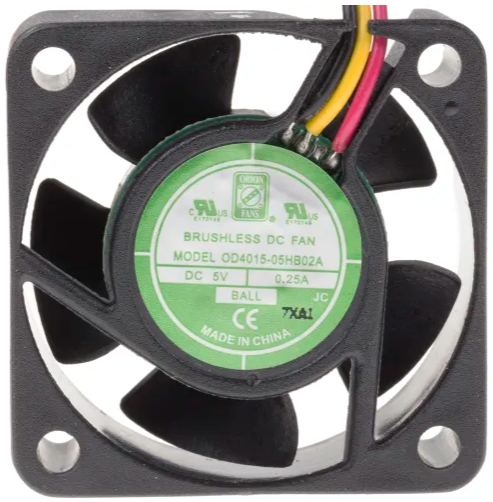
 Design with RS PRO OD4015 Series Axial Fan 5V dc 14.4 m³/h in Cirkit Designer
Introduction
The RS PRO OD4015 Series Axial Fan is a compact and efficient cooling solution designed for a wide range of electronic applications. Operating at 5V DC, this axial fan delivers a maximum airflow of 14.4 m³/h, making it ideal for cooling small enclosures, electronic devices, and circuit boards. Its compact size and reliable performance make it a popular choice for applications requiring effective heat dissipation in confined spaces.
Explore Projects Built with RS PRO OD4015 Series Axial Fan 5V dc 14.4 m³/h
 Open Project in Cirkit Designer
 Open Project in Cirkit Designer
 Open Project in Cirkit Designer
 Open Project in Cirkit Designer
Explore Projects Built with RS PRO OD4015 Series Axial Fan 5V dc 14.4 m³/h
Open Project in Cirkit DesignerOpen Project in Cirkit DesignerOpen Project in Cirkit DesignerOpen Project in Cirkit DesignerCommon Applications and Use Cases
- Cooling for electronic enclosures and cabinets
- Heat dissipation in power supplies and amplifiers
- Ventilation for 3D printers and small machinery
- Thermal management in embedded systems and single-board computers
- General-purpose cooling in DIY electronics projects
Technical Specifications
Key Technical Details
| Parameter | Value |
|---|---|
| Operating Voltage | 5V DC |
| Maximum Airflow | 14.4 m³/h |
| Fan Dimensions | 40mm x 40mm x 15mm |
| Rated Current | 0.12A |
| Power Consumption | 0.6W |
| Bearing Type | Sleeve Bearing |
| Noise Level | 25 dBA |
| Operating Temperature | -10°C to +70°C |
| Connector Type | 2-wire (red and black) |
| Weight | 16g |
Pin Configuration and Descriptions
| Wire Color | Function | Description |
|---|---|---|
| Red | Positive (+) | Connect to the positive terminal of the power supply (5V DC). |
| Black | Ground (-) | Connect to the ground terminal of the power supply. |
Usage Instructions
How to Use the Component in a Circuit
- Power Supply: Ensure that the power supply provides a stable 5V DC output. The fan operates optimally at this voltage.
- Wiring: Connect the red wire to the positive terminal of the power supply and the black wire to the ground terminal.
- Mounting: Secure the fan in place using screws or adhesive mounts. Ensure that the airflow direction aligns with your cooling requirements (airflow direction is typically indicated by an arrow on the fan housing).
- Testing: Power on the circuit and verify that the fan operates smoothly without unusual noise or vibration.
Important Considerations and Best Practices
- Voltage Tolerance: Do not exceed the rated voltage of 5V DC, as this may damage the fan.
- Airflow Direction: Check the airflow direction before installation to ensure proper cooling.
- Noise Reduction: Use rubber mounts or grommets to minimize vibration and noise during operation.
- Maintenance: Periodically clean the fan blades to prevent dust buildup, which can reduce efficiency and increase noise.
- Heat Dissipation: Ensure adequate ventilation around the fan to maximize cooling performance.
Example: Connecting to an Arduino UNO
The RS PRO OD4015 fan can be controlled using an Arduino UNO for applications requiring variable fan speed. Below is an example of how to connect and control the fan using a PWM signal.
Circuit Diagram
- Connect the red wire of the fan to a 5V pin on the Arduino.
- Connect the black wire of the fan to the collector of an NPN transistor (e.g., 2N2222).
- Connect the emitter of the transistor to the ground.
- Connect a 1kΩ resistor between the base of the transistor and a PWM-capable pin on the Arduino (e.g., Pin 9).
- Add a flyback diode (e.g., 1N4007) across the fan terminals to protect the circuit from voltage spikes.
Arduino Code
// RS PRO OD4015 Fan Control Example
// This code demonstrates how to control the fan speed using PWM on an Arduino UNO.

const int fanPin = 9; // PWM pin connected to the transistor base

void setup() {
  pinMode(fanPin, OUTPUT); // Set the fan control pin as an output
}

void loop() {
  // Gradually increase fan speed
  for (int speed = 0; speed <= 255; speed += 5) {
    analogWrite(fanPin, speed); // Set PWM duty cycle
    delay(50); // Wait 50ms before increasing speed
  }

  // Gradually decrease fan speed
  for (int speed = 255; speed >= 0; speed -= 5) {
    analogWrite(fanPin, speed); // Set PWM duty cycle
    delay(50); // Wait 50ms before decreasing speed
  }
}
Troubleshooting and FAQs
Common Issues and Solutions
| Issue | Possible Cause | Solution |
|---|---|---|
| Fan does not spin | Incorrect wiring or no power supply | Verify wiring and ensure a stable 5V DC supply. |
| Fan spins but airflow is weak | Dust buildup or incorrect installation | Clean the fan blades and check airflow direction. |
| Excessive noise or vibration | Loose mounting or worn bearings | Tighten mounting screws or replace the fan if bearings are worn. |
| Fan overheats or stops working | Overvoltage or prolonged operation at high temperatures | Ensure the voltage is within the rated range and improve ventilation. |
FAQs
Can I use this fan with a 12V power supply?
- No, the fan is designed for 5V DC operation. Using a higher voltage may damage the fan.
How do I determine the airflow direction?
- The airflow direction is typically indicated by an arrow on the fan housing. If no arrow is present, the airflow is usually from the open side to the side with the fan frame.
Can I control the fan speed without an Arduino?
- Yes, you can use a PWM controller or a variable resistor to adjust the fan speed manually.
Is this fan suitable for outdoor use?
- No, the fan is not weatherproof and should only be used in indoor or protected environments.
By following this documentation, users can effectively integrate the RS PRO OD4015 Series Axial Fan into their projects for reliable and efficient cooling.