Cirkit Designer Logo
Cirkit Designer
Your all-in-one circuit design IDE
Home / 
Component Documentation

How to Use Adafruit LED Sequin - Rose Pink: Examples, Pinouts, and Specs

Image of Adafruit LED Sequin - Rose Pink
Cirkit Designer LogoDesign with Adafruit LED Sequin - Rose Pink in Cirkit Designer

Introduction

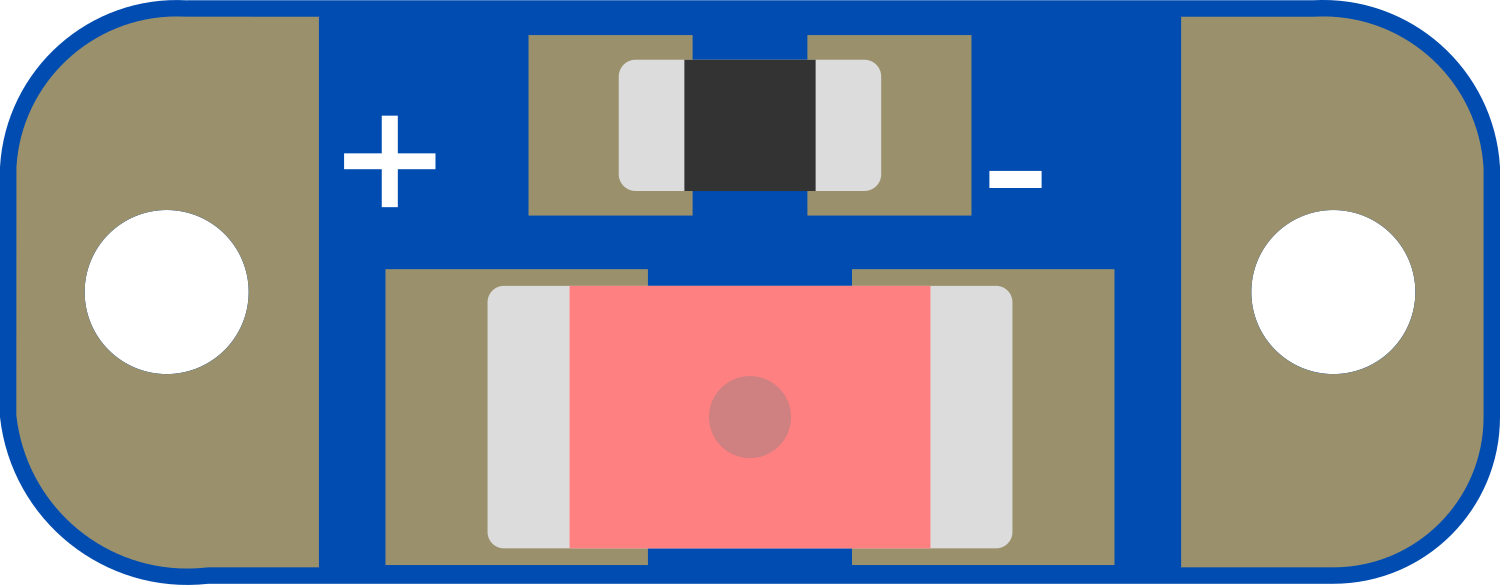
The Adafruit LED Sequin - Rose Pink is a compact, sewable electronic component that integrates a single LED with a built-in resistor. This component is specifically designed for wearable projects, allowing designers and hobbyists to add light and color to textiles and clothing. The LED Sequin can be controlled by a microcontroller, such as an Arduino, to create various lighting effects including blinking, fading, or color-changing patterns.

Explore Projects Built with Adafruit LED Sequin - Rose Pink

Use Cirkit Designer to design, explore, and prototype these projects online. Some projects support real-time simulation. Click "Open Project" to start designing instantly!
Arduino Nano Controlled Sound and Light Effects System with NeoPixel LEDs
Image of Proton Pack: A project utilizing Adafruit LED Sequin - Rose Pink in a practical application
This circuit features an Arduino Nano microcontroller connected to a series of WS2812B LEDs, Adafruit NeoPixel Jewels, and Sticks, forming an addressable LED array. The Arduino controls the LED patterns and sequences, and interfaces with an Adafruit Audio FX Mini Sound Board for audio playback, which is amplified by an Adafruit PAM8302 amplifier connected to piezo speakers. The circuit includes toggle and push switches for user interaction, and uses a lipo battery with MP1584EN power regulators for power management. The embedded code on the Arduino facilitates complex lighting effects and sound playback, responding to switch states and button presses to create an interactive experience.
Cirkit Designer LogoOpen Project in Cirkit Designer
Arduino UNO Controlled NeoPixel Ring Light Show
Image of 6 Ring Series: A project utilizing Adafruit LED Sequin - Rose Pink in a practical application
This circuit consists of an Arduino UNO microcontroller connected to six Adafruit 12 NeoPixel Rings, each with 12 LEDs, for a total of 72 LEDs. The Arduino controls the LEDs to display a yellow color with varying brightness, creating a pulsating effect.
Cirkit Designer LogoOpen Project in Cirkit Designer
Battery-Powered Adafruit Flora RGB NeoPixel Light Show
Image of FloraTest: A project utilizing Adafruit LED Sequin - Rose Pink in a practical application
This circuit consists of an Adafruit Flora v3 microcontroller connected to a Breadboard-friendly RGB Smart NeoPixel and powered by a 3xAAA battery pack. The microcontroller runs code to control the NeoPixel, displaying various colors and patterns.
Cirkit Designer LogoOpen Project in Cirkit Designer
Battery-Powered Smart Light with Proximity Sensor and OLED Display using Adafruit QT Py RP2040
Image of lab: A project utilizing Adafruit LED Sequin - Rose Pink in a practical application
This circuit is a portable, battery-powered system featuring an Adafruit QT Py RP2040 microcontroller that interfaces with an OLED display, a proximity sensor, an accelerometer, and an RGB LED strip. The system is powered by a lithium-ion battery with a step-up boost converter to provide 5V for the LED strip, and it includes a toggle switch for power control. The microcontroller communicates with the sensors and display via I2C.
Cirkit Designer LogoOpen Project in Cirkit Designer

Explore Projects Built with Adafruit LED Sequin - Rose Pink

Use Cirkit Designer to design, explore, and prototype these projects online. Some projects support real-time simulation. Click "Open Project" to start designing instantly!
Image of Proton Pack: A project utilizing Adafruit LED Sequin - Rose Pink in a practical application
Arduino Nano Controlled Sound and Light Effects System with NeoPixel LEDs
This circuit features an Arduino Nano microcontroller connected to a series of WS2812B LEDs, Adafruit NeoPixel Jewels, and Sticks, forming an addressable LED array. The Arduino controls the LED patterns and sequences, and interfaces with an Adafruit Audio FX Mini Sound Board for audio playback, which is amplified by an Adafruit PAM8302 amplifier connected to piezo speakers. The circuit includes toggle and push switches for user interaction, and uses a lipo battery with MP1584EN power regulators for power management. The embedded code on the Arduino facilitates complex lighting effects and sound playback, responding to switch states and button presses to create an interactive experience.
Cirkit Designer LogoOpen Project in Cirkit Designer
Image of 6 Ring Series: A project utilizing Adafruit LED Sequin - Rose Pink in a practical application
Arduino UNO Controlled NeoPixel Ring Light Show
This circuit consists of an Arduino UNO microcontroller connected to six Adafruit 12 NeoPixel Rings, each with 12 LEDs, for a total of 72 LEDs. The Arduino controls the LEDs to display a yellow color with varying brightness, creating a pulsating effect.
Cirkit Designer LogoOpen Project in Cirkit Designer
Image of FloraTest: A project utilizing Adafruit LED Sequin - Rose Pink in a practical application
Battery-Powered Adafruit Flora RGB NeoPixel Light Show
This circuit consists of an Adafruit Flora v3 microcontroller connected to a Breadboard-friendly RGB Smart NeoPixel and powered by a 3xAAA battery pack. The microcontroller runs code to control the NeoPixel, displaying various colors and patterns.
Cirkit Designer LogoOpen Project in Cirkit Designer
Image of lab: A project utilizing Adafruit LED Sequin - Rose Pink in a practical application
Battery-Powered Smart Light with Proximity Sensor and OLED Display using Adafruit QT Py RP2040
This circuit is a portable, battery-powered system featuring an Adafruit QT Py RP2040 microcontroller that interfaces with an OLED display, a proximity sensor, an accelerometer, and an RGB LED strip. The system is powered by a lithium-ion battery with a step-up boost converter to provide 5V for the LED strip, and it includes a toggle switch for power control. The microcontroller communicates with the sensors and display via I2C.
Cirkit Designer LogoOpen Project in Cirkit Designer

Common Applications and Use Cases

  • Wearable electronics (e.g., costumes, fashion accessories)
  • E-textiles and smart garments
  • Decorative lighting for fabric-based projects
  • Educational projects to teach electronics and sewing

Technical Specifications

Key Technical Details

  • Color: Rose Pink
  • Operating Voltage: 3.0V - 6.0V
  • Current Draw: ~5mA (at 3.3V)
  • Brightness: Typical
  • Diameter: 12.5mm / 0.5"
  • Height: 2.7mm / 0.1"
  • Weight: 0.4g

Pin Configuration and Descriptions

Pin Description
+ Positive power supply (Anode)
- Ground (Cathode)

Usage Instructions

How to Use the Component in a Circuit

  1. Power Supply: Connect the '+' pin to a power supply between 3.0V and 6.0V. For use with an Arduino, connect to one of the digital I/O pins.
  2. Ground Connection: Connect the '-' pin to the ground (GND) of your power source or microcontroller.
  3. Sewing: Use conductive thread to sew the LED Sequin into your textile project, ensuring that the connections are secure and insulated from each other to prevent short circuits.
  4. Microcontroller Control: To control the LED Sequin with an Arduino, use a digital output pin to turn the LED on and off.

Important Considerations and Best Practices

  • Ensure that the power supply voltage does not exceed 6.0V to prevent damaging the LED.
  • When sewing, make sure that the conductive threads do not touch each other as this can create a short circuit.
  • If multiple LED Sequins are used, ensure that they are connected correctly in parallel, with all '+' pins and all '-' pins connected to their respective lines.
  • To diffuse the light from the LED Sequin, consider using a layer of translucent fabric over the LED.

Example Arduino Code

// Define the pin connected to the LED Sequin
const int ledPin = 9; // PWM pin for dimming capability

void setup() {
  pinMode(ledPin, OUTPUT); // Set the LED pin as an output
}

void loop() {
  analogWrite(ledPin, 127); // Set the brightness to 50%
  delay(1000);              // Wait for 1 second
  analogWrite(ledPin, 255); // Set the brightness to 100%
  delay(1000);              // Wait for 1 second
}

Troubleshooting and FAQs

Common Issues

  • LED Not Lighting Up: Ensure that the power supply is correctly connected and within the specified voltage range. Check for any loose threads or poor connections.
  • LED Too Dim: Verify that the power supply voltage is sufficient and that the microcontroller's output pin is providing the correct signal.
  • Short Circuit: If the LED Sequin is not functioning and the power supply is correct, inspect the sewn connections for any shorts caused by overlapping conductive threads.

Solutions and Tips for Troubleshooting

  • Double-check all connections, especially if the LED Sequin is not lighting up.
  • Use a multimeter to verify the voltage at the LED Sequin's pins.
  • If using multiple LED Sequins, ensure they are not drawing more current than the power supply or microcontroller pin can handle.
  • Consider adding a small switch to the circuit to easily turn the LED Sequin on and off.

FAQs

Q: Can I wash garments with LED Sequins sewn in? A: Yes, but hand washing is recommended, and the power supply should be removed before washing. Ensure the garment is completely dry before reconnecting the power.

Q: How many LED Sequins can I connect to a single Arduino pin? A: It depends on the current limit of the Arduino pin (typically 20-40mA). As each LED Sequin draws approximately 5mA, you can connect up to 4-8 LED Sequins in parallel to a single pin without exceeding the current limit.