How to Use MPPT 20A: Examples, Pinouts, and Specs

Introduction
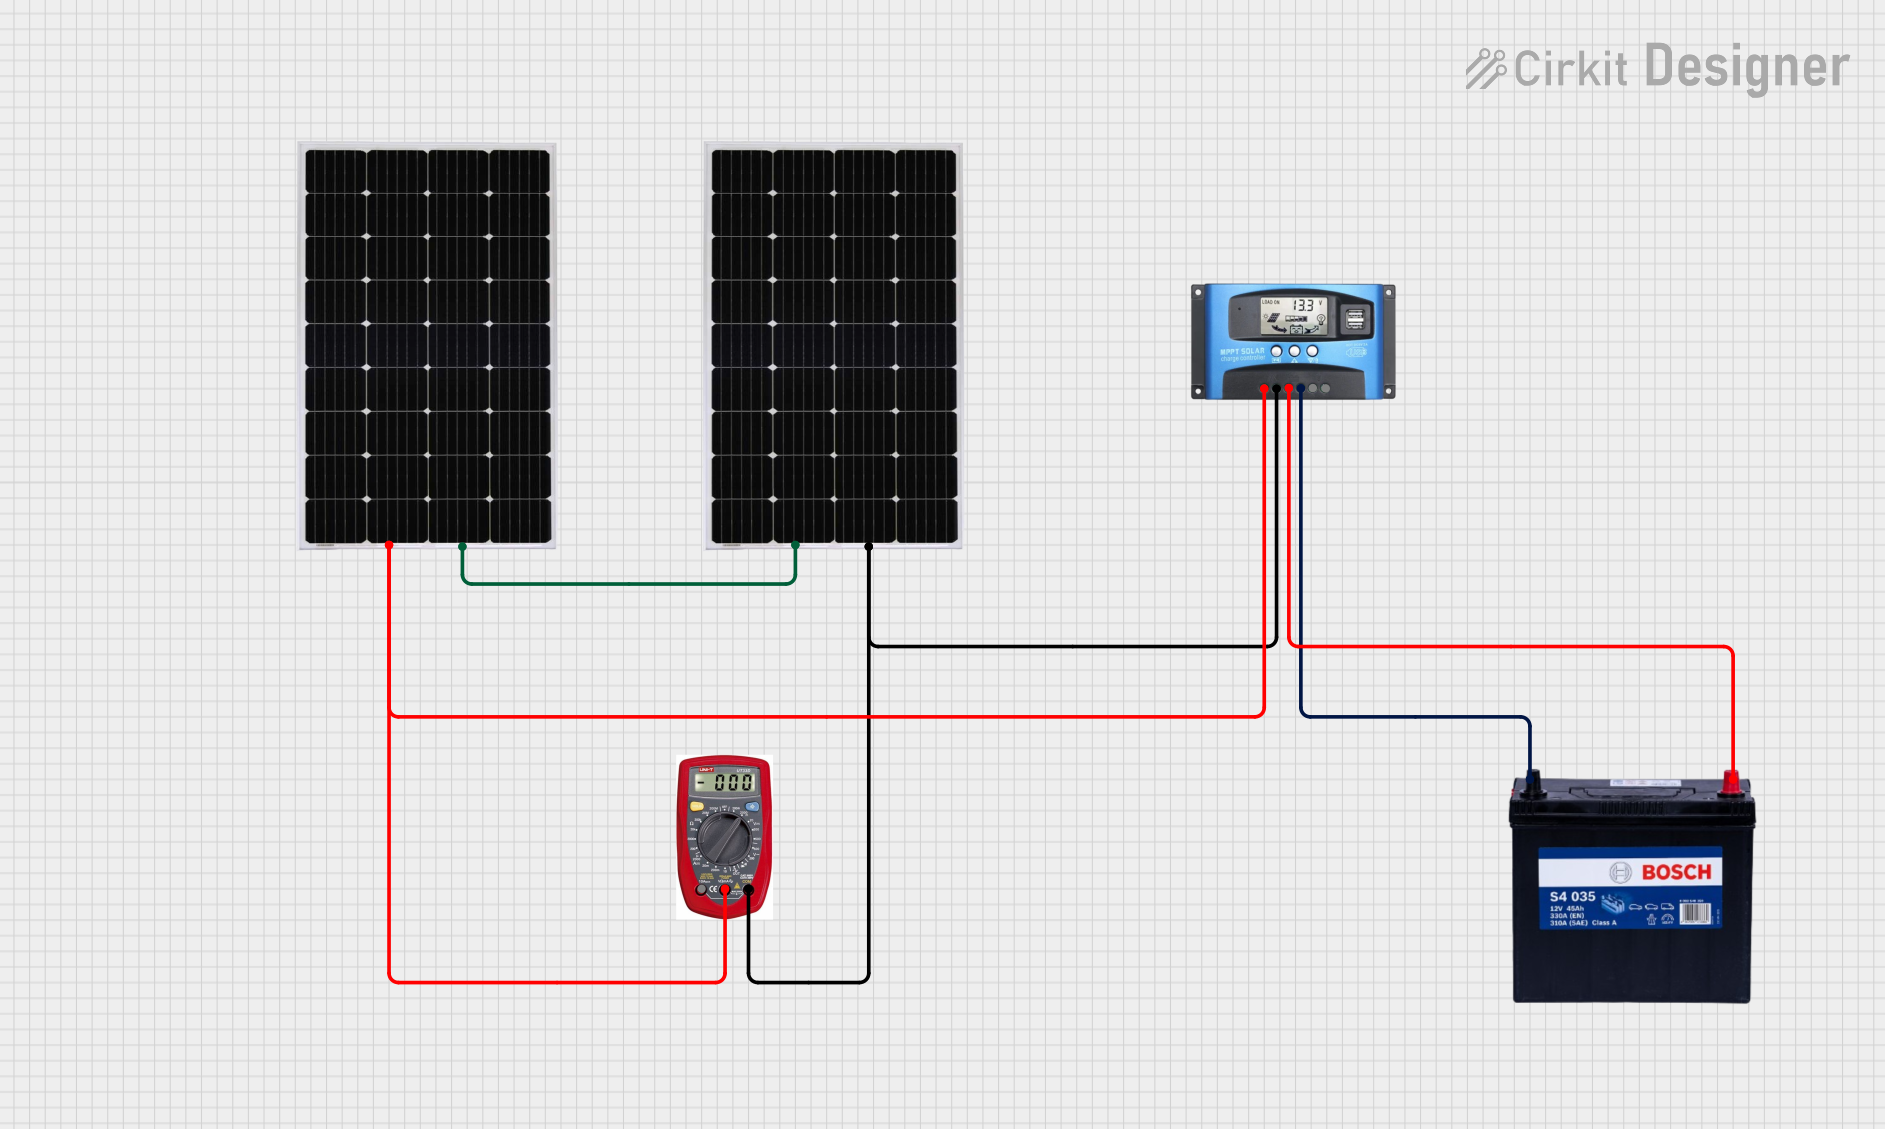
The MPPT 20A is a Maximum Power Point Tracking (MPPT) charge controller designed to optimize the power output from solar panels. It ensures efficient energy conversion and management in solar power systems by dynamically adjusting the operating point of the solar panels to extract maximum power. With a maximum current rating of 20A, this component is ideal for medium-sized solar installations.
Explore Projects Built with MPPT 20A


Explore Projects Built with MPPT 20A
Common Applications and Use Cases
- Solar power systems for residential and commercial use
- Off-grid solar installations
- Battery charging and energy storage systems
- Solar-powered lighting and irrigation systems
- Renewable energy research and development projects
Technical Specifications
The MPPT 20A charge controller is built to handle a variety of solar panel configurations and battery types. Below are its key technical details:
| Parameter | Value |
|---|---|
| Maximum Input Voltage | 100V DC |
| Maximum Output Current | 20A |
| Battery Voltage Range | 12V / 24V (auto-detect) |
| Efficiency | Up to 98% |
| Operating Temperature | -20°C to 60°C |
| Protection Features | Overcharge, over-discharge, |
| short-circuit, reverse polarity | |
| Display | LCD screen for real-time data |
| Communication Interface | RS485 or UART (optional) |
Pin Configuration and Descriptions
The MPPT 20A typically has the following terminal connections:
| Pin/Terminal | Description |
|---|---|
| Solar Panel (+) | Positive input terminal for the solar panel |
| Solar Panel (-) | Negative input terminal for the solar panel |
| Battery (+) | Positive output terminal for the battery |
| Battery (-) | Negative output terminal for the battery |
| Load (+) | Positive terminal for the connected load (optional) |
| Load (-) | Negative terminal for the connected load (optional) |
Usage Instructions
How to Use the MPPT 20A in a Circuit
Connect the Solar Panel:
- Attach the positive and negative terminals of the solar panel to the corresponding
Solar Panel (+)andSolar Panel (-)inputs on the MPPT 20A. - Ensure the solar panel's voltage does not exceed the maximum input voltage (100V DC).
- Attach the positive and negative terminals of the solar panel to the corresponding
Connect the Battery:
- Connect the positive and negative terminals of the battery to the
Battery (+)andBattery (-)outputs. - The MPPT 20A will automatically detect the battery voltage (12V or 24V).
- Connect the positive and negative terminals of the battery to the
Optional Load Connection:
- If you wish to power a load directly, connect the load's positive and negative terminals to the
Load (+)andLoad (-)outputs.
- If you wish to power a load directly, connect the load's positive and negative terminals to the
Power On:
- Once all connections are secure, the MPPT 20A will power on and begin tracking the maximum power point of the solar panel.
Monitor Performance:
- Use the built-in LCD screen to monitor real-time data such as input voltage, output current, and battery status.
Important Considerations and Best Practices
- Safety First: Always disconnect the battery and solar panel before making any wiring changes.
- Proper Sizing: Ensure the solar panel's power output and the battery's capacity are compatible with the MPPT 20A's specifications.
- Ventilation: Install the MPPT 20A in a well-ventilated area to prevent overheating.
- Firmware Updates: If the MPPT 20A supports firmware updates, ensure it is running the latest version for optimal performance.
Arduino UNO Integration Example
The MPPT 20A can be monitored using an Arduino UNO via its RS485 or UART communication interface. Below is an example code snippet for reading data from the MPPT 20A using RS485:
#include <SoftwareSerial.h>

// Define RS485 communication pins
#define RX_PIN 10  // Arduino RX pin connected to MPPT TX
#define TX_PIN 11  // Arduino TX pin connected to MPPT RX

SoftwareSerial rs485(RX_PIN, TX_PIN);

void setup() {
  Serial.begin(9600); // Initialize Serial Monitor
  rs485.begin(9600);  // Initialize RS485 communication

  Serial.println("MPPT 20A Monitoring Started");
}

void loop() {
  if (rs485.available()) {
    // Read data from MPPT 20A
    String data = "";
    while (rs485.available()) {
      char c = rs485.read();
      data += c;
    }

    // Print received data to Serial Monitor
    Serial.println("MPPT Data: " + data);
  }

  delay(1000); // Wait 1 second before next read
}
Note: Ensure the RS485 module is properly connected to the Arduino UNO and the MPPT 20A. Refer to the MPPT 20A's communication protocol documentation for specific data formats.
Troubleshooting and FAQs
Common Issues and Solutions
No Power Output:
- Cause: Incorrect wiring or loose connections.
- Solution: Double-check all connections and ensure the solar panel and battery are properly connected.
Overheating:
- Cause: Poor ventilation or excessive current draw.
- Solution: Install the MPPT 20A in a well-ventilated area and ensure the load does not exceed 20A.
LCD Screen Not Displaying Data:
- Cause: Faulty display or power supply issue.
- Solution: Verify the input voltage and check for any loose internal connections.
Battery Not Charging:
- Cause: Battery voltage mismatch or damaged battery.
- Solution: Ensure the battery voltage is within the supported range (12V/24V) and test the battery with a multimeter.
FAQs
Q: Can the MPPT 20A handle multiple solar panels?
- A: Yes, as long as the combined voltage and current of the panels do not exceed the MPPT 20A's specifications.
Q: Does the MPPT 20A support lithium-ion batteries?
- A: Yes, but ensure the battery's charging profile matches the MPPT 20A's settings.
Q: How do I reset the MPPT 20A?
- A: Disconnect all power sources (solar panel and battery), wait for 30 seconds, and reconnect.
Q: Can I use the MPPT 20A without a battery?
- A: No, the MPPT 20A requires a battery to function properly as it regulates the charging process.
This concludes the MPPT 20A documentation. For further assistance, refer to the manufacturer's user manual or contact technical support.