How to Use RunCam Phoenix 2: Examples, Pinouts, and Specs
Introduction
The RunCam Phoenix 2 is a high-performance FPV (First Person View) camera designed by RunCam for drone racing, freestyle flying, and aerial photography. It features a 4:3 aspect ratio, low latency, and exceptional low-light performance, making it a versatile choice for capturing clear and vibrant video in various lighting conditions. With its robust design and advanced imaging capabilities, the Phoenix 2 is a favorite among drone enthusiasts and professionals alike.
Explore Projects Built with RunCam Phoenix 2


Explore Projects Built with RunCam Phoenix 2
Common Applications and Use Cases
- Drone Racing: Provides low-latency video for real-time piloting.
- Freestyle Flying: Captures smooth and vibrant footage during acrobatic maneuvers.
- Aerial Photography: Delivers high-quality video in diverse lighting conditions.
- FPV Systems: Integrates seamlessly with FPV transmitters and goggles for immersive experiences.
Technical Specifications
Key Technical Details
| Parameter | Specification |
|---|---|
| Manufacturer | RunCam |
| Model | Phoenix 2 |
| Aspect Ratio | 4:3 (Switchable to 16:9) |
| Resolution | 1000 TVL |
| Sensor | 1/2" CMOS |
| Lens | 2.1mm (M12) |
| Field of View (FOV) | 155° (Diagonal) |
| Signal System | PAL/NTSC (Switchable) |
| Minimum Illumination | 0.01 Lux |
| Input Voltage | 5V - 36V |
| Power Consumption | 200mA @ 5V |
| Dimensions | 19mm × 19mm × 21mm |
| Weight | 9g |
| Operating Temperature | -20°C to 60°C |
| Latency | < 6ms |
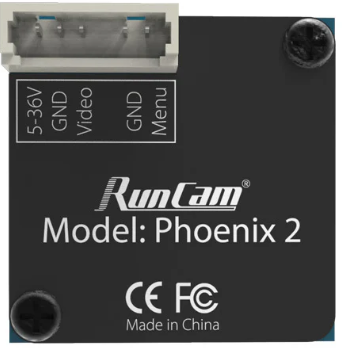
Pin Configuration and Descriptions
The RunCam Phoenix 2 has a 4-pin connector for power, video, and control signals. Below is the pinout:
| Pin Number | Pin Name | Description |
|---|---|---|
| 1 | GND | Ground connection |
| 2 | VCC | Power input (5V - 36V) |
| 3 | VIDEO | Analog video output |
| 4 | OSD | On-Screen Display control (UART input) |
Usage Instructions
How to Use the RunCam Phoenix 2 in a Circuit
- Power Connection: Connect the VCC pin to a power source within the range of 5V to 36V. Ensure the power supply is stable to avoid damage to the camera.
- Ground Connection: Connect the GND pin to the ground of your power source.
- Video Output: Connect the VIDEO pin to the video input of your FPV transmitter or display device.
- OSD Control: Use the OSD pin to configure camera settings via a UART-compatible controller or joystick.
Important Considerations and Best Practices
- Voltage Range: Ensure the input voltage is within the specified range (5V - 36V) to prevent damage.
- Signal System: Switch between PAL and NTSC modes as needed for compatibility with your FPV system.
- Aspect Ratio: Adjust the aspect ratio (4:3 or 16:9) to match your display or goggles.
- Lens Protection: Use a lens cap or cover when the camera is not in use to prevent scratches or damage.
- Low-Light Performance: Take advantage of the camera's excellent low-light capabilities for night flying or dim environments.
Example: Connecting to an Arduino UNO for OSD Control
The RunCam Phoenix 2 can be configured using the OSD pin and a UART interface. Below is an example of how to connect and control the camera using an Arduino UNO:
Wiring Diagram
| RunCam Pin | Arduino Pin |
|---|---|
| GND | GND |
| VCC | 5V |
| OSD | Digital Pin 10 |
Arduino Code
#include <SoftwareSerial.h>

// Define RX and TX pins for UART communication
SoftwareSerial cameraOSD(10, 11); // RX = Pin 10, TX = Pin 11

void setup() {
  // Initialize serial communication with the camera
  cameraOSD.begin(9600); // Default baud rate for RunCam OSD control
  Serial.begin(9600);    // For debugging via Serial Monitor

  // Example: Send a command to switch to NTSC mode
  sendOSDCommand("NTSC");
}

void loop() {
  // Continuously monitor and send commands if needed
}

// Function to send OSD commands to the camera
void sendOSDCommand(String command) {
  if (command == "NTSC") {
    cameraOSD.write(0x01); // Example command to switch to NTSC
    Serial.println("Switched to NTSC mode");
  }
  // Add more commands as needed
}
Troubleshooting and FAQs
Common Issues and Solutions
No Video Output:
- Cause: Incorrect wiring or power supply issues.
- Solution: Verify all connections and ensure the power supply is within the 5V - 36V range.
Blurry or Distorted Image:
- Cause: Dirty or damaged lens.
- Solution: Clean the lens with a microfiber cloth or replace it if damaged.
High Latency:
- Cause: Incompatible FPV system or interference.
- Solution: Ensure the FPV transmitter and receiver are compatible and operating on a clear channel.
OSD Control Not Working:
- Cause: Incorrect UART connection or baud rate.
- Solution: Verify the OSD pin is connected to the correct UART pins and the baud rate is set to 9600.
FAQs
Q: Can I use the Phoenix 2 with a 3.3V power source?
A: No, the minimum input voltage is 5V. Using a lower voltage may damage the camera.Q: How do I switch between PAL and NTSC modes?
A: Use the OSD control pin to send the appropriate command via UART or use the joystick controller provided by RunCam.Q: Is the camera waterproof?
A: No, the Phoenix 2 is not waterproof. Avoid exposing it to water or moisture.Q: Can I use the camera with a 16:9 display?
A: Yes, the aspect ratio can be switched to 16:9 for compatibility with widescreen displays.
This concludes the documentation for the RunCam Phoenix 2. For further assistance, refer to the official RunCam user manual or contact their support team.