The DS18B20 is a precision digital temperature sensor that provides temperature measurements in a digital form using a 1-Wire interface. This sensor is widely used in various applications such as environmental monitoring, HVAC systems, and temperature regulation. The Wokwi compatible version of the DS18B20 is designed to integrate smoothly with the Wokwi simulation platform, allowing for easy development and testing of temperature sensing applications.
Explore Projects Built with DS18B20 Temperature Sensor (Wokwi Compatible)
Use Cirkit Designer to design, explore, and prototype these projects online. Some projects support real-time simulation. Click "Open Project" to start designing instantly!
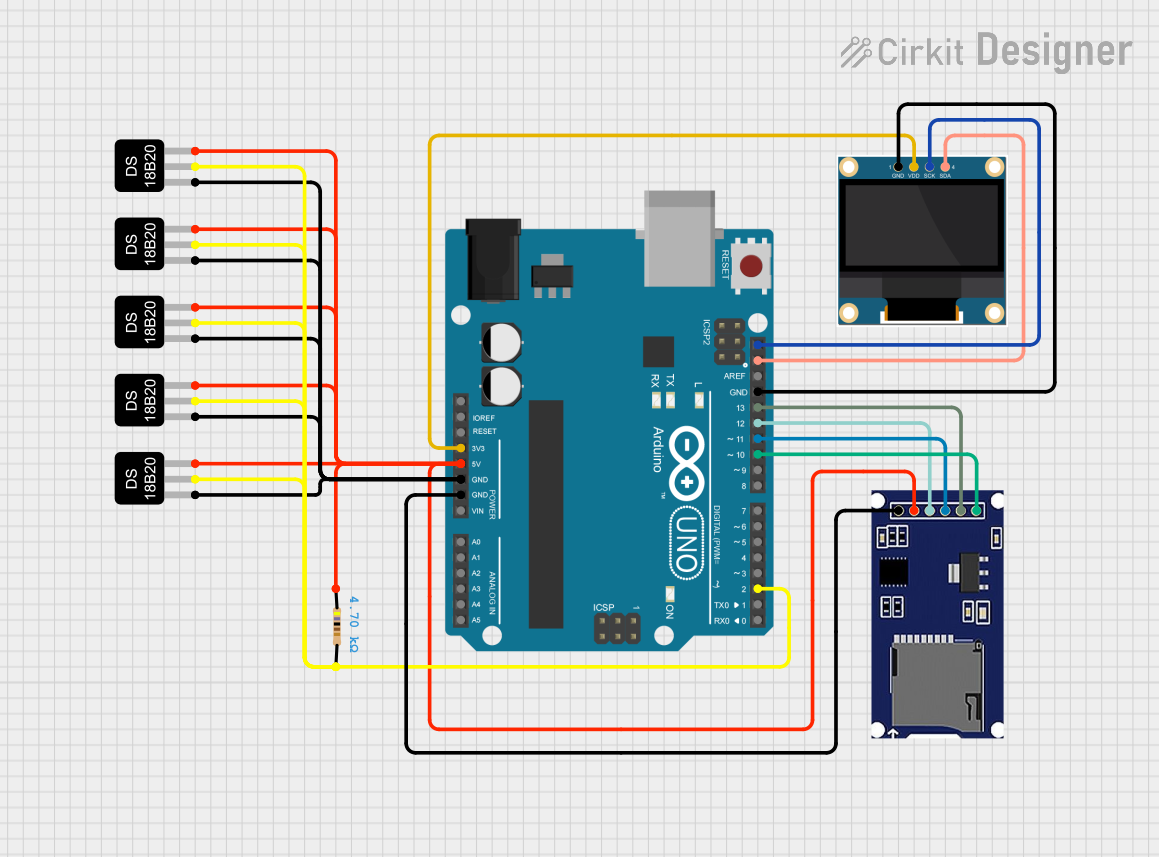
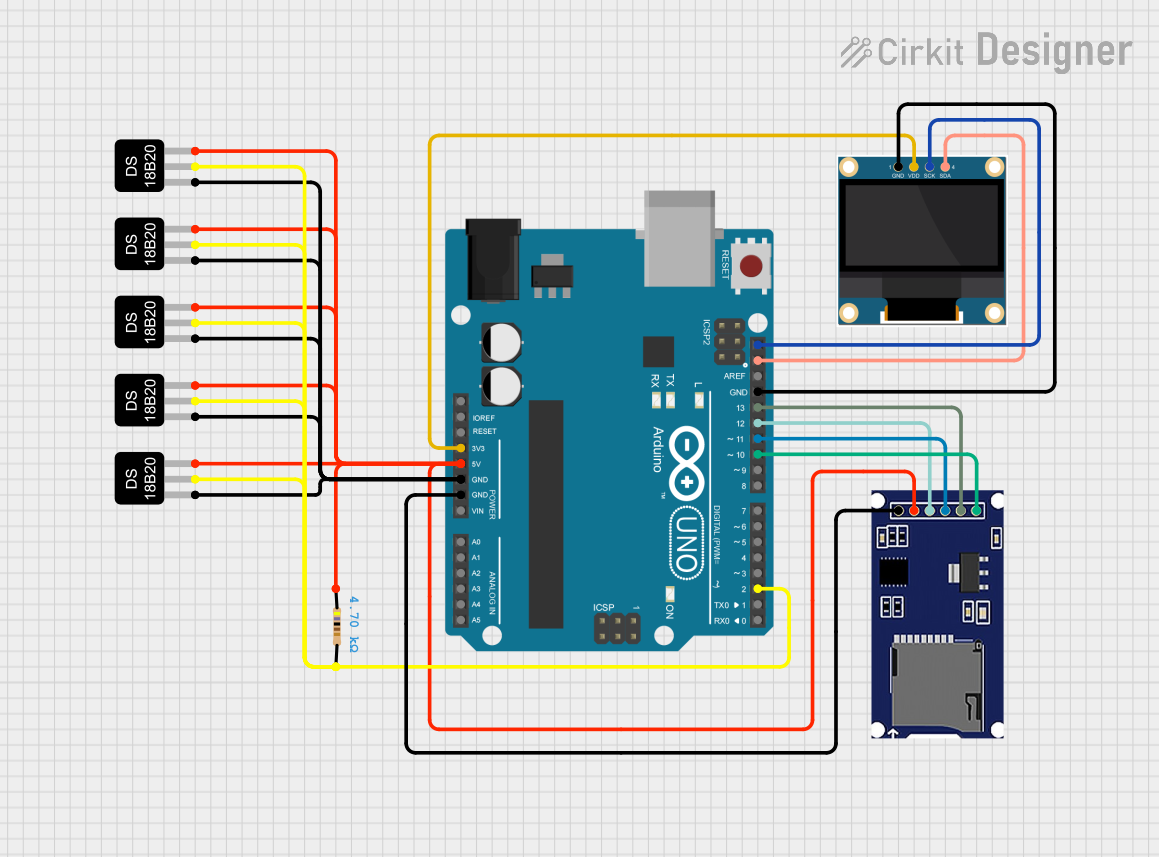
This circuit is designed to monitor temperatures using multiple DS18B20 sensors, display the readings on an OLED screen, and log the data to an SD card. It uses an Arduino UNO for control and data processing, with the sensors, display, and SD module interfacing through digital communication protocols.
This circuit is designed to read temperatures from multiple DS18B20 temperature sensors using an Arduino UNO, display the readings on a 0.96" OLED screen, and log the data to an SD card. The Arduino communicates with the OLED display via I2C (SCL and SDA) and with the SD card module using SPI (SCK, MOSI, MISO, CS). A single 4.7k Ohm pull-up resistor is connected to the data lines of the temperature sensors, which are interfaced with the Arduino through a digital pin configured for one-wire communication.
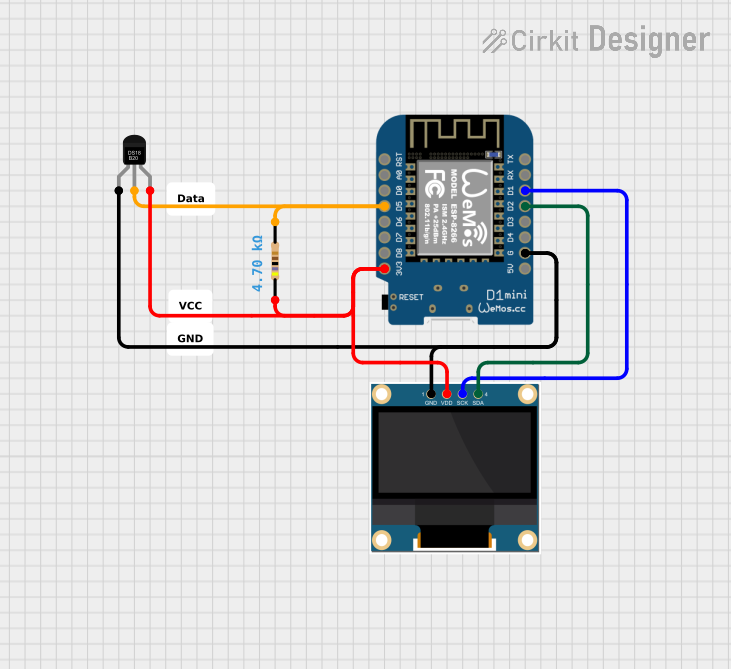
This circuit is designed to measure temperature using a DS18B20 1-Wire Temperature Sensor and display the readings on a 0.96" OLED screen. The Wemos D1 Mini serves as the microcontroller, interfacing with the temperature sensor via a digital input with a pull-up resistor and communicating with the OLED display over an I2C connection. The circuit is likely used for a compact temperature monitoring system.
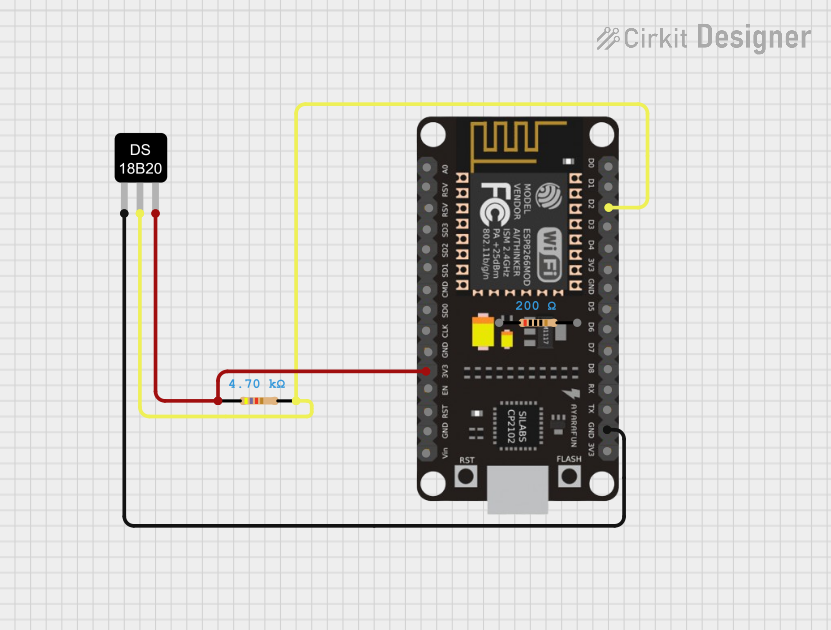
This circuit features an ESP8266 NodeMCU microcontroller connected to a DS18B20 temperature sensor. The sensor's data line (DQ) is connected to the D2 pin of the NodeMCU through a 4.7k ohm pull-up resistor, which is a common configuration for one-wire temperature sensors. The sensor is powered by the 3.3V supply from the NodeMCU, and both the sensor and the NodeMCU share a common ground.
Connect the GND pin to the ground of the power supply.
Connect the VDD pin to a 3.0V to 5.5V power supply.
Connect the DQ pin to a digital input/output pin on the microcontroller.
Place a 4.7kΩ pull-up resistor between the DQ pin and the VDD pin.
Important Considerations and Best Practices
Ensure that the power supply voltage is within the specified range to prevent damage.
Use the 4.7kΩ pull-up resistor on the DQ line for reliable communication.
Avoid long wire lengths for the 1-Wire bus to minimize signal degradation.
Multiple DS18B20 sensors can be connected to the same 1-Wire bus, each with a unique address.
Example Code for Arduino UNO
#include <OneWire.h>
#include <DallasTemperature.h>

// Data wire is connected to pin 2 on the Arduino
#define ONE_WIRE_BUS 2

// Setup a oneWire instance to communicate with any OneWire devices
OneWire oneWire(ONE_WIRE_BUS);

// Pass our oneWire reference to Dallas Temperature sensor
DallasTemperature sensors(&oneWire);

void setup() {
  // Start serial communication for debugging
  Serial.begin(9600);
  // Start the DS18B20 sensor
  sensors.begin();
}

void loop() {
  // Request temperature measurements from sensors
  sensors.requestTemperatures();
  // Fetch and print the temperature in Celsius
  Serial.print("Temperature: ");
  Serial.print(sensors.getTempCByIndex(0));
  Serial.println("°C");
  // Wait 1 second before next measurement
  delay(1000);
}
Troubleshooting and FAQs
Common Issues
Temperature Readings Are Inaccurate:
Ensure the pull-up resistor is properly connected.
Verify that the sensor is not exposed to rapid temperature changes.
No Communication with Sensor:
Check the wiring, especially the pull-up resistor on the DQ pin.
Make sure the correct pin is defined in the ONE_WIRE_BUS constant.
Multiple Sensors Not Working:
Ensure each sensor has a unique address.
Avoid long wires to minimize signal degradation on the 1-Wire bus.
Solutions and Tips for Troubleshooting
Use the sensors.getAddress() function to verify the address of each connected DS18B20 sensor.
Use the sensors.setResolution() function to adjust the resolution of the temperature readings.
If experiencing erratic behavior, add a 0.1 µF decoupling capacitor between the VDD and GND pins of the sensor.
FAQs
Q: Can I connect multiple DS18B20 sensors to the same microcontroller pin?
A: Yes, the 1-Wire protocol allows multiple sensors to share the same data line, each with a unique address.
Q: How do I set the resolution of the DS18B20 sensor?
A: Use the sensors.setResolution(sensorAddress, resolution) function, where resolution can be 9, 10, 11, or 12 bits.
Q: What is the purpose of the pull-up resistor on the DQ pin?
A: The pull-up resistor is necessary for the 1-Wire bus to function correctly. It pulls the data line high when the bus is idle.
Q: How long can the wires be when connecting the DS18B20 sensor?
A: The maximum wire length depends on the quality of the wire and the environment, but it is generally recommended to keep the length under 3 meters for reliable communication.

 Open Project in Cirkit Designer