Cirkit Designer Logo
Cirkit Designer
Your all-in-one circuit design IDE
Home / 
Component Documentation

How to Use Adafruit Mini 8x8 LED Matrix Backpack Yellow-Green: Examples, Pinouts, and Specs
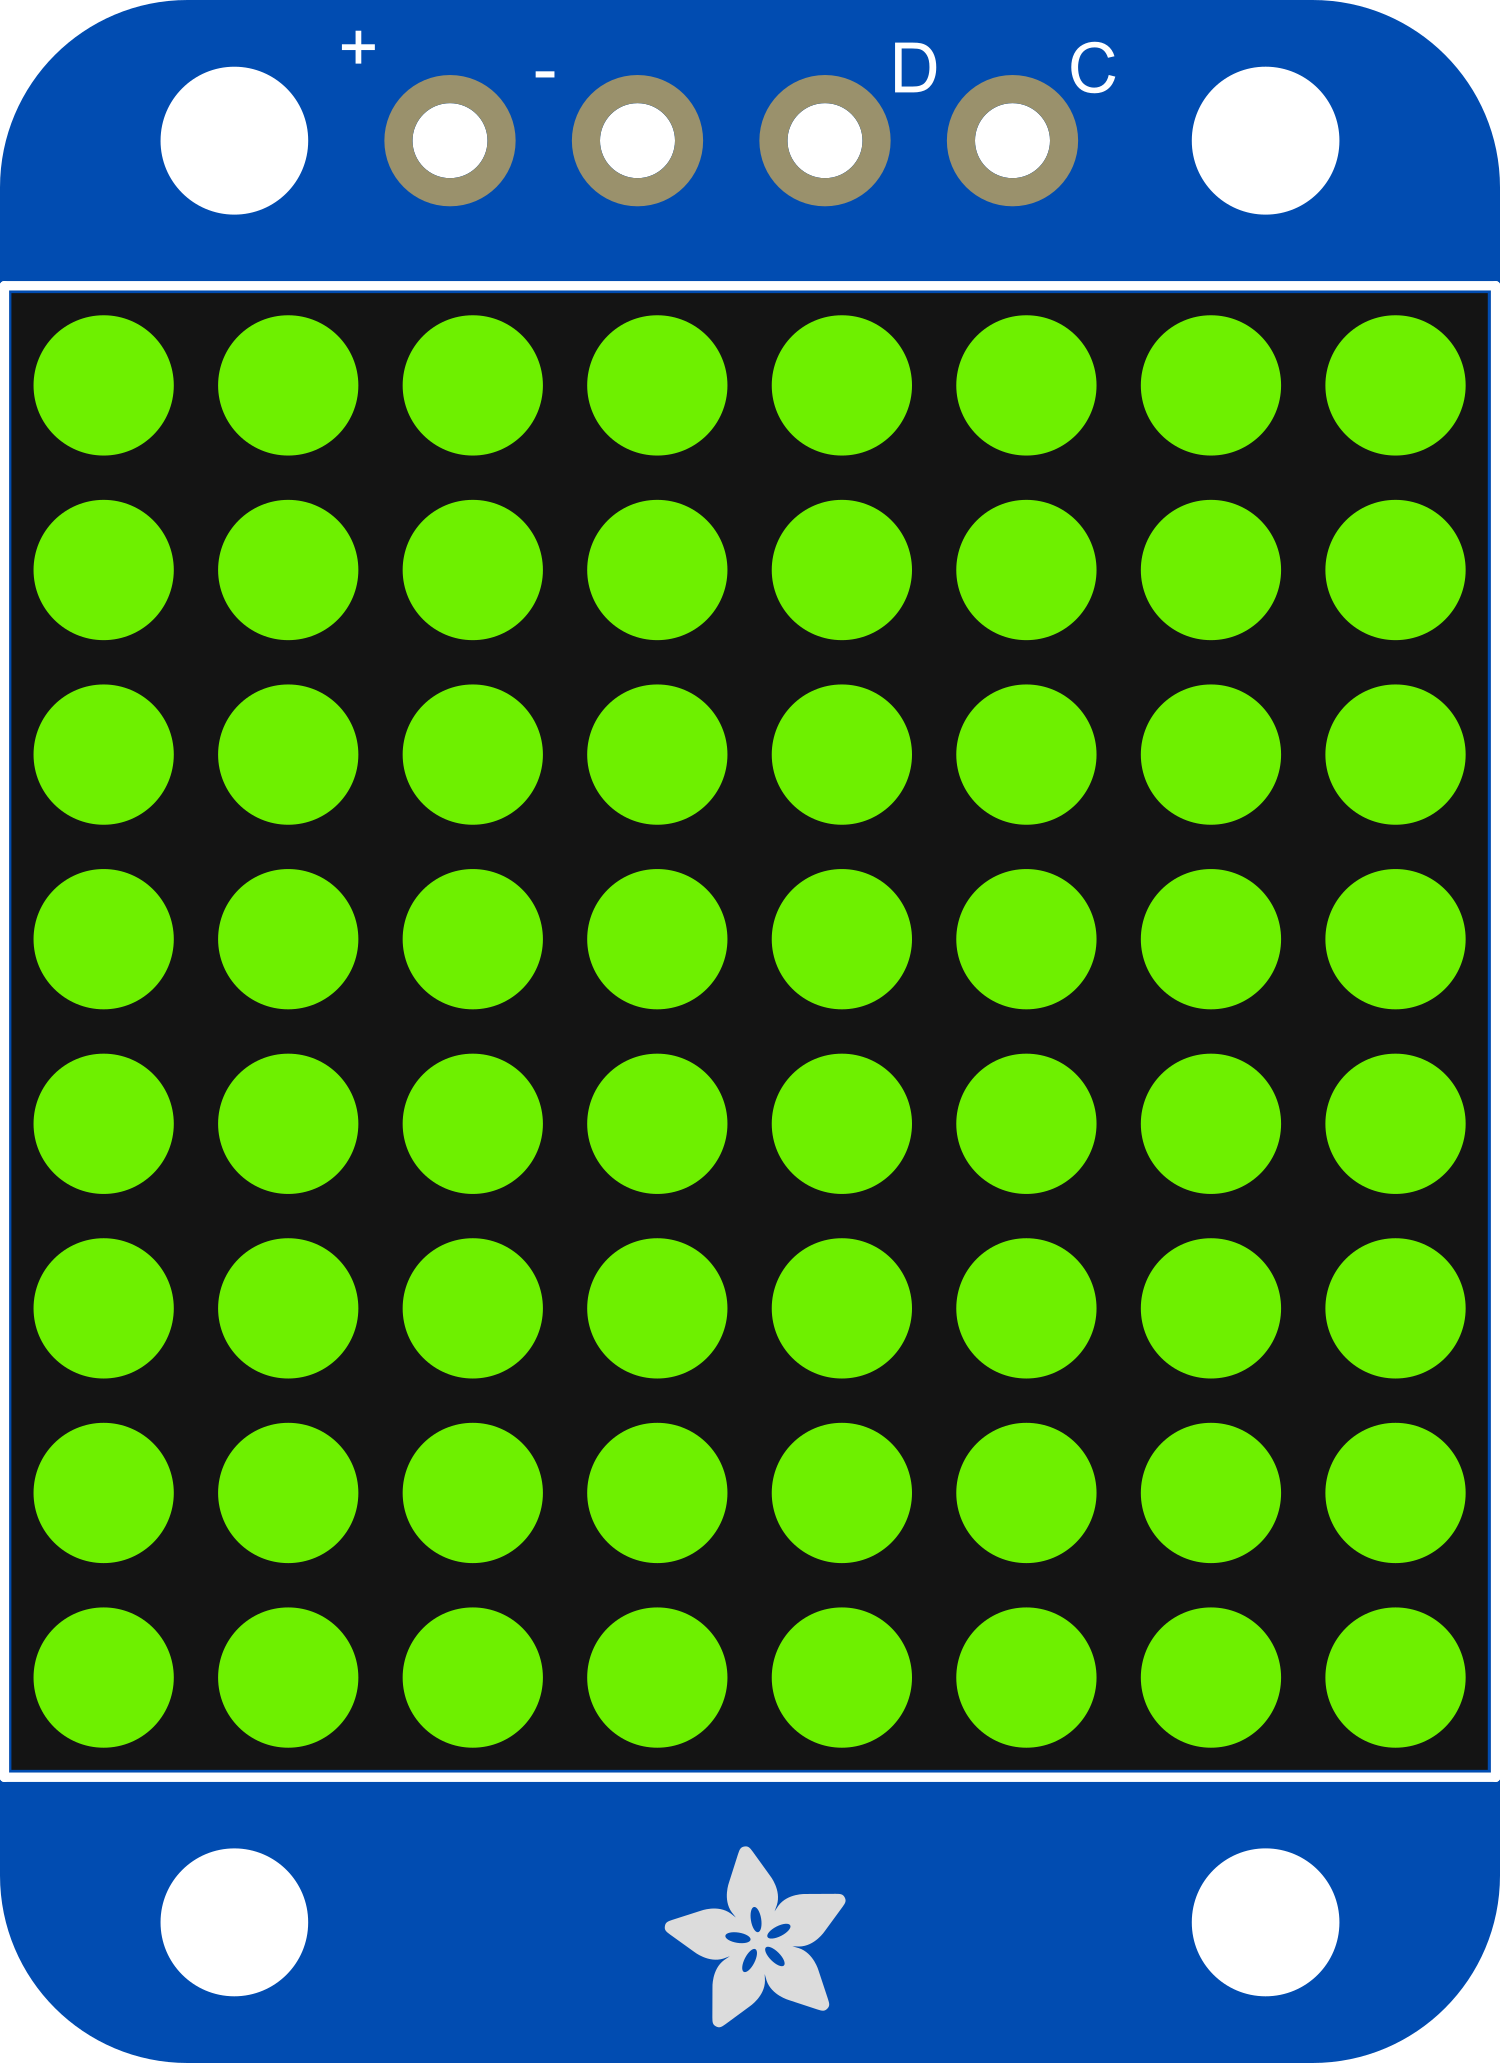
Image of Adafruit Mini 8x8 LED Matrix Backpack Yellow-Green
Cirkit Designer LogoDesign with Adafruit Mini 8x8 LED Matrix Backpack Yellow-Green in Cirkit Designer

Introduction

The Adafruit Mini 8x8 LED Matrix Backpack Yellow-Green is a versatile and compact display module that provides an 8x8 grid of 64 yellow-green LEDs. This component is ideal for creating small-scale visual displays, and it can be used in a variety of applications such as wearable electronics, indicators, message boards, and games. The backpack simplifies the process of driving the LED matrix by using a constant-current driver and a built-in microcontroller interface.

Explore Projects Built with Adafruit Mini 8x8 LED Matrix Backpack Yellow-Green
Use Cirkit Designer to design, explore, and prototype these projects online. Some projects support real-time simulation. Click "Open Project" to start designing instantly!
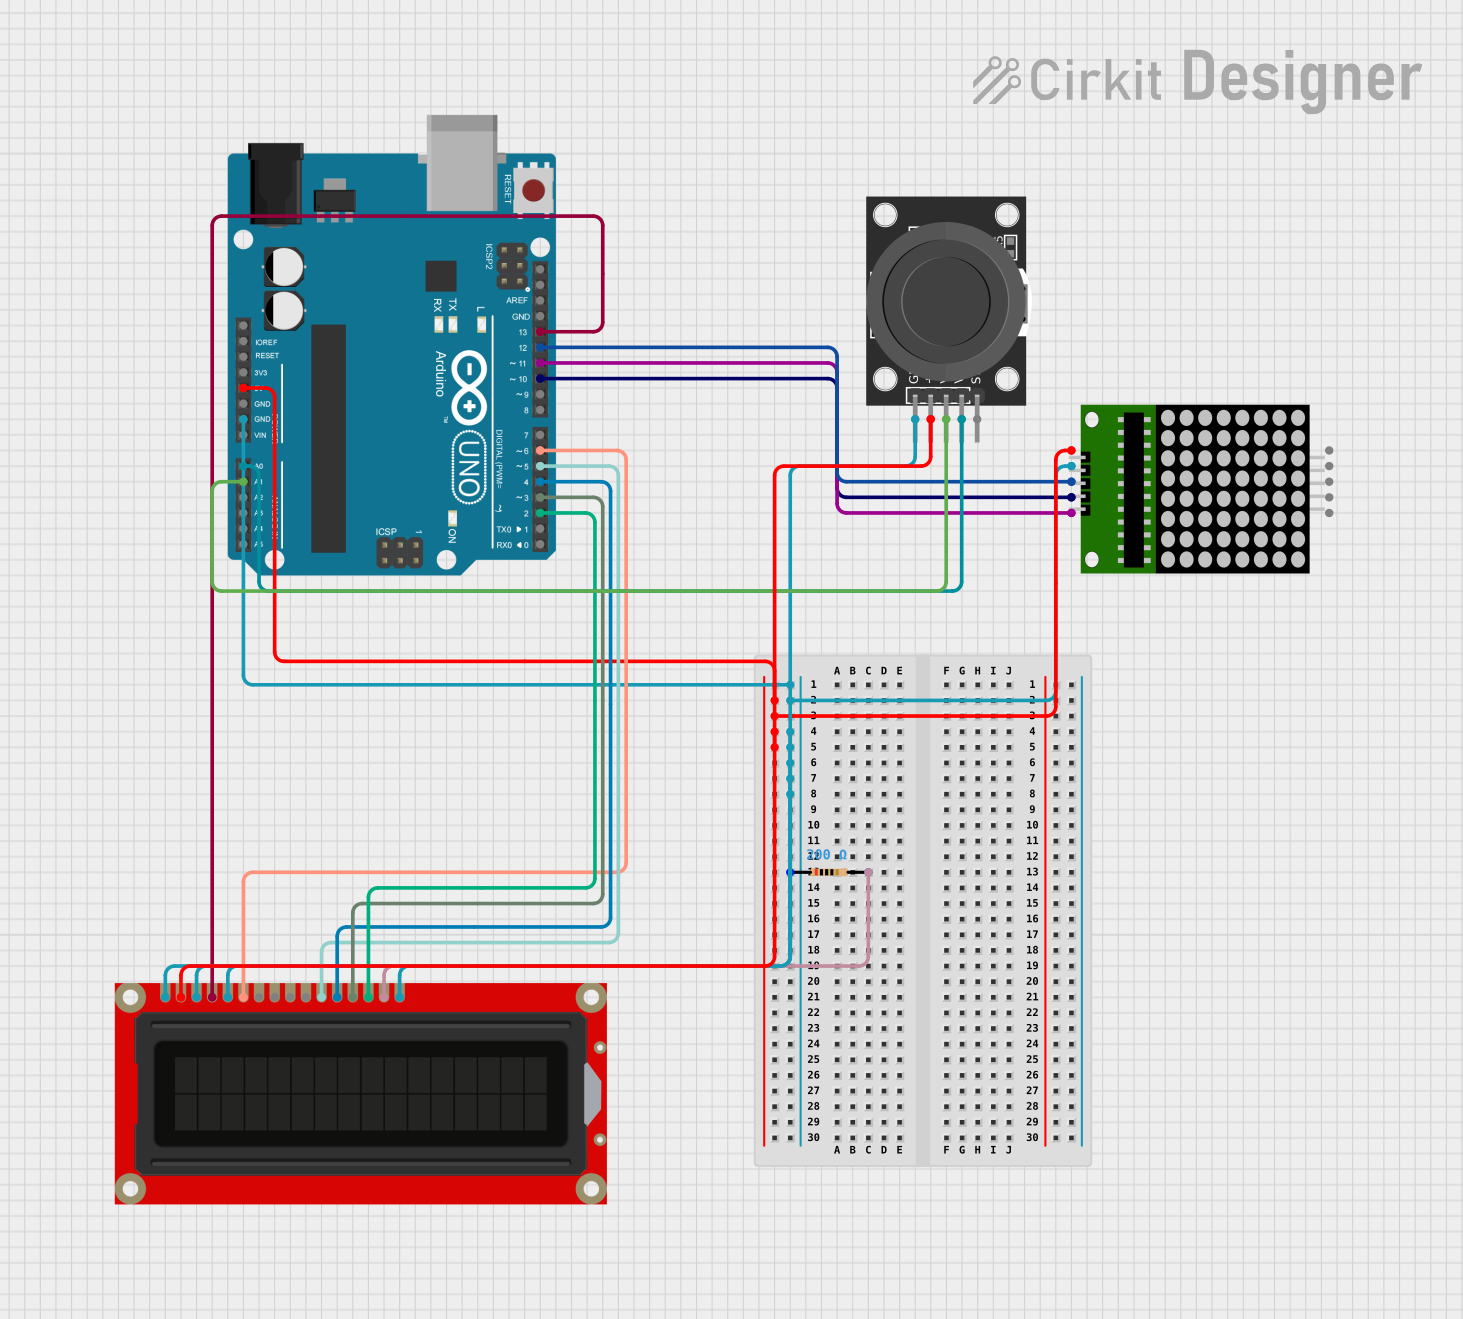
Arduino UNO Controlled LED Matrix and LCD Interface with Joystick Interaction
Image of Digital Game Circuit: A project utilizing Adafruit Mini 8x8 LED Matrix Backpack Yellow-Green in a practical application
This circuit features an Arduino UNO microcontroller interfaced with an 8x8 LED matrix, an LCD screen, and a KY-023 Dual Axis Joystick Module. The Arduino controls the LED matrix via digital pins D10-D12 and powers the matrix, LCD, and joystick module from its 5V output. The joystick's analog outputs are connected to the Arduino's analog inputs A0 and A1 for position sensing, while the LCD is controlled through digital pins D2-D6 and D13 for display purposes.
Cirkit Designer LogoOpen Project in Cirkit Designer
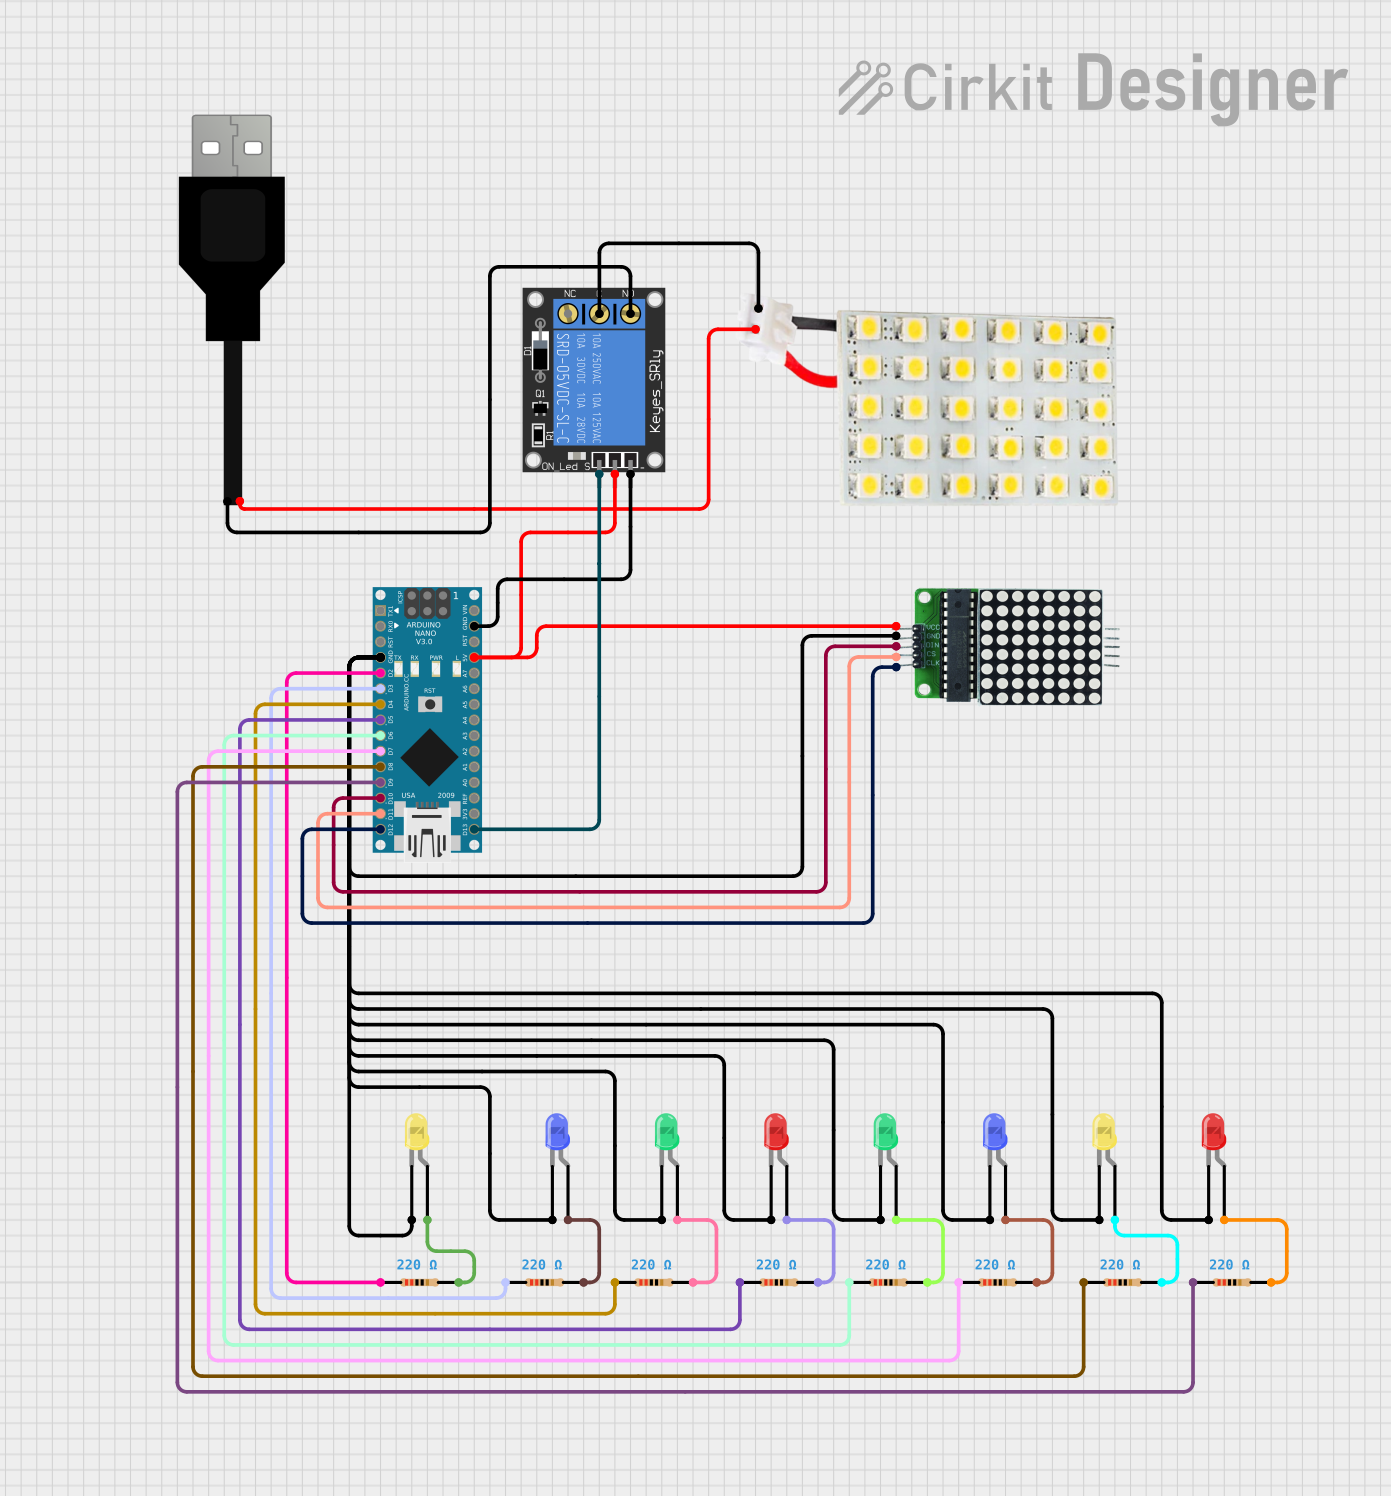
Arduino Nano Controlled LED Display and Relay System
Image of Design for Arduino Nano: A project utilizing Adafruit Mini 8x8 LED Matrix Backpack Yellow-Green in a practical application
This circuit features an Arduino Nano microcontroller connected to an 8x8 LED matrix and multiple individual LEDs with current-limiting resistors. The Arduino controls the LED matrix and individual LEDs, likely for display or signaling purposes. Additionally, there is a 1-channel relay module that can be controlled by the Arduino to switch external loads, and a USB connection for power and potential programming of the Arduino.
Cirkit Designer LogoOpen Project in Cirkit Designer
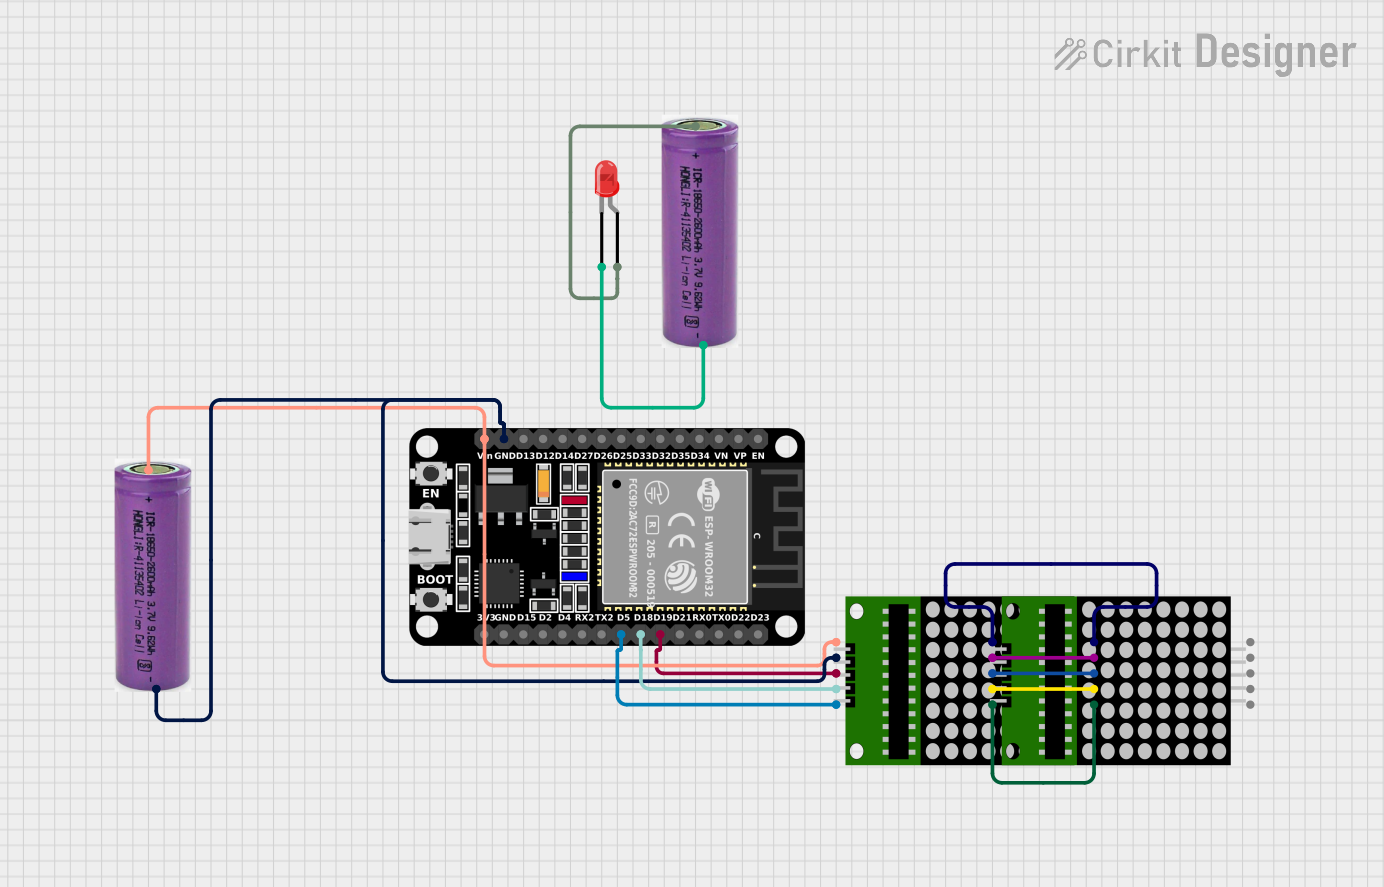
ESP32-Controlled Dual 8x8 LED Matrix Display with NTP Time Synchronization
Image of time: A project utilizing Adafruit Mini 8x8 LED Matrix Backpack Yellow-Green in a practical application
This circuit features an ESP32 microcontroller connected to two cascaded 8x8 LED matrix displays, powered by a 3.3V battery. The ESP32 drives the displays to show time and other information, with the code indicating functionality for connecting to WiFi, synchronizing time via NTP, and displaying data on the matrices using custom fonts. Additionally, there is a separate 3.3V battery powering a red LED, which appears to function as a simple indicator light.
Cirkit Designer LogoOpen Project in Cirkit Designer
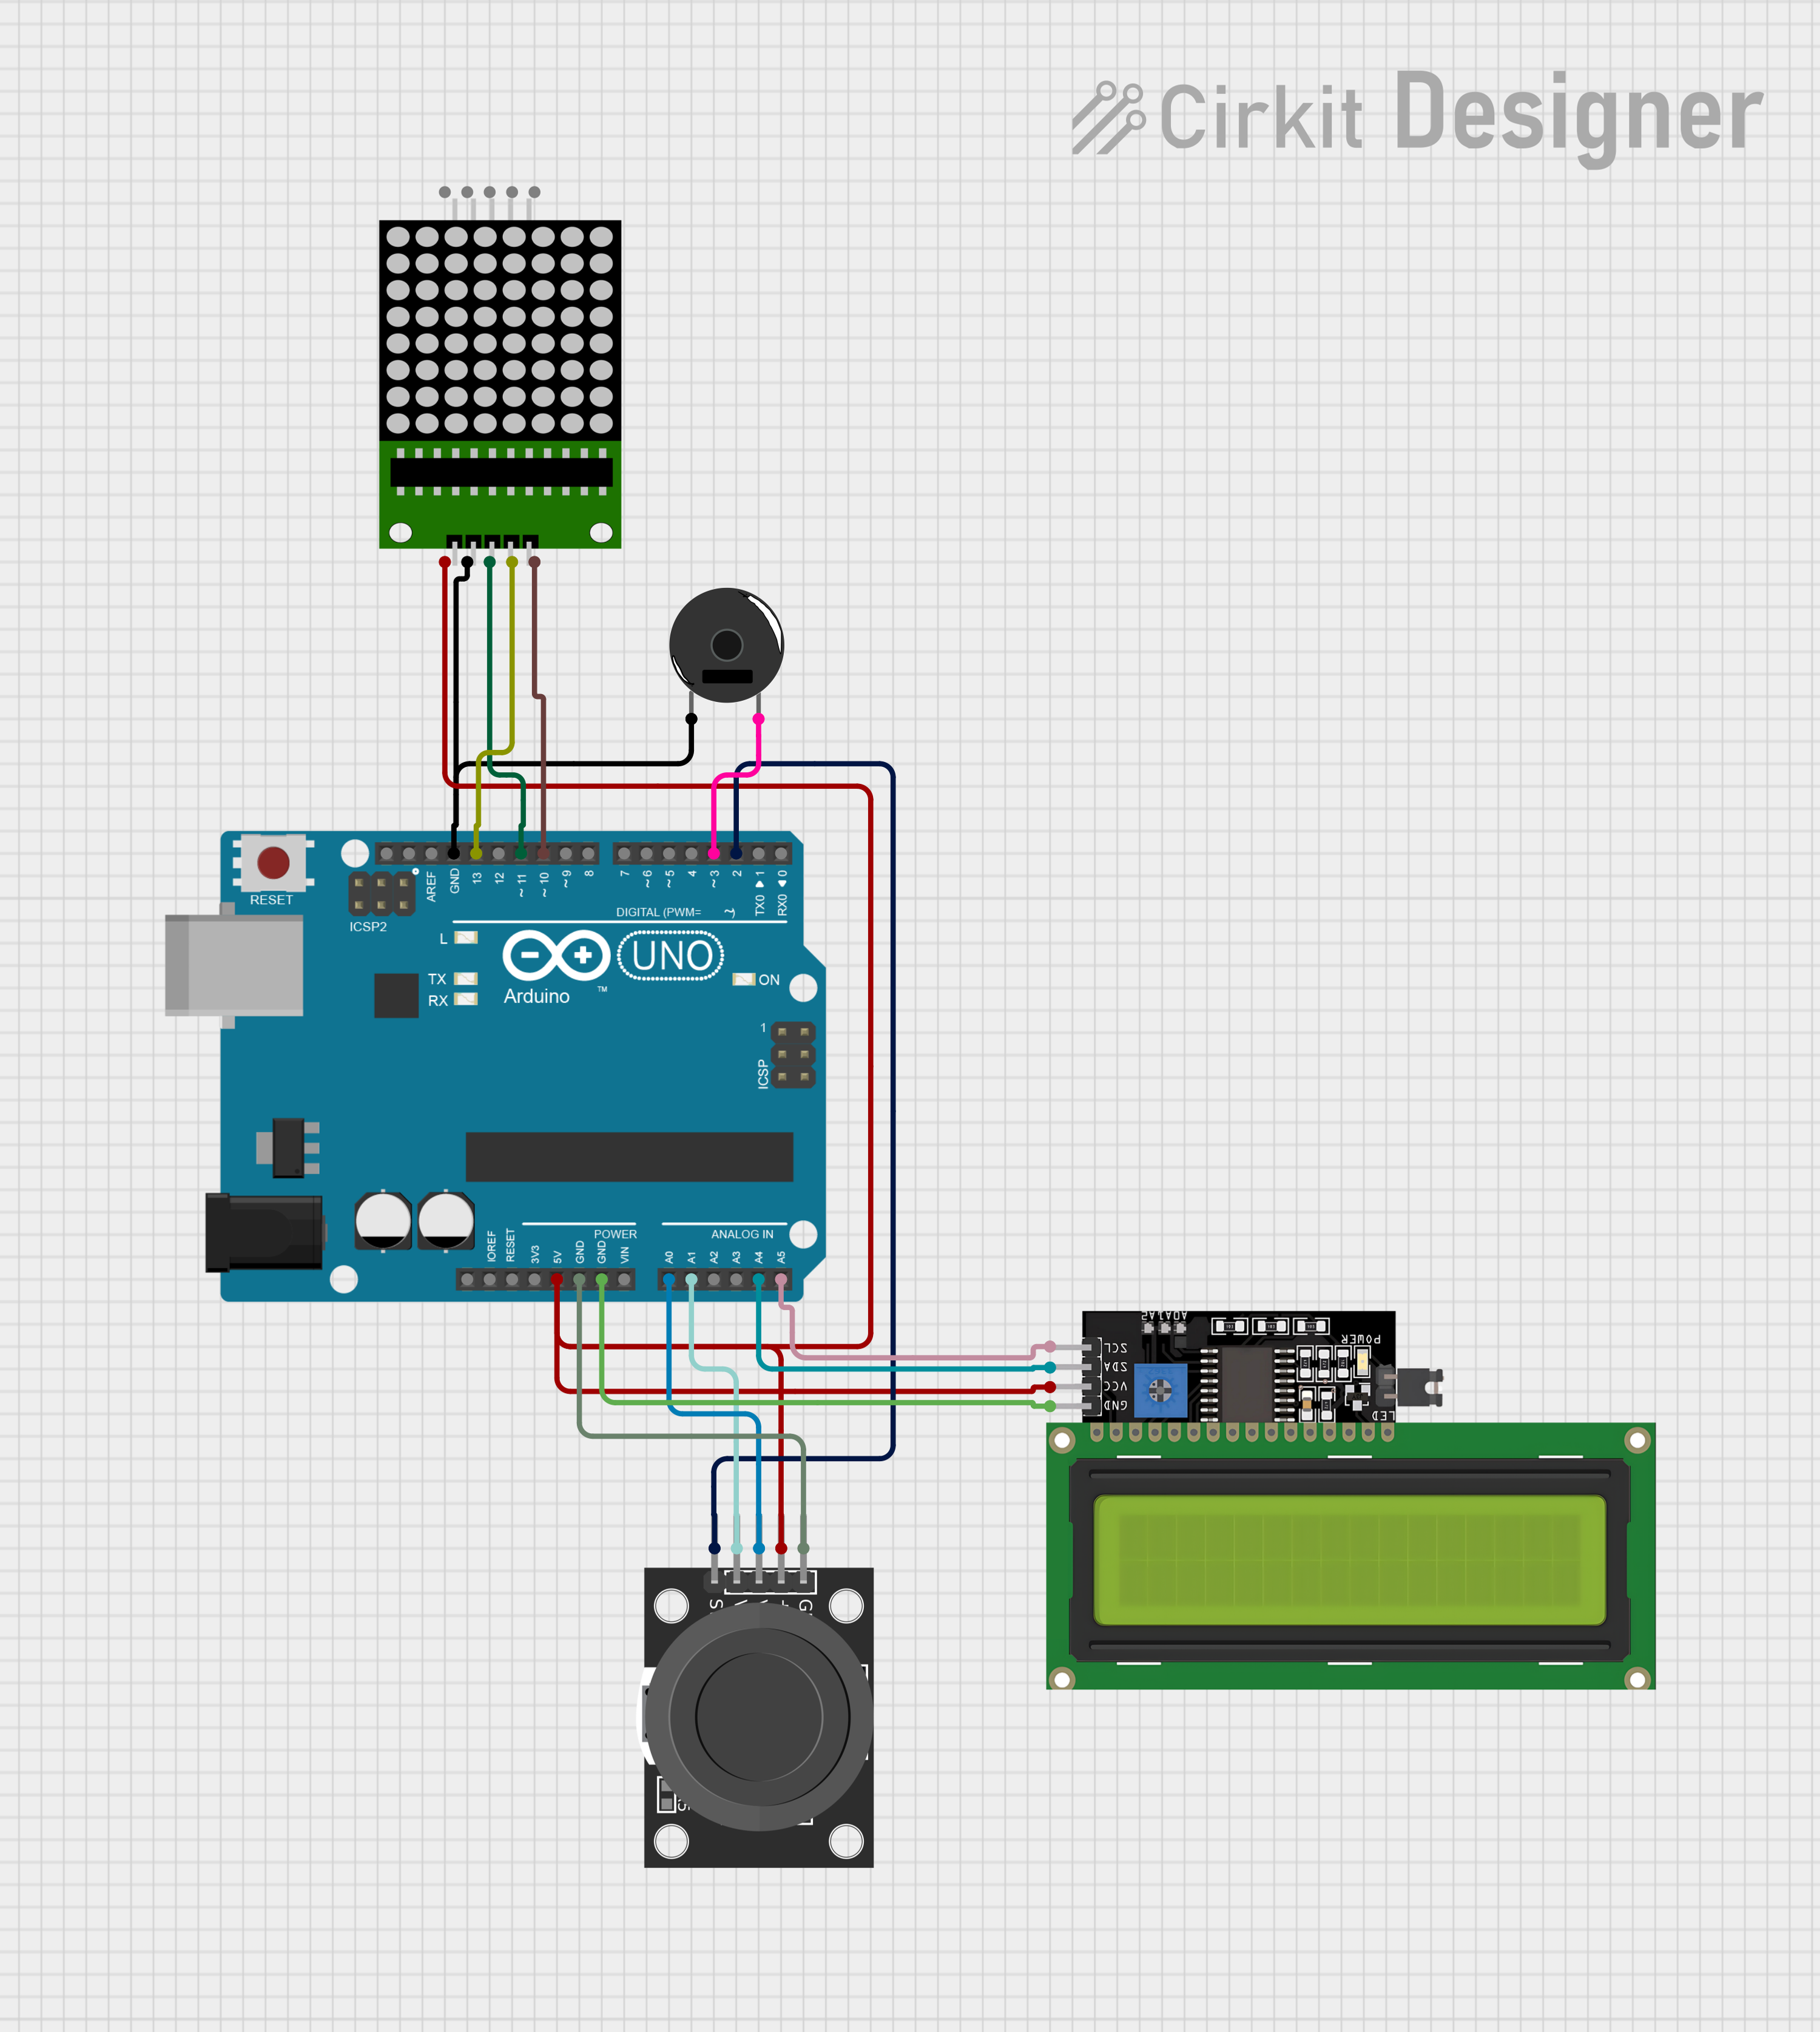
Arduino UNO Controlled Interactive Display with Joystick and Buzzer Feedback
Image of joystick: A project utilizing Adafruit Mini 8x8 LED Matrix Backpack Yellow-Green in a practical application
This circuit features an Arduino UNO microcontroller connected to an 8x8 LED matrix, an LCD display with I2C interface, a KY-023 Dual Axis Joystick Module, and a Piezo Buzzer. The Arduino controls the LED matrix via digital pins and provides an interface for the joystick's analog inputs and button press. The LCD display is used for output, and the buzzer is driven by a digital pin for audio feedback.
Cirkit Designer LogoOpen Project in Cirkit Designer

Explore Projects Built with Adafruit Mini 8x8 LED Matrix Backpack Yellow-Green

Use Cirkit Designer to design, explore, and prototype these projects online. Some projects support real-time simulation. Click "Open Project" to start designing instantly!
Image of Digital Game Circuit: A project utilizing Adafruit Mini 8x8 LED Matrix Backpack Yellow-Green in a practical application
Arduino UNO Controlled LED Matrix and LCD Interface with Joystick Interaction
This circuit features an Arduino UNO microcontroller interfaced with an 8x8 LED matrix, an LCD screen, and a KY-023 Dual Axis Joystick Module. The Arduino controls the LED matrix via digital pins D10-D12 and powers the matrix, LCD, and joystick module from its 5V output. The joystick's analog outputs are connected to the Arduino's analog inputs A0 and A1 for position sensing, while the LCD is controlled through digital pins D2-D6 and D13 for display purposes.
Cirkit Designer LogoOpen Project in Cirkit Designer
Image of Design for Arduino Nano: A project utilizing Adafruit Mini 8x8 LED Matrix Backpack Yellow-Green in a practical application
Arduino Nano Controlled LED Display and Relay System
This circuit features an Arduino Nano microcontroller connected to an 8x8 LED matrix and multiple individual LEDs with current-limiting resistors. The Arduino controls the LED matrix and individual LEDs, likely for display or signaling purposes. Additionally, there is a 1-channel relay module that can be controlled by the Arduino to switch external loads, and a USB connection for power and potential programming of the Arduino.
Cirkit Designer LogoOpen Project in Cirkit Designer
Image of time: A project utilizing Adafruit Mini 8x8 LED Matrix Backpack Yellow-Green in a practical application
ESP32-Controlled Dual 8x8 LED Matrix Display with NTP Time Synchronization
This circuit features an ESP32 microcontroller connected to two cascaded 8x8 LED matrix displays, powered by a 3.3V battery. The ESP32 drives the displays to show time and other information, with the code indicating functionality for connecting to WiFi, synchronizing time via NTP, and displaying data on the matrices using custom fonts. Additionally, there is a separate 3.3V battery powering a red LED, which appears to function as a simple indicator light.
Cirkit Designer LogoOpen Project in Cirkit Designer
Image of joystick: A project utilizing Adafruit Mini 8x8 LED Matrix Backpack Yellow-Green in a practical application
Arduino UNO Controlled Interactive Display with Joystick and Buzzer Feedback
This circuit features an Arduino UNO microcontroller connected to an 8x8 LED matrix, an LCD display with I2C interface, a KY-023 Dual Axis Joystick Module, and a Piezo Buzzer. The Arduino controls the LED matrix via digital pins and provides an interface for the joystick's analog inputs and button press. The LCD display is used for output, and the buzzer is driven by a digital pin for audio feedback.
Cirkit Designer LogoOpen Project in Cirkit Designer

Technical Specifications

Key Technical Details

  • LED Color: Yellow-Green
  • Matrix Size: 8x8 (64 LEDs total)
  • Operating Voltage: 4.5V - 5.5V
  • Max Current (per LED): 30mA
  • Communication: I2C interface
  • I2C Addresses: Selectable via solder jumpers

Pin Configuration and Descriptions

Pin Number Name Description
1 GND Ground connection
2 VCC Power supply (4.5V - 5.5V)
3 SDA I2C Data line
4 SCL I2C Clock line

Usage Instructions

Connecting to a Circuit

  1. Connect the GND pin to the ground of your microcontroller.
  2. Connect the VCC pin to a 4.5V - 5.5V power supply.
  3. Connect the SDA and SCL pins to the I2C data and clock lines on your microcontroller.

Programming with Arduino

To control the LED matrix with an Arduino UNO, you will need to use the Adafruit LED Backpack library. Here is a simple example code to get started:

#include <Wire.h>
#include <Adafruit_GFX.h>
#include <Adafruit_LEDBackpack.h>

Adafruit_8x8matrix matrix = Adafruit_8x8matrix();

void setup() {
  matrix.begin(0x70); // Initialize the matrix with the I2C address
  matrix.setBrightness(10); // Set the brightness to a value between 0 and 15
}

void loop() {
  matrix.clear(); // Clear the matrix display
  matrix.drawPixel(4, 4, LED_ON); // Turn on a single LED at (x=4, y=4)
  matrix.writeDisplay(); // Update the display with the changes
  delay(500);
  matrix.clear(); // Clear the display again
  matrix.writeDisplay(); // Update the display
  delay(500);
}

Important Considerations and Best Practices

  • Ensure that the power supply voltage does not exceed 5.5V to prevent damage to the LED matrix.
  • When using multiple LED matrices, make sure to set unique I2C addresses for each one using the solder jumpers on the back of the backpack.
  • To avoid flickering, update the display after making all changes to the LED states.
  • Use the setBrightness function to adjust the display brightness according to your application needs.

Troubleshooting and FAQs

Common Issues

  • LEDs are not lighting up: Check the power supply connections and ensure that the I2C lines are properly connected to the microcontroller.
  • Display is flickering: Make sure to call writeDisplay() only after all changes to the display have been made.
  • Some LEDs are dimmer than others: Ensure that the brightness is set uniformly using the setBrightness function.

Solutions and Tips for Troubleshooting

  • Double-check wiring, especially the I2C connections.
  • Verify that the correct I2C address is being used in your code.
  • If using multiple devices on the I2C bus, ensure that there are no address conflicts.
  • Check the power supply for proper voltage and current capabilities.

FAQs

Q: Can I daisy-chain multiple LED matrices? A: Yes, you can connect multiple matrices in series, but you will need to assign a unique I2C address to each matrix.

Q: How do I change the I2C address? A: The I2C address can be changed by soldering or desoldering the address jumpers on the back of the backpack.

Q: Can the matrix display colors other than yellow-green? A: This specific model of the LED matrix backpack only displays yellow-green. For different colors, you would need to purchase a different model with the desired LED color.

Remember to always follow best practices for electronic components and circuit design to ensure the longevity and proper functioning of your Adafruit Mini 8x8 LED Matrix Backpack Yellow-Green.