Cirkit Designer Logo
Cirkit Designer
Your all-in-one circuit design IDE
Home / 
Component Documentation

How to Use Adafruit MAX98306 Stereo 3.7W Class D Audio Amplifier: Examples, Pinouts, and Specs

Image of Adafruit MAX98306 Stereo 3.7W Class D Audio Amplifier
Cirkit Designer LogoDesign with Adafruit MAX98306 Stereo 3.7W Class D Audio Amplifier in Cirkit Designer

Introduction

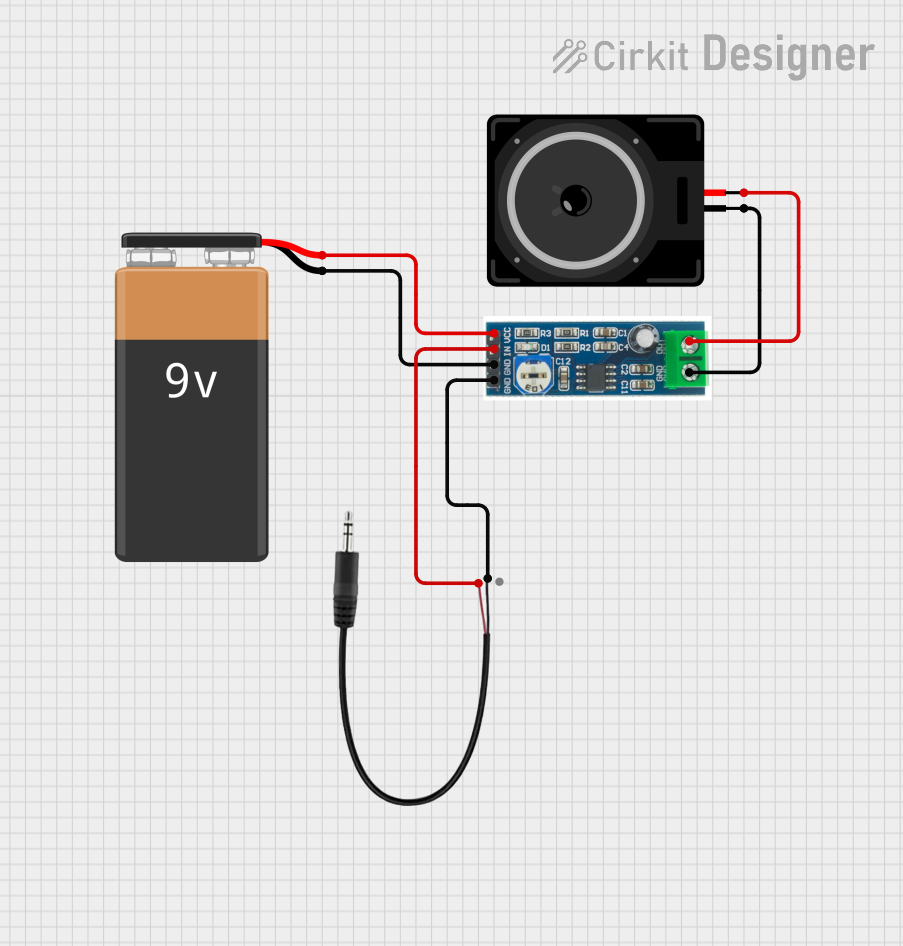
The Adafruit MAX98306 is a compact and efficient stereo audio amplifier that utilizes Class D amplification technology. It is designed to deliver high-quality sound with minimal distortion and can provide up to 3.7 watts of power per channel. This makes it an ideal choice for portable and battery-powered projects where size and power efficiency are critical. Common applications include DIY speakers, portable audio players, and any project requiring amplified sound.

Explore Projects Built with Adafruit MAX98306 Stereo 3.7W Class D Audio Amplifier

Use Cirkit Designer to design, explore, and prototype these projects online. Some projects support real-time simulation. Click "Open Project" to start designing instantly!
PAM8403 Amplified Piezo Speaker Array with ATTiny Control
Image of mamamo: A project utilizing Adafruit MAX98306 Stereo 3.7W Class D Audio Amplifier in a practical application
This circuit is an audio amplification system with multiple piezo speakers driven by a PAM8403 amplifier IC. It features an ATtiny microcontroller for potential audio control, powered by a 5V battery with capacitors for stabilization and a trimmer potentiometer for input level adjustment.
Cirkit Designer LogoOpen Project in Cirkit Designer
Raspberry Pi 5-Based Multi-Channel Audio System
Image of Noise Cancelling Project: A project utilizing Adafruit MAX98306 Stereo 3.7W Class D Audio Amplifier in a practical application
This circuit is an audio playback system that uses a Raspberry Pi 5 to process digital audio signals. The signals are sent to an I2S DAC and then amplified by PAM8302 amplifiers to drive two loudspeakers, providing stereo sound output.
Cirkit Designer LogoOpen Project in Cirkit Designer
LM386 Amplifier Circuit with 3.5mm Audio Input and Loudspeaker Output
Image of DIY Speaker: A project utilizing Adafruit MAX98306 Stereo 3.7W Class D Audio Amplifier in a practical application
This circuit is an audio amplification system. It uses an LM386 audio amplifier module to amplify the audio signal from a 3.5mm audio jack input and drives a loudspeaker. The system is powered by a 9V battery, with the audio input connected to the left channel of the audio jack.
Cirkit Designer LogoOpen Project in Cirkit Designer
ESP32-Based Wi-Fi Controlled Audio Processing System
Image of resona : A project utilizing Adafruit MAX98306 Stereo 3.7W Class D Audio Amplifier in a practical application
This circuit features an ESP32 microcontroller interfaced with an Adafruit MAX9814 Electret Microphone Amplifier for audio input and a Max98357 amplifier connected to a speaker for audio output. The ESP32 processes the audio signals from the microphone and sends the processed data to the speaker through the Max98357 amplifier.
Cirkit Designer LogoOpen Project in Cirkit Designer

Explore Projects Built with Adafruit MAX98306 Stereo 3.7W Class D Audio Amplifier

Use Cirkit Designer to design, explore, and prototype these projects online. Some projects support real-time simulation. Click "Open Project" to start designing instantly!
Image of mamamo: A project utilizing Adafruit MAX98306 Stereo 3.7W Class D Audio Amplifier in a practical application
PAM8403 Amplified Piezo Speaker Array with ATTiny Control
This circuit is an audio amplification system with multiple piezo speakers driven by a PAM8403 amplifier IC. It features an ATtiny microcontroller for potential audio control, powered by a 5V battery with capacitors for stabilization and a trimmer potentiometer for input level adjustment.
Cirkit Designer LogoOpen Project in Cirkit Designer
Image of Noise Cancelling Project: A project utilizing Adafruit MAX98306 Stereo 3.7W Class D Audio Amplifier in a practical application
Raspberry Pi 5-Based Multi-Channel Audio System
This circuit is an audio playback system that uses a Raspberry Pi 5 to process digital audio signals. The signals are sent to an I2S DAC and then amplified by PAM8302 amplifiers to drive two loudspeakers, providing stereo sound output.
Cirkit Designer LogoOpen Project in Cirkit Designer
Image of DIY Speaker: A project utilizing Adafruit MAX98306 Stereo 3.7W Class D Audio Amplifier in a practical application
LM386 Amplifier Circuit with 3.5mm Audio Input and Loudspeaker Output
This circuit is an audio amplification system. It uses an LM386 audio amplifier module to amplify the audio signal from a 3.5mm audio jack input and drives a loudspeaker. The system is powered by a 9V battery, with the audio input connected to the left channel of the audio jack.
Cirkit Designer LogoOpen Project in Cirkit Designer
Image of resona : A project utilizing Adafruit MAX98306 Stereo 3.7W Class D Audio Amplifier in a practical application
ESP32-Based Wi-Fi Controlled Audio Processing System
This circuit features an ESP32 microcontroller interfaced with an Adafruit MAX9814 Electret Microphone Amplifier for audio input and a Max98357 amplifier connected to a speaker for audio output. The ESP32 processes the audio signals from the microphone and sends the processed data to the speaker through the Max98357 amplifier.
Cirkit Designer LogoOpen Project in Cirkit Designer

Technical Specifications

Key Features

  • Output Power: Up to 3.7W per channel at 3Ω
  • Power Supply Voltage: 3.7V to 5.5V
  • Efficiency: Over 90% when driving 8Ω speakers
  • PSRR: -77dB at 217Hz
  • THD+N: 0.2% at 1W
  • SNR: 90dB typical
  • Shutdown Current: 0.7µA

Pin Configuration and Descriptions

Pin Number Name Description
1 L+ Left channel positive output
2 L- Left channel negative output
3 R+ Right channel positive output
4 R- Right channel negative output
5 VDD Power supply voltage (3.7V to 5.5V)
6 GND Ground
7 INL Left channel audio input
8 INR Right channel audio input
9 GAIN Gain selection input
10 SD Shutdown control input (active low)

Usage Instructions

Connecting to a Circuit

  1. Connect the power supply to the VDD pin and ground to the GND pin.
  2. Attach your audio input source to the INL and INR pins for left and right channels, respectively.
  3. Connect your speakers to the L+ and L- for the left channel, and R+ and R- for the right channel.
  4. Optionally, you can control the gain by connecting the GAIN pin to different voltage levels.
  5. The SD pin can be connected to a microcontroller or switch to enable or disable the amplifier.

Best Practices

  • Use a clean power supply to minimize noise.
  • Keep audio input lines as short as possible to reduce interference.
  • Ensure that speakers are compatible with the amplifier's power output to avoid damage.
  • Avoid running the amplifier at maximum volume for extended periods to prevent overheating.

Example Code for Arduino UNO

// Example code to control the Adafruit MAX98306 with an Arduino UNO

const int shutdownPin = 2; // Connect to the SD pin of the amplifier

void setup() {
  pinMode(shutdownPin, OUTPUT);
  // Start the amplifier
  digitalWrite(shutdownPin, LOW);
}

void loop() {
  // Your audio processing code goes here
  // To shutdown the amplifier, set the shutdownPin HIGH
  // To restart the amplifier, set the shutdownPin LOW
}

Troubleshooting and FAQs

Common Issues

  • No Sound: Ensure that the power supply is connected properly and the SD pin is set to LOW.
  • Distorted Sound: Check if the speakers are rated for the output power and the audio input is not too high.
  • Intermittent Sound: Verify that all connections are secure and there is no loose wiring.

Solutions and Tips

  • If you experience noise in the audio, try using a shorter cable for the audio input.
  • Make sure the power supply can deliver sufficient current for the amplifier.
  • Use a heatsink if the amplifier is getting too warm during operation.

FAQs

Q: Can I use this amplifier with 4Ω speakers? A: Yes, but the output power will be lower than with 3Ω speakers.

Q: What should I do if the amplifier gets too hot? A: Ensure adequate ventilation and consider adding a heatsink to dissipate heat.

Q: Can I chain two of these amplifiers for more power? A: No, chaining amplifiers is not recommended as it can lead to damage and distortion.