Cirkit Designer Logo
Cirkit Designer
Your all-in-one circuit design IDE
Home / 
Component Documentation

How to Use temperature sensor: Examples, Pinouts, and Specs

Image of temperature sensor
Cirkit Designer LogoDesign with temperature sensor in Cirkit Designer

Introduction

The TC74 is a digital temperature sensor manufactured by JJY. It is designed to measure the temperature of an environment or object and convert it into a readable digital signal. This sensor is highly reliable, compact, and easy to integrate into various systems. It communicates via the I²C protocol, making it suitable for applications requiring precise temperature monitoring.

Explore Projects Built with temperature sensor

Use Cirkit Designer to design, explore, and prototype these projects online. Some projects support real-time simulation. Click "Open Project" to start designing instantly!
Arduino UNO Based Temperature Monitoring System with DS18B20 Sensor
Image of DS18b20 sim test: A project utilizing temperature sensor in a practical application
This circuit is designed to measure temperature using a DS18B20 sensor interfaced with an Arduino UNO. The Arduino reads temperature data from the sensor via a 1-Wire bus with a pull-up resistor and outputs the readings to the serial console.
Cirkit Designer LogoOpen Project in Cirkit Designer
Arduino UNO with DS18B20 Temperature Sensor Monitoring
Image of Measure Temperature With Arduino UNO and DS18B20: A project utilizing temperature sensor in a practical application
This circuit is designed to measure temperature using a DS18B20 temperature sensor interfaced with an Arduino UNO microcontroller. The sensor's data line is connected to digital pin 4 of the Arduino through a 4.7k Ohm pull-up resistor, and the Arduino runs a sketch that reads the temperature in Celsius and Fahrenheit, then outputs the readings to the serial monitor. The purpose of the circuit is to provide a digital temperature reading for monitoring or control applications.
Cirkit Designer LogoOpen Project in Cirkit Designer
Arduino UNO Based LM35 Temperature Sensor Monitoring System
Image of Measuring Temperature With LM35 and Arduino UNO: A project utilizing temperature sensor in a practical application
This circuit is designed to measure temperature using an LM35 temperature sensor interfaced with an Arduino UNO microcontroller. The sensor's output voltage, which is proportional to the temperature, is read by the Arduino's analog input A0. The embedded code on the Arduino processes this signal to calculate and output the temperature in both Celsius and Fahrenheit to the serial monitor.
Cirkit Designer LogoOpen Project in Cirkit Designer
Arduino UNO Based DS18B20 Temperature Sensor Monitoring System
Image of DS18b20 sim test - no extra libs: A project utilizing temperature sensor in a practical application
This circuit is designed to measure temperature using a DS18B20 temperature sensor. The Arduino UNO microcontroller reads the temperature data from the sensor and outputs the readings to the serial console. A 200 Ohm resistor is used to provide a pull-up on the data line of the sensor, connected to digital pin D2, with the pull-up control managed by pin D3 on the Arduino.
Cirkit Designer LogoOpen Project in Cirkit Designer

Explore Projects Built with temperature sensor

Use Cirkit Designer to design, explore, and prototype these projects online. Some projects support real-time simulation. Click "Open Project" to start designing instantly!
Image of DS18b20 sim test: A project utilizing temperature sensor in a practical application
Arduino UNO Based Temperature Monitoring System with DS18B20 Sensor
This circuit is designed to measure temperature using a DS18B20 sensor interfaced with an Arduino UNO. The Arduino reads temperature data from the sensor via a 1-Wire bus with a pull-up resistor and outputs the readings to the serial console.
Cirkit Designer LogoOpen Project in Cirkit Designer
Image of Measure Temperature With Arduino UNO and DS18B20: A project utilizing temperature sensor in a practical application
Arduino UNO with DS18B20 Temperature Sensor Monitoring
This circuit is designed to measure temperature using a DS18B20 temperature sensor interfaced with an Arduino UNO microcontroller. The sensor's data line is connected to digital pin 4 of the Arduino through a 4.7k Ohm pull-up resistor, and the Arduino runs a sketch that reads the temperature in Celsius and Fahrenheit, then outputs the readings to the serial monitor. The purpose of the circuit is to provide a digital temperature reading for monitoring or control applications.
Cirkit Designer LogoOpen Project in Cirkit Designer
Image of Measuring Temperature With LM35 and Arduino UNO: A project utilizing temperature sensor in a practical application
Arduino UNO Based LM35 Temperature Sensor Monitoring System
This circuit is designed to measure temperature using an LM35 temperature sensor interfaced with an Arduino UNO microcontroller. The sensor's output voltage, which is proportional to the temperature, is read by the Arduino's analog input A0. The embedded code on the Arduino processes this signal to calculate and output the temperature in both Celsius and Fahrenheit to the serial monitor.
Cirkit Designer LogoOpen Project in Cirkit Designer
Image of DS18b20 sim test - no extra libs: A project utilizing temperature sensor in a practical application
Arduino UNO Based DS18B20 Temperature Sensor Monitoring System
This circuit is designed to measure temperature using a DS18B20 temperature sensor. The Arduino UNO microcontroller reads the temperature data from the sensor and outputs the readings to the serial console. A 200 Ohm resistor is used to provide a pull-up on the data line of the sensor, connected to digital pin D2, with the pull-up control managed by pin D3 on the Arduino.
Cirkit Designer LogoOpen Project in Cirkit Designer

Common Applications

  • HVAC (Heating, Ventilation, and Air Conditioning) systems
  • Weather monitoring stations
  • Industrial process control
  • Consumer electronics (e.g., thermostats, smart home devices)
  • Data logging and environmental monitoring systems

Technical Specifications

The TC74 is a low-power, high-accuracy temperature sensor with the following key specifications:

Parameter Value
Supply Voltage (Vcc) 2.7V to 5.5V
Temperature Range -40°C to +125°C
Accuracy ±1°C (typical)
Communication Protocol I²C
Operating Current 200 µA (typical)
Standby Current 5 µA (typical)
Output Resolution 8-bit
Package Type SOIC-8, DIP-8

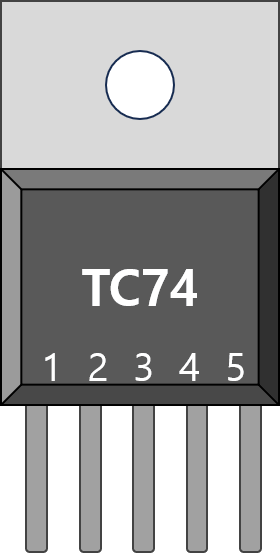
Pin Configuration and Descriptions

The TC74 is available in an 8-pin package. Below is the pinout and description:

Pin Number Pin Name Description
1 Vcc Power supply input (2.7V to 5.5V)
2 GND Ground
3 SDA Serial Data Line for I²C communication
4 SCL Serial Clock Line for I²C communication
5 A0 Address selection bit (used for I²C addressing)
6 A1 Address selection bit (used for I²C addressing)
7 A2 Address selection bit (used for I²C addressing)
8 NC No connection

Usage Instructions

How to Use the TC74 in a Circuit

  1. Power Supply: Connect the Vcc pin to a 3.3V or 5V power source and the GND pin to ground.
  2. I²C Communication: Connect the SDA and SCL pins to the corresponding I²C pins on your microcontroller (e.g., Arduino).
  3. Pull-Up Resistors: Use 4.7kΩ pull-up resistors on the SDA and SCL lines for proper I²C operation.
  4. Address Configuration: Set the A0, A1, and A2 pins to configure the I²C address. These pins can be connected to Vcc or GND to set the desired address.

Important Considerations

  • Ensure the operating voltage is within the specified range (2.7V to 5.5V).
  • Avoid placing the sensor near heat sources or in direct sunlight for accurate readings.
  • Use decoupling capacitors (e.g., 0.1 µF) between Vcc and GND to reduce noise.

Example Code for Arduino UNO

Below is an example of how to interface the TC74 with an Arduino UNO to read temperature data:

#include <Wire.h> // Include the Wire library for I²C communication

#define TC74_ADDRESS 0x48 // Default I²C address of the TC74 sensor

void setup() {
  Wire.begin(); // Initialize I²C communication
  Serial.begin(9600); // Start serial communication for debugging
  Serial.println("TC74 Temperature Sensor Example");
}

void loop() {
  int temperature = readTemperature(); // Read temperature from the sensor
  Serial.print("Temperature: ");
  Serial.print(temperature);
  Serial.println(" °C");
  delay(1000); // Wait for 1 second before reading again
}

int readTemperature() {
  Wire.beginTransmission(TC74_ADDRESS); // Start communication with TC74
  Wire.write(0x00); // Point to the temperature register
  Wire.endTransmission(false); // Send the data and keep the connection active
  Wire.requestFrom(TC74_ADDRESS, 1); // Request 1 byte of data from the sensor

  if (Wire.available()) {
    return Wire.read(); // Read and return the temperature value
  } else {
    Serial.println("Error: No data received from TC74");
    return -127; // Return an error value
  }
}

Notes on the Code

  • The default I²C address of the TC74 is 0x48. Adjust the address if you change the A0, A1, or A2 pin configuration.
  • The temperature is returned as an 8-bit signed integer, where each unit represents 1°C.

Troubleshooting and FAQs

Common Issues

  1. No Data Received from the Sensor

    • Cause: Incorrect I²C address or wiring.
    • Solution: Verify the I²C address and ensure proper connections for SDA, SCL, Vcc, and GND.
  2. Inaccurate Temperature Readings

    • Cause: Sensor placed near heat sources or in direct sunlight.
    • Solution: Relocate the sensor to a location with stable ambient conditions.
  3. I²C Communication Errors

    • Cause: Missing pull-up resistors on SDA and SCL lines.
    • Solution: Add 4.7kΩ pull-up resistors to the SDA and SCL lines.

FAQs

Q: Can the TC74 measure negative temperatures?
A: Yes, the TC74 can measure temperatures as low as -40°C. The output is a signed 8-bit value.

Q: How do I change the I²C address of the TC74?
A: Configure the A0, A1, and A2 pins by connecting them to Vcc or GND. Refer to the datasheet for the address mapping.

Q: Is the TC74 suitable for battery-powered applications?
A: Yes, the TC74 has low power consumption, making it ideal for battery-powered devices.

Q: Can I use the TC74 with a 3.3V microcontroller?
A: Yes, the TC74 operates within a voltage range of 2.7V to 5.5V, so it is compatible with 3.3V systems.