How to Use PAM8302: Examples, Pinouts, and Specs
Introduction
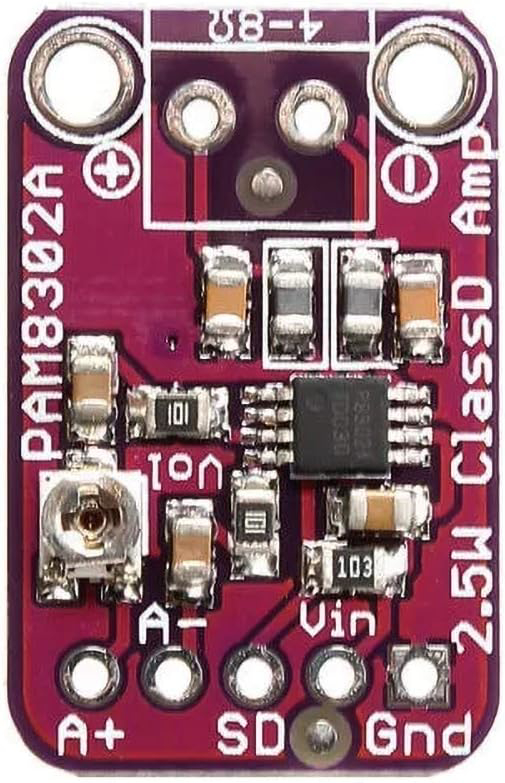
The PAM8302, manufactured by Adafruit (Part ID: Mono 2.5W Class D Audio Amplifier), is a highly efficient Class-D audio amplifier designed for driving small speakers. It delivers up to 2.5W of output power with minimal distortion, making it an excellent choice for portable and battery-powered applications. Its compact size and low power consumption make it ideal for projects requiring high-quality audio output in a small form factor.
Explore Projects Built with PAM8302


Explore Projects Built with PAM8302
Common Applications
- Portable speaker systems
- DIY audio projects
- Battery-powered devices
- Internet of Things (IoT) devices with audio output
- Educational and prototyping projects
Technical Specifications
The PAM8302 is designed to operate efficiently while maintaining excellent audio quality. Below are its key technical specifications:
| Parameter | Value |
|---|---|
| Operating Voltage | 2.0V to 5.5V |
| Output Power | 2.5W @ 4Ω, 10% THD+N, 5V supply |
| Efficiency | Up to 90% |
| Input Type | Analog (Single-Ended or Differential) |
| Gain | Fixed at 24dB |
| Speaker Impedance | 4Ω to 8Ω |
| Total Harmonic Distortion | < 0.1% @ 1W, 8Ω, 1kHz |
| Quiescent Current | ~4mA |
| Shutdown Current | < 0.1µA |
| Dimensions | 20mm x 20mm x 2mm |
Pin Configuration and Descriptions
The PAM8302 module has a simple pinout for easy integration into your projects. Below is the pin configuration:
| Pin Name | Description |
|---|---|
| VIN | Power supply input (2.0V to 5.5V). Connect to a regulated power source. |
| GND | Ground connection. Connect to the ground of your circuit. |
| A+ | Positive audio input. Connect to the positive terminal of your audio source. |
| A- | Negative audio input. Connect to the negative terminal of your audio source. |
| SPK+ | Positive speaker output. Connect to the positive terminal of your speaker. |
| SPK- | Negative speaker output. Connect to the negative terminal of your speaker. |
| SD | Shutdown pin. Pull low to disable the amplifier and reduce power consumption. |
Usage Instructions
The PAM8302 is straightforward to use in audio amplification circuits. Follow the steps below to integrate it into your project:
Basic Circuit Setup
- Power Supply: Connect the VIN pin to a regulated power source (2.0V to 5.5V). Ensure the GND pin is connected to the ground of your circuit.
- Audio Input: Connect your audio source to the A+ and A- pins. For single-ended input, connect A- to GND.
- Speaker Connection: Connect the SPK+ and SPK- pins to the positive and negative terminals of your speaker, respectively. Use a speaker with an impedance of 4Ω to 8Ω.
- Shutdown Control (Optional): To enable the amplifier, leave the SD pin unconnected or pull it high. To disable the amplifier, pull the SD pin low.
Important Considerations
- Speaker Selection: Use speakers with an impedance of 4Ω or higher to avoid overloading the amplifier.
- Power Supply: Ensure the power supply voltage does not exceed 5.5V to prevent damage to the component.
- Heat Dissipation: The PAM8302 is highly efficient, but ensure proper ventilation if operating at high power levels for extended periods.
- Noise Reduction: Use short, shielded wires for audio input to minimize noise and interference.
Example: Connecting PAM8302 to an Arduino UNO
The PAM8302 can be used with an Arduino UNO to amplify audio signals. Below is an example of how to connect and control the amplifier:
Circuit Connections
- Connect the VIN pin of the PAM8302 to the 5V pin of the Arduino.
- Connect the GND pin of the PAM8302 to the GND pin of the Arduino.
- Connect the A+ pin to an audio signal source (e.g., a DAC output or PWM pin from the Arduino).
- Connect the A- pin to GND.
- Connect SPK+ and SPK- to a speaker.
Example Arduino Code
/*
  Example code for generating a PWM audio signal to drive the PAM8302
  amplifier using an Arduino UNO. This code generates a simple square
  wave tone on pin 9.

  Note: Use a low-pass filter or DAC for better audio quality.
*/

const int audioPin = 9; // PWM pin connected to A+ of PAM8302

void setup() {
  pinMode(audioPin, OUTPUT); // Set the audio pin as an output
}

void loop() {
  // Generate a 1kHz square wave tone
  tone(audioPin, 1000); // Play a 1kHz tone
  delay(1000);          // Play for 1 second
  noTone(audioPin);     // Stop the tone
  delay(1000);          // Wait for 1 second
}
Troubleshooting and FAQs
Common Issues and Solutions
No Sound Output
- Cause: Incorrect wiring or insufficient power supply.
- Solution: Double-check all connections and ensure the power supply voltage is within the specified range.
Distorted Audio
- Cause: Overdriving the amplifier or using a low-impedance speaker.
- Solution: Reduce the input signal amplitude or use a speaker with an impedance of 4Ω or higher.
Excessive Noise
- Cause: Long or unshielded audio input wires.
- Solution: Use short, shielded wires for the audio input and ensure proper grounding.
Amplifier Not Powering On
- Cause: SD pin is pulled low or disconnected power supply.
- Solution: Ensure the SD pin is pulled high or left unconnected, and verify the power supply.
FAQs
Q: Can I use the PAM8302 with a 3.3V power supply?
A: Yes, the PAM8302 operates with a supply voltage as low as 2.0V, so it is compatible with 3.3V systems.
Q: What is the maximum speaker power I can use?
A: The PAM8302 can drive up to 2.5W into a 4Ω speaker with a 5V power supply. Ensure your speaker can handle this power level.
Q: Can I use the PAM8302 with stereo audio?
A: No, the PAM8302 is a mono amplifier. For stereo audio, you will need two PAM8302 modules.
Q: How do I reduce power consumption in my project?
A: Use the SD pin to disable the amplifier when not in use. This reduces the current draw to less than 0.1µA.
By following this documentation, you can effectively integrate the PAM8302 into your audio projects and achieve high-quality sound output.