Cirkit Designer Logo
Cirkit Designer
Your all-in-one circuit design IDE
Home / 
Component Documentation

How to Use BUZZER_PIXHAWK: Examples, Pinouts, and Specs

Image of BUZZER_PIXHAWK
Cirkit Designer LogoDesign with BUZZER_PIXHAWK in Cirkit Designer

Introduction

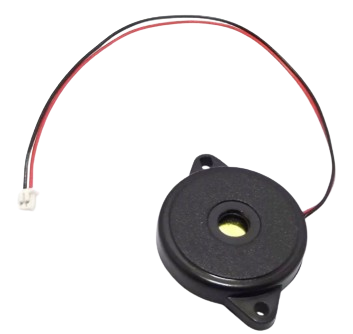
The BUZZER_PIXHAWK is an audio output device specifically designed for use with the Pixhawk flight controller. It provides audible alerts and notifications, ensuring that users are informed of critical system statuses, warnings, and other operational events during flight operations. This component is essential for enhancing situational awareness in drone and UAV systems.

Explore Projects Built with BUZZER_PIXHAWK

Use Cirkit Designer to design, explore, and prototype these projects online. Some projects support real-time simulation. Click "Open Project" to start designing instantly!
Raspberry Pi Pico W-Based Smart Safety System with Flame Detection and Intruder Alerts
Image of final: A project utilizing BUZZER_PIXHAWK in a practical application
This circuit is a multi-sensor monitoring system using a Raspberry Pi Pico W microcontroller. It includes a flame sensor, a buzzer module, a microphone, and a Hall effect sensor for detecting various environmental conditions such as fire, sound, and magnetic fields. The microcontroller is programmed to send notifications via Wi-Fi and activate the buzzer based on sensor inputs, potentially for a security or safety monitoring application.
Cirkit Designer LogoOpen Project in Cirkit Designer
Raspberry Pi Pico-Based Gas Detection System with LCD Display and Buzzer Alert
Image of Gas Detector: A project utilizing BUZZER_PIXHAWK in a practical application
This circuit features a Raspberry Pi Pico microcontroller interfaced with various components including a 16x2 I2C LCD, an MQ-9 gas sensor, a potentiometer, a buzzer, and a pushbutton. The circuit is designed to read sensor data, display information on the LCD, and control the buzzer and other peripherals through the microcontroller.
Cirkit Designer LogoOpen Project in Cirkit Designer
ESP32-Based Intruder Alert System with Piezo and PIR Sensors, Wi-Fi Enabled
Image of Mohith ESP32: A project utilizing BUZZER_PIXHAWK in a practical application
This circuit is a security system that uses multiple piezo sensors and a PIR sensor to detect motion or vibrations. When any sensor is triggered, the ESP32 Devkit V1 microcontroller activates a buzzer and uses the ESP32-CAM module to capture a photo, which is then sent to the owner via WiFi.
Cirkit Designer LogoOpen Project in Cirkit Designer
Photon 2 Motion Detector Alarm with PIR Sensor and Wi-Fi Control
Image of final project: A project utilizing BUZZER_PIXHAWK in a practical application
This circuit is a motion-activated alarm system using a Photon microcontroller, a PIR sensor, a piezo buzzer, a red LED, and a pushbutton. When motion is detected by the PIR sensor, the red LED lights up and the buzzer sounds an alarm, which can be deactivated manually via the pushbutton or remotely through the Particle Cloud.
Cirkit Designer LogoOpen Project in Cirkit Designer

Explore Projects Built with BUZZER_PIXHAWK

Use Cirkit Designer to design, explore, and prototype these projects online. Some projects support real-time simulation. Click "Open Project" to start designing instantly!
Image of final: A project utilizing BUZZER_PIXHAWK in a practical application
Raspberry Pi Pico W-Based Smart Safety System with Flame Detection and Intruder Alerts
This circuit is a multi-sensor monitoring system using a Raspberry Pi Pico W microcontroller. It includes a flame sensor, a buzzer module, a microphone, and a Hall effect sensor for detecting various environmental conditions such as fire, sound, and magnetic fields. The microcontroller is programmed to send notifications via Wi-Fi and activate the buzzer based on sensor inputs, potentially for a security or safety monitoring application.
Cirkit Designer LogoOpen Project in Cirkit Designer
Image of Gas Detector: A project utilizing BUZZER_PIXHAWK in a practical application
Raspberry Pi Pico-Based Gas Detection System with LCD Display and Buzzer Alert
This circuit features a Raspberry Pi Pico microcontroller interfaced with various components including a 16x2 I2C LCD, an MQ-9 gas sensor, a potentiometer, a buzzer, and a pushbutton. The circuit is designed to read sensor data, display information on the LCD, and control the buzzer and other peripherals through the microcontroller.
Cirkit Designer LogoOpen Project in Cirkit Designer
Image of Mohith ESP32: A project utilizing BUZZER_PIXHAWK in a practical application
ESP32-Based Intruder Alert System with Piezo and PIR Sensors, Wi-Fi Enabled
This circuit is a security system that uses multiple piezo sensors and a PIR sensor to detect motion or vibrations. When any sensor is triggered, the ESP32 Devkit V1 microcontroller activates a buzzer and uses the ESP32-CAM module to capture a photo, which is then sent to the owner via WiFi.
Cirkit Designer LogoOpen Project in Cirkit Designer
Image of final project: A project utilizing BUZZER_PIXHAWK in a practical application
Photon 2 Motion Detector Alarm with PIR Sensor and Wi-Fi Control
This circuit is a motion-activated alarm system using a Photon microcontroller, a PIR sensor, a piezo buzzer, a red LED, and a pushbutton. When motion is detected by the PIR sensor, the red LED lights up and the buzzer sounds an alarm, which can be deactivated manually via the pushbutton or remotely through the Particle Cloud.
Cirkit Designer LogoOpen Project in Cirkit Designer

Common Applications and Use Cases

  • Flight Status Alerts: Notifies users of system states such as arming, disarming, and errors.
  • Warning Signals: Provides audio warnings for low battery, GPS issues, or other critical conditions.
  • System Feedback: Confirms user actions like parameter changes or mode switches.
  • UAV and Drone Systems: Commonly used in drones, quadcopters, and other UAVs equipped with Pixhawk controllers.

Technical Specifications

Key Technical Details

  • Operating Voltage: 3.3V to 5V DC
  • Current Consumption: < 30mA
  • Sound Pressure Level (SPL): ≥ 85 dB at 10 cm
  • Frequency Range: 2 kHz to 4 kHz
  • Connector Type: 3-pin JST-GH
  • Dimensions: 20mm x 20mm x 10mm
  • Weight: 5 grams

Pin Configuration and Descriptions

The BUZZER_PIXHAWK uses a 3-pin JST-GH connector for interfacing with the Pixhawk flight controller. The pinout is as follows:

Pin Number Pin Name Description
1 VCC Power supply input (3.3V to 5V DC)
2 GND Ground connection
3 SIGNAL Control signal from Pixhawk

Usage Instructions

How to Use the BUZZER_PIXHAWK in a Circuit

  1. Connection to Pixhawk:

    • Locate the "BUZZER" port on the Pixhawk flight controller.
    • Connect the BUZZER_PIXHAWK to the port using the 3-pin JST-GH connector. Ensure proper alignment of the pins (VCC, GND, SIGNAL).
  2. Power Requirements:

    • The buzzer operates within a voltage range of 3.3V to 5V, which is supplied directly by the Pixhawk controller.
  3. Configuration:

    • The Pixhawk firmware (e.g., PX4 or ArduPilot) automatically manages the buzzer's operation. No additional configuration is typically required.
    • Ensure that the firmware is up-to-date to support all buzzer functionalities.
  4. Testing:

    • Power on the Pixhawk system. The buzzer should emit a startup tone, indicating proper functionality.
    • Perform system actions (e.g., arming/disarming) to verify that the buzzer provides the expected audio feedback.

Important Considerations and Best Practices

  • Mounting: Securely mount the buzzer on the drone frame to prevent vibrations or disconnections during flight.
  • Volume: Ensure the buzzer is audible in the operating environment. For noisy conditions, consider using an external amplifier or a louder buzzer.
  • Signal Integrity: Avoid routing the SIGNAL wire near high-power components to prevent interference.
  • Firmware Compatibility: Verify that the Pixhawk firmware version supports the buzzer's features.

Example Code for Arduino UNO (Optional Use Case)

While the BUZZER_PIXHAWK is primarily designed for Pixhawk, it can also be used with an Arduino UNO for testing or custom applications. Below is an example code snippet:

// Example code to control BUZZER_PIXHAWK with Arduino UNO
// Connect VCC to 5V, GND to GND, and SIGNAL to a PWM-capable pin (e.g., D9)

#define BUZZER_PIN 9  // Define the pin connected to the SIGNAL pin of the buzzer

void setup() {
  pinMode(BUZZER_PIN, OUTPUT);  // Set the buzzer pin as an output
}

void loop() {
  // Generate a 2 kHz tone for 500 ms
  tone(BUZZER_PIN, 2000, 500);
  delay(1000);  // Wait for 1 second

  // Generate a 4 kHz tone for 500 ms
  tone(BUZZER_PIN, 4000, 500);
  delay(1000);  // Wait for 1 second
}

Troubleshooting and FAQs

Common Issues and Solutions

  1. No Sound from the Buzzer:

    • Cause: Incorrect connection or insufficient power supply.
    • Solution: Verify the pin connections (VCC, GND, SIGNAL) and ensure the Pixhawk is powered on.
  2. Buzzer Emits Continuous Tone:

    • Cause: Firmware issue or incorrect SIGNAL input.
    • Solution: Update the Pixhawk firmware and check the SIGNAL wire for interference.
  3. Low Volume or Distorted Sound:

    • Cause: Environmental noise or damaged buzzer.
    • Solution: Test the buzzer in a quieter environment or replace it if damaged.
  4. Buzzer Not Responding to System Events:

    • Cause: Misconfigured Pixhawk settings.
    • Solution: Check the Pixhawk configuration parameters related to the buzzer (e.g., NTF_BUZZ_ENABLE).

FAQs

  • Q: Can I use the BUZZER_PIXHAWK with other flight controllers?
    A: The buzzer is optimized for Pixhawk but may work with other controllers that support similar signaling.

  • Q: How do I reduce the buzzer's volume?
    A: You can use a resistor in series with the SIGNAL pin to reduce the volume, though this may affect performance.

  • Q: Is the buzzer waterproof?
    A: No, the BUZZER_PIXHAWK is not waterproof. Protect it from moisture during operation.

  • Q: Can I extend the buzzer's cable?
    A: Yes, but ensure the extension does not introduce significant resistance or signal degradation.

This concludes the documentation for the BUZZER_PIXHAWK. For further assistance, refer to the Pixhawk user manual or contact the manufacturer.