Cirkit Designer Logo
Cirkit Designer
Your all-in-one circuit design IDE
Home / 
Component Documentation

How to Use ESP32C3 Supermini: Examples, Pinouts, and Specs

Image of ESP32C3 Supermini
Cirkit Designer LogoDesign with ESP32C3 Supermini in Cirkit Designer

Introduction

The ESP32C3 Supermini is a compact and powerful microcontroller module designed for Internet of Things (IoT) applications. It integrates Wi-Fi and Bluetooth connectivity, making it ideal for smart home devices, wearable electronics, and various wireless sensor networks. With its rich set of features and low power consumption, the ESP32C3 Supermini is suitable for a wide range of applications, from simple DIY projects to complex industrial systems.

Explore Projects Built with ESP32C3 Supermini

Use Cirkit Designer to design, explore, and prototype these projects online. Some projects support real-time simulation. Click "Open Project" to start designing instantly!
ESP32C3 Supermini-Based Smart Environment Monitor and Lighting Control System
Image of Bedside RGB and Lamp: A project utilizing ESP32C3 Supermini in a practical application
This is a smart control system featuring an ESP32C3 Supermini microcontroller for interfacing with various sensors and actuators. It includes temperature and humidity sensing, RGB LED strip control, user input via a pushbutton and rotary encoder, and AC power control through a two-channel relay. The system is powered by an AC source converted to DC by the HLK-PM12 module.
Cirkit Designer LogoOpen Project in Cirkit Designer
ESP32-C3 and Micro SD Card Module for Data Logging
Image of Esp 32 super mini with MicroSd module: A project utilizing ESP32C3 Supermini in a practical application
This circuit features an ESP32-C3 microcontroller interfaced with a Micro SD Card Module. The ESP32-C3 handles SPI communication with the SD card for data storage and retrieval, with specific GPIO pins assigned for MOSI, MISO, SCK, and CS signals.
Cirkit Designer LogoOpen Project in Cirkit Designer
ESP32C3 and LoRa-Enabled Environmental Sensing Node
Image of temperature_KA: A project utilizing ESP32C3 Supermini in a practical application
This circuit features an ESP32C3 Supermini microcontroller connected to a LORA_RA02 module and a DHT11 temperature and humidity sensor. The ESP32C3 handles communication with the LORA module via SPI (using GPIO05, GPIO06, GPIO10, and GPIO04 for MISO, MOSI, NSS, and SCK respectively) and GPIO01 and GPIO02 for additional control signals. The DHT11 sensor is interfaced through GPIO03 for data reading, and all components share a common power supply through the 3.3V and GND pins.
Cirkit Designer LogoOpen Project in Cirkit Designer
ESP32C3 Wi-Fi Enabled Weather Station with Micro SD Card Logging
Image of Esp 32 Micro Sd + Esp32 DHT 22: A project utilizing ESP32C3 Supermini in a practical application
The circuit consists of multiple ESP32C3 microcontrollers interfacing with DHT22 temperature and humidity sensors and a Micro SD Card module. One ESP32C3 scans for WiFi networks, while others read data from the DHT22 sensors and potentially store or process this data.
Cirkit Designer LogoOpen Project in Cirkit Designer

Explore Projects Built with ESP32C3 Supermini

Use Cirkit Designer to design, explore, and prototype these projects online. Some projects support real-time simulation. Click "Open Project" to start designing instantly!
Image of Bedside RGB and Lamp: A project utilizing ESP32C3 Supermini in a practical application
ESP32C3 Supermini-Based Smart Environment Monitor and Lighting Control System
This is a smart control system featuring an ESP32C3 Supermini microcontroller for interfacing with various sensors and actuators. It includes temperature and humidity sensing, RGB LED strip control, user input via a pushbutton and rotary encoder, and AC power control through a two-channel relay. The system is powered by an AC source converted to DC by the HLK-PM12 module.
Cirkit Designer LogoOpen Project in Cirkit Designer
Image of Esp 32 super mini with MicroSd module: A project utilizing ESP32C3 Supermini in a practical application
ESP32-C3 and Micro SD Card Module for Data Logging
This circuit features an ESP32-C3 microcontroller interfaced with a Micro SD Card Module. The ESP32-C3 handles SPI communication with the SD card for data storage and retrieval, with specific GPIO pins assigned for MOSI, MISO, SCK, and CS signals.
Cirkit Designer LogoOpen Project in Cirkit Designer
Image of temperature_KA: A project utilizing ESP32C3 Supermini in a practical application
ESP32C3 and LoRa-Enabled Environmental Sensing Node
This circuit features an ESP32C3 Supermini microcontroller connected to a LORA_RA02 module and a DHT11 temperature and humidity sensor. The ESP32C3 handles communication with the LORA module via SPI (using GPIO05, GPIO06, GPIO10, and GPIO04 for MISO, MOSI, NSS, and SCK respectively) and GPIO01 and GPIO02 for additional control signals. The DHT11 sensor is interfaced through GPIO03 for data reading, and all components share a common power supply through the 3.3V and GND pins.
Cirkit Designer LogoOpen Project in Cirkit Designer
Image of Esp 32 Micro Sd + Esp32 DHT 22: A project utilizing ESP32C3 Supermini in a practical application
ESP32C3 Wi-Fi Enabled Weather Station with Micro SD Card Logging
The circuit consists of multiple ESP32C3 microcontrollers interfacing with DHT22 temperature and humidity sensors and a Micro SD Card module. One ESP32C3 scans for WiFi networks, while others read data from the DHT22 sensors and potentially store or process this data.
Cirkit Designer LogoOpen Project in Cirkit Designer

Technical Specifications

Key Technical Details

  • CPU: 32-bit RISC-V single-core processor
  • Clock Frequency: Up to 160 MHz
  • Flash Memory: 4 MB
  • SRAM: 400 KB
  • Wi-Fi: 802.11 b/g/n (2.4 GHz)
  • Bluetooth: Bluetooth 5.0 LE
  • GPIO Pins: 22
  • ADC Channels: 6
  • DAC Channels: 2
  • UART: 2
  • SPI: 2
  • I2C: 2
  • PWM Channels: 8
  • Operating Voltage: 3.0 to 3.6 V
  • I/O Pin Voltage: 3.3 V (not 5V tolerant)
  • Operating Temperature: -40°C to 125°C

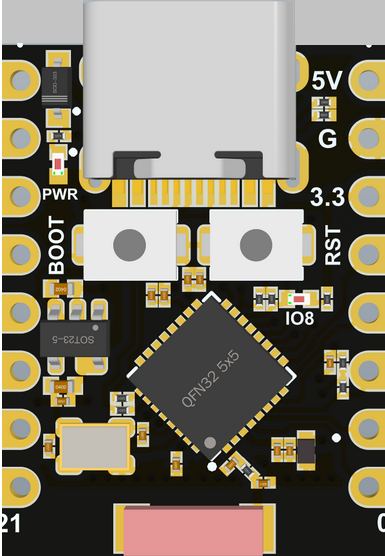
Pin Configuration and Descriptions

Pin Number Function Description
1 GND Ground
2 3V3 3.3V power supply
3 EN Chip enable. Active high.
4 IO0 General-purpose I/O and/or boot mode select.
... ... ...
n IO21 General-purpose I/O.

Note: This is a simplified representation. Refer to the actual datasheet for complete pinout information.

Usage Instructions

Integrating with a Circuit

  1. Power Supply: Ensure that the ESP32C3 Supermini is powered with a stable 3.3V supply. Exceeding the voltage rating can damage the device.

  2. GPIO Pins: When interfacing with other components, make sure that the voltage levels match the ESP32C3's 3.3V I/O levels to prevent damage.

  3. Antenna: For optimal wireless performance, ensure that the antenna area is clear of metal objects and other sources of interference.

  4. Programming: The ESP32C3 Supermini can be programmed using the ESP-IDF, Arduino IDE, or other compatible development environments.

Best Practices

  • Use a decoupling capacitor close to the power supply pins to smooth out voltage spikes.
  • Avoid running high-speed signals near the antenna to minimize interference.
  • Implement proper ESD precautions when handling the device to prevent static damage.

Example Code for Arduino UNO

#include <WiFi.h>

// Replace with your network credentials
const char* ssid = "your_SSID";
const char* password = "your_PASSWORD";

void setup() {
  Serial.begin(115200);
  
  // Connect to Wi-Fi
  WiFi.begin(ssid, password);
  while (WiFi.status() != WL_CONNECTED) {
    delay(500);
    Serial.println("Connecting to WiFi...");
  }
  Serial.println("Connected to WiFi");
}

void loop() {
  // Your main code would go here
}

Note: This code is for illustration purposes. Actual implementation may vary based on the specific requirements and the development environment.

Troubleshooting and FAQs

Common Issues

  • Wi-Fi Connectivity Problems: Ensure the antenna is not obstructed and the Wi-Fi credentials are correct.
  • Unexpected Resets: Check the power supply for stability and sufficient current capability.
  • I/O Pin Damage: Verify that the voltage levels are within the specified range for the I/O pins.

Solutions and Tips

  • Wi-Fi Reconnection: Implement a reconnection strategy in your code to handle temporary Wi-Fi outages.
  • Power Supply: Use a regulated power source and avoid long power leads that can introduce voltage drops.
  • ESD Precautions: Always ground yourself before handling the ESP32C3 Supermini to prevent electrostatic discharge damage.

FAQs

Q: Can the ESP32C3 Supermini be used with a 5V power supply? A: No, the operating voltage is 3.0 to 3.6V. Using a 5V supply can damage the microcontroller.

Q: Is the ESP32C3 Supermini compatible with Arduino IDE? A: Yes, it can be programmed using the Arduino IDE with the appropriate board support package installed.

Q: How many GPIO pins are available for general use? A: There are 22 GPIO pins available, but some may have specific functions, so check the datasheet for details.

For further assistance, consult the ESP32C3 Supermini's datasheet and the community forums dedicated to ESP32 development.