Cirkit Designer Logo
Cirkit Designer
Your all-in-one circuit design IDE
Home / 
Component Documentation

How to Use Touch Shield v11: Examples, Pinouts, and Specs

Image of Touch Shield v11
Cirkit Designer LogoDesign with Touch Shield v11 in Cirkit Designer

Introduction

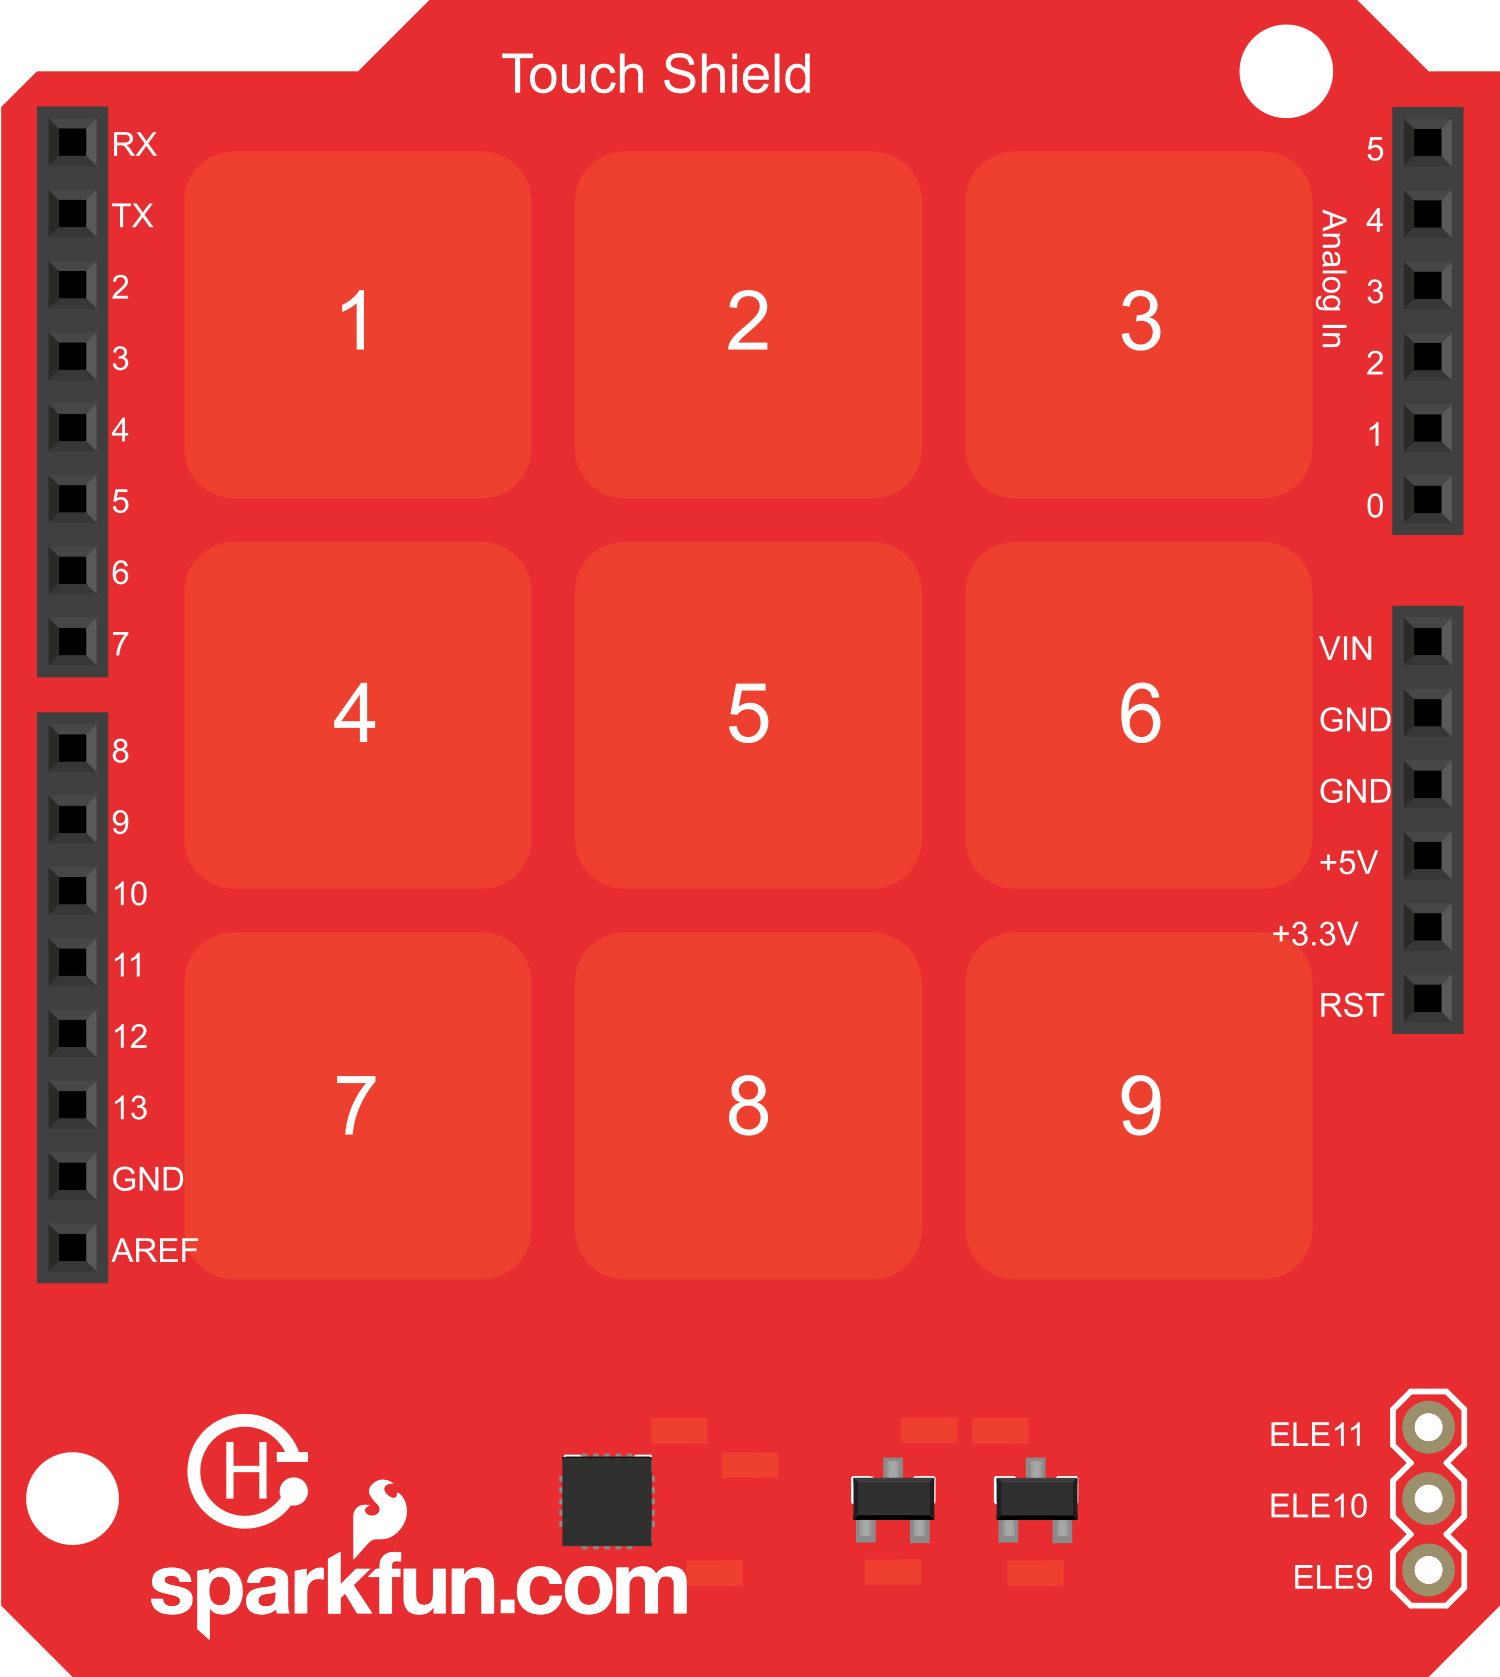
The Touch Shield v11 is an innovative electronic component designed to add touch sensing capabilities to your projects. It is an updated version of the previous Touch Shield, offering enhanced touch response and compatibility with a wide range of Arduino boards. This shield is ideal for creating interactive interfaces, such as control panels, keyboards, or other touch-responsive surfaces.

Explore Projects Built with Touch Shield v11

Use Cirkit Designer to design, explore, and prototype these projects online. Some projects support real-time simulation. Click "Open Project" to start designing instantly!
Arduino Sensor Shield with I2C LCD and Bluetooth Interface
Image of wallE: A project utilizing Touch Shield v11 in a practical application
This circuit features an Arduino Sensor Shield v5.0 interfaced with an I2C LCD Display and an HC-05 Bluetooth Module. The LCD Display is connected for power, ground, and I2C communication, allowing it to display data or messages. The HC-05 Bluetooth Module is wired for serial communication with the Arduino Sensor Shield, enabling wireless data exchange with other Bluetooth-enabled devices.
Cirkit Designer LogoOpen Project in Cirkit Designer
Arduino Sensor Shield-Based Smart Distance and Tilt Detection System with Ultrasonic and IR Sensors
Image of 1207: A project utilizing Touch Shield v11 in a practical application
This circuit integrates various sensors and actuators with an Arduino Sensor Shield to create an interactive system. It uses an ultrasonic sensor for distance measurement, an IR sensor for object detection, a tilt sensor for orientation detection, and an 8x8 LED matrix for visual feedback. Additionally, it controls a servo motor and a buzzer, responding to sensor inputs and user interactions.
Cirkit Designer LogoOpen Project in Cirkit Designer
Capacitive Touch and Ultrasonic Sensor Interface with Adafruit Feather nRF52840 Sense
Image of Senior Design Project: A project utilizing Touch Shield v11 in a practical application
This circuit features an Adafruit Feather nRF52840 Sense microcontroller connected to an ultrasonic sensor for distance measurement and an Adafruit AT42QT1010 capacitive touch sensor for touch input. The ultrasonic sensor's Trigger and Echo pins are interfaced with the microcontroller's digital pins D6 and D9, respectively, to send and receive ultrasonic signals. Additionally, a pressure-sensitive conductive sheet (Velostat) is connected in series with a 10k Ohm resistor to the microcontroller's analog pin A0, likely forming a pressure sensor.
Cirkit Designer LogoOpen Project in Cirkit Designer
Arduino Nano and 3.5 TFT LCD Shield Display Interface
Image of BAROMETR BMP280 TFT 9488: A project utilizing Touch Shield v11 in a practical application
This circuit interfaces an Arduino Nano with a 3.5-inch TFT LCD Shield, allowing the Arduino to control the display and read/write data to it. The connections include data lines, control signals, and power, enabling the Arduino to drive the LCD for various display applications.
Cirkit Designer LogoOpen Project in Cirkit Designer

Explore Projects Built with Touch Shield v11

Use Cirkit Designer to design, explore, and prototype these projects online. Some projects support real-time simulation. Click "Open Project" to start designing instantly!
Image of wallE: A project utilizing Touch Shield v11 in a practical application
Arduino Sensor Shield with I2C LCD and Bluetooth Interface
This circuit features an Arduino Sensor Shield v5.0 interfaced with an I2C LCD Display and an HC-05 Bluetooth Module. The LCD Display is connected for power, ground, and I2C communication, allowing it to display data or messages. The HC-05 Bluetooth Module is wired for serial communication with the Arduino Sensor Shield, enabling wireless data exchange with other Bluetooth-enabled devices.
Cirkit Designer LogoOpen Project in Cirkit Designer
Image of 1207: A project utilizing Touch Shield v11 in a practical application
Arduino Sensor Shield-Based Smart Distance and Tilt Detection System with Ultrasonic and IR Sensors
This circuit integrates various sensors and actuators with an Arduino Sensor Shield to create an interactive system. It uses an ultrasonic sensor for distance measurement, an IR sensor for object detection, a tilt sensor for orientation detection, and an 8x8 LED matrix for visual feedback. Additionally, it controls a servo motor and a buzzer, responding to sensor inputs and user interactions.
Cirkit Designer LogoOpen Project in Cirkit Designer
Image of Senior Design Project: A project utilizing Touch Shield v11 in a practical application
Capacitive Touch and Ultrasonic Sensor Interface with Adafruit Feather nRF52840 Sense
This circuit features an Adafruit Feather nRF52840 Sense microcontroller connected to an ultrasonic sensor for distance measurement and an Adafruit AT42QT1010 capacitive touch sensor for touch input. The ultrasonic sensor's Trigger and Echo pins are interfaced with the microcontroller's digital pins D6 and D9, respectively, to send and receive ultrasonic signals. Additionally, a pressure-sensitive conductive sheet (Velostat) is connected in series with a 10k Ohm resistor to the microcontroller's analog pin A0, likely forming a pressure sensor.
Cirkit Designer LogoOpen Project in Cirkit Designer
Image of BAROMETR BMP280 TFT 9488: A project utilizing Touch Shield v11 in a practical application
Arduino Nano and 3.5 TFT LCD Shield Display Interface
This circuit interfaces an Arduino Nano with a 3.5-inch TFT LCD Shield, allowing the Arduino to control the display and read/write data to it. The connections include data lines, control signals, and power, enabling the Arduino to drive the LCD for various display applications.
Cirkit Designer LogoOpen Project in Cirkit Designer

Common Applications and Use Cases

  • Interactive art installations
  • DIY game controllers
  • Home automation control panels
  • Prototyping user interfaces for devices
  • Educational tools for learning about touch sensing technology

Technical Specifications

Key Technical Details

  • Operating Voltage: 3.3V to 5V
  • Current Consumption: Typically 30mA (depends on usage)
  • Touch Sensing Resolution: 1024x1024
  • Communication: SPI interface
  • Compatibility: Works with Arduino UNO, Mega, and other compatible boards

Pin Configuration and Descriptions

Pin Number Function Description
1 VCC Power supply (3.3V to 5V)
2 GND Ground
3 RESET Reset pin, active low
4 INT Interrupt pin, active low
5 SDA SPI data line
6 SCL SPI clock line
7 CS SPI chip select, active low

Usage Instructions

How to Use the Component in a Circuit

  1. Powering the Shield: Connect the VCC pin to the 5V output on your Arduino and the GND pin to one of the ground pins.
  2. SPI Communication: Connect the SDA, SCL, and CS pins to the corresponding SPI pins on your Arduino board.
  3. Reset and Interrupt: Connect the RESET pin to the reset pin on your Arduino if you wish to control the shield's reset function. The INT pin can be connected to an external interrupt pin on your Arduino to handle touch events.

Important Considerations and Best Practices

  • Ensure that the power supply is within the specified voltage range to prevent damage.
  • Use proper ESD precautions when handling the Touch Shield v11 to avoid static damage.
  • When designing a touch interface, consider the placement of touch elements to avoid accidental activations.
  • Calibrate the touch sensing functionality for your specific application to improve accuracy.

Example Code for Arduino UNO

#include <SPI.h>

// Define the Touch Shield v11 SPI pin connections
#define CS_PIN   10
#define RESET_PIN 9

void setup() {
  // Initialize serial communication for debugging
  Serial.begin(9600);
  
  // Set up the SPI communication
  SPI.begin();
  pinMode(CS_PIN, OUTPUT);
  pinMode(RESET_PIN, OUTPUT);
  
  // Reset the Touch Shield v11
  digitalWrite(RESET_PIN, LOW);
  delay(10);
  digitalWrite(RESET_PIN, HIGH);
  delay(10);
  
  // Additional setup code as required for your application
}

void loop() {
  // Code to read touch events and respond accordingly
  // This will depend on the specific functions provided by the Touch Shield v11 library
}

Troubleshooting and FAQs

Common Issues Users Might Face

  • Touch Sensitivity: If the touch sensitivity is too low or too high, recalibrate the touch sensor.
  • SPI Communication Errors: Ensure that the SPI pins are correctly connected and that there are no loose connections.
  • Power Issues: Verify that the shield is receiving the correct voltage and that the power supply is stable.

Solutions and Tips for Troubleshooting

  • Calibration: Follow the calibration procedure outlined in the Touch Shield v11 library documentation.
  • Connections: Double-check all connections, especially the SPI lines, for solid contact.
  • Code Debugging: Use serial output to debug and verify that the shield is properly initialized and responding to touch events.

FAQs

Q: Can the Touch Shield v11 work with 3.3V systems? A: Yes, the shield can operate at 3.3V, but ensure that all connected components are compatible with this voltage level.

Q: How do I update the firmware on the Touch Shield v11? A: Firmware updates, if available, can be applied through the SPI interface using a specific procedure provided by the manufacturer.

Q: What is the maximum touch sensing area of the Touch Shield v11? A: The maximum sensing area is determined by the resolution, which is 1024x1024. The physical size will depend on the overlaying touch panel used with the shield.

For further assistance, consult the manufacturer's support resources or community forums dedicated to Arduino and touch sensing technology.