How to Use Grove vision ai v2: Examples, Pinouts, and Specs
Introduction
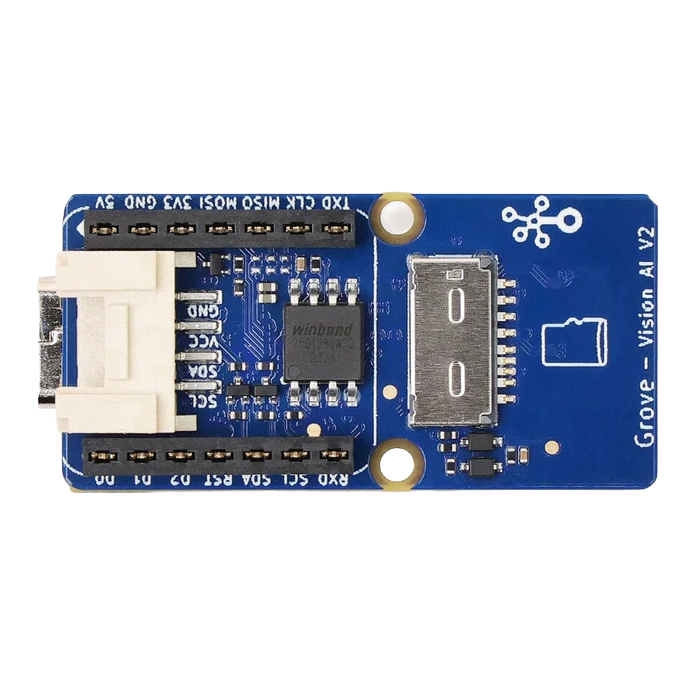
The Grove Vision AI V2, developed by Seeed Studio, is an advanced vision sensor equipped with artificial intelligence capabilities. It is designed to perform image recognition, object detection, and other visual processing tasks with high efficiency. This component is ideal for developers looking to integrate AI-powered vision into their projects without requiring extensive knowledge of machine learning or computer vision.
Explore Projects Built with Grove vision ai v2


Explore Projects Built with Grove vision ai v2
Common Applications and Use Cases
- Object detection and classification
- Face recognition and tracking
- Smart home automation (e.g., gesture-based control)
- Robotics and autonomous vehicles
- Industrial automation and quality control
- Educational projects and AI prototyping
Technical Specifications
The Grove Vision AI V2 is a compact and powerful module with the following key specifications:
| Parameter | Specification |
|---|---|
| Processor | Dual-core ARM Cortex-M7 (600 MHz) |
| AI Framework | TensorFlow Lite Micro, MicroPython |
| Camera Resolution | 2 MP (1600 x 1200 pixels) |
| Communication Interfaces | UART, I2C, SPI, GPIO |
| Input Voltage | 3.3V - 5V DC |
| Power Consumption | ~200 mA (typical) |
| Dimensions | 40 mm x 20 mm x 10 mm |
| Operating Temperature | -20°C to 70°C |
Pin Configuration and Descriptions
The Grove Vision AI V2 features a standard Grove connector and additional pins for flexible interfacing. Below is the pin configuration:
| Pin Name | Type | Description |
|---|---|---|
| VCC | Power Input | Power supply input (3.3V - 5V DC) |
| GND | Ground | Ground connection |
| RX | UART Input | UART receive pin for serial communication |
| TX | UART Output | UART transmit pin for serial communication |
| SDA | I2C Data | I2C data line for communication |
| SCL | I2C Clock | I2C clock line for communication |
| GPIO | Digital I/O | General-purpose input/output pin |
Usage Instructions
The Grove Vision AI V2 is designed for easy integration with microcontrollers such as Arduino, Raspberry Pi, and other platforms. Below are the steps to use the component effectively:
Step 1: Hardware Setup
- Connect the Grove Vision AI V2 to your microcontroller using the Grove connector or jumper wires.
- Ensure the power supply is within the specified range (3.3V - 5V DC).
- If using UART, connect the RX and TX pins to the corresponding UART pins on your microcontroller.
- For I2C communication, connect the SDA and SCL pins to the appropriate I2C pins on your microcontroller.
Step 2: Software Setup
- Install the required libraries and drivers for your platform. For Arduino, install the Seeed_Arduino_GroveAI library from the Arduino IDE Library Manager.
- Configure the communication interface (UART or I2C) in your code.
Step 3: Example Code for Arduino UNO
Below is an example of how to use the Grove Vision AI V2 with an Arduino UNO via UART:
#include <SoftwareSerial.h>

// Define the UART pins for communication with Grove Vision AI V2
SoftwareSerial groveAI(2, 3); // RX = Pin 2, TX = Pin 3

void setup() {
  Serial.begin(9600); // Initialize Serial Monitor
  groveAI.begin(115200); // Initialize Grove Vision AI at 115200 baud rate

  Serial.println("Grove Vision AI V2 Test");
}

void loop() {
  if (groveAI.available()) {
    // Read data from Grove Vision AI and print to Serial Monitor
    String data = groveAI.readString();
    Serial.println("Data from Vision AI: " + data);
  }

  delay(100); // Small delay to avoid flooding the Serial Monitor
}
Important Considerations and Best Practices
- Ensure the module is powered within the specified voltage range to avoid damage.
- Use a stable power source to prevent communication errors or unexpected behavior.
- When using UART, ensure the baud rate matches the configuration of the Grove Vision AI V2.
- For I2C communication, ensure the correct pull-up resistors are in place if required by your setup.
- Avoid exposing the camera lens to direct sunlight or harsh environments to maintain image quality.
Troubleshooting and FAQs
Common Issues and Solutions
No response from the module:
- Verify the power supply and connections.
- Check the communication interface (UART/I2C) and ensure the correct pins are used.
- Confirm the baud rate or I2C address matches the module's configuration.
Data corruption or incomplete data:
- Use shorter cables to reduce signal interference.
- Ensure a stable power supply to the module.
Poor image recognition performance:
- Ensure the camera lens is clean and unobstructed.
- Provide adequate lighting for the target object.
Module overheating:
- Check the operating environment and ensure proper ventilation.
- Avoid prolonged operation in high-temperature conditions.
FAQs
Q: Can the Grove Vision AI V2 work with Raspberry Pi?
A: Yes, the module can be connected to a Raspberry Pi using UART or I2C. You may need to install additional libraries for Python-based communication.
Q: What AI models are supported?
A: The module supports TensorFlow Lite Micro models. You can train and deploy custom models using TensorFlow tools.
Q: How do I update the firmware?
A: Firmware updates can be performed using the Seeed Studio tools and instructions provided on their official website.
Q: Can I use multiple Grove Vision AI modules in one project?
A: Yes, you can use multiple modules by assigning unique I2C addresses or using separate UART interfaces.
By following this documentation, you can effectively integrate the Grove Vision AI V2 into your projects and leverage its powerful AI capabilities.