How to Use 3.7V Rechargeable Li-ion Nokia Battery: Examples, Pinouts, and Specs
Introduction
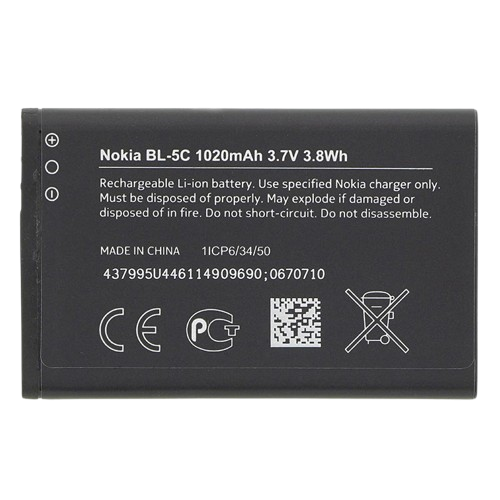
The Nokia BL-5C 1020mAh 3.7V 3.8Wh is a compact, rechargeable lithium-ion battery designed for use in portable electronic devices. Manufactured by Nokia, this battery is known for its high energy density, long cycle life, and reliable performance. It provides a nominal voltage of 3.7V and a capacity of 1020mAh, making it suitable for applications requiring lightweight and efficient power sources.
Explore Projects Built with 3.7V Rechargeable Li-ion Nokia Battery


Explore Projects Built with 3.7V Rechargeable Li-ion Nokia Battery
Common Applications and Use Cases
- Mobile phones and smartphones
- Portable media players
- DIY electronics projects
- Backup power for small devices
- Robotics and IoT applications
Technical Specifications
The following table outlines the key technical details of the Nokia BL-5C battery:
| Parameter | Specification |
|---|---|
| Manufacturer | Nokia |
| Part ID | BL-5C |
| Nominal Voltage | 3.7V |
| Capacity | 1020mAh |
| Energy | 3.8Wh |
| Chemistry | Lithium-ion (Li-ion) |
| Dimensions (L x W x H) | 53mm x 34mm x 5.5mm |
| Weight | ~22g |
| Charging Voltage | 4.2V (maximum) |
| Discharge Cutoff | 3.0V (minimum) |
| Operating Temperature | 0°C to 45°C (charge) |
| -20°C to 60°C (discharge) | |
| Cycle Life | ~500 charge/discharge cycles |
Pin Configuration and Descriptions
The BL-5C battery has three terminals, as described in the table below:
| Pin | Label | Description |
|---|---|---|
| 1 | B+ | Positive terminal for power output |
| 2 | B- | Negative terminal for power output |
| 3 | T | Temperature sensing pin (used for safety monitoring) |
Note: The temperature sensing pin (T) is optional and may not be used in all applications.
Usage Instructions
How to Use the Component in a Circuit
- Connection: Connect the positive terminal (B+) to the positive rail of your circuit and the negative terminal (B-) to the ground rail. If your application supports temperature monitoring, connect the T pin to the appropriate input on your circuit.
- Charging: Use a Li-ion battery charger with a constant current/constant voltage (CC/CV) charging profile. Ensure the charging voltage does not exceed 4.2V.
- Discharging: Avoid discharging the battery below 3.0V to prevent damage and reduce cycle life.
- Protection Circuit: For safety, use a battery management system (BMS) or protection circuit module (PCM) to prevent overcharging, over-discharging, and short circuits.
Important Considerations and Best Practices
- Avoid Overcharging: Overcharging the battery beyond 4.2V can lead to overheating and potential safety hazards.
- Temperature Range: Operate the battery within the specified temperature range to ensure optimal performance and safety.
- Storage: Store the battery in a cool, dry place at ~40% charge for long-term storage.
- Recycling: Dispose of the battery responsibly at an authorized recycling facility.
Example: Using the BL-5C with an Arduino UNO
The BL-5C can be used to power an Arduino UNO via its VIN pin. Below is an example of how to monitor the battery voltage using the Arduino's analog input:
// Example: Monitor BL-5C battery voltage with Arduino UNO
const int batteryPin = A0;  // Analog pin connected to battery voltage divider
const float voltageDividerRatio = 2.0; // Adjust based on your resistor values
const float referenceVoltage = 5.0;   // Arduino UNO's reference voltage

void setup() {
  Serial.begin(9600); // Initialize serial communication
}

void loop() {
  int analogValue = analogRead(batteryPin); // Read analog value from pin
  float batteryVoltage = (analogValue / 1023.0) * referenceVoltage * voltageDividerRatio;

  // Print the battery voltage to the Serial Monitor
  Serial.print("Battery Voltage: ");
  Serial.print(batteryVoltage);
  Serial.println(" V");

  delay(1000); // Wait for 1 second before the next reading
}
Note: Use a voltage divider circuit to step down the battery voltage to a safe level for the Arduino's analog input (0-5V). For example, use two resistors in a 1:1 ratio to divide the voltage by 2.
Troubleshooting and FAQs
Common Issues and Solutions
Battery Not Charging
- Cause: Faulty charger or incorrect charging voltage.
- Solution: Verify the charger output is 4.2V and compatible with Li-ion batteries.
Battery Drains Quickly
- Cause: High current draw or aging battery.
- Solution: Check the load current and replace the battery if it has reached the end of its cycle life.
Overheating During Use
- Cause: Overcharging, short circuit, or excessive current draw.
- Solution: Use a BMS or PCM to protect the battery and ensure proper ventilation.
Arduino Reads Incorrect Voltage
- Cause: Incorrect voltage divider ratio or loose connections.
- Solution: Double-check the resistor values in the voltage divider and ensure secure connections.
FAQs
Q1: Can I use the BL-5C battery without a protection circuit?
A1: While it is possible, it is not recommended. A protection circuit ensures safety by preventing overcharging, over-discharging, and short circuits.
Q2: How long does the BL-5C battery last on a single charge?
A2: The runtime depends on the load current. For example, a 100mA load will last approximately 10 hours (1020mAh ÷ 100mA).
Q3: Can I charge the BL-5C with a USB charger?
A3: Yes, if the USB charger outputs 4.2V and is designed for Li-ion batteries. Avoid using chargers with higher voltages.
Q4: Is the BL-5C battery safe for DIY projects?
A4: Yes, as long as you follow proper safety guidelines, including using a protection circuit and avoiding overcharging or over-discharging.
Q5: How do I know if the battery is fully charged?
A5: The battery is fully charged when the charging voltage reaches 4.2V and the current drops to a minimal level (typically <50mA).