Cirkit Designer Logo
Cirkit Designer
Your all-in-one circuit design IDE
Home / 
Component Documentation

How to Use Photon 2: Examples, Pinouts, and Specs

Image of Photon 2
Cirkit Designer LogoDesign with Photon 2 in Cirkit Designer

Introduction

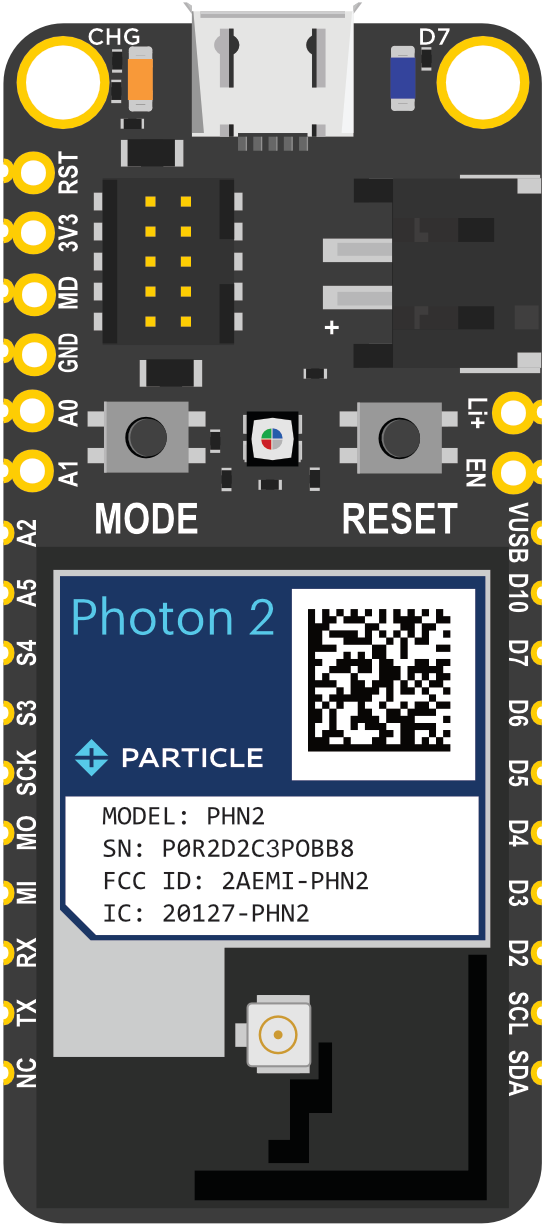
The Photon 2 is a powerful Wi-Fi development kit designed by Particle for creating connected projects and products. It features a Broadcom Wi-Fi chip, a robust ARM Cortex M3 microcontroller, and seamless integration with the Particle cloud platform. This makes it an ideal choice for IoT (Internet of Things) applications, home automation, and other connected projects.

Explore Projects Built with Photon 2

Use Cirkit Designer to design, explore, and prototype these projects online. Some projects support real-time simulation. Click "Open Project" to start designing instantly!
Photon 2 Motion Detector Alarm with PIR Sensor and Wi-Fi Control
Image of final project: A project utilizing Photon 2 in a practical application
This circuit is a motion-activated alarm system using a Photon microcontroller, a PIR sensor, a piezo buzzer, a red LED, and a pushbutton. When motion is detected by the PIR sensor, the red LED lights up and the buzzer sounds an alarm, which can be deactivated manually via the pushbutton or remotely through the Particle Cloud.
Cirkit Designer LogoOpen Project in Cirkit Designer
ESP32-Based Wi-Fi Controlled Laser Shooting Game with OLED Display
Image of 123: A project utilizing Photon 2 in a practical application
This circuit is a laser shooting game controlled by a PS3 controller, featuring an ESP32 microcontroller, two photosensitive sensors for light detection, and a motor driver to control two DC motors. The game includes an OLED display for score visualization, and a MOSFET to control an LED bulb, with power supplied by a 12V battery and regulated by a DC-DC step-down converter.
Cirkit Designer LogoOpen Project in Cirkit Designer
ESP32-Based Security System with RFID and Laser Intrusion Detection
Image of CPE doorlock system upgrade: A project utilizing Photon 2 in a practical application
This circuit is a security and access control system featuring motion detection, laser beam-break sensing, and RFID scanning, interfaced with a keypad and visual/audible indicators, powered by a solar-charged battery, and capable of controlling an electric lock via a relay.
Cirkit Designer LogoOpen Project in Cirkit Designer
ESP32-Based Security System with RFID, PIR Sensor, and Laser Modules
Image of CPE doorlock system upgrade: A project utilizing Photon 2 in a practical application
This circuit is designed for a security and access control system with motion detection, beam-break detection, RFID-based access, and user input via a keypad. It is managed by an ESP32 microcontroller, which also controls an OLED display and an electric lock through a relay. The system is powered by a solar panel with a charge controller and UPS battery, with buck converters for voltage regulation.
Cirkit Designer LogoOpen Project in Cirkit Designer

Explore Projects Built with Photon 2

Use Cirkit Designer to design, explore, and prototype these projects online. Some projects support real-time simulation. Click "Open Project" to start designing instantly!
Image of final project: A project utilizing Photon 2 in a practical application
Photon 2 Motion Detector Alarm with PIR Sensor and Wi-Fi Control
This circuit is a motion-activated alarm system using a Photon microcontroller, a PIR sensor, a piezo buzzer, a red LED, and a pushbutton. When motion is detected by the PIR sensor, the red LED lights up and the buzzer sounds an alarm, which can be deactivated manually via the pushbutton or remotely through the Particle Cloud.
Cirkit Designer LogoOpen Project in Cirkit Designer
Image of 123: A project utilizing Photon 2 in a practical application
ESP32-Based Wi-Fi Controlled Laser Shooting Game with OLED Display
This circuit is a laser shooting game controlled by a PS3 controller, featuring an ESP32 microcontroller, two photosensitive sensors for light detection, and a motor driver to control two DC motors. The game includes an OLED display for score visualization, and a MOSFET to control an LED bulb, with power supplied by a 12V battery and regulated by a DC-DC step-down converter.
Cirkit Designer LogoOpen Project in Cirkit Designer
Image of CPE doorlock system upgrade: A project utilizing Photon 2 in a practical application
ESP32-Based Security System with RFID and Laser Intrusion Detection
This circuit is a security and access control system featuring motion detection, laser beam-break sensing, and RFID scanning, interfaced with a keypad and visual/audible indicators, powered by a solar-charged battery, and capable of controlling an electric lock via a relay.
Cirkit Designer LogoOpen Project in Cirkit Designer
Image of CPE doorlock system upgrade: A project utilizing Photon 2 in a practical application
ESP32-Based Security System with RFID, PIR Sensor, and Laser Modules
This circuit is designed for a security and access control system with motion detection, beam-break detection, RFID-based access, and user input via a keypad. It is managed by an ESP32 microcontroller, which also controls an OLED display and an electric lock through a relay. The system is powered by a solar panel with a charge controller and UPS battery, with buck converters for voltage regulation.
Cirkit Designer LogoOpen Project in Cirkit Designer

Common Applications and Use Cases

  • IoT Devices: Easily connect sensors and actuators to the internet.
  • Home Automation: Control lights, thermostats, and other home devices remotely.
  • Prototyping: Quickly develop and test new connected products.
  • Educational Projects: Ideal for learning about IoT and embedded systems.

Technical Specifications

Key Technical Details

Specification Value
Microcontroller ARM Cortex M3
Wi-Fi Chip Broadcom BCM43362
Operating Voltage 3.3V
Input Voltage 3.6V to 5.5V
Digital I/O Pins 18
Analog Input Pins 8
Flash Memory 1MB
SRAM 128KB
Clock Speed 120MHz
Dimensions 36.58mm x 20.32mm

Pin Configuration and Descriptions

Pin Name Description
1 VIN Input voltage (3.6V to 5.5V)
2 GND Ground
3 3V3 3.3V output
4 A0 Analog input 0
5 A1 Analog input 1
6 A2 Analog input 2
7 A3 Analog input 3
8 A4 Analog input 4
9 A5 Analog input 5
10 A6 Analog input 6
11 A7 Analog input 7
12 D0 Digital I/O 0
13 D1 Digital I/O 1
14 D2 Digital I/O 2
15 D3 Digital I/O 3
16 D4 Digital I/O 4
17 D5 Digital I/O 5
18 D6 Digital I/O 6
19 D7 Digital I/O 7
20 RX UART Receive
21 TX UART Transmit
22 RST Reset
23 WKP Wakeup
24 DAC Digital-to-Analog Converter
25 VBAT Battery input (3.6V to 4.2V)

Usage Instructions

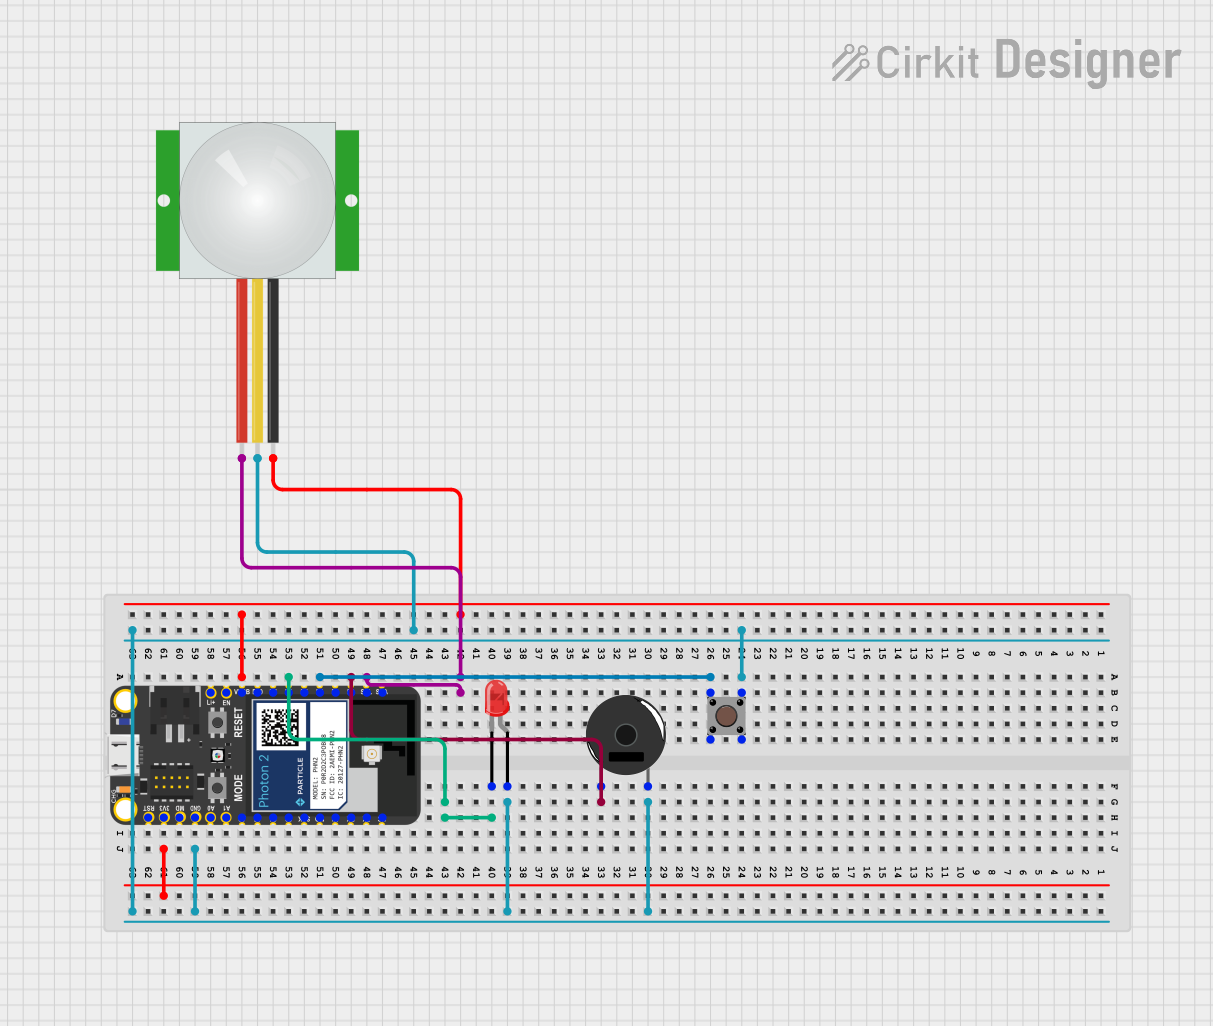
How to Use the Photon 2 in a Circuit

  1. Powering the Photon 2:

    • Connect the VIN pin to a power source (3.6V to 5.5V).
    • Connect the GND pin to the ground of the power source.
  2. Connecting to Wi-Fi:

    • Use the Particle mobile app or Particle CLI to configure Wi-Fi credentials.
  3. Programming:

    • Use the Particle Web IDE, Particle Dev, or Particle CLI to write and upload code.
  4. Connecting Sensors and Actuators:

    • Use the digital and analog pins to connect various sensors and actuators.

Important Considerations and Best Practices

  • Power Supply: Ensure a stable power supply to avoid unexpected resets.
  • Pin Usage: Avoid using pins for multiple purposes simultaneously.
  • Wi-Fi Signal: Ensure a strong Wi-Fi signal for reliable connectivity.
  • Firmware Updates: Regularly update the firmware for new features and security patches.

Example Code

Here is an example code to blink an LED connected to pin D7:

// This #include statement was automatically added by the Particle IDE.
#include "Particle.h"

// Define the pin for the LED
const int ledPin = D7;

void setup() {
    // Initialize the LED pin as an output
    pinMode(ledPin, OUTPUT);
}

void loop() {
    // Turn the LED on
    digitalWrite(ledPin, HIGH);
    delay(1000); // Wait for 1 second

    // Turn the LED off
    digitalWrite(ledPin, LOW);
    delay(1000); // Wait for 1 second
}

Troubleshooting and FAQs

Common Issues Users Might Face

  1. Wi-Fi Connection Issues:

    • Solution: Ensure correct Wi-Fi credentials and a strong signal. Use the Particle app to reconfigure if needed.
  2. Power Issues:

    • Solution: Verify the power supply voltage and current ratings. Ensure connections are secure.
  3. Code Upload Failures:

    • Solution: Check USB connections and drivers. Ensure the Photon 2 is in DFU mode if using Particle CLI.
  4. Unresponsive Device:

    • Solution: Perform a factory reset by holding the MODE button until the LED blinks white.

FAQs

  1. How do I reset the Photon 2?

    • Hold the RST button for a few seconds until the device restarts.
  2. Can I use the Photon 2 with Arduino IDE?

    • No, the Photon 2 is programmed using the Particle Web IDE, Particle Dev, or Particle CLI.
  3. How do I update the firmware?

    • Use the Particle Web IDE or Particle CLI to upload the latest firmware.
  4. What is the maximum input voltage for the VIN pin?

    • The maximum input voltage for the VIN pin is 5.5V.

By following this documentation, users can effectively utilize the Photon 2 for their connected projects and troubleshoot common issues they may encounter.