How to Use RAIN WATER SENSOR MODULE 12V: Examples, Pinouts, and Specs
Introduction
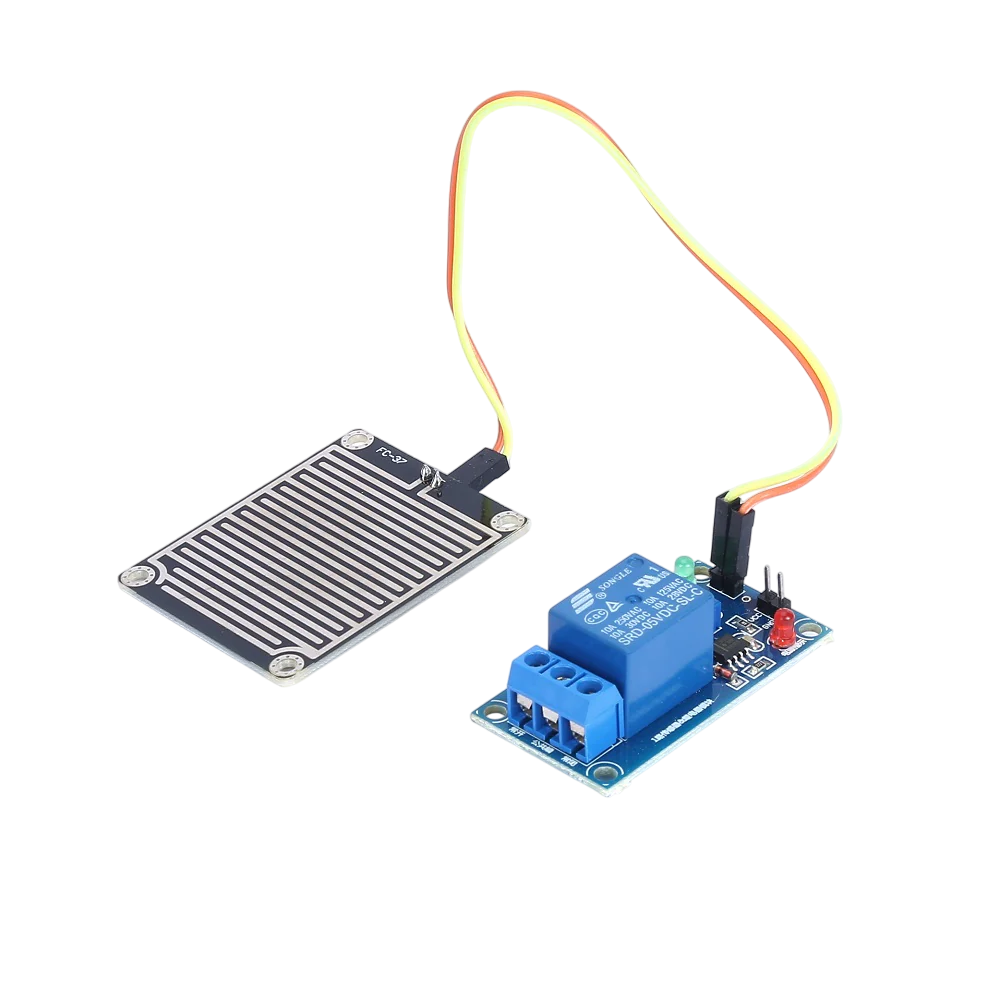
The Rain Water Sensor Module 12V is a versatile electronic component designed to detect the presence of rainwater. It operates at a standard 12V input and provides an easy way to monitor environmental conditions. The module typically consists of a rain detection board and a control board, which work together to sense water droplets and output a corresponding signal.
Explore Projects Built with RAIN WATER SENSOR MODULE 12V
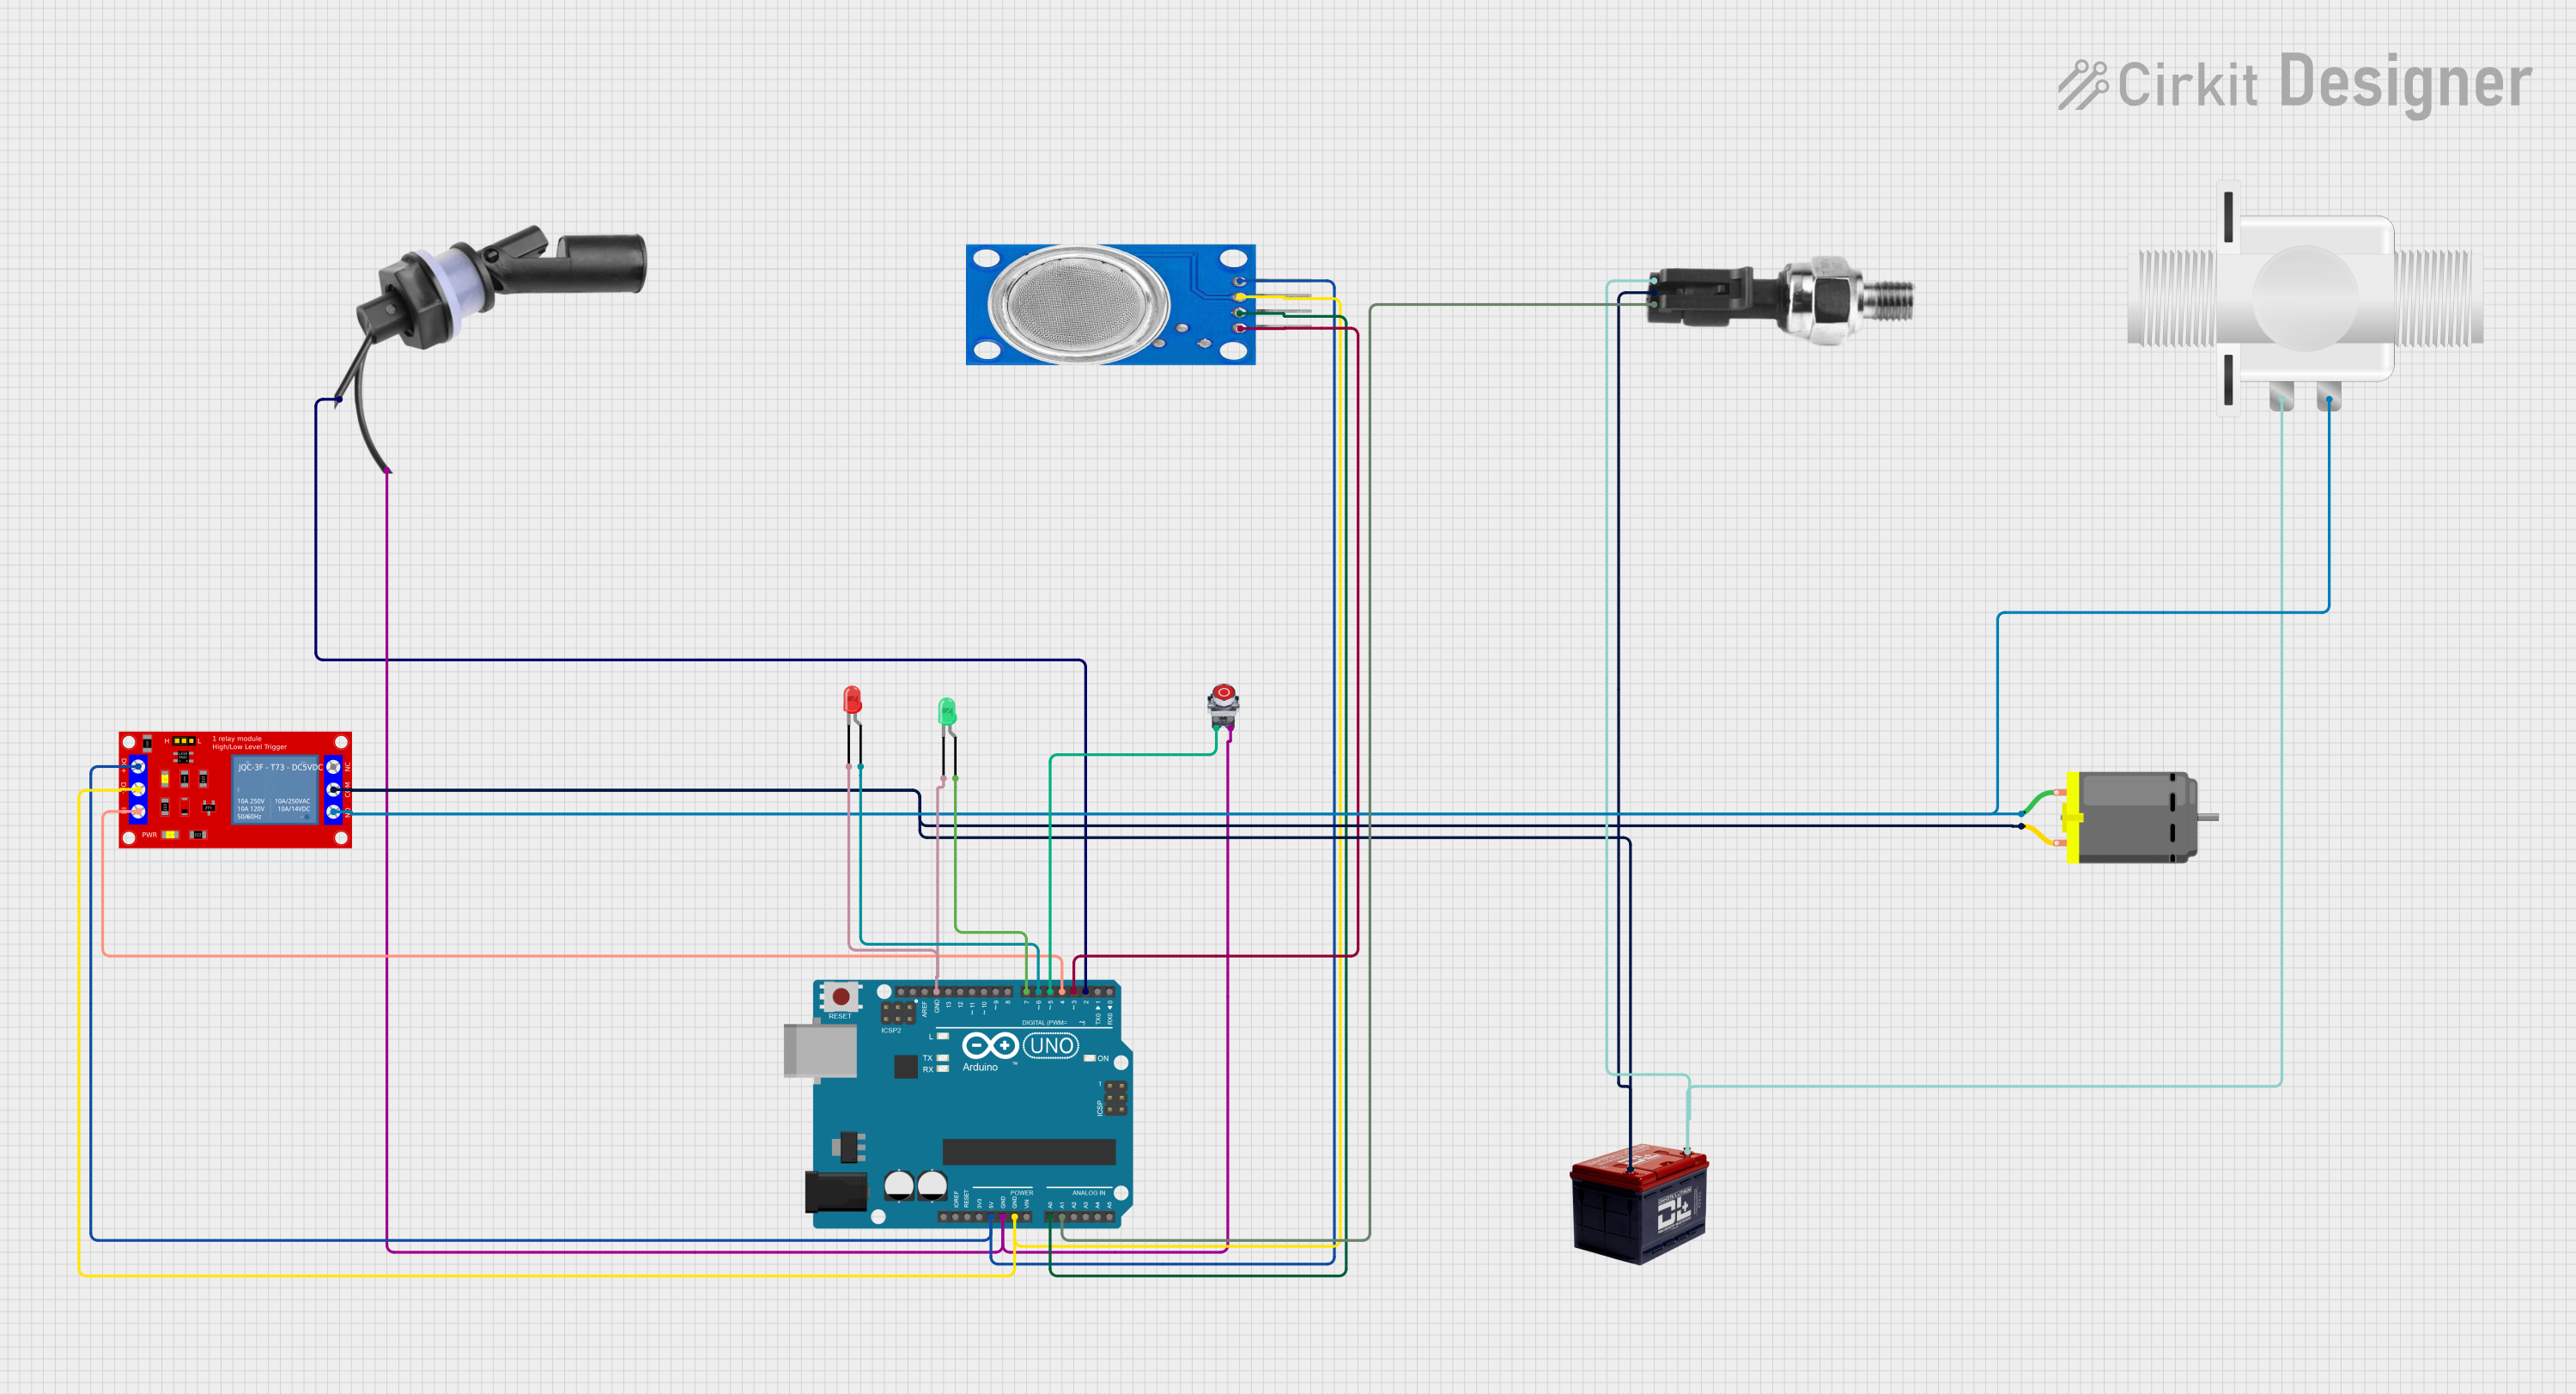

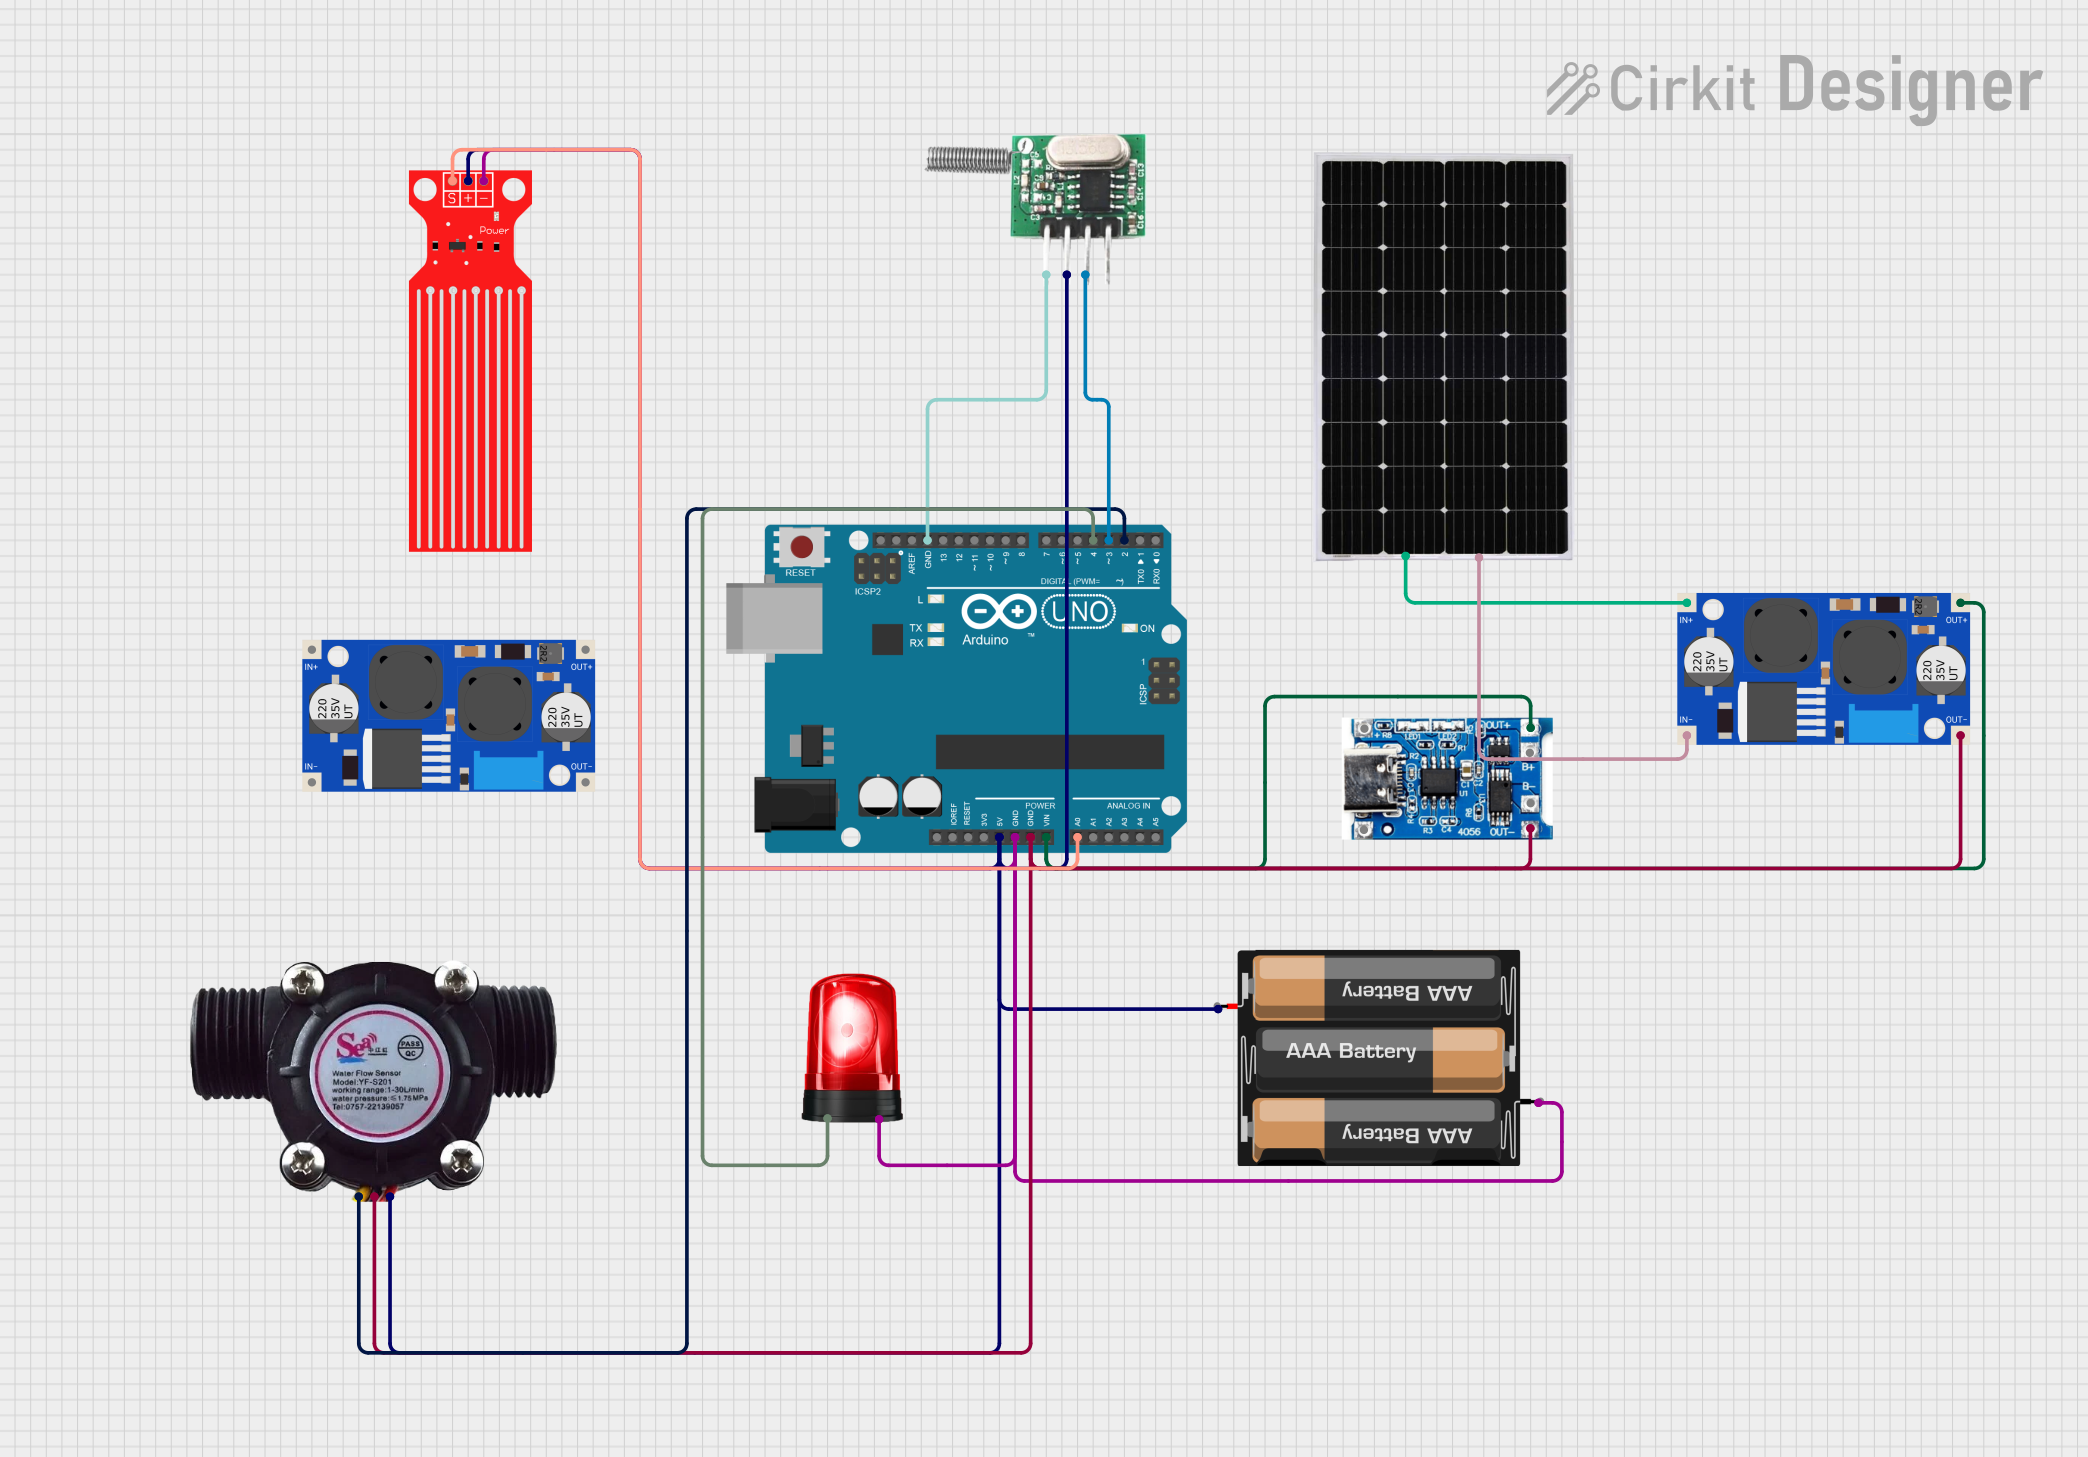
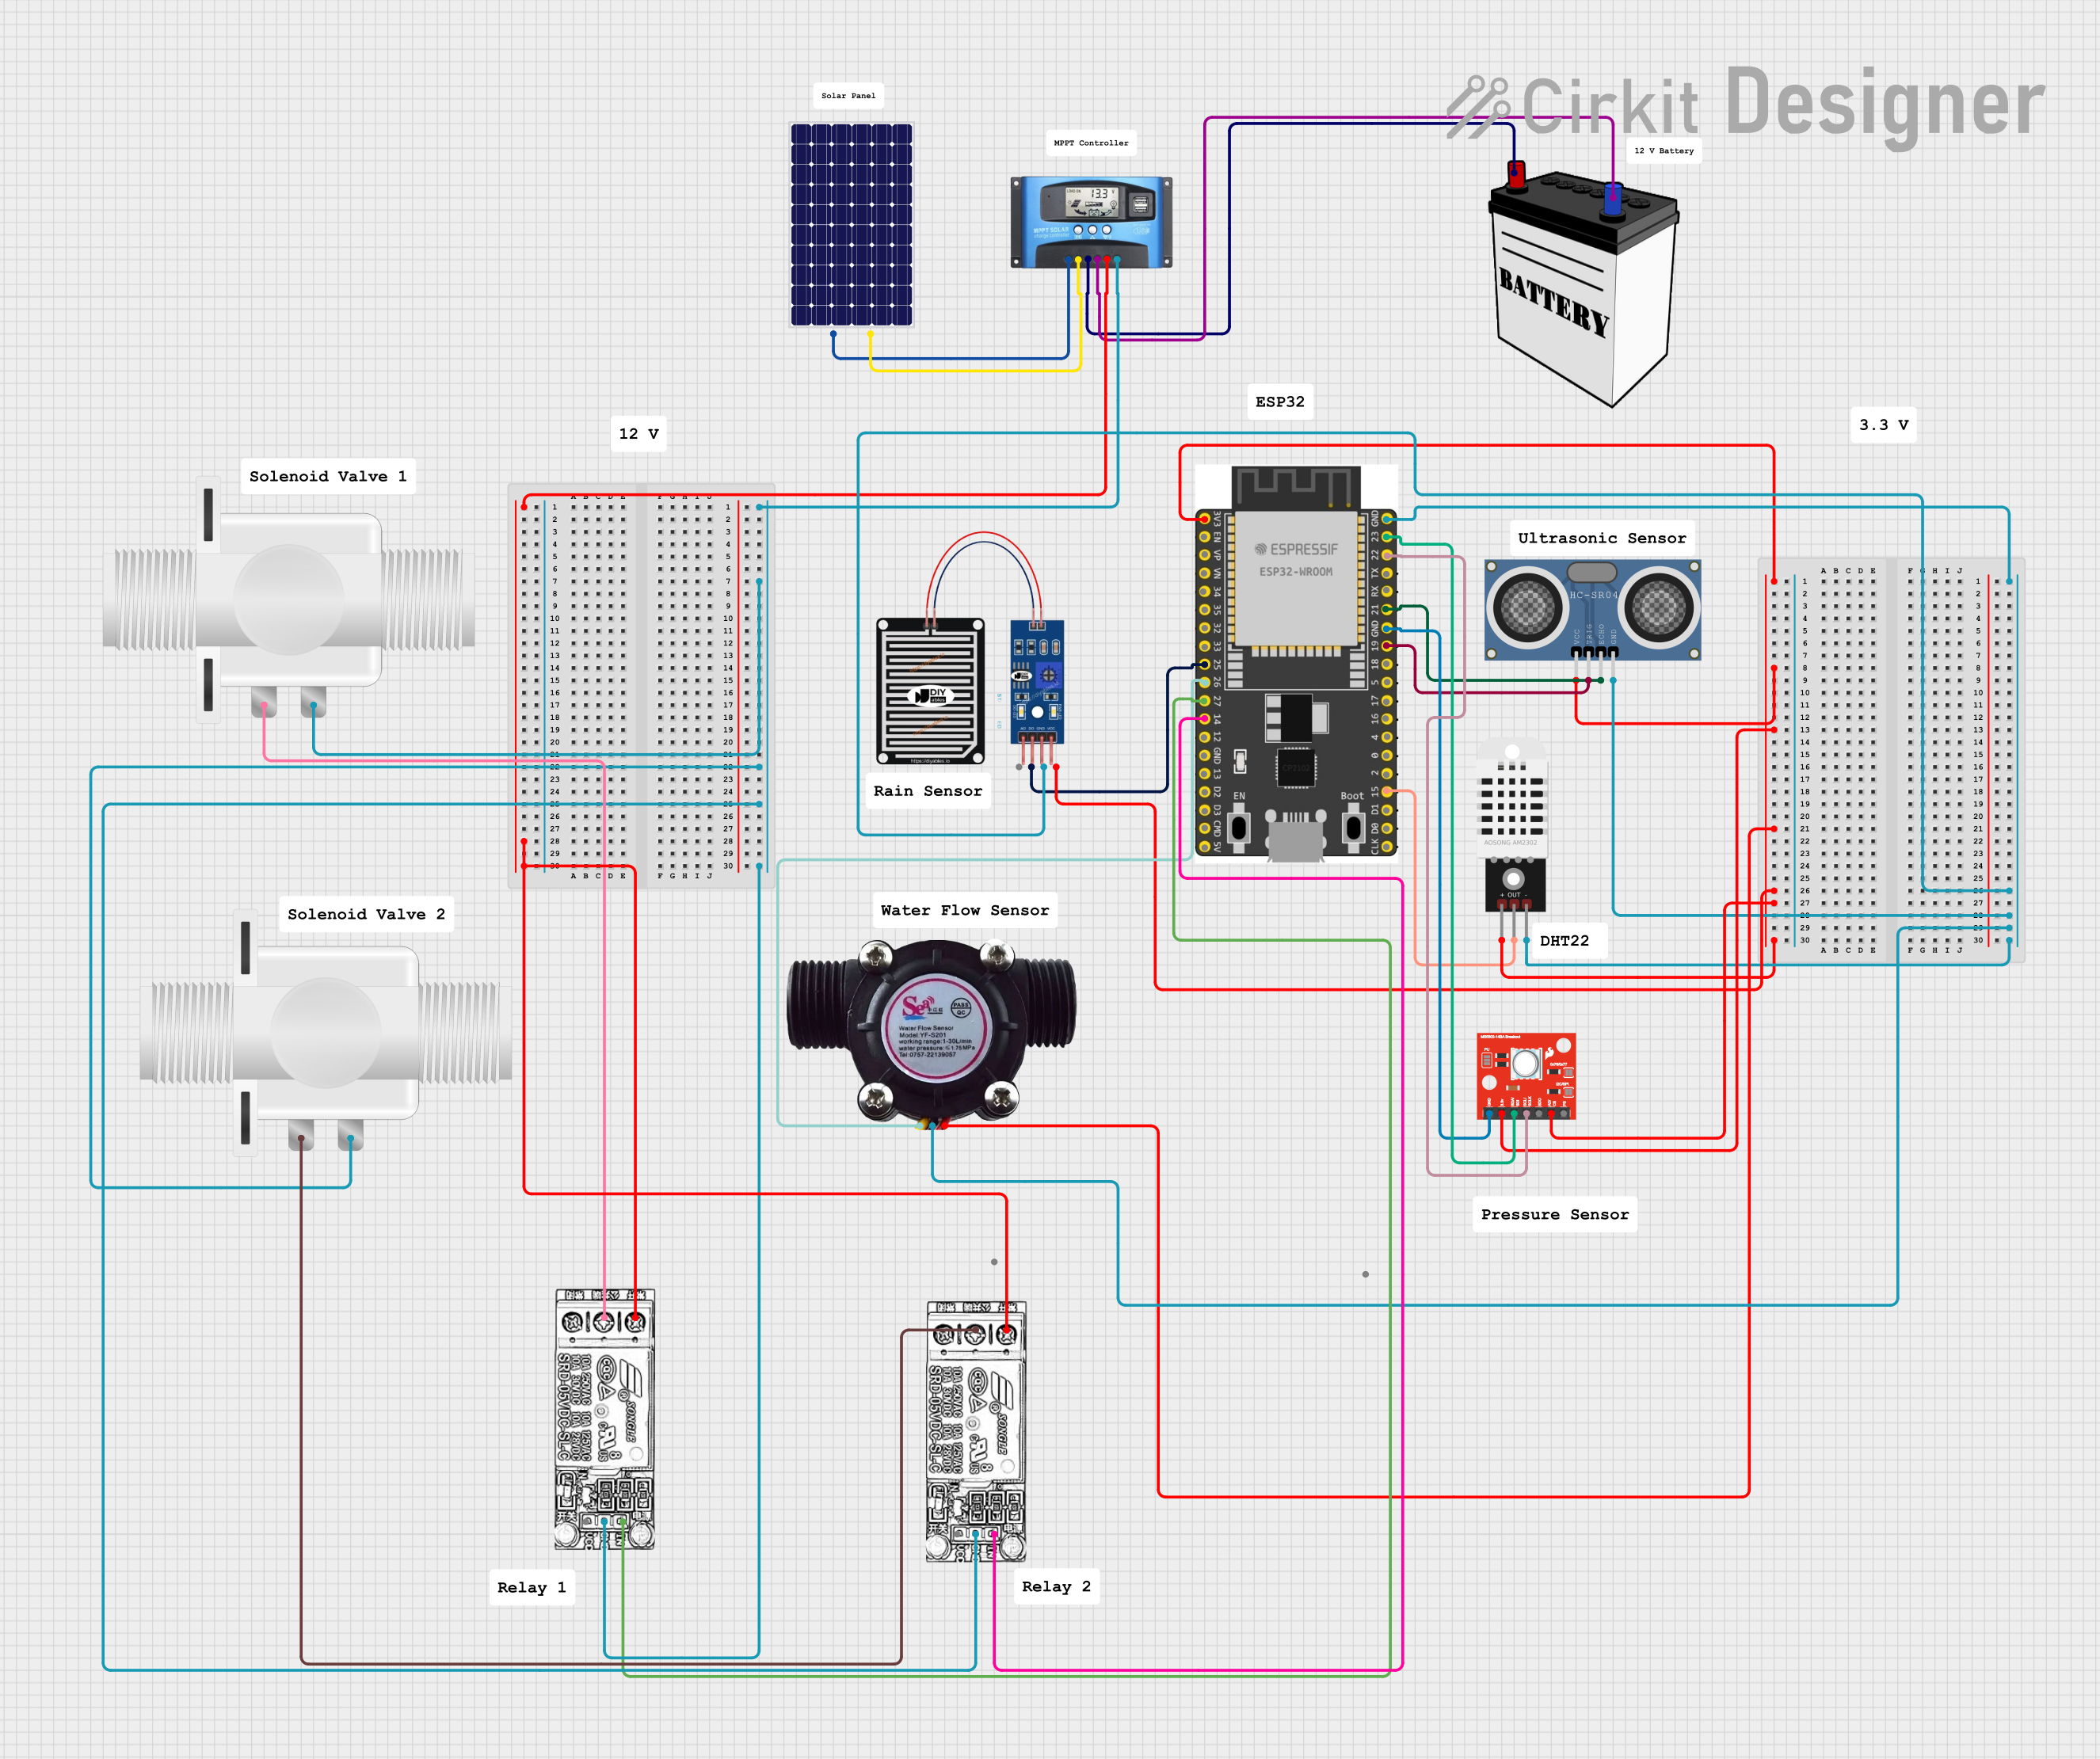
Explore Projects Built with RAIN WATER SENSOR MODULE 12V
Common Applications and Use Cases
- Automatic irrigation systems for agriculture or gardening
- Weather monitoring and rain detection systems
- Smart home automation (e.g., closing windows during rain)
- Water leakage detection in industrial or residential setups
Technical Specifications
Below are the key technical details of the Rain Water Sensor Module 12V:
| Parameter | Specification |
|---|---|
| Operating Voltage | 12V DC |
| Output Signal | Digital (High/Low) and Analog (0-5V) |
| Detection Area | ~5cm x 4cm (rain detection board) |
| Sensitivity Adjustment | Potentiometer on the control board |
| Output Type | Digital: TTL logic, Analog: Voltage |
| Dimensions | ~3.2cm x 1.4cm (control board) |
| Operating Temperature | -40°C to 85°C |
Pin Configuration and Descriptions
The Rain Water Sensor Module has the following pin configuration:
Control Board Pinout
| Pin Name | Description |
|---|---|
| VCC | Power supply input (12V DC) |
| GND | Ground connection |
| D0 | Digital output (High when no rain, Low when rain detected) |
| A0 | Analog output (Voltage proportional to water level) |
Rain Detection Board Connection
| Pin Name | Description |
|---|---|
| S | Signal pin (connects to control board) |
| + | Positive power input (connects to control board) |
| - | Ground connection (connects to control board) |
Usage Instructions
How to Use the Component in a Circuit
- Power the Module: Connect the VCC pin to a 12V DC power source and the GND pin to the ground.
- Connect Outputs:
- For digital output, connect the D0 pin to a microcontroller or logic circuit.
- For analog output, connect the A0 pin to an ADC (Analog-to-Digital Converter) pin of a microcontroller.
- Rain Detection Board: Attach the rain detection board to the control board using the provided pins (S, +, -).
- Adjust Sensitivity: Use the potentiometer on the control board to adjust the sensitivity of the digital output.
Important Considerations and Best Practices
- Placement: Ensure the rain detection board is placed in an open area where it can directly come into contact with rainwater.
- Waterproofing: Protect the control board from water exposure to prevent damage.
- Signal Stability: Use pull-up or pull-down resistors if necessary to stabilize the digital output signal.
- Power Supply: Use a regulated 12V DC power source to avoid damage to the module.
Example: Connecting to an Arduino UNO
Below is an example of how to connect the Rain Water Sensor Module to an Arduino UNO and read its output:
Circuit Connections
- Connect the module's VCC to the Arduino's 5V pin (if using a 5V version of the module) or an external 12V power supply.
- Connect the GND pin to the Arduino's GND.
- Connect the D0 pin to Arduino digital pin 2.
- Connect the A0 pin to Arduino analog pin A0.
Arduino Code
// Define pin connections
const int digitalPin = 2;  // Digital output from the sensor
const int analogPin = A0; // Analog output from the sensor

void setup() {
  // Initialize serial communication for debugging
  Serial.begin(9600);

  // Set the digital pin as input
  pinMode(digitalPin, INPUT);
}

void loop() {
  // Read the digital output (High = no rain, Low = rain detected)
  int digitalValue = digitalRead(digitalPin);

  // Read the analog output (proportional to water level)
  int analogValue = analogRead(analogPin);

  // Print the values to the Serial Monitor
  Serial.print("Digital Output: ");
  Serial.println(digitalValue);
  Serial.print("Analog Output: ");
  Serial.println(analogValue);

  // Add a small delay for stability
  delay(500);
}
Troubleshooting and FAQs
Common Issues and Solutions
No Output Signal:
- Ensure the module is powered with the correct voltage (12V DC).
- Check all connections, especially between the rain detection board and the control board.
- Verify that the rain detection board is exposed to water droplets.
Unstable Digital Output:
- Adjust the sensitivity using the potentiometer on the control board.
- Use a pull-up or pull-down resistor to stabilize the signal.
Analog Output Not Changing:
- Ensure the rain detection board is clean and free of debris.
- Verify that the analog pin is correctly connected to the microcontroller.
FAQs
Q: Can this module detect the intensity of rain?
A: Yes, the analog output (A0) provides a voltage proportional to the amount of water on the detection board, which can be used to estimate rain intensity.
Q: Is the module waterproof?
A: The rain detection board is designed to be water-resistant, but the control board must be protected from water exposure.
Q: Can I use this module with a 5V power supply?
A: Some versions of the module support 5V operation. Check the specific model's datasheet to confirm compatibility.