Cirkit Designer
Your all-in-one circuit design IDE
Home /
Component Documentation
How to Use df robot flame sensor: Examples, Pinouts, and Specs
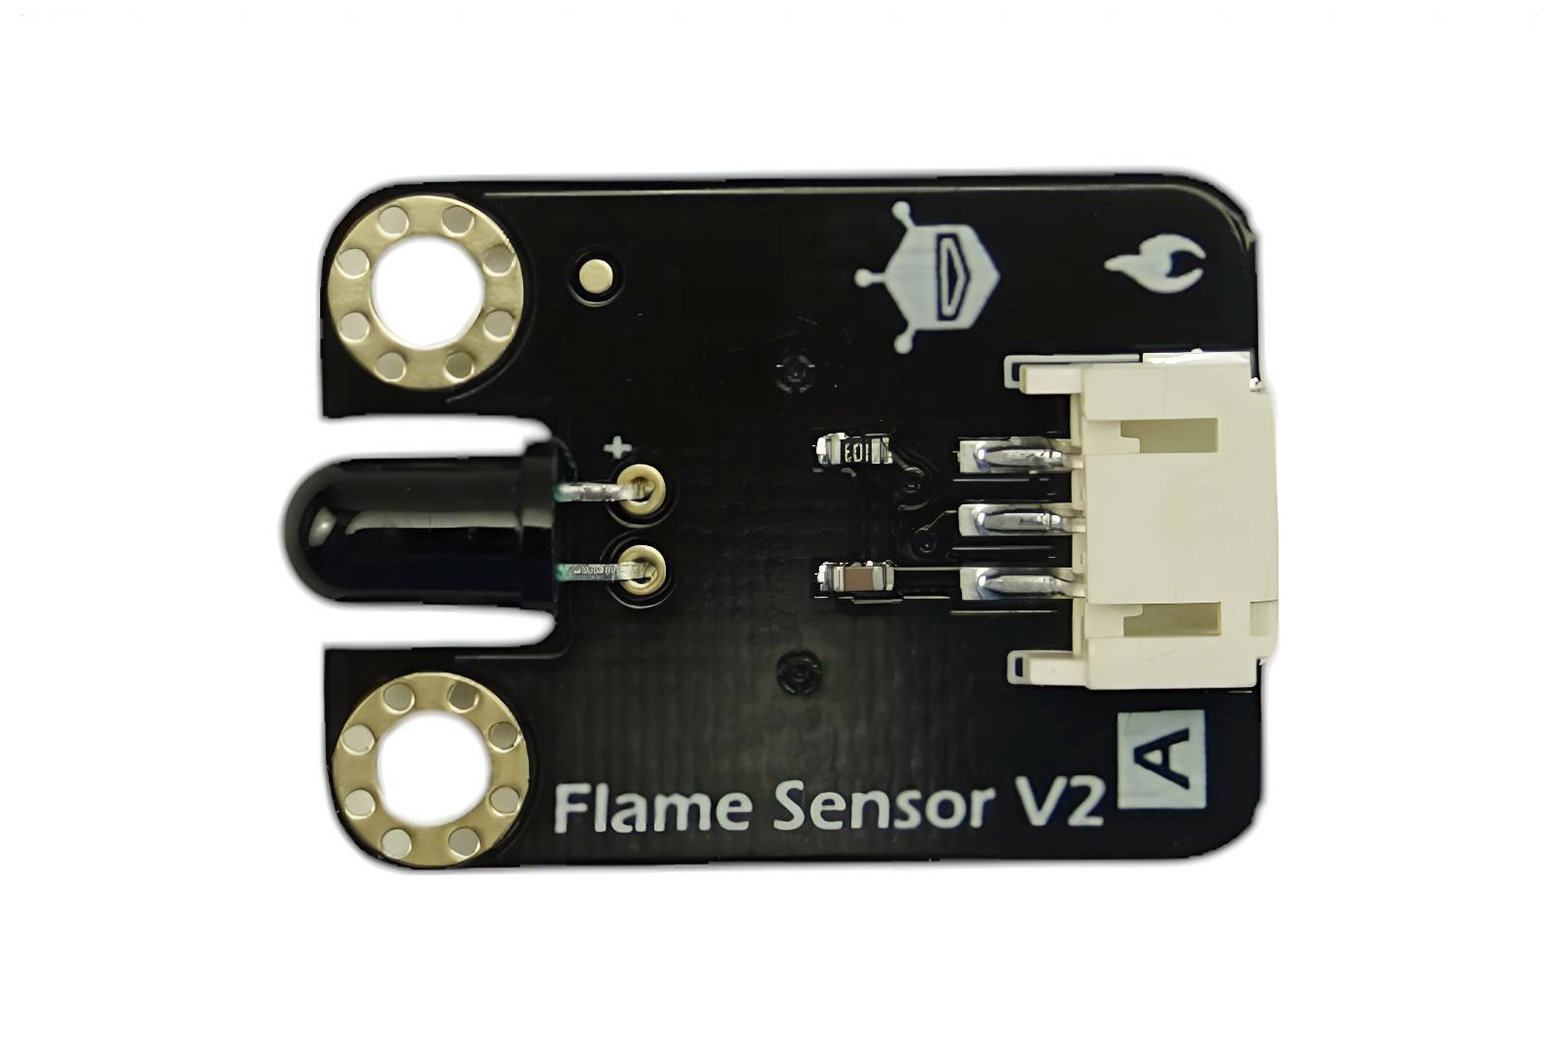
Introduction
The DF Robot Flame Sensor is a highly sensitive device designed to detect the presence of flame or fire. It is commonly used in fire detection systems and can provide an output signal to trigger alarms or other safety measures. This sensor is an essential component in safety and security applications, offering a reliable means to detect fire and prevent potential hazards.
Explore Projects Built with df robot flame sensor
Arduino UNO-Based Fire Detection and Extinguishing Robot with Flame Sensors and Servo Control
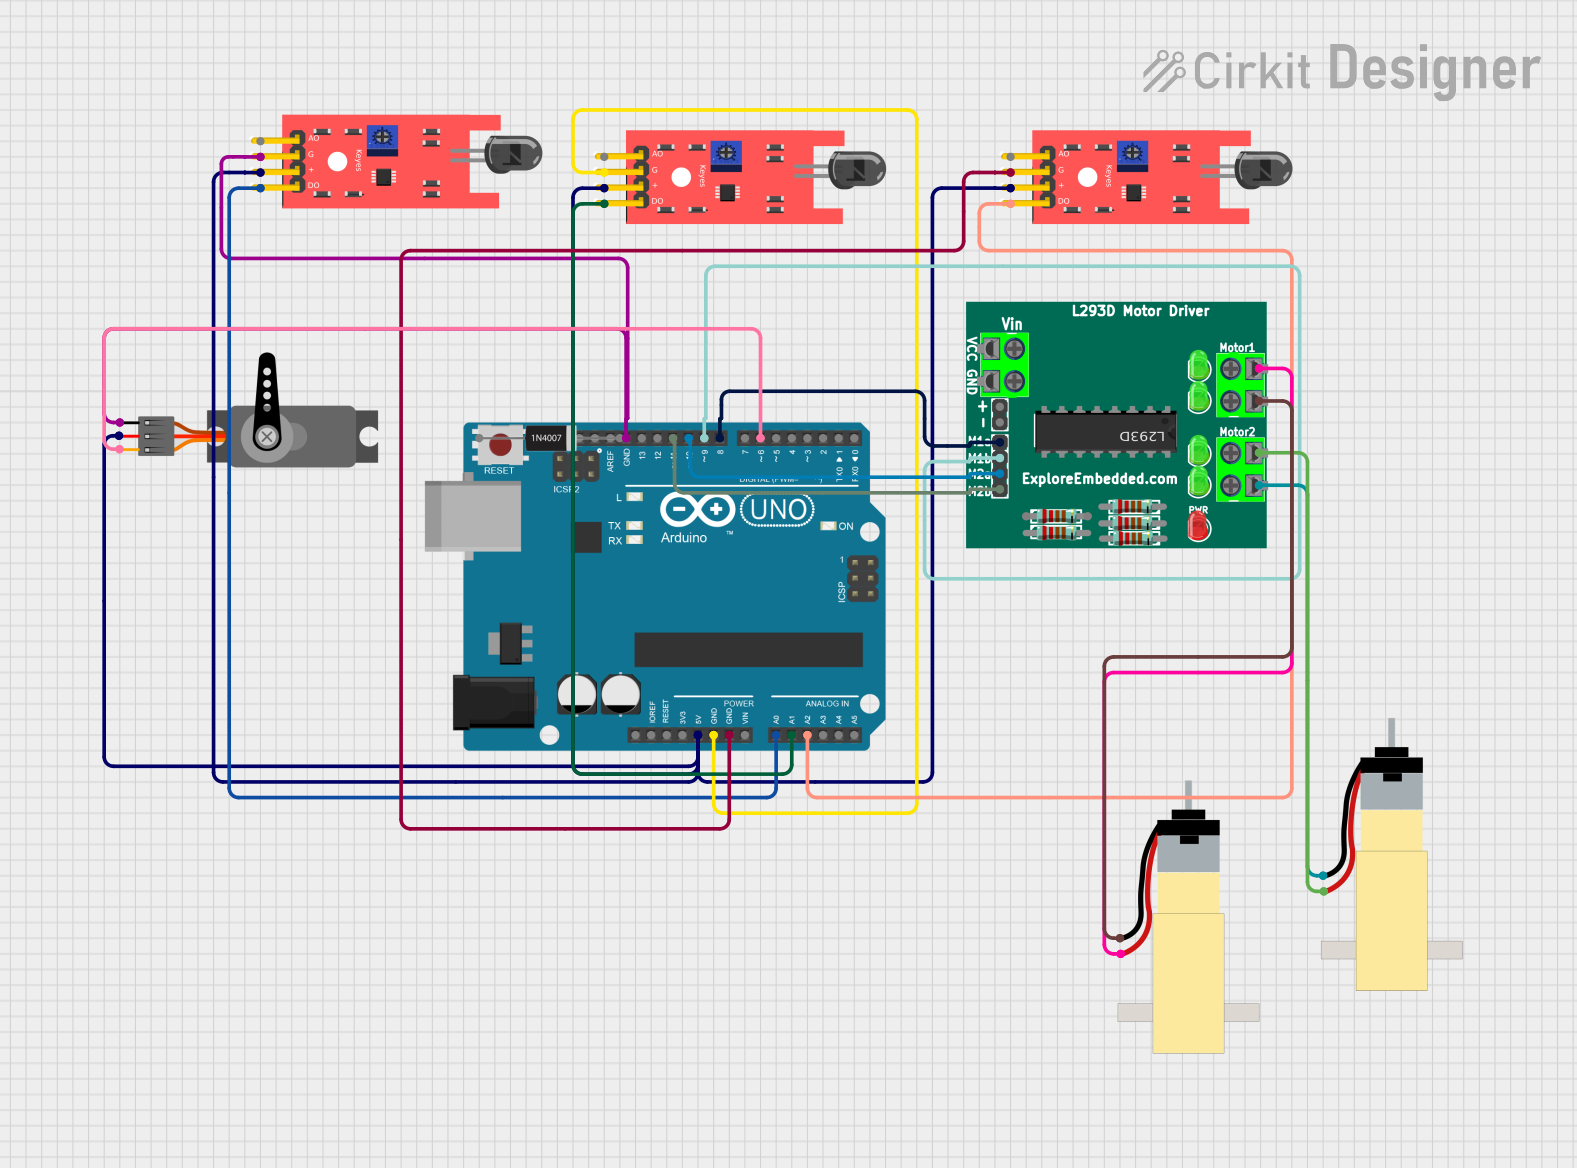
This circuit is a fire-detecting robot that uses three KY-026 flame sensors to detect fire and control its movement via two hobby gearmotors driven by an L293D motor driver. An Arduino UNO processes the sensor data to navigate towards the fire and activates a servo motor to aim a fire extinguisher nozzle, controlled by a solenoid valve, to extinguish the fire.
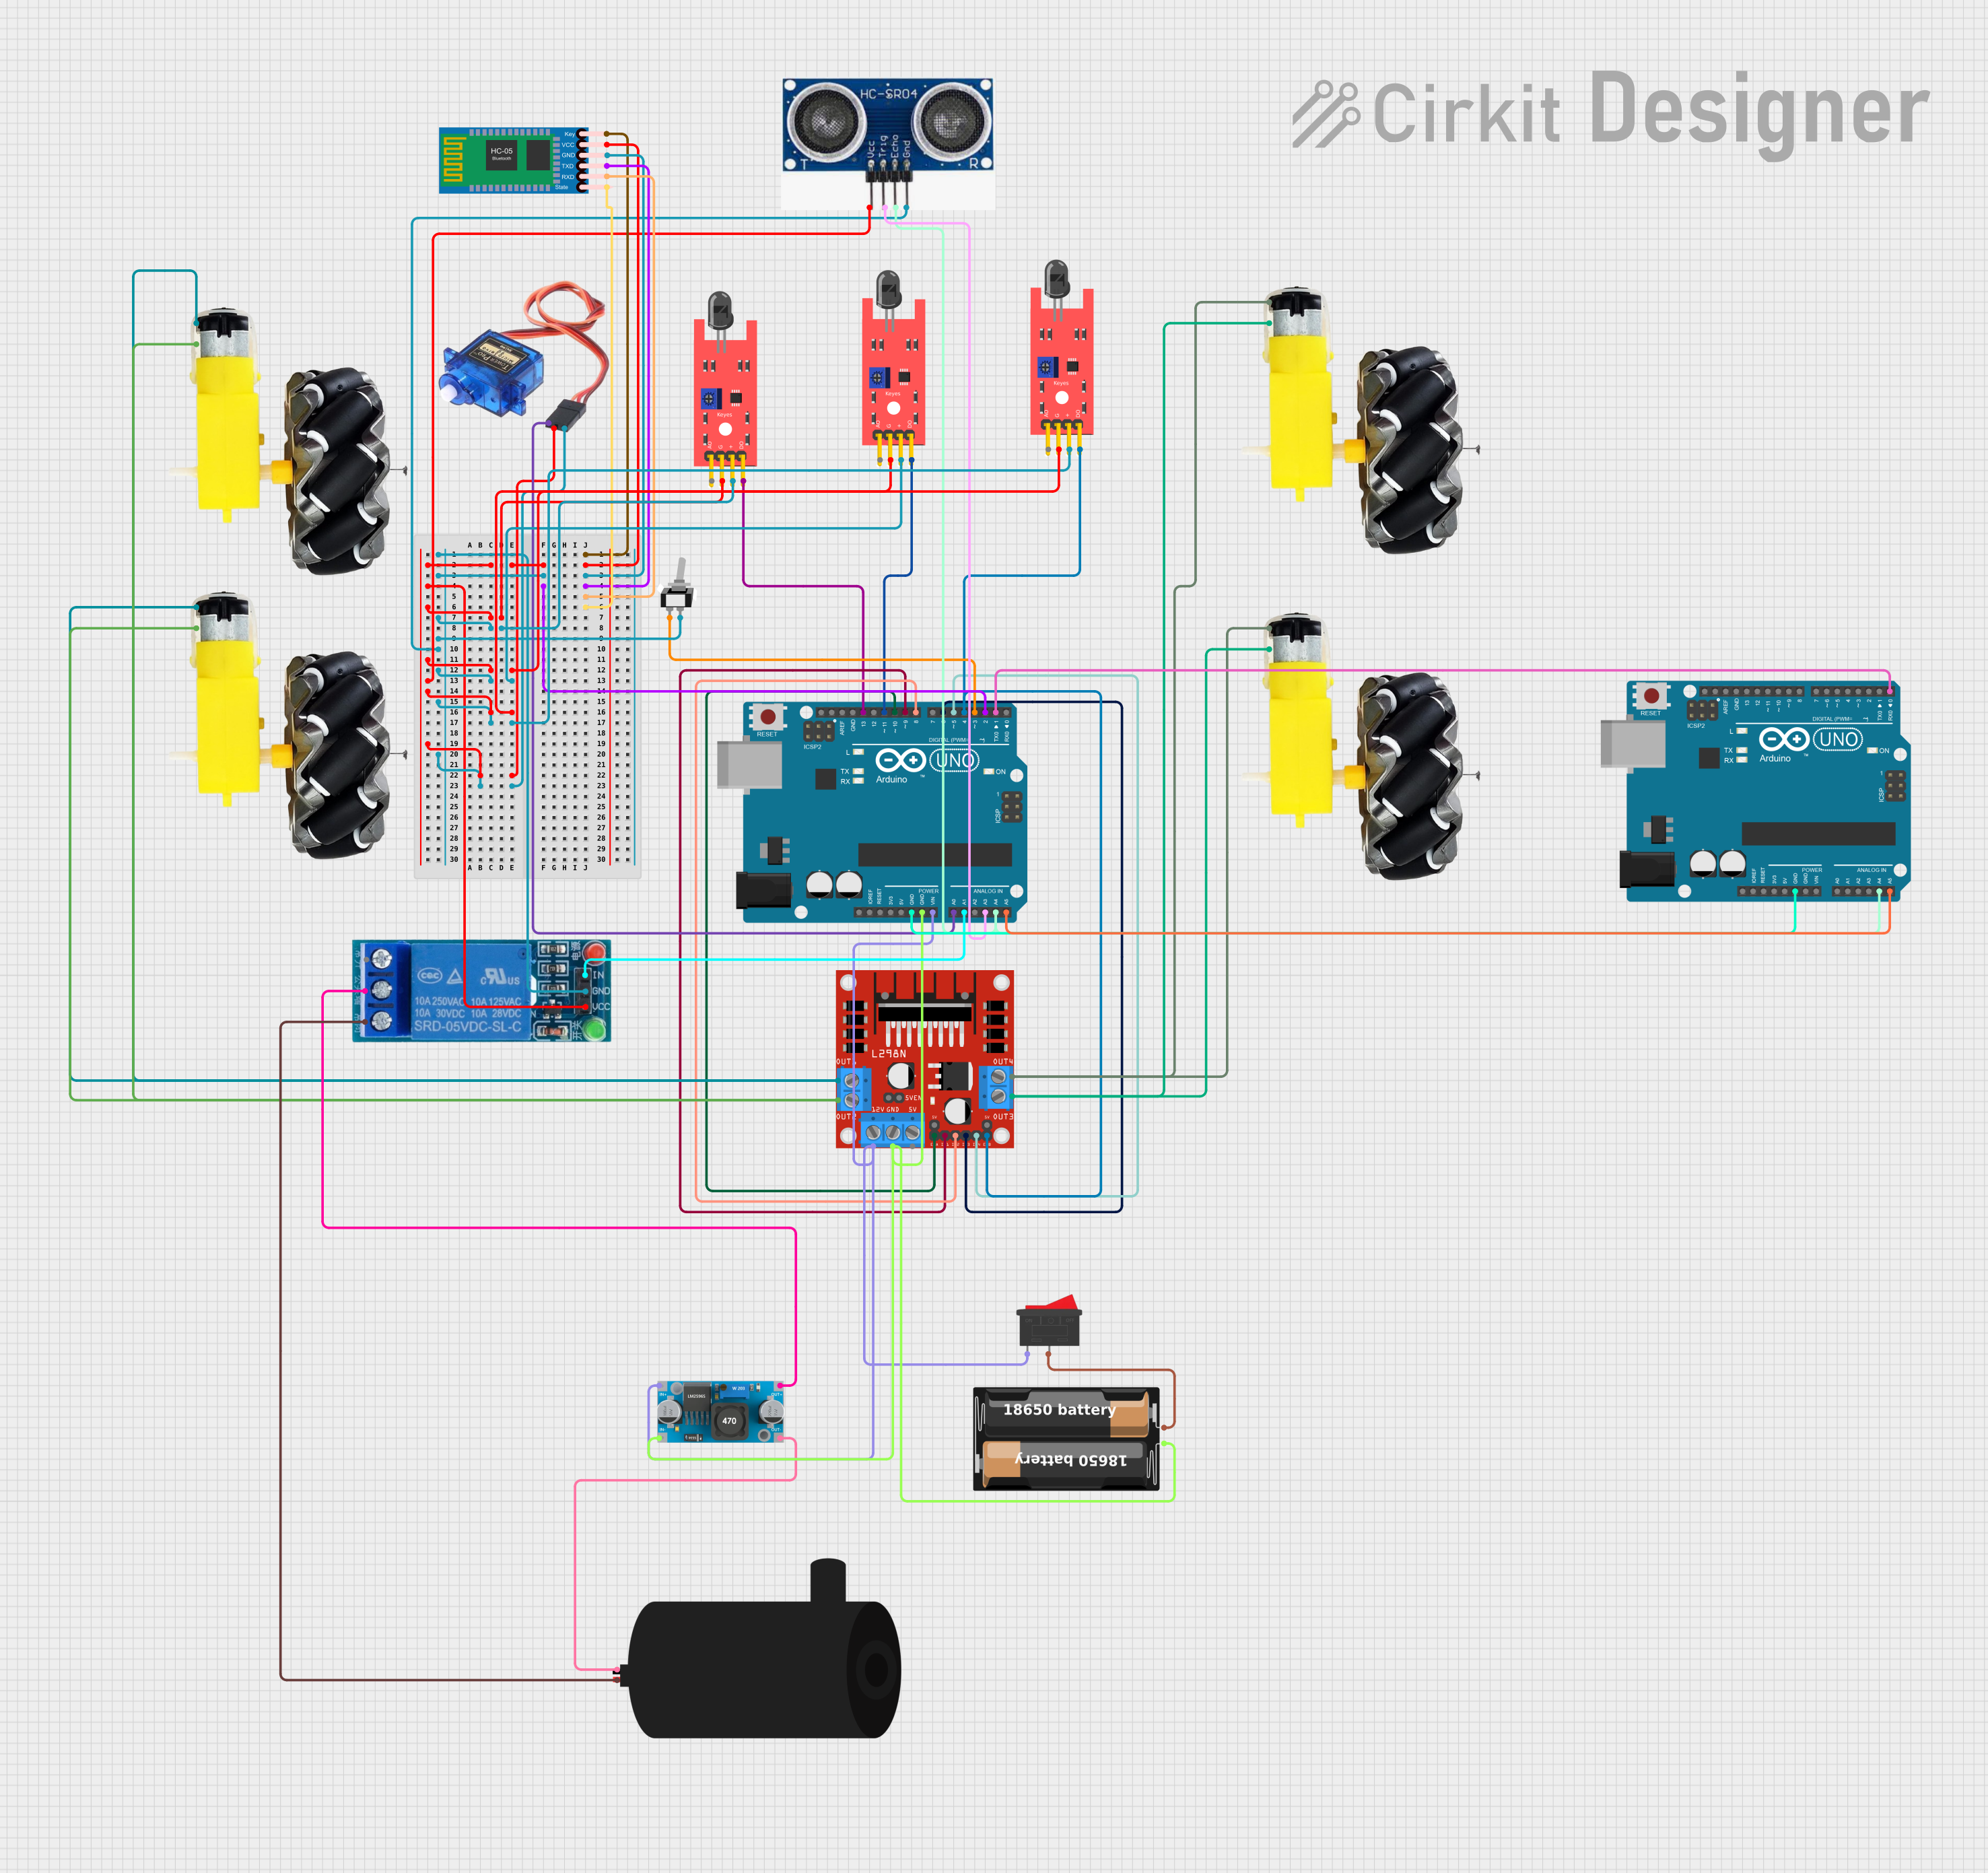
Arduino-Controlled Firefighting Robot with Ultrasonic Obstacle Detection and Bluetooth Interface
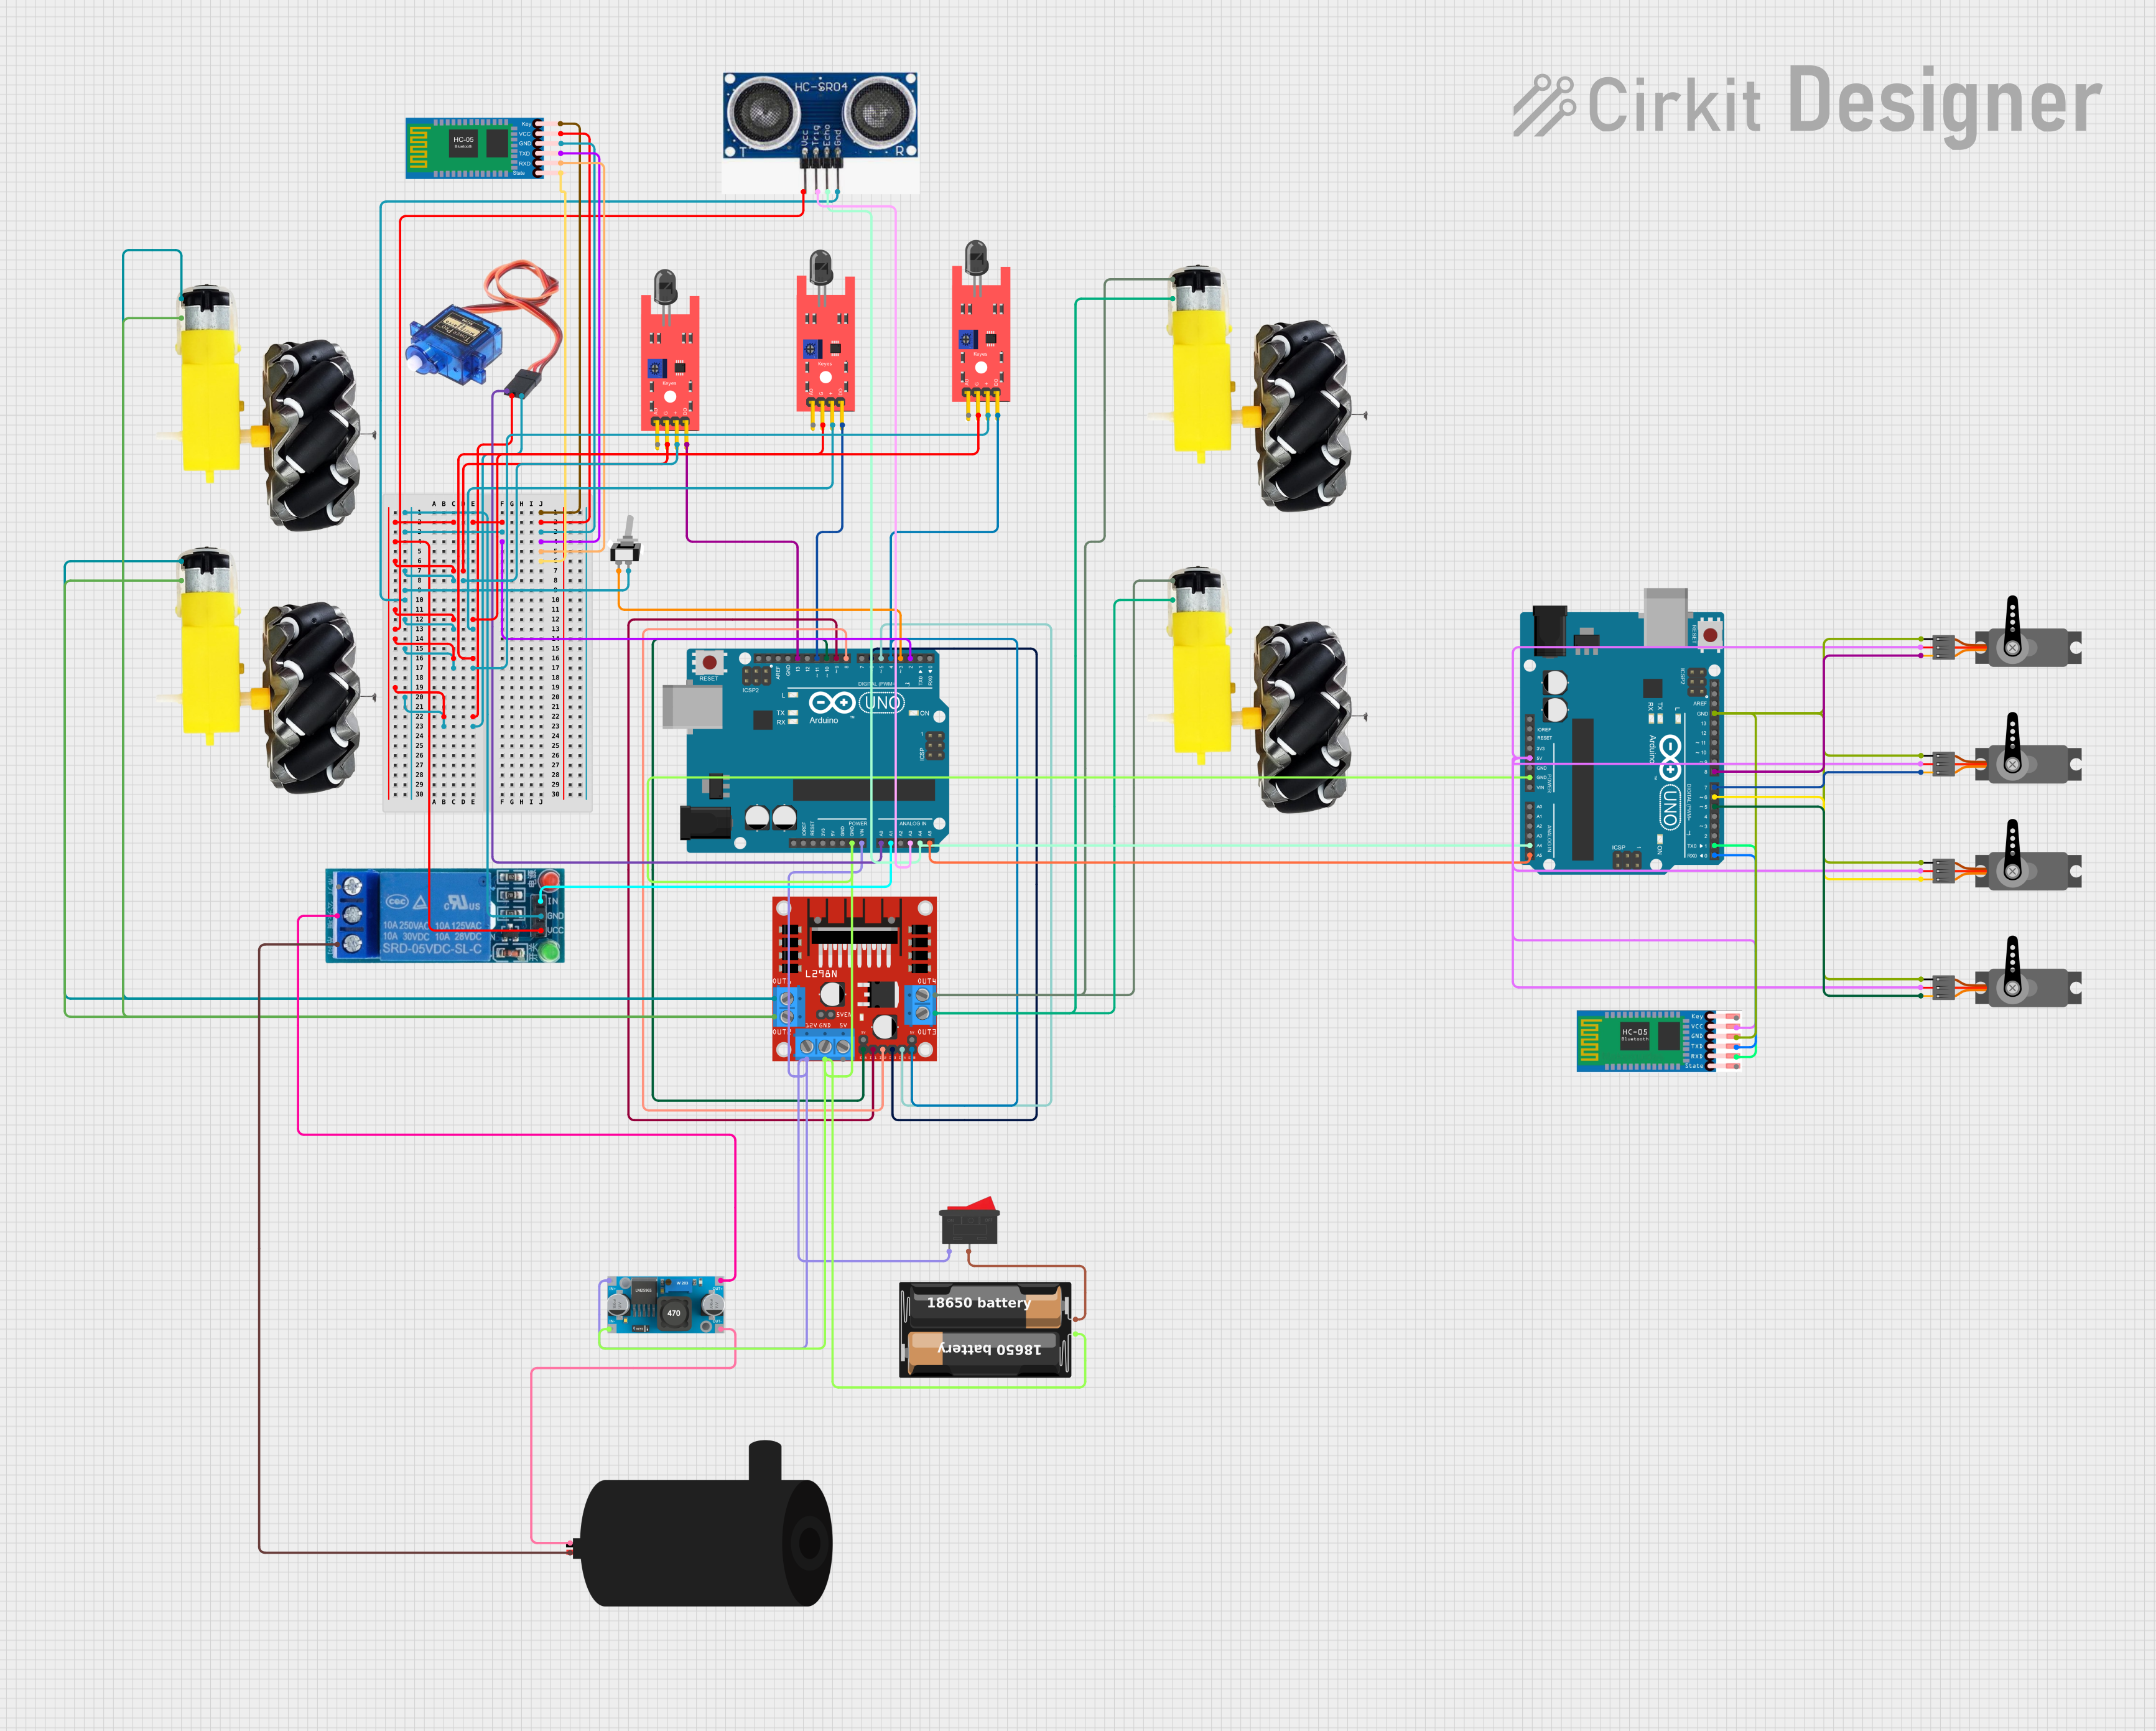
This circuit is designed for a fire-fighting robot with autonomous navigation and remote control capabilities. It includes flame sensors for fire detection, ultrasonic sensors for obstacle avoidance, and a water pump for extinguishing fires. The robot's movement is controlled by an Arduino UNO microcontroller, which also interfaces with an HC-05 Bluetooth module for remote commands and drives motors through an L298N motor driver.
Arduino UNO-Based Fire Detection and Extinguishing Robot with Flame Sensors and Servo Motors
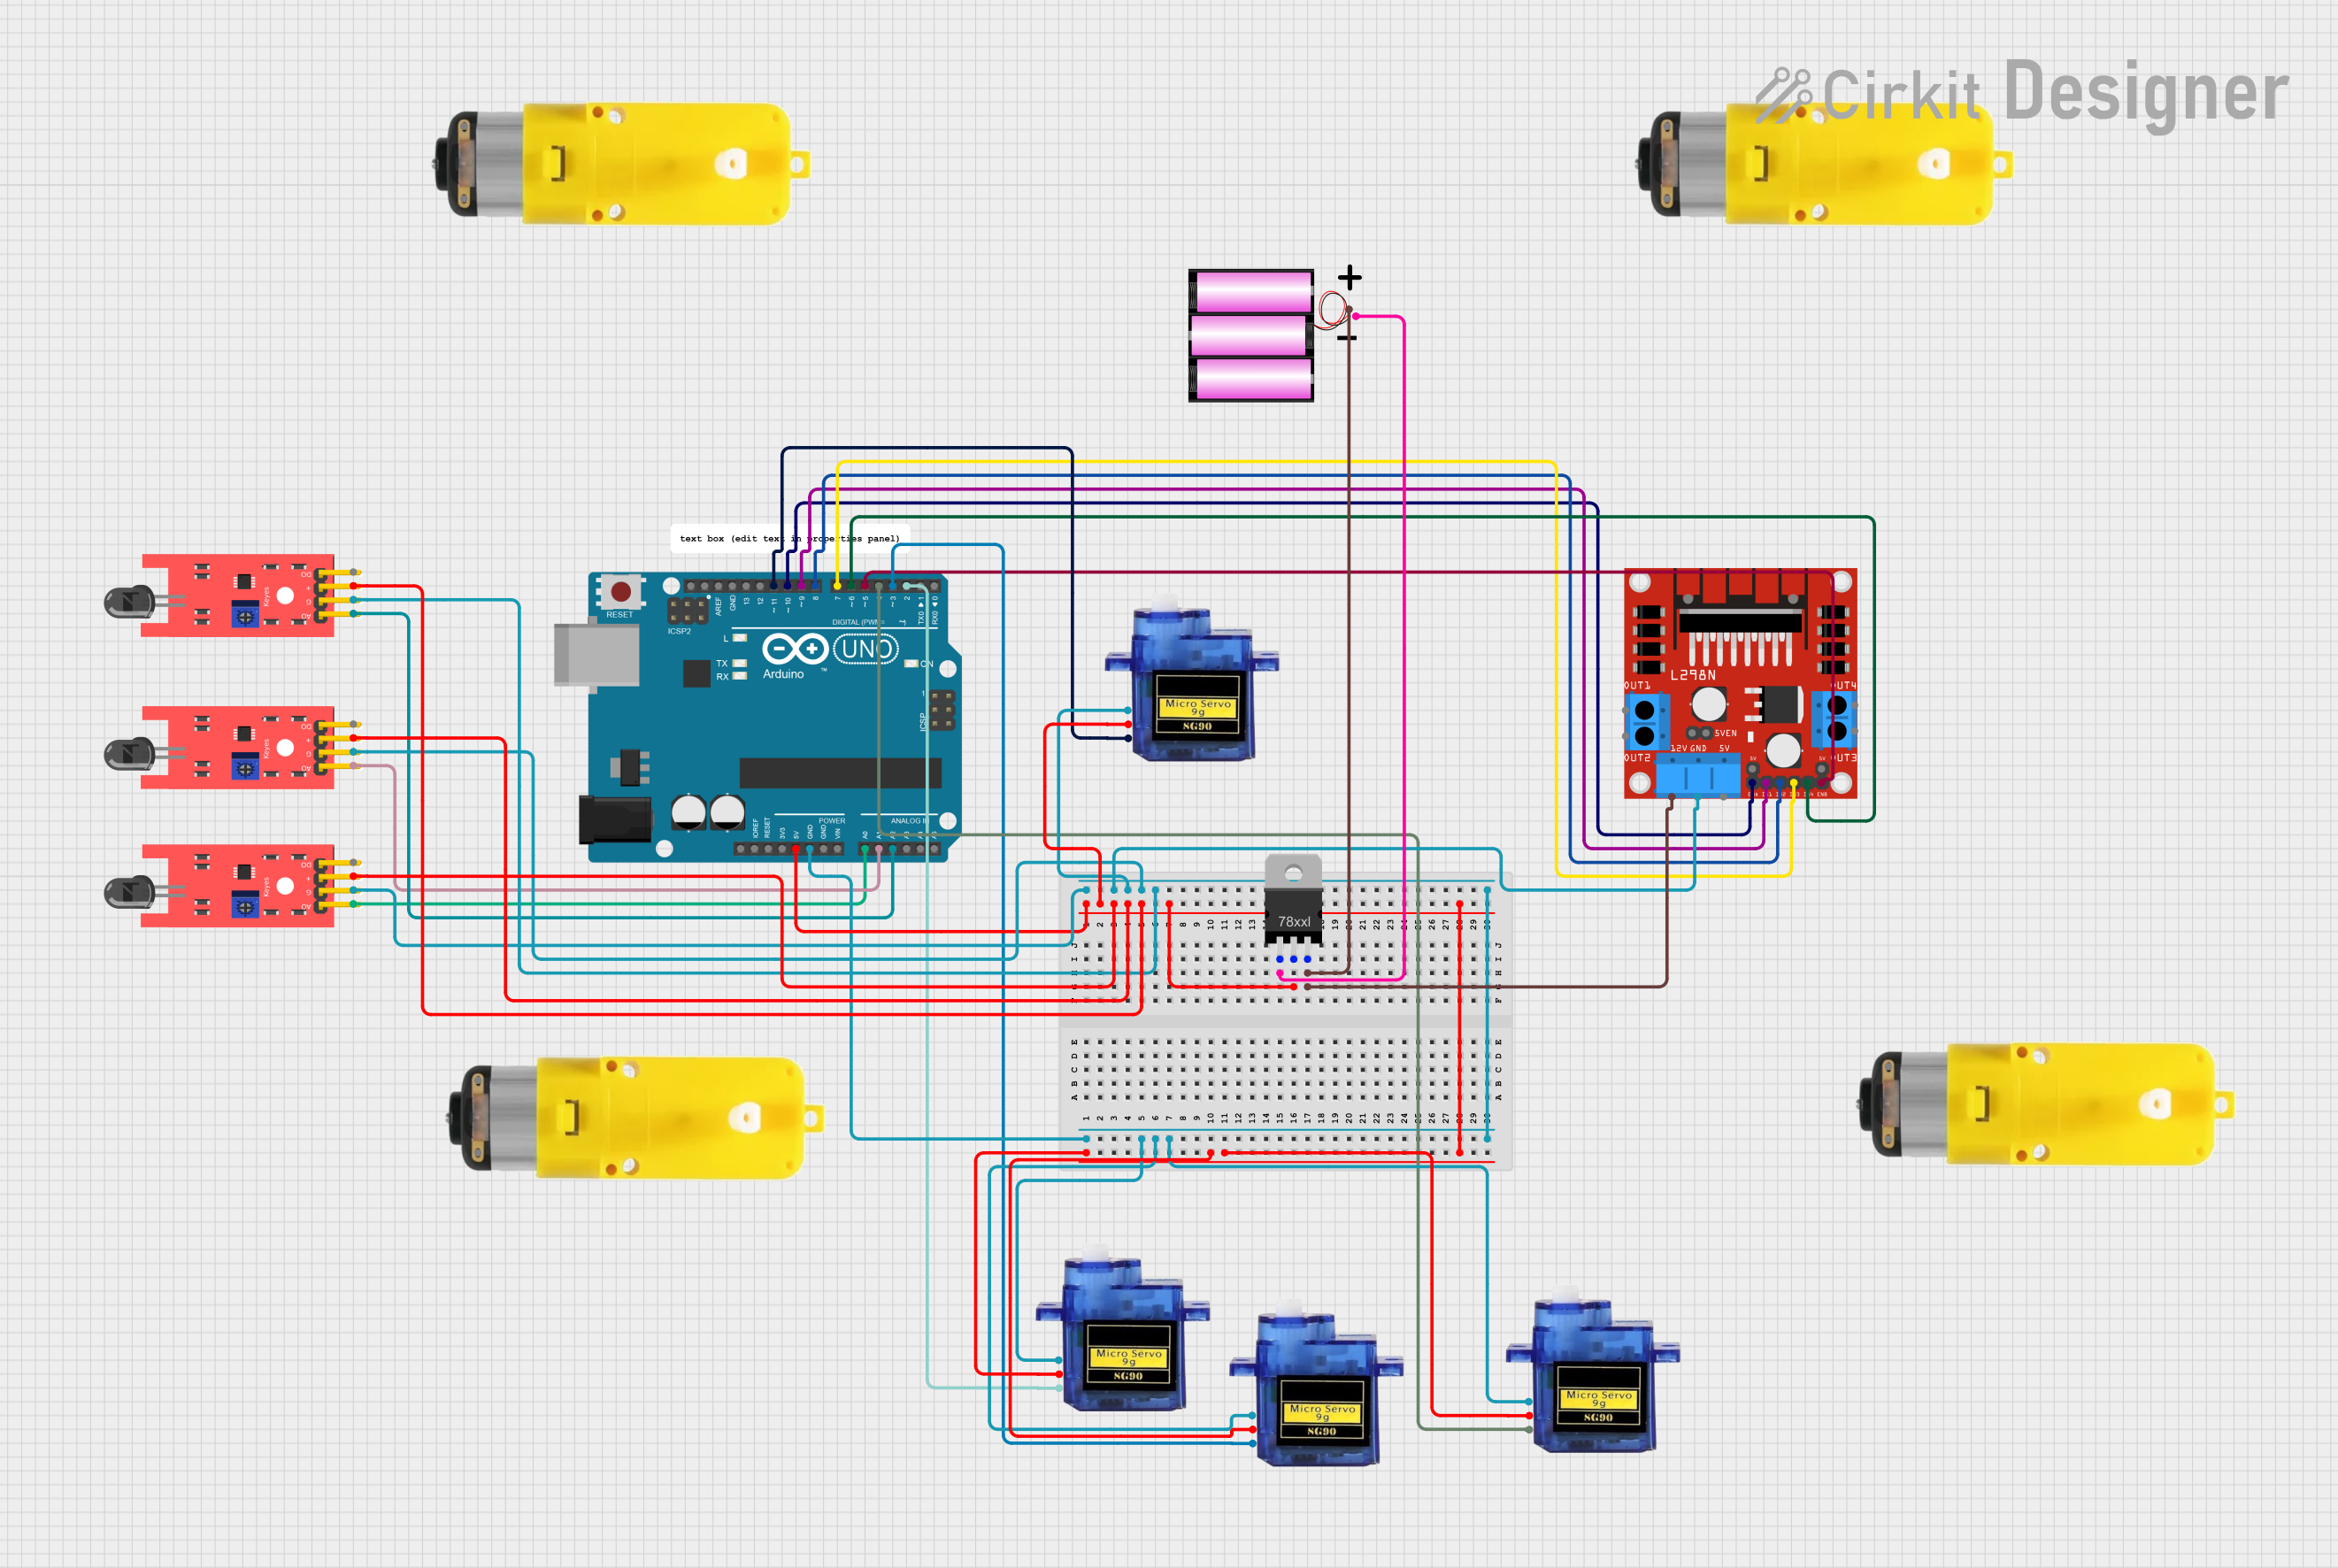
This circuit is a fire-fighting robot controlled by an Arduino UNO. It uses multiple flame sensors to detect fire and controls motors and servos to navigate towards the fire and activate a water pump to extinguish it. The robot can operate in both manual and automatic modes, with the automatic mode using sensor inputs to guide its actions.
Arduino-Controlled Firefighting Robot with Bluetooth and Ultrasonic Sensing
This circuit is designed for a fire-fighting robot equipped with flame sensors, ultrasonic distance sensing, and a water pump for extinguishing fires. It uses an Arduino UNO for control, interfacing with an HC-05 Bluetooth module for remote commands, driving motors through an L298N motor driver, and activating a relay to control the water pump. The robot can autonomously detect and move towards fires, avoid obstacles, and be manually controlled via Bluetooth.
Explore Projects Built with df robot flame sensor
Arduino UNO-Based Fire Detection and Extinguishing Robot with Flame Sensors and Servo Control
This circuit is a fire-detecting robot that uses three KY-026 flame sensors to detect fire and control its movement via two hobby gearmotors driven by an L293D motor driver. An Arduino UNO processes the sensor data to navigate towards the fire and activates a servo motor to aim a fire extinguisher nozzle, controlled by a solenoid valve, to extinguish the fire.
Arduino-Controlled Firefighting Robot with Ultrasonic Obstacle Detection and Bluetooth Interface
This circuit is designed for a fire-fighting robot with autonomous navigation and remote control capabilities. It includes flame sensors for fire detection, ultrasonic sensors for obstacle avoidance, and a water pump for extinguishing fires. The robot's movement is controlled by an Arduino UNO microcontroller, which also interfaces with an HC-05 Bluetooth module for remote commands and drives motors through an L298N motor driver.
Arduino UNO-Based Fire Detection and Extinguishing Robot with Flame Sensors and Servo Motors
This circuit is a fire-fighting robot controlled by an Arduino UNO. It uses multiple flame sensors to detect fire and controls motors and servos to navigate towards the fire and activate a water pump to extinguish it. The robot can operate in both manual and automatic modes, with the automatic mode using sensor inputs to guide its actions.
Arduino-Controlled Firefighting Robot with Bluetooth and Ultrasonic Sensing
This circuit is designed for a fire-fighting robot equipped with flame sensors, ultrasonic distance sensing, and a water pump for extinguishing fires. It uses an Arduino UNO for control, interfacing with an HC-05 Bluetooth module for remote commands, driving motors through an L298N motor driver, and activating a relay to control the water pump. The robot can autonomously detect and move towards fires, avoid obstacles, and be manually controlled via Bluetooth.
Technical Specifications
Key Technical Details
| Parameter | Value |
|---|---|
| Operating Voltage | 3.3V to 5V |
| Detection Range | Up to 100 cm (depending on flame size) |
| Detection Angle | 60 degrees |
| Output Type | Digital and Analog |
| Response Time | < 15 ms |
| Operating Temperature | -25°C to 85°C |
Pin Configuration and Descriptions
| Pin Number | Pin Name | Description |
|---|---|---|
| 1 | VCC | Power supply (3.3V to 5V) |
| 2 | GND | Ground |
| 3 | D0 | Digital output (HIGH when flame is detected) |
| 4 | A0 | Analog output (proportional to flame intensity) |
Usage Instructions
How to Use the Component in a Circuit
- Power Supply: Connect the VCC pin to a 3.3V or 5V power supply and the GND pin to the ground of your circuit.
- Digital Output: Connect the D0 pin to a digital input pin on your microcontroller (e.g., Arduino UNO) to receive a HIGH signal when a flame is detected.
- Analog Output: Connect the A0 pin to an analog input pin on your microcontroller to receive a variable voltage signal proportional to the flame intensity.
Important Considerations and Best Practices
- Placement: Ensure the sensor is placed in a location where it has a clear line of sight to the area being monitored for flames.
- Sensitivity Adjustment: Some models may have a potentiometer to adjust sensitivity. Adjust it according to your specific application needs.
- Avoid Direct Sunlight: Direct sunlight can interfere with the sensor's ability to detect flames accurately.
- Regular Testing: Periodically test the sensor to ensure it is functioning correctly and replace it if necessary.
Example Code for Arduino UNO
// DF Robot Flame Sensor Example Code for Arduino UNO

const int flameSensorDigitalPin = 2; // Digital pin connected to D0
const int flameSensorAnalogPin = A0; // Analog pin connected to A0
const int ledPin = 13;               // LED pin for indication

void setup() {
  pinMode(flameSensorDigitalPin, INPUT); // Set digital pin as input
  pinMode(ledPin, OUTPUT);               // Set LED pin as output
  Serial.begin(9600);                    // Initialize serial communication
}

void loop() {
  int flameDigital = digitalRead(flameSensorDigitalPin); // Read digital output
  int flameAnalog = analogRead(flameSensorAnalogPin);    // Read analog output

  // Print analog value to serial monitor
  Serial.print("Analog Value: ");
  Serial.println(flameAnalog);

  // If flame is detected, turn on LED
  if (flameDigital == HIGH) {
    digitalWrite(ledPin, HIGH);
    Serial.println("Flame detected!");
  } else {
    digitalWrite(ledPin, LOW);
    Serial.println("No flame detected.");
  }

  delay(100); // Small delay for stability
}
Troubleshooting and FAQs
Common Issues Users Might Face
- False Positives: The sensor may trigger false alarms due to interference from other light sources.
- No Detection: The sensor may fail to detect flames if it is not properly aligned or if the sensitivity is not correctly adjusted.
- Intermittent Signals: Unstable power supply or loose connections can cause intermittent signals.
Solutions and Tips for Troubleshooting
- Check Connections: Ensure all connections are secure and the power supply is stable.
- Adjust Sensitivity: Use the potentiometer (if available) to adjust the sensitivity of the sensor.
- Shield from Light: Shield the sensor from direct sunlight and other strong light sources to prevent false positives.
- Test Regularly: Regularly test the sensor to ensure it is functioning correctly and replace it if necessary.
By following this documentation, users can effectively integrate the DF Robot Flame Sensor into their projects, ensuring reliable flame detection and enhancing safety measures.