Cirkit Designer Logo
Cirkit Designer
Your all-in-one circuit design IDE
Home / 
Component Documentation

How to Use SHT31: Examples, Pinouts, and Specs

Image of SHT31
Cirkit Designer LogoDesign with SHT31 in Cirkit Designer

Introduction

The SHT31 is a high-accuracy digital humidity and temperature sensor designed and manufactured by Sensirion. It offers excellent performance and a wide range of features, making it ideal for advanced consumer products, industrial systems, and Internet of Things (IoT) applications. Its precision and reliability are well-suited for environmental monitoring, weather stations, smart home automation, and HVAC systems.

Explore Projects Built with SHT31

Use Cirkit Designer to design, explore, and prototype these projects online. Some projects support real-time simulation. Click "Open Project" to start designing instantly!
Arduino Nano Weather Station with Ethernet Connectivity
Image of Nano_Sht31_W5500: A project utilizing SHT31 in a practical application
This circuit features an Arduino Nano microcontroller interfaced with an Ethernet W5500 module for network connectivity and an SHT31 sensor for temperature and humidity measurements. The Arduino Nano communicates with the Ethernet module via SPI and reads data from the SHT31 sensor using I2C, enabling remote monitoring of environmental conditions.
Cirkit Designer LogoOpen Project in Cirkit Designer
Wi-Fi Controlled Weather Station with ESP32, DHT22, and SHTC3 Sensors
Image of ESP32-POE-ISO 2 AC and 2 Sensor: A project utilizing SHT31 in a practical application
This circuit integrates an ESP32 microcontroller with a DHT22 temperature and humidity sensor, an Adafruit SHTC3 sensor, and a 2-channel relay module. The ESP32 reads environmental data from the sensors and can control external devices through the relay module.
Cirkit Designer LogoOpen Project in Cirkit Designer
Arduino Nano-Controlled LED Display with RTC and Humidity Sensing
Image of Alarm Clock: A project utilizing SHT31 in a practical application
This circuit features a Nano 3.0 ATmega328P microcontroller connected to an LED dot display, a real-time clock (RTC DS3231), and a humidity and temperature sensor (SHT21). The microcontroller communicates with the RTC and SHT21 via I2C (using A4 and A5 as SDA and SCL lines, respectively), and it controls the LED display through SPI-like signals (using D10, D11, and D12 for DIN, CS, and CLK). The circuit is designed to display time and environmental data on the LED display, with all components sharing a common power supply and ground.
Cirkit Designer LogoOpen Project in Cirkit Designer
ESP32-Based Wi-Fi Weather Station with DHT11 and AHT10 Sensors
Image of otro: A project utilizing SHT31 in a practical application
This circuit features an ESP32 microcontroller interfaced with two sensors: a DHT11 for temperature and humidity data, and an AHT10 for more precise temperature and humidity measurements. The ESP32 collects data from these sensors via GPIO pins and I2C communication, respectively, and powers both sensors through its 3.3V and GND pins.
Cirkit Designer LogoOpen Project in Cirkit Designer

Explore Projects Built with SHT31

Use Cirkit Designer to design, explore, and prototype these projects online. Some projects support real-time simulation. Click "Open Project" to start designing instantly!
Image of Nano_Sht31_W5500: A project utilizing SHT31 in a practical application
Arduino Nano Weather Station with Ethernet Connectivity
This circuit features an Arduino Nano microcontroller interfaced with an Ethernet W5500 module for network connectivity and an SHT31 sensor for temperature and humidity measurements. The Arduino Nano communicates with the Ethernet module via SPI and reads data from the SHT31 sensor using I2C, enabling remote monitoring of environmental conditions.
Cirkit Designer LogoOpen Project in Cirkit Designer
Image of ESP32-POE-ISO 2 AC and 2 Sensor: A project utilizing SHT31 in a practical application
Wi-Fi Controlled Weather Station with ESP32, DHT22, and SHTC3 Sensors
This circuit integrates an ESP32 microcontroller with a DHT22 temperature and humidity sensor, an Adafruit SHTC3 sensor, and a 2-channel relay module. The ESP32 reads environmental data from the sensors and can control external devices through the relay module.
Cirkit Designer LogoOpen Project in Cirkit Designer
Image of Alarm Clock: A project utilizing SHT31 in a practical application
Arduino Nano-Controlled LED Display with RTC and Humidity Sensing
This circuit features a Nano 3.0 ATmega328P microcontroller connected to an LED dot display, a real-time clock (RTC DS3231), and a humidity and temperature sensor (SHT21). The microcontroller communicates with the RTC and SHT21 via I2C (using A4 and A5 as SDA and SCL lines, respectively), and it controls the LED display through SPI-like signals (using D10, D11, and D12 for DIN, CS, and CLK). The circuit is designed to display time and environmental data on the LED display, with all components sharing a common power supply and ground.
Cirkit Designer LogoOpen Project in Cirkit Designer
Image of otro: A project utilizing SHT31 in a practical application
ESP32-Based Wi-Fi Weather Station with DHT11 and AHT10 Sensors
This circuit features an ESP32 microcontroller interfaced with two sensors: a DHT11 for temperature and humidity data, and an AHT10 for more precise temperature and humidity measurements. The ESP32 collects data from these sensors via GPIO pins and I2C communication, respectively, and powers both sensors through its 3.3V and GND pins.
Cirkit Designer LogoOpen Project in Cirkit Designer

Technical Specifications

Key Technical Details

  • Humidity Measurement Range: 0 to 100% RH
  • Temperature Measurement Range: -40°C to +125°C
  • Humidity Accuracy: ±2% RH (10 to 90% RH)
  • Temperature Accuracy: ±0.3°C
  • Supply Voltage Range: 2.4V to 5.5V
  • Interface: I2C
  • Response Time: < 8 sec (tau63%)
  • I2C Address Options: 0x44 (ADDR pin connected to GND) or 0x45 (ADDR pin connected to VDD)

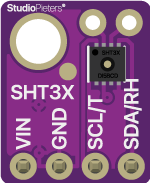
Pin Configuration and Descriptions

Pin Number Name Description
1 VDD Supply voltage
2 GND Ground
3 SDA Serial Data Line for I2C
4 SCL Serial Clock Line for I2C
5 nRESET Active low reset pin
6 ALERT Alert pin (optional use)
7 ADDR I2C address selection pin

Usage Instructions

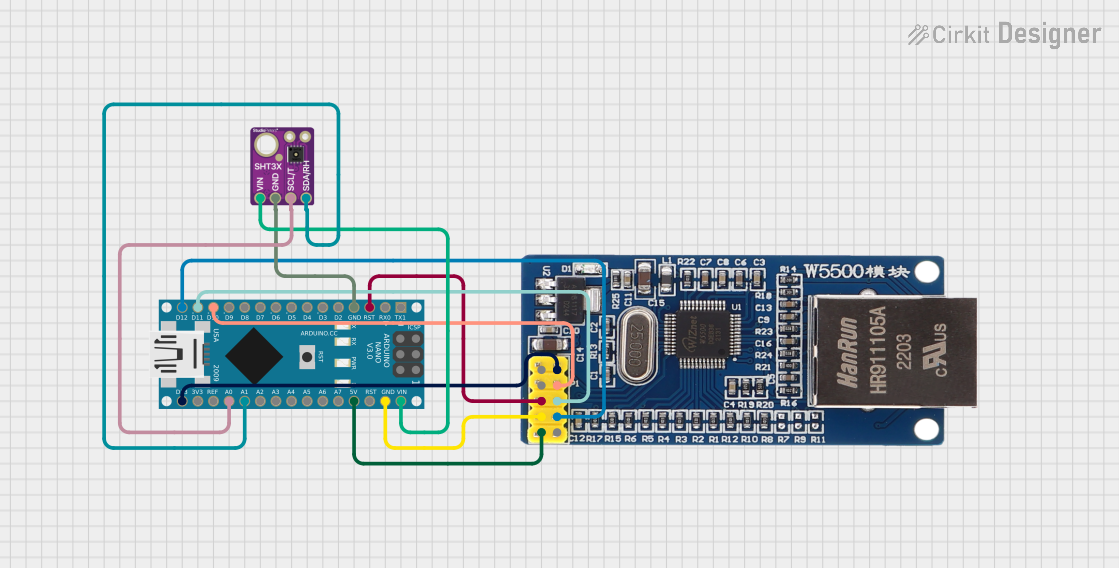
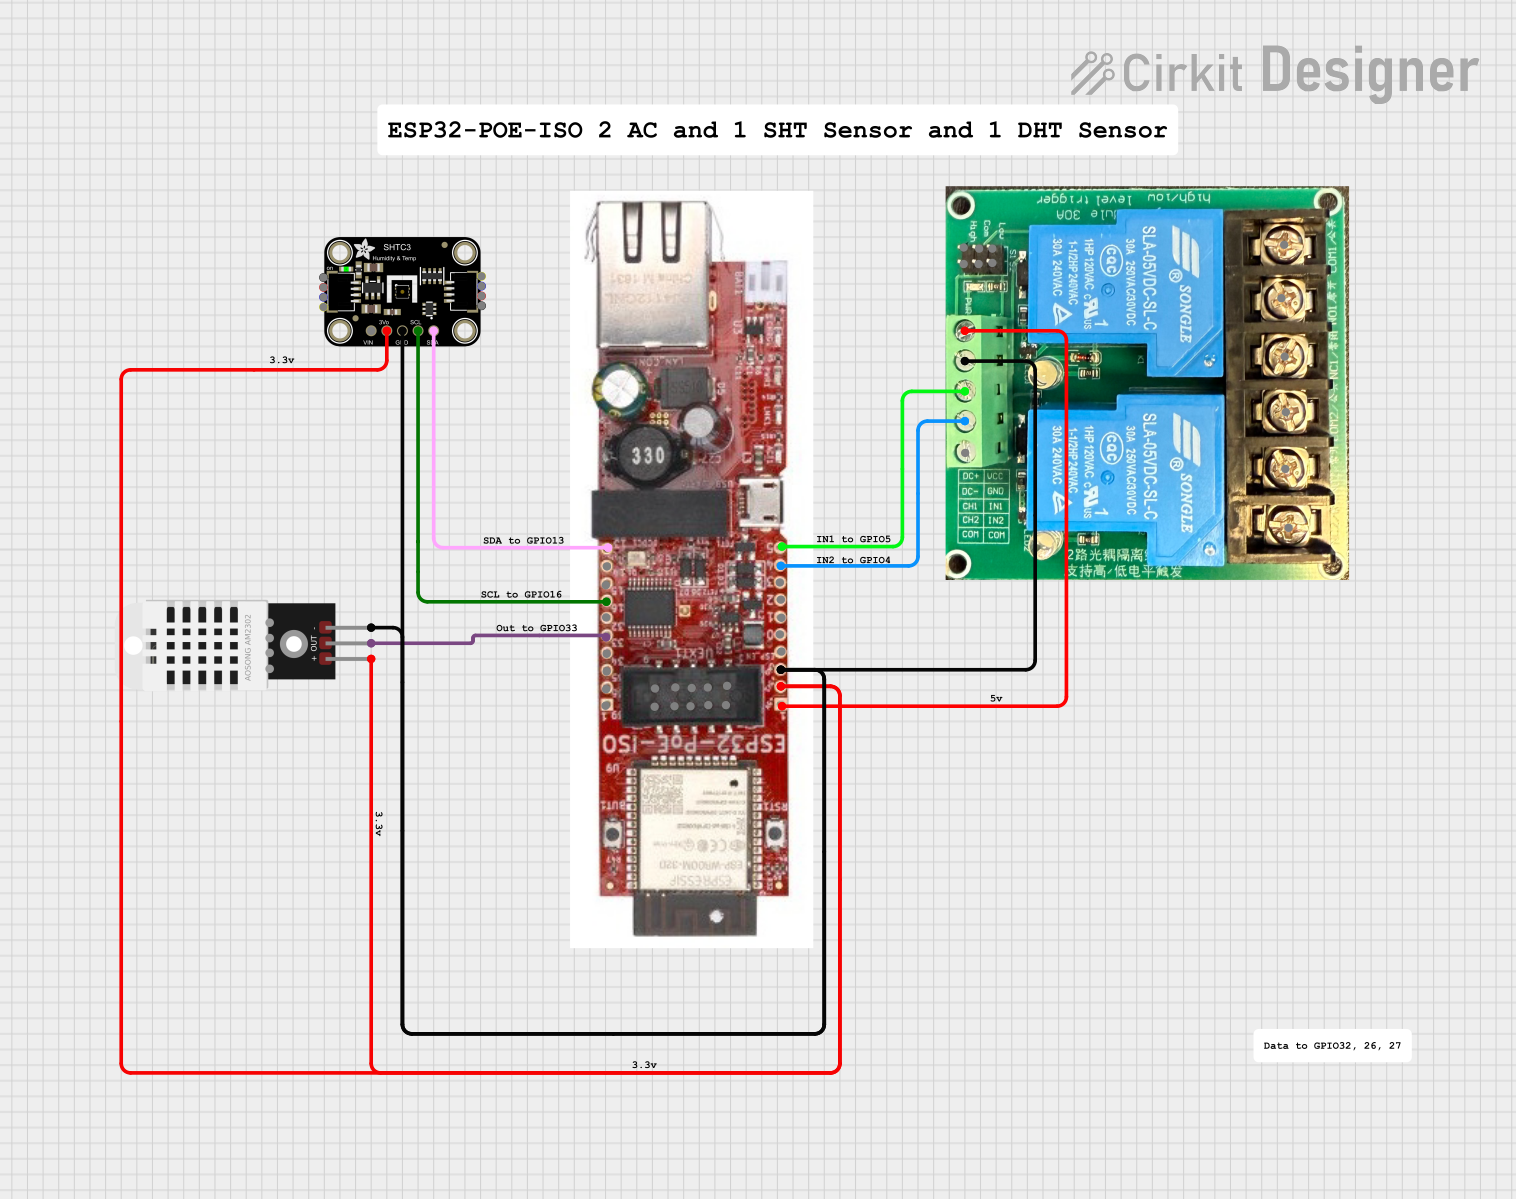
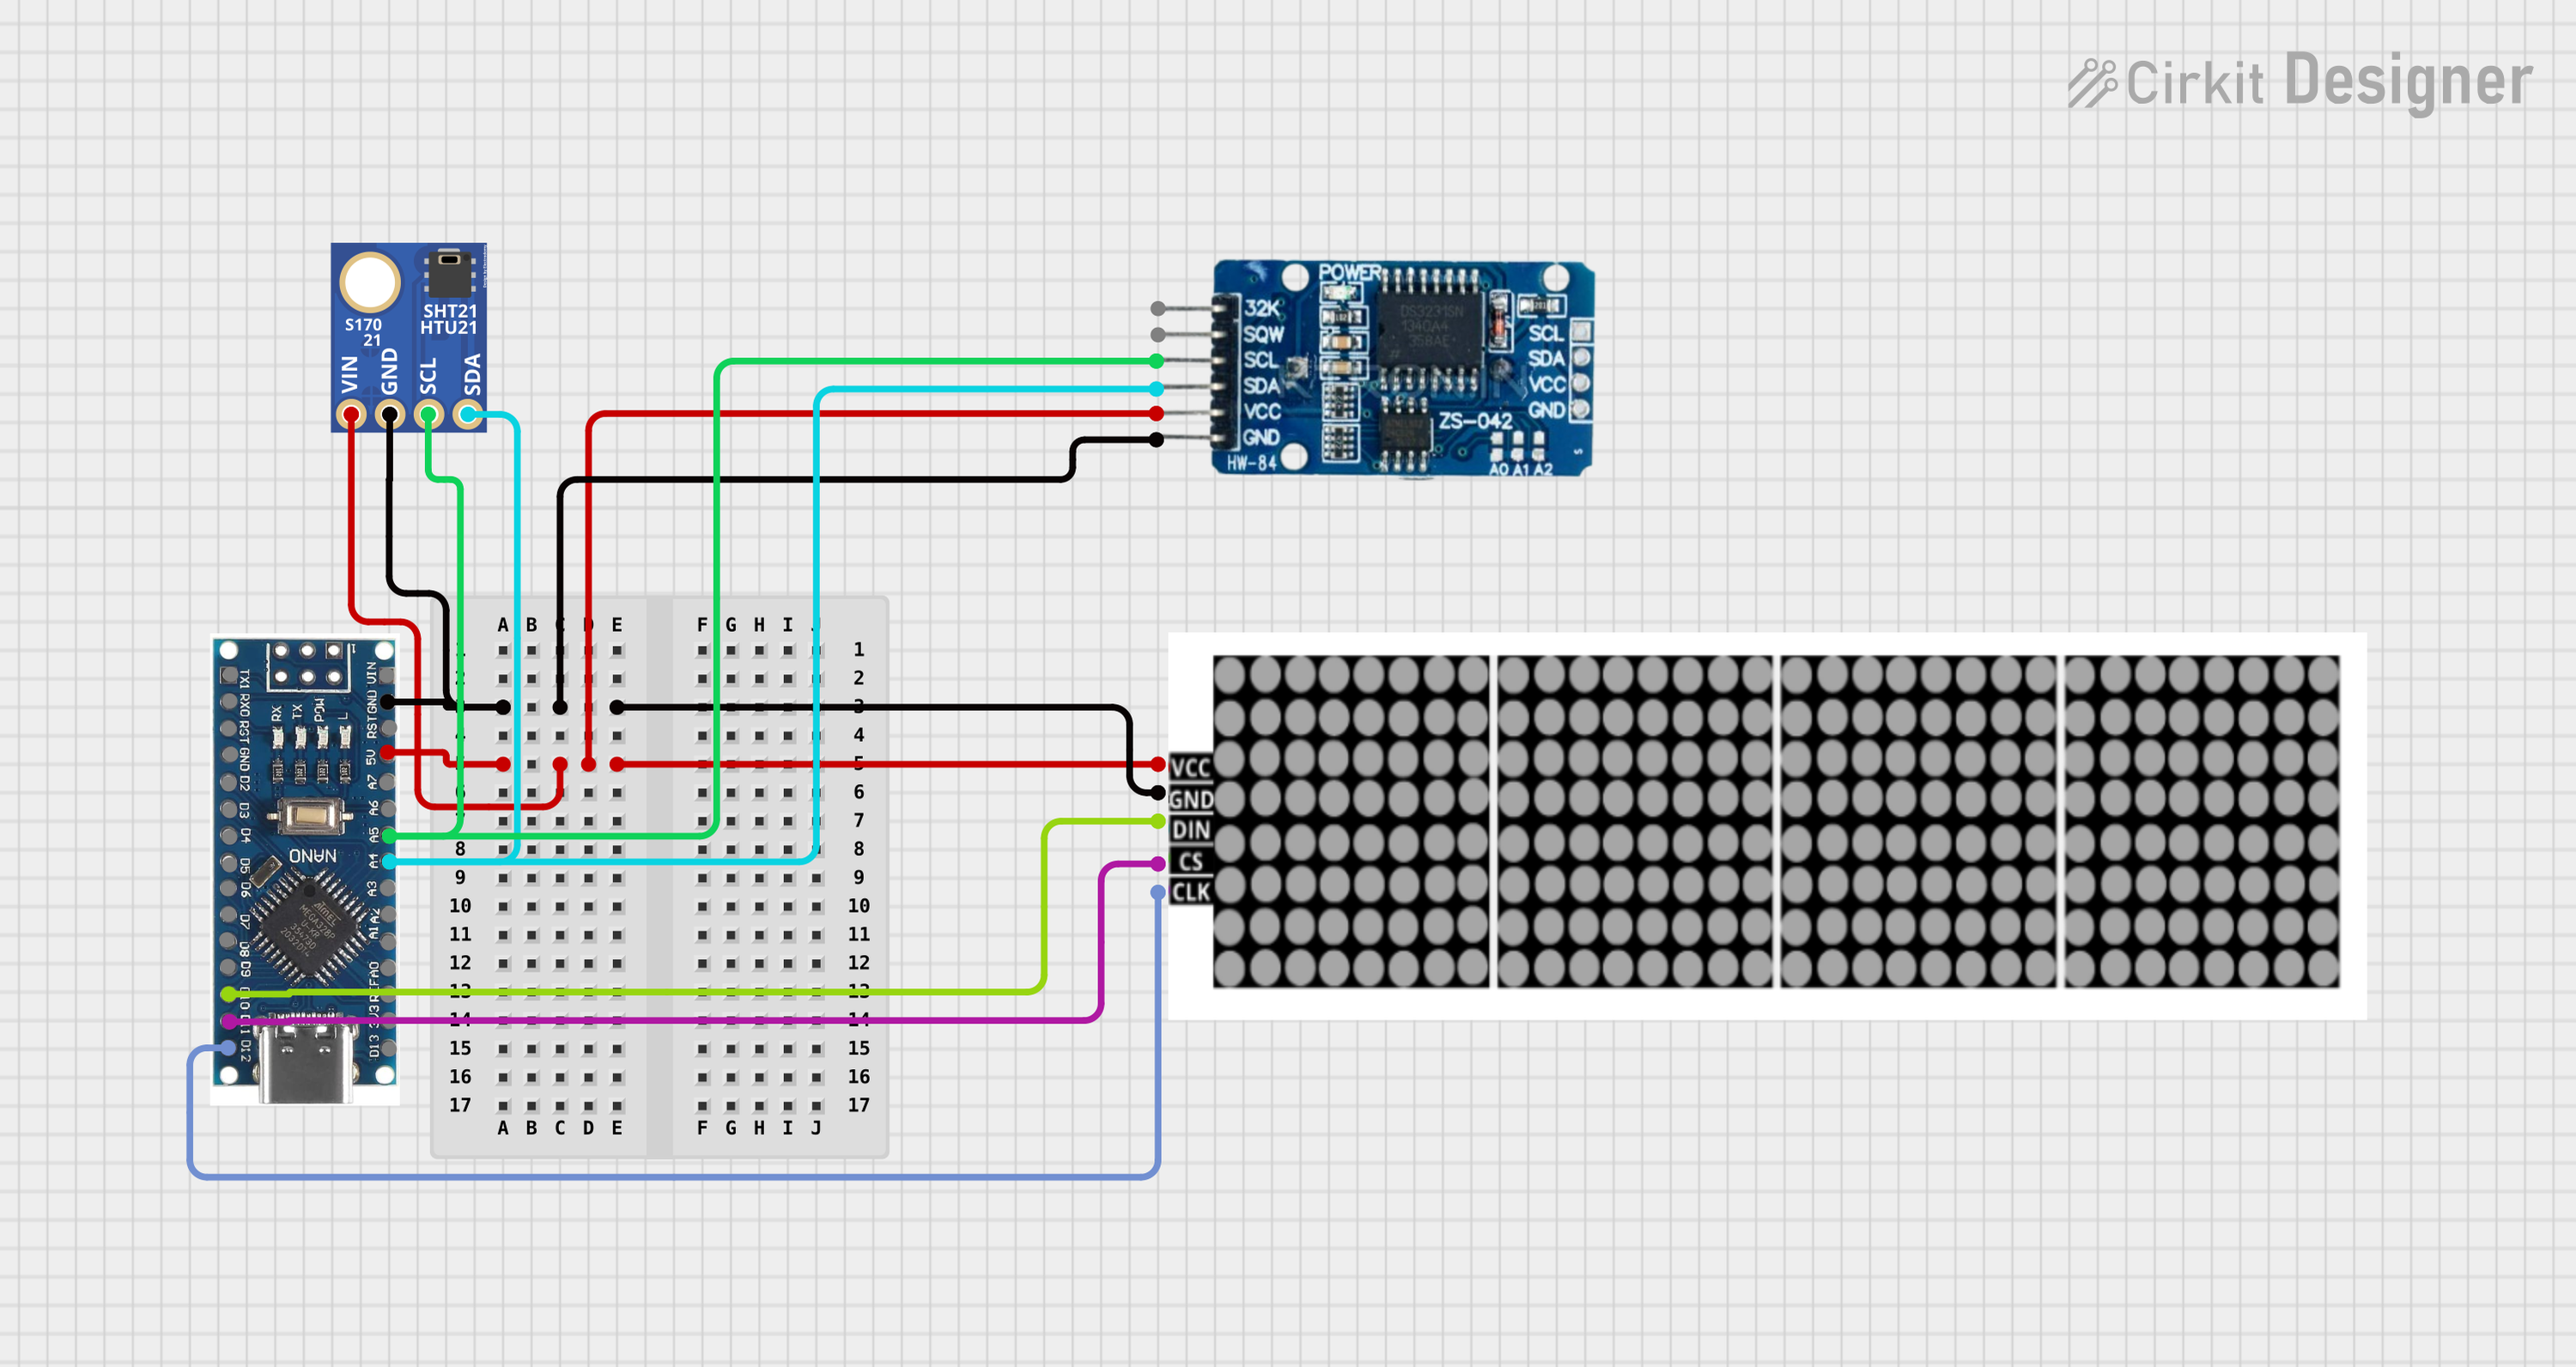
Integration into a Circuit

To use the SHT31 sensor in a circuit:

  1. Connect the VDD pin to a power supply within the 2.4V to 5.5V range.
  2. Connect the GND pin to the ground of the power supply.
  3. Connect the SDA and SCL pins to the I2C data and clock lines, respectively.
  4. Optionally, connect the nRESET pin to a digital output on your microcontroller if you wish to reset the sensor via software.
  5. Optionally, use the ALERT pin for system alerts based on humidity and temperature thresholds.
  6. Set the ADDR pin to either GND or VDD to select the I2C address.

Best Practices

  • Ensure that the power supply is stable and within the specified voltage range.
  • Use pull-up resistors on the SDA and SCL lines, typically 10kΩ.
  • Keep the I2C lines as short as possible to prevent signal degradation.
  • Avoid placing the sensor near heat sources or in direct sunlight to prevent false readings.
  • Implement proper ESD precautions when handling the sensor.

Example Code for Arduino UNO

#include <Wire.h>
#include "SHT31.h"

SHT31 sht31 = SHT31();

void setup() {
  Serial.begin(9600);
  Wire.begin();
  if (!sht31.begin(0x44)) { // Set to 0x45 if ADDR pin is tied to VDD
    Serial.println("Could not find a valid SHT31 sensor, check wiring!");
    while (1) delay(1);
  }
}

void loop() {
  float temp = sht31.getTemperature();
  float hum = sht31.getHumidity();

  if (!isnan(temp)) { // Check if 'temp' is not an error value
    Serial.print("Temp *C = "); Serial.println(temp);
  } else {
    Serial.println("Failed to read temperature");
  }

  if (!isnan(hum)) { // Check if 'hum' is not an error value
    Serial.print("Hum. % = "); Serial.println(hum);
  } else {
    Serial.println("Failed to read humidity");
  }

  delay(1000);
}

Troubleshooting and FAQs

Common Issues

  • Sensor not detected: Ensure wiring is correct, pull-up resistors are in place, and the correct I2C address is used in the code.
  • Inaccurate readings: Verify the sensor is not exposed to heat sources or direct sunlight. Check for proper airflow around the sensor.
  • Unstable readings: Ensure the power supply is stable and within the recommended voltage range.

FAQs

Q: Can the SHT31 sensor be used outdoors? A: Yes, but it should be protected from direct exposure to water and sunlight.

Q: How can I extend the I2C cable length? A: Use shielded cables and lower the pull-up resistor value to maintain signal integrity.

Q: What is the purpose of the ALERT pin? A: The ALERT pin can be used to trigger an interrupt on the host microcontroller when humidity or temperature exceeds programmed limits.

Q: How do I calibrate the sensor? A: The SHT31 is factory-calibrated. However, for critical applications, you may perform additional calibration using known humidity and temperature references.

Q: Is there a sleep mode to reduce power consumption? A: Yes, the SHT31 supports a low-power mode that can be activated via I2C commands.

This documentation provides a comprehensive guide to integrating and using the SHT31 sensor in various applications. For further information, consult the manufacturer's datasheet and application notes.