How to Use PQ12 Cable Adapter: Examples, Pinouts, and Specs
Introduction
The PQ12 Cable Adapter, manufactured by Actuonix, is a versatile component designed to connect different types of cables or devices. It facilitates seamless communication and power transfer between connected devices, making it an essential tool for a wide range of applications. With its compact design and robust functionality, the PQ12 Cable Adapter is ideal for use in robotics, automation systems, and prototyping projects.
Explore Projects Built with PQ12 Cable Adapter


Explore Projects Built with PQ12 Cable Adapter
Common Applications and Use Cases
- Connecting actuators, sensors, or other peripherals to control systems.
- Prototyping and testing electronic circuits.
- Facilitating communication between devices with different connector types.
- Powering small electronic devices or modules.
Technical Specifications
The PQ12 Cable Adapter is designed to provide reliable connectivity and power transfer. Below are its key technical details:
Key Technical Details
- Manufacturer Part ID: PQ12
- Voltage Rating: 5V to 12V DC
- Current Rating: Up to 2A
- Connector Types: JST 3-pin and standard 3-pin servo connectors
- Cable Length: 150mm (typical)
- Operating Temperature: -20°C to 60°C
- Material: High-quality plastic housing with gold-plated pins for durability.
Pin Configuration and Descriptions
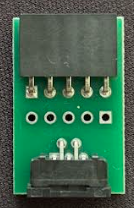
The PQ12 Cable Adapter features a JST 3-pin connector on one end and a standard 3-pin servo connector on the other. The pinout is as follows:
JST 3-Pin Connector
| Pin Number | Name | Description |
|---|---|---|
| 1 | VCC | Power supply (5V to 12V DC) |
| 2 | GND | Ground connection |
| 3 | Signal | Control or data signal |
Standard 3-Pin Servo Connector
| Pin Number | Name | Description |
|---|---|---|
| 1 | VCC | Power supply (5V to 12V DC) |
| 2 | GND | Ground connection |
| 3 | Signal | Control or data signal |
Usage Instructions
The PQ12 Cable Adapter is straightforward to use and can be integrated into various electronic systems. Follow the steps below to use the adapter effectively:
How to Use the PQ12 Cable Adapter in a Circuit
- Identify the Connectors: Determine which end of the adapter connects to your device (e.g., actuator, sensor) and which end connects to your control system (e.g., microcontroller).
- Connect the JST 3-Pin Connector: Plug the JST 3-pin connector into the corresponding port on your device. Ensure the pin alignment matches the pinout described above.
- Connect the Servo Connector: Attach the standard 3-pin servo connector to your control system or power source.
- Verify Connections: Double-check all connections to ensure proper alignment and secure fit.
- Power On the System: Once all connections are secure, power on your system to begin operation.
Important Considerations and Best Practices
- Voltage Compatibility: Ensure the voltage supplied to the adapter matches the requirements of your connected device (5V to 12V DC).
- Signal Integrity: Use short, high-quality cables to minimize signal degradation.
- Avoid Overloading: Do not exceed the current rating of 2A to prevent damage to the adapter or connected devices.
- Secure Connections: Ensure all connectors are firmly seated to avoid intermittent connections.
Example: Using the PQ12 Cable Adapter with an Arduino UNO
The PQ12 Cable Adapter can be used to connect an actuator to an Arduino UNO. Below is an example code snippet to control an actuator using the adapter:
#include <Servo.h> // Include the Servo library

Servo actuator; // Create a Servo object to control the actuator

void setup() {
  actuator.attach(9); // Attach the actuator to pin 9 on the Arduino
  // Ensure the PQ12 Cable Adapter is connected to the actuator and Arduino
}

void loop() {
  actuator.write(0); // Move the actuator to position 0
  delay(1000);       // Wait for 1 second
  actuator.write(90); // Move the actuator to position 90
  delay(1000);       // Wait for 1 second
  actuator.write(180); // Move the actuator to position 180
  delay(1000);       // Wait for 1 second
}
Troubleshooting and FAQs
Common Issues Users Might Face
Device Not Responding:
- Cause: Loose or incorrect connections.
- Solution: Verify all connections and ensure proper pin alignment.
Signal Interference:
- Cause: Long or poor-quality cables.
- Solution: Use shorter, shielded cables to reduce interference.
Overheating:
- Cause: Exceeding the current rating of 2A.
- Solution: Ensure the connected device does not draw more than 2A.
Voltage Mismatch:
- Cause: Supplying incorrect voltage to the adapter.
- Solution: Verify the voltage requirements of your device and ensure the power source matches.
Solutions and Tips for Troubleshooting
- Use a multimeter to check voltage and continuity across the adapter.
- Test the adapter with a different device to rule out issues with the connected device.
- Refer to the device's datasheet for specific voltage and current requirements.
By following this documentation, users can effectively integrate the PQ12 Cable Adapter into their projects and troubleshoot common issues with ease.