Cirkit Designer Logo
Cirkit Designer
Your all-in-one circuit design IDE
Home / 
Component Documentation

How to Use Adafruit Circuit Playground TFT Gizmo: Examples, Pinouts, and Specs

Image of Adafruit Circuit Playground TFT Gizmo
Cirkit Designer LogoDesign with Adafruit Circuit Playground TFT Gizmo in Cirkit Designer

Introduction

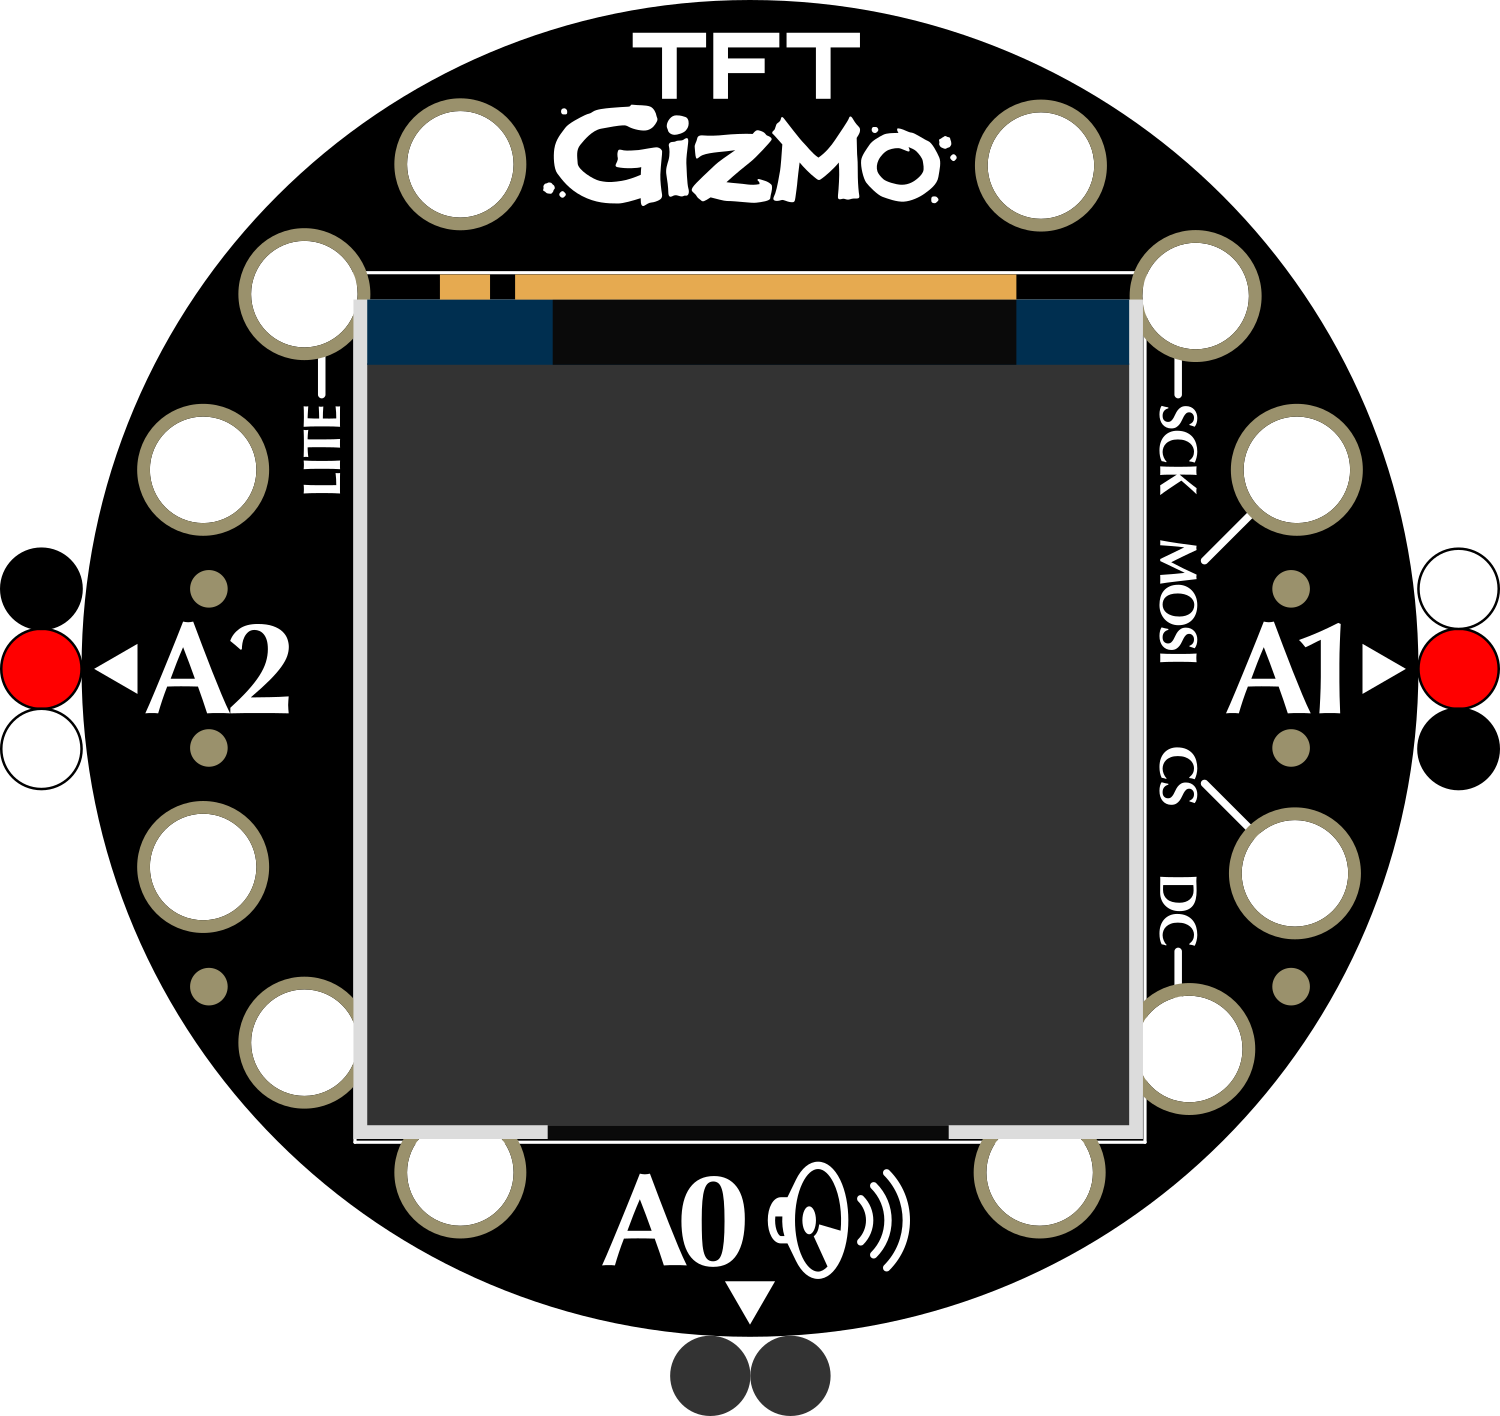
The Adafruit Circuit Playground TFT Gizmo is an add-on for the Circuit Playground Express and Bluefruit that adds a vibrant 240x240 pixel 1.54" TFT display with a 24-bit color depth. This display is perfect for adding graphics, color, and touch interface to your Circuit Playground projects. It's ideal for creating portable games, data visualization, or even as a tiny monitor for your microcontroller.

Explore Projects Built with Adafruit Circuit Playground TFT Gizmo

Use Cirkit Designer to design, explore, and prototype these projects online. Some projects support real-time simulation. Click "Open Project" to start designing instantly!
NodeMCU ESP8266 Controlled Drone with TFT Display and nRF24L01 Communication
Image of receiver/transmitter: A project utilizing Adafruit Circuit Playground TFT Gizmo in a practical application
This circuit features a NodeMCU V3 ESP8266 microcontroller interfaced with an LCD TFT screen, an nRF24L01 wireless transceiver, and an Adafruit Analog 2-Axis Joystick. The NodeMCU collects joystick inputs and displays information on the TFT screen, while also communicating with other devices via the nRF24L01 module. The circuit is powered by a 9V battery, with the NodeMCU regulating the voltage for other components.
Cirkit Designer LogoOpen Project in Cirkit Designer
Arduino Mega 2560 Controlled TFT Touchscreen Interface
Image of Tablero Moto: A project utilizing Adafruit Circuit Playground TFT Gizmo in a practical application
This circuit connects an Arduino Mega 2560 microcontroller to a 3.5-inch 480x320 TFT LCD display. The Arduino provides power, ground, and digital signals to control the display, including data lines for pixel information and control lines for reset, write, and command/data selection. The embedded code initializes the display and configures the Arduino's pins for communication, likely to create a user interface or visual output for a project.
Cirkit Designer LogoOpen Project in Cirkit Designer
Raspberry Pi Zero W-Based Handheld Gaming Console with LCD Display
Image of pigame: A project utilizing Adafruit Circuit Playground TFT Gizmo in a practical application
This circuit integrates a Raspberry Pi Zero W with an LCD TFT screen and two custom PiGrrl Zero gamepad PCBs. The Raspberry Pi provides power to the LCD screen and communicates with it via GPIO pins for control signals and SPI for data transfer. The gamepad PCBs are connected to the Raspberry Pi's GPIO pins, allowing for user input to be processed by the Raspberry Pi for gaming or other interactive applications.
Cirkit Designer LogoOpen Project in Cirkit Designer
ESP32-S3 and ILI9488 TFT LCD Display for Interactive Graphics
Image of IOT_V1: A project utilizing Adafruit Circuit Playground TFT Gizmo in a practical application
This circuit features an ESP32-S3 microcontroller connected to an ILI9488 TFT LCD display. The ESP32-S3 initializes and controls the display, demonstrating basic graphics and text rendering using the TFT_eSPI library.
Cirkit Designer LogoOpen Project in Cirkit Designer

Explore Projects Built with Adafruit Circuit Playground TFT Gizmo

Use Cirkit Designer to design, explore, and prototype these projects online. Some projects support real-time simulation. Click "Open Project" to start designing instantly!
Image of receiver/transmitter: A project utilizing Adafruit Circuit Playground TFT Gizmo in a practical application
NodeMCU ESP8266 Controlled Drone with TFT Display and nRF24L01 Communication
This circuit features a NodeMCU V3 ESP8266 microcontroller interfaced with an LCD TFT screen, an nRF24L01 wireless transceiver, and an Adafruit Analog 2-Axis Joystick. The NodeMCU collects joystick inputs and displays information on the TFT screen, while also communicating with other devices via the nRF24L01 module. The circuit is powered by a 9V battery, with the NodeMCU regulating the voltage for other components.
Cirkit Designer LogoOpen Project in Cirkit Designer
Image of Tablero Moto: A project utilizing Adafruit Circuit Playground TFT Gizmo in a practical application
Arduino Mega 2560 Controlled TFT Touchscreen Interface
This circuit connects an Arduino Mega 2560 microcontroller to a 3.5-inch 480x320 TFT LCD display. The Arduino provides power, ground, and digital signals to control the display, including data lines for pixel information and control lines for reset, write, and command/data selection. The embedded code initializes the display and configures the Arduino's pins for communication, likely to create a user interface or visual output for a project.
Cirkit Designer LogoOpen Project in Cirkit Designer
Image of pigame: A project utilizing Adafruit Circuit Playground TFT Gizmo in a practical application
Raspberry Pi Zero W-Based Handheld Gaming Console with LCD Display
This circuit integrates a Raspberry Pi Zero W with an LCD TFT screen and two custom PiGrrl Zero gamepad PCBs. The Raspberry Pi provides power to the LCD screen and communicates with it via GPIO pins for control signals and SPI for data transfer. The gamepad PCBs are connected to the Raspberry Pi's GPIO pins, allowing for user input to be processed by the Raspberry Pi for gaming or other interactive applications.
Cirkit Designer LogoOpen Project in Cirkit Designer
Image of IOT_V1: A project utilizing Adafruit Circuit Playground TFT Gizmo in a practical application
ESP32-S3 and ILI9488 TFT LCD Display for Interactive Graphics
This circuit features an ESP32-S3 microcontroller connected to an ILI9488 TFT LCD display. The ESP32-S3 initializes and controls the display, demonstrating basic graphics and text rendering using the TFT_eSPI library.
Cirkit Designer LogoOpen Project in Cirkit Designer

Common Applications and Use Cases

  • Portable gaming devices
  • Data visualization tools
  • Interactive wearable electronics
  • Educational projects for learning graphics programming
  • User interfaces for projects requiring visual output

Technical Specifications

Key Technical Details

  • Display Type: 1.54" TFT LCD
  • Resolution: 240x240 pixels
  • Color Depth: 24-bit (16 million colors)
  • Interface: SPI
  • Operating Voltage: 3.3V (powered via the Circuit Playground board)
  • Touch Screen: Capacitive touch overlay

Pin Configuration and Descriptions

Pin Number Description
A1 TFT Reset
A2 TFT Data/Command select
A3 TFT Chip Select
A4 TFT SPI Clock
A5 TFT SPI Data Out (MOSI)
A6 TFT SPI Data In (MISO) - not used
A7 Capacitive Touch IRQ

Usage Instructions

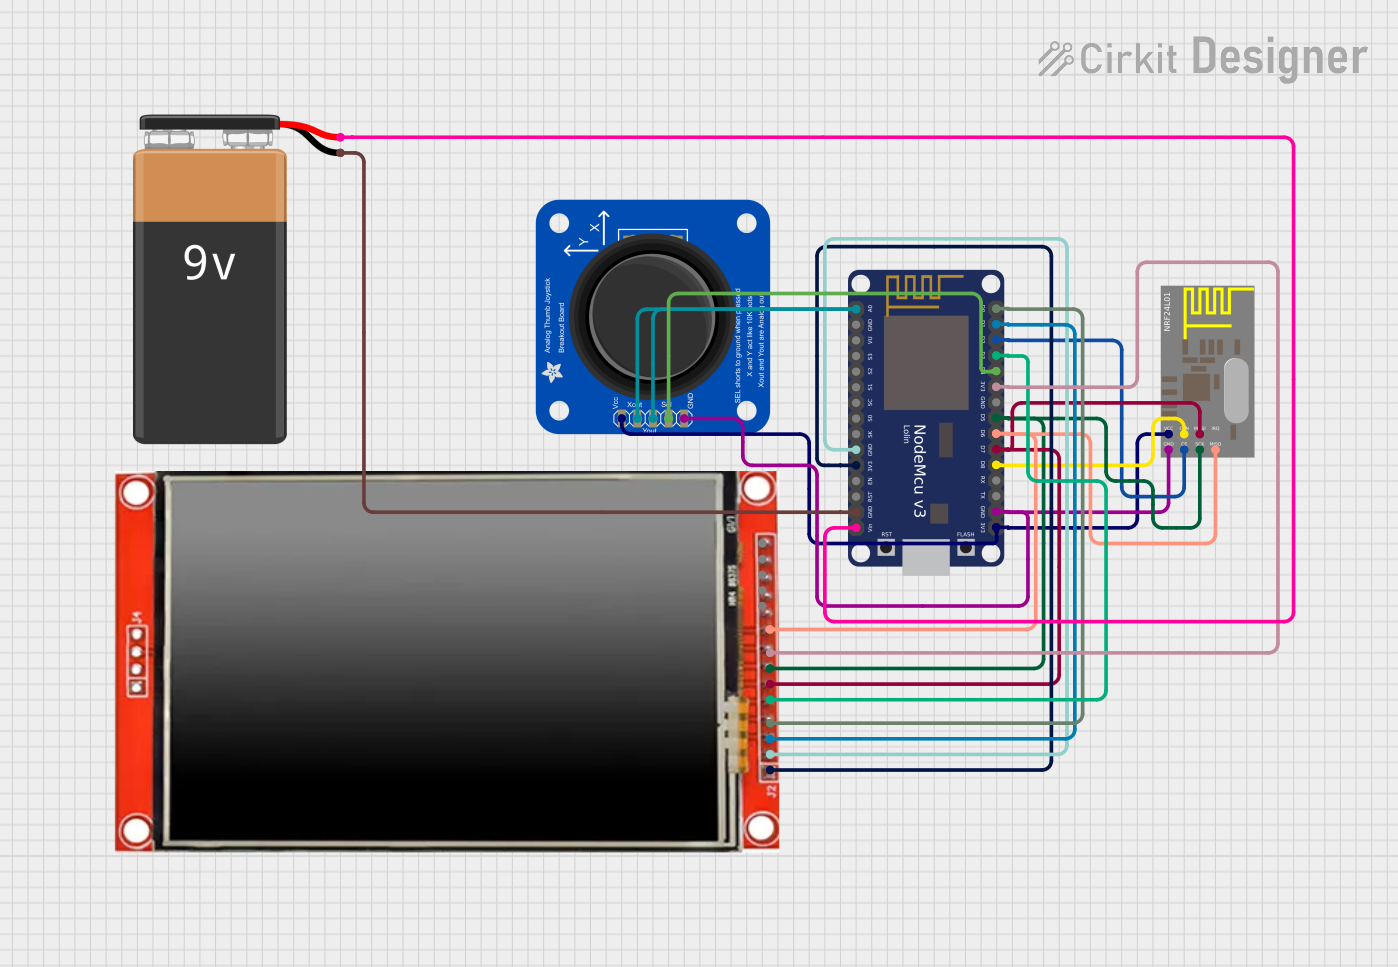
How to Use the Component in a Circuit

  1. Mounting: Carefully align the TFT Gizmo over the Circuit Playground board, ensuring the connector pads touch the corresponding pads on the Circuit Playground.
  2. Securing: Use the included screws and nuts to secure the TFT Gizmo to the Circuit Playground.
  3. Programming: Use the Arduino IDE or CircuitPython to program the Circuit Playground board to interact with the TFT display.

Important Considerations and Best Practices

  • Power: Ensure that the Circuit Playground board is powered with a sufficient and stable power source to handle the additional current draw from the TFT display.
  • Libraries: Install the necessary libraries for the TFT Gizmo, such as the Adafruit_GFX library for graphics and Adafruit_ST7789 for the display driver.
  • Touch Sensitivity: When using the capacitive touch feature, calibrate the touch screen for accurate input.
  • Updates: Keep the libraries and board firmware up to date to ensure compatibility and access to the latest features.

Example Code for Arduino UNO

#include <Adafruit_GFX.h>    // Core graphics library
#include <Adafruit_ST7789.h> // Hardware-specific library for ST7789

// Define the pins for the TFT Gizmo
#define TFT_CS        A3
#define TFT_RST       A1
#define TFT_DC        A2

// Initialize the ST7789 display:
Adafruit_ST7789 tft = Adafruit_ST7789(TFT_CS, TFT_DC, TFT_RST);

void setup() {
  tft.init(240, 240);           // Initialize the display with its resolution
  tft.fillScreen(ST77XX_BLACK); // Clear the screen to black
}

void loop() {
  // Display a simple line of text
  tft.setCursor(0, 0);          // Set the cursor to the top-left corner
  tft.setTextColor(ST77XX_WHITE);// Set the text color to white
  tft.setTextSize(1);            // Set the text size to 1
  tft.println("Hello, World!");  // Print the text to the screen
}

Troubleshooting and FAQs

Common Issues Users Might Face

  • Display Not Lighting Up: Ensure that the TFT Gizmo is properly mounted and secured to the Circuit Playground board. Check the power supply and connections.
  • Garbled or No Display: Verify that the correct libraries are installed and that the pin definitions match the connections. Also, check for any updates to the libraries or firmware.
  • Unresponsive Touch Screen: Calibrate the touch screen and ensure that the IRQ pin is correctly connected and configured in your code.

Solutions and Tips for Troubleshooting

  • Check Connections: Double-check that all connections are secure and that there are no shorts or open circuits.
  • Library Issues: Reinstall the Adafruit_GFX and Adafruit_ST7789 libraries through the Library Manager in the Arduino IDE.
  • Code Review: Look over your code to ensure there are no syntax or logical errors. Use serial debugging to help identify issues.

FAQs

Q: Can I use the TFT Gizmo with other microcontrollers?

A: Yes, as long as the microcontroller supports SPI communication and operates at 3.3V logic levels.

Q: How do I update the firmware on my Circuit Playground board?

A: Firmware updates can be done through the Arduino IDE or the CircuitPython updater tool, depending on which programming language you are using.

Q: Is the touch screen resistive or capacitive?

A: The TFT Gizmo features a capacitive touch overlay, which provides a more responsive touch interface compared to resistive touch screens.