
How to Use Capture Video USB: Examples, Pinouts, and Specs
 Design with Capture Video USB in Cirkit Designer
Introduction
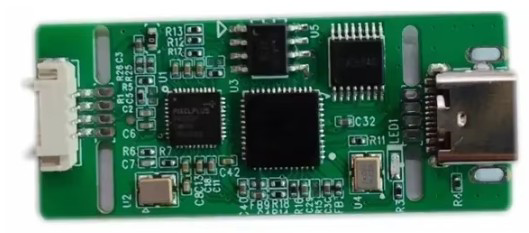
The Capture Video USB is a versatile device designed to capture video signals from various sources, such as cameras, gaming consoles, or DVD players, and transfer them to a computer via a USB connection. This component is widely used for video streaming, recording, and live broadcasting. It is an essential tool for content creators, gamers, and professionals who need to digitize analog or HDMI video signals for editing or sharing.
Explore Projects Built with Capture Video USB
 Open Project in Cirkit Designer
 Open Project in Cirkit Designer
 Open Project in Cirkit Designer
 Open Project in Cirkit Designer
Explore Projects Built with Capture Video USB

 Open Project in Cirkit Designer
 Open Project in Cirkit Designer
 Open Project in Cirkit Designer
 Open Project in Cirkit Designer
Common Applications and Use Cases
- Live Streaming: Capture and stream video content to platforms like YouTube, Twitch, or Zoom.
- Video Recording: Record high-quality video from external devices for later editing or archiving.
- Gaming: Stream or record gameplay from consoles such as PlayStation, Xbox, or Nintendo Switch.
- Video Conversion: Convert analog video signals (e.g., from VHS tapes) to digital formats.
- Surveillance: Integrate with security cameras for monitoring and recording footage.
Technical Specifications
The following table outlines the key technical details of the Capture Video USB device:
| Specification | Details |
|---|---|
| Input Interfaces | HDMI, RCA (Composite Video), or S-Video (varies by model) |
| Output Interface | USB 2.0 or USB 3.0 |
| Supported Resolutions | Up to 1080p (1920x1080) at 30fps or 60fps (model-dependent) |
| Video Formats Supported | MPEG-4, H.264, MJPEG |
| Audio Support | Stereo audio capture via HDMI or RCA |
| Power Supply | Powered via USB (5V, 500mA typical) |
| Operating System Support | Windows, macOS, Linux |
| Dimensions | Compact, typically 60mm x 25mm x 10mm |
| Weight | Lightweight, approximately 30g |
Pin Configuration and Descriptions
The Capture Video USB does not have traditional pins but includes the following ports:
| Port | Description |
|---|---|
| HDMI Input | Connects to HDMI video sources (e.g., cameras, gaming consoles). |
| RCA Input | Connects to analog video sources (e.g., VHS players, older camcorders). |
| USB Output | Transfers captured video and audio data to the computer. |
| Audio Input (3.5mm) | Optional port for external audio input (varies by model). |
Usage Instructions
How to Use the Capture Video USB in a Circuit
The Capture Video USB is a plug-and-play device that does not require integration into a traditional electronic circuit. Instead, it connects directly to video sources and a computer. Follow these steps to use the device:
Connect the Video Source:
- For HDMI sources, connect the HDMI cable from the video source to the HDMI input port on the Capture Video USB.
- For analog sources, use the RCA or S-Video cables to connect the video source to the corresponding input ports.
Connect to the Computer:
- Plug the USB output of the Capture Video USB into an available USB port on your computer.
Install Drivers (if required):
- Some models may require driver installation. Check the manufacturer's website for the latest drivers and software.
Launch Video Capture Software:
- Open video capture or streaming software (e.g., OBS Studio, VLC Media Player, or proprietary software provided by the manufacturer).
- Select the Capture Video USB as the video and audio input device.
Configure Settings:
- Adjust resolution, frame rate, and audio settings in the software to match your requirements.
Start Capturing or Streaming:
- Begin recording or streaming your video content.
Important Considerations and Best Practices
- USB Port Compatibility: Ensure the device is connected to a USB 3.0 port for optimal performance, especially for high-resolution video.
- Cable Quality: Use high-quality HDMI or RCA cables to minimize signal loss and ensure clear video capture.
- Heat Management: The device may become warm during extended use. Ensure proper ventilation to prevent overheating.
- Software Compatibility: Verify that your video capture software supports the Capture Video USB. OBS Studio is a popular choice for most users.
- Latency: For real-time applications like gaming, ensure the device has low latency to avoid delays in video output.
Example: Using Capture Video USB with Arduino UNO
While the Capture Video USB is not typically used with microcontrollers like the Arduino UNO, it can be integrated into projects where the Arduino controls external devices (e.g., switching video sources). Below is an example of Arduino code to control a relay that switches between two video sources:
// Example: Arduino code to control a relay for switching video sources
const int relayPin = 7; // Pin connected to the relay module

void setup() {
  pinMode(relayPin, OUTPUT); // Set the relay pin as an output
  digitalWrite(relayPin, LOW); // Start with the relay off
}

void loop() {
  // Example: Toggle the relay every 5 seconds
  digitalWrite(relayPin, HIGH); // Turn on the relay (switch to source 1)
  delay(5000); // Wait for 5 seconds
  digitalWrite(relayPin, LOW); // Turn off the relay (switch to source 2)
  delay(5000); // Wait for 5 seconds
}
Troubleshooting and FAQs
Common Issues and Solutions
No Video Signal Detected:
- Solution: Check all cable connections and ensure the video source is powered on. Verify that the correct input source is selected in the video capture software.
Poor Video Quality:
- Solution: Use high-quality cables and ensure the resolution settings in the software match the video source.
Device Not Recognized by Computer:
- Solution: Install the latest drivers from the manufacturer's website. Try connecting to a different USB port.
Audio Not Captured:
- Solution: Ensure the audio source is properly connected and selected in the software. For HDMI, verify that the audio output is enabled on the video source.
High Latency:
- Solution: Use a USB 3.0 port and reduce the resolution or frame rate in the software settings.
FAQs
Q: Can I use the Capture Video USB with a smartphone?
- A: Yes, with an appropriate USB OTG adapter and compatible video capture app.
Q: Does the device support 4K video?
- A: Most models support up to 1080p. Check the specifications of your specific model for 4K support.
Q: Can I use this device for live streaming?
- A: Yes, the Capture Video USB is ideal for live streaming when paired with software like OBS Studio.
Q: Is additional power required?
- A: No, the device is powered directly via the USB connection.
Q: Can I capture video from encrypted HDMI sources (e.g., Blu-ray players)?
- A: No, the device does not bypass HDCP encryption.