Cirkit Designer Logo
Cirkit Designer
Your all-in-one circuit design IDE
Home / 
Component Documentation

How to Use 5v mini water pump: Examples, Pinouts, and Specs

Image of 5v mini water pump
Cirkit Designer LogoDesign with 5v mini water pump in Cirkit Designer

Introduction

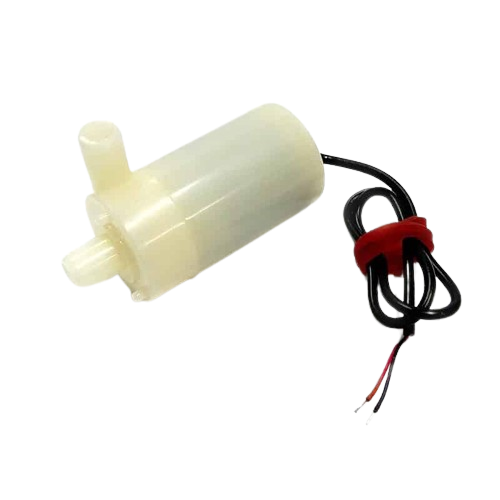
The 5V Mini Water Pump is a compact and efficient solution for moving water in small-scale projects. It is designed to operate with a 5V power supply, making it ideal for use with low-voltage control systems such as Arduino boards. Common applications include desktop fountains, pet water dispensers, plant watering systems, and small aquariums.

Explore Projects Built with 5v mini water pump

Use Cirkit Designer to design, explore, and prototype these projects online. Some projects support real-time simulation. Click "Open Project" to start designing instantly!
ESP8266 NodeMCU Controlled Relay for Water Pump Automation
Image of smart : A project utilizing 5v mini water pump in a practical application
This circuit is designed to control a 5V mini water pump using an ESP8266 NodeMCU microcontroller. The pump's operation is switched by a 5V relay, which is controlled by the NodeMCU. A 9V battery powers the system, and a rocker switch is included to manually enable or disable the pump.
Cirkit Designer LogoOpen Project in Cirkit Designer
ESP8266 NodeMCU Controlled Water Flow System with Dual Relay Pump Activation
Image of water project: A project utilizing 5v mini water pump in a practical application
This circuit is designed to control a 5V mini water pump using an ESP8266 NodeMCU microcontroller, which is powered by a 5V adapter. The water flow is monitored by two water flow sensors, whose signals are read by the microcontroller on pins D5 and D7. The pump is switched on and off through a 2-channel relay module, which is controlled by the microcontroller via pin D2.
Cirkit Designer LogoOpen Project in Cirkit Designer
Arduino-Controlled Bluetooth Water Pump System
Image of BLUETOOTH MOTOR: A project utilizing 5v mini water pump in a practical application
This circuit is designed to remotely control a mini water pump via Bluetooth using an Arduino UNO. It includes an HC-05 Bluetooth module for wireless communication, a 5V relay to switch the pump, and is powered by an 18650 Li-Ion battery with a rocker switch for power control.
Cirkit Designer LogoOpen Project in Cirkit Designer
Raspberry Pi Controlled Water Pump with MOSFET Switching
Image of Water Pump Wiring: A project utilizing 5v mini water pump in a practical application
This circuit controls a 5V mini water pump using a Raspberry Pi 4B. The Raspberry Pi drives the gate of a MOSFET to switch the pump on and off, with a resistor in series to limit current. The DC power source provides the necessary voltage for the pump and the Raspberry Pi.
Cirkit Designer LogoOpen Project in Cirkit Designer

Explore Projects Built with 5v mini water pump

Use Cirkit Designer to design, explore, and prototype these projects online. Some projects support real-time simulation. Click "Open Project" to start designing instantly!
Image of smart : A project utilizing 5v mini water pump in a practical application
ESP8266 NodeMCU Controlled Relay for Water Pump Automation
This circuit is designed to control a 5V mini water pump using an ESP8266 NodeMCU microcontroller. The pump's operation is switched by a 5V relay, which is controlled by the NodeMCU. A 9V battery powers the system, and a rocker switch is included to manually enable or disable the pump.
Cirkit Designer LogoOpen Project in Cirkit Designer
Image of water project: A project utilizing 5v mini water pump in a practical application
ESP8266 NodeMCU Controlled Water Flow System with Dual Relay Pump Activation
This circuit is designed to control a 5V mini water pump using an ESP8266 NodeMCU microcontroller, which is powered by a 5V adapter. The water flow is monitored by two water flow sensors, whose signals are read by the microcontroller on pins D5 and D7. The pump is switched on and off through a 2-channel relay module, which is controlled by the microcontroller via pin D2.
Cirkit Designer LogoOpen Project in Cirkit Designer
Image of BLUETOOTH MOTOR: A project utilizing 5v mini water pump in a practical application
Arduino-Controlled Bluetooth Water Pump System
This circuit is designed to remotely control a mini water pump via Bluetooth using an Arduino UNO. It includes an HC-05 Bluetooth module for wireless communication, a 5V relay to switch the pump, and is powered by an 18650 Li-Ion battery with a rocker switch for power control.
Cirkit Designer LogoOpen Project in Cirkit Designer
Image of Water Pump Wiring: A project utilizing 5v mini water pump in a practical application
Raspberry Pi Controlled Water Pump with MOSFET Switching
This circuit controls a 5V mini water pump using a Raspberry Pi 4B. The Raspberry Pi drives the gate of a MOSFET to switch the pump on and off, with a resistor in series to limit current. The DC power source provides the necessary voltage for the pump and the Raspberry Pi.
Cirkit Designer LogoOpen Project in Cirkit Designer

Technical Specifications

General Specifications

  • Operating Voltage: 5V DC
  • Working Current: 100-200mA
  • Power Consumption: 0.5W to 1W
  • Max Lift: 40-110cm
  • Max Flow Rate: 80-120L/H
  • Operating Environment: 0-40°C, non-freezing
  • Noise: <40dB
  • Life Expectancy: >20,000 hours

Pin Configuration and Descriptions

Pin Number Description Notes
1 Positive Power (V+) Connect to 5V power supply
2 Ground (GND) Connect to system ground

Usage Instructions

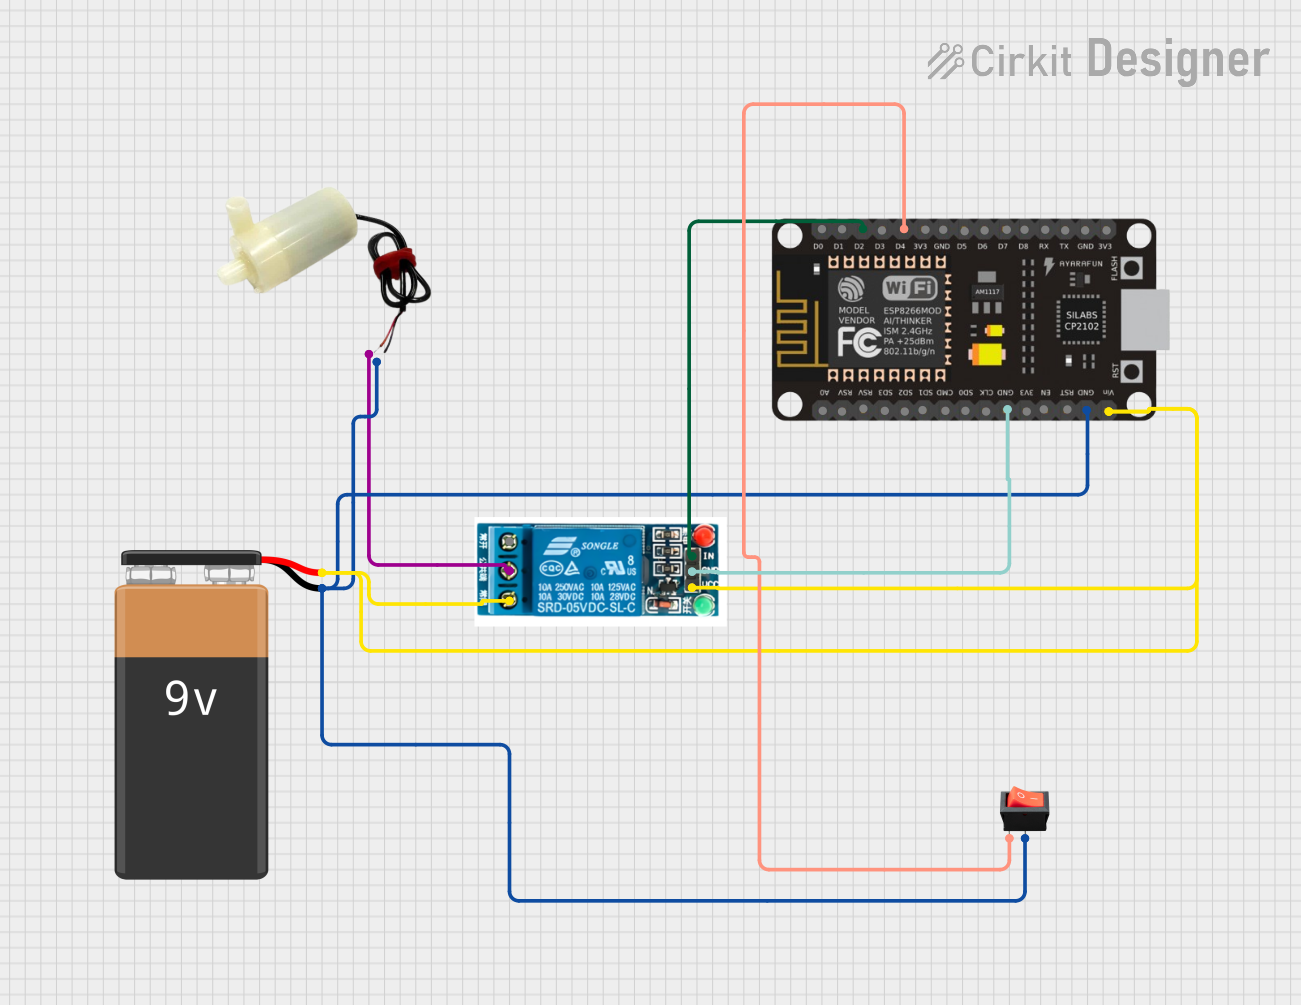
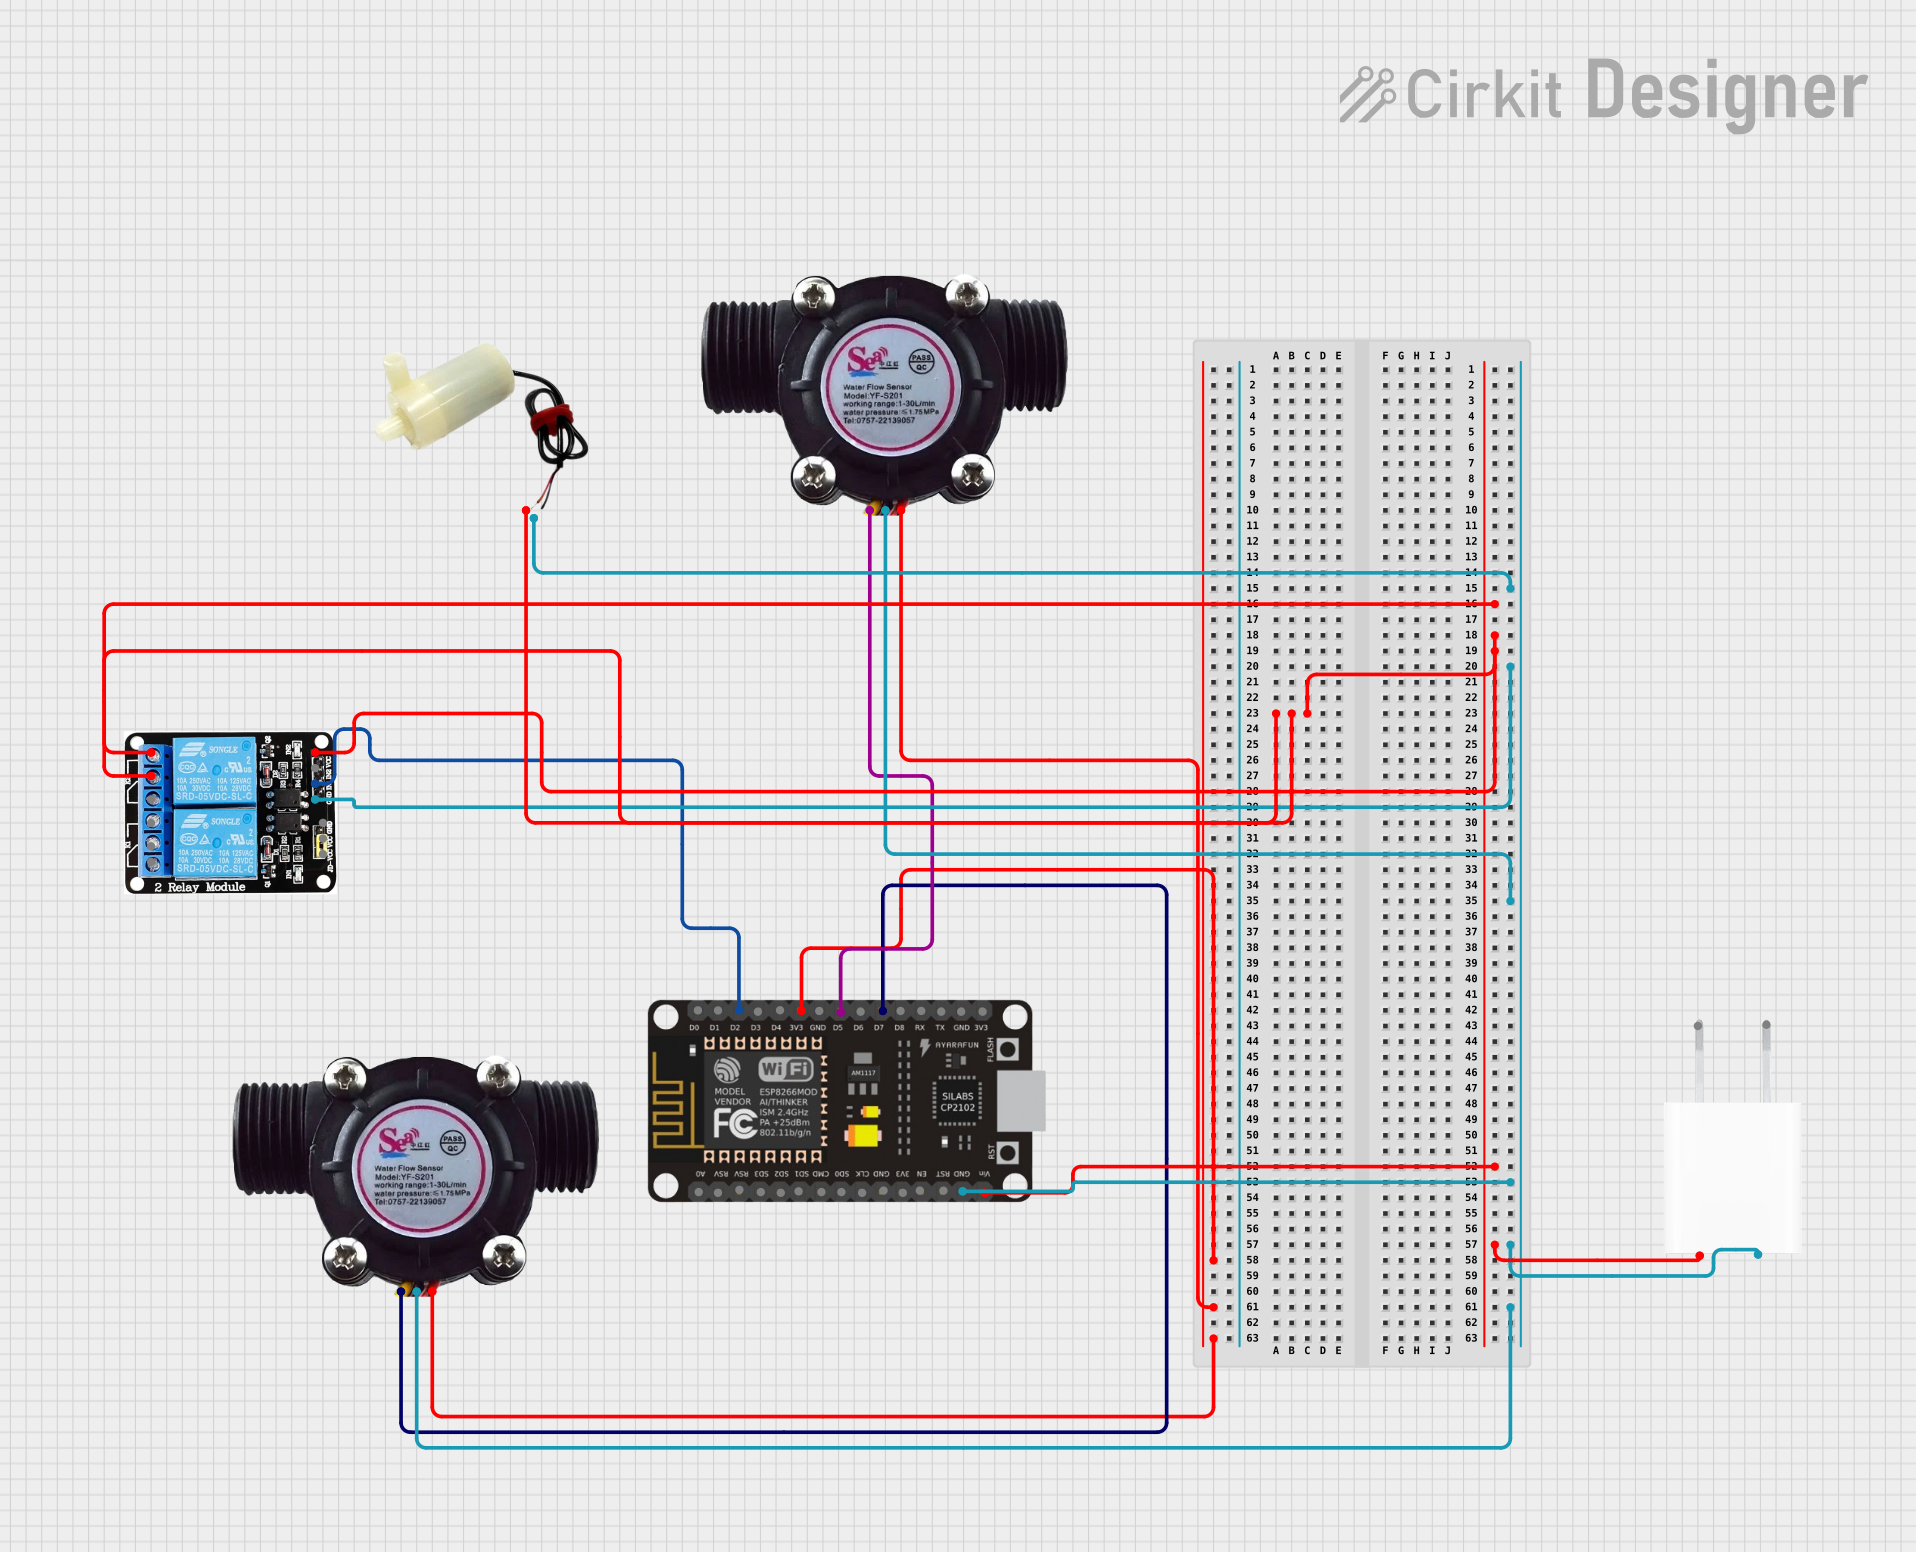
Integration into a Circuit

  1. Power Supply: Ensure that the power supply can deliver 5V and at least 200mA. Connect the positive terminal to the V+ pin and the ground to the GND pin of the pump.

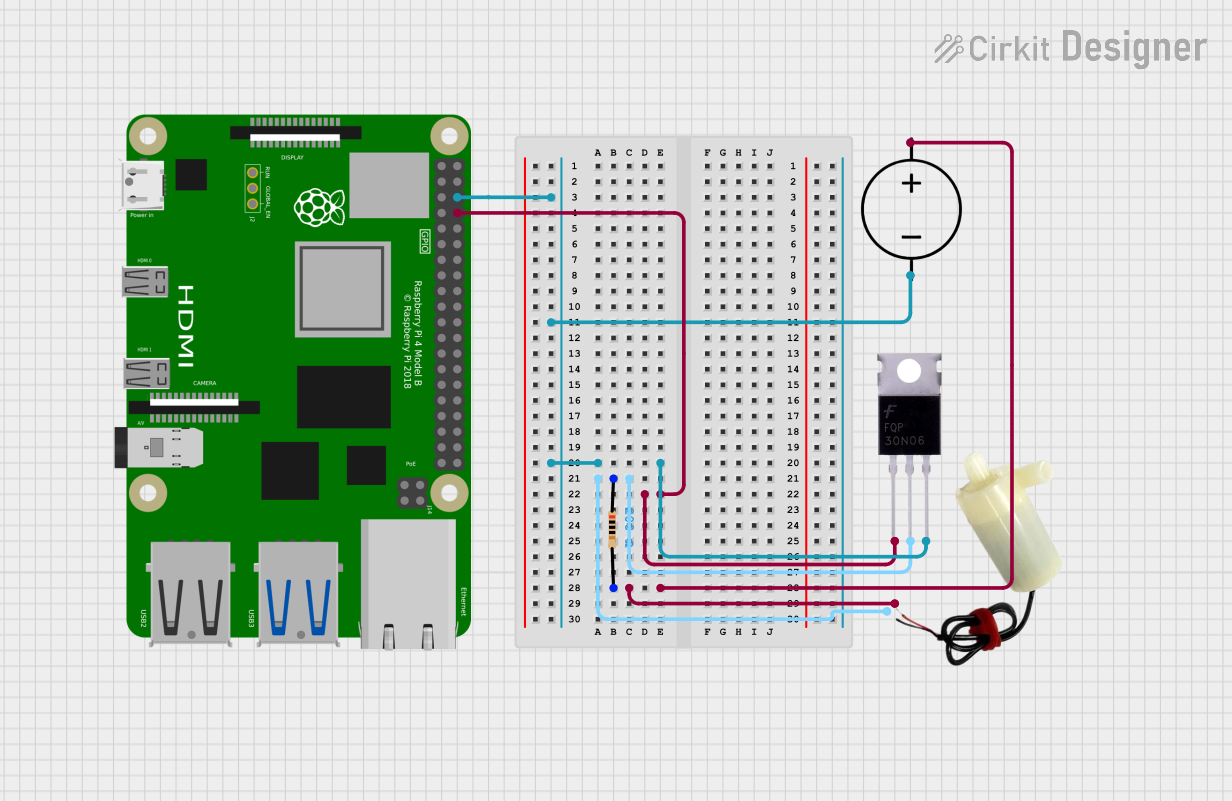
  2. Control: To control the pump with an Arduino, use a transistor or a relay module as the pump requires more current than an Arduino pin can supply directly.

  3. Protection: It's recommended to use a diode (like a 1N4001) in reverse bias across the pump terminals to protect against voltage spikes when the pump is turned off.

  4. Tubing: Attach appropriate tubing to the inlet and outlet of the pump. Ensure that the tubing is secure to prevent leaks.

Best Practices

  • Priming: Before first use, prime the pump by submerging it in water to ensure it has enough liquid to start pumping.
  • Waterproofing: Ensure that all electrical connections are waterproofed to prevent short circuits.
  • Mounting: Secure the pump to prevent vibrations and noise.
  • Maintenance: Regularly clean the pump to prevent blockages and ensure a long service life.

Example Arduino Code

// Control a 5V Mini Water Pump with Arduino

const int pumpPin = 3; // Connect pump control to pin 3

void setup() {
  pinMode(pumpPin, OUTPUT); // Set pump pin as an output
}

void loop() {
  digitalWrite(pumpPin, HIGH); // Turn on the pump
  delay(10000);                // Run the pump for 10 seconds
  digitalWrite(pumpPin, LOW);  // Turn off the pump
  delay(20000);                // Wait for 20 seconds
}

Troubleshooting and FAQs

Common Issues

  • Pump Not Starting: Check the power supply and connections. Ensure the pump is primed with water.
  • Low Flow Rate: Verify that there are no blockages in the tubing and that the pump is not running dry.
  • Noise: Secure the pump to dampen vibrations and check for air in the system.

FAQs

Q: Can I run the pump continuously? A: Yes, but it's recommended to allow periodic rest to extend the pump's life.

Q: Is it safe to use with drinking water? A: The pump is not certified for potable water. Use with non-potable water applications.

Q: Can I control the flow rate? A: Flow rate control is not inherent to the pump but can be achieved by regulating the voltage or using a flow control valve.

For further assistance, consult the manufacturer's datasheet or contact technical support.