Cirkit Designer Logo
Cirkit Designer
Your all-in-one circuit design IDE
Home / 
Component Documentation

How to Use ENDSTOP: Examples, Pinouts, and Specs

Image of ENDSTOP
Cirkit Designer LogoDesign with ENDSTOP in Cirkit Designer

Introduction

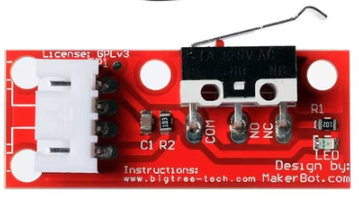
An endstop is a mechanical switch or sensor designed to detect the position of a moving part in a machine. It is commonly used in 3D printers, CNC machines, and other automated systems to define the limits of movement and ensure precise operation. Endstops play a critical role in preventing mechanical components from moving beyond their intended range, which could otherwise result in damage or misalignment.

Explore Projects Built with ENDSTOP

Use Cirkit Designer to design, explore, and prototype these projects online. Some projects support real-time simulation. Click "Open Project" to start designing instantly!
ESP32-Based Sensor Monitoring System with OLED Display and E-Stop
Image of MVP_design: A project utilizing ENDSTOP in a practical application
This circuit features an ESP32 microcontroller that interfaces with a variety of sensors and output devices. It is powered by a Lipo battery through a buck converter, ensuring a stable voltage supply. The ESP32 collects data from a DHT11 temperature and humidity sensor and a vibration sensor, controls a buzzer, and displays information on an OLED screen. An emergency stop (E Stop) is connected for safety purposes, allowing the system to be quickly deactivated.
Cirkit Designer LogoOpen Project in Cirkit Designer
Arduino Mega 2560-Based Safety Monitoring and Control System with Temperature Sensor and Relay Module
Image of conveyor_V_1: A project utilizing ENDSTOP in a practical application
This circuit is a safety and control system using an Arduino Mega 2560, which monitors various switches and a DHT11 sensor to control an 8-channel relay module. The system includes emergency stop buttons, pushbuttons, and a 3-position switch to manage safety conditions and activate relays based on temperature and switch inputs.
Cirkit Designer LogoOpen Project in Cirkit Designer
Electromechanical Pump Control Circuit with Emergency Stop
Image of Pelton.: A project utilizing ENDSTOP in a practical application
This circuit is designed to control a pump using a contactor that is manually operated by a switch and can be overridden by an emergency stop. The contactor enables power from an AC power outlet to the pump, and the emergency stop can interrupt the power circuit for safety purposes.
Cirkit Designer LogoOpen Project in Cirkit Designer
Arduino Nano Controlled Relay System with Safety Interlocks
Image of HYD: A project utilizing ENDSTOP in a practical application
This circuit includes an Arduino Nano microcontroller interfaced with multiple pushbuttons, limit switches, an emergency stop, a 2-channel relay module, and a 1-channel relay module. The Arduino controls the relay modules based on inputs from the pushbuttons and limit switches, which likely serve as user interfaces and position or safety sensors. The circuit is powered by a 5V power supply unit (PSU), which is connected to an AC supply, and the emergency stop is configured to potentially interrupt the circuit for safety purposes.
Cirkit Designer LogoOpen Project in Cirkit Designer

Explore Projects Built with ENDSTOP

Use Cirkit Designer to design, explore, and prototype these projects online. Some projects support real-time simulation. Click "Open Project" to start designing instantly!
Image of MVP_design: A project utilizing ENDSTOP in a practical application
ESP32-Based Sensor Monitoring System with OLED Display and E-Stop
This circuit features an ESP32 microcontroller that interfaces with a variety of sensors and output devices. It is powered by a Lipo battery through a buck converter, ensuring a stable voltage supply. The ESP32 collects data from a DHT11 temperature and humidity sensor and a vibration sensor, controls a buzzer, and displays information on an OLED screen. An emergency stop (E Stop) is connected for safety purposes, allowing the system to be quickly deactivated.
Cirkit Designer LogoOpen Project in Cirkit Designer
Image of conveyor_V_1: A project utilizing ENDSTOP in a practical application
Arduino Mega 2560-Based Safety Monitoring and Control System with Temperature Sensor and Relay Module
This circuit is a safety and control system using an Arduino Mega 2560, which monitors various switches and a DHT11 sensor to control an 8-channel relay module. The system includes emergency stop buttons, pushbuttons, and a 3-position switch to manage safety conditions and activate relays based on temperature and switch inputs.
Cirkit Designer LogoOpen Project in Cirkit Designer
Image of Pelton.: A project utilizing ENDSTOP in a practical application
Electromechanical Pump Control Circuit with Emergency Stop
This circuit is designed to control a pump using a contactor that is manually operated by a switch and can be overridden by an emergency stop. The contactor enables power from an AC power outlet to the pump, and the emergency stop can interrupt the power circuit for safety purposes.
Cirkit Designer LogoOpen Project in Cirkit Designer
Image of HYD: A project utilizing ENDSTOP in a practical application
Arduino Nano Controlled Relay System with Safety Interlocks
This circuit includes an Arduino Nano microcontroller interfaced with multiple pushbuttons, limit switches, an emergency stop, a 2-channel relay module, and a 1-channel relay module. The Arduino controls the relay modules based on inputs from the pushbuttons and limit switches, which likely serve as user interfaces and position or safety sensors. The circuit is powered by a 5V power supply unit (PSU), which is connected to an AC supply, and the emergency stop is configured to potentially interrupt the circuit for safety purposes.
Cirkit Designer LogoOpen Project in Cirkit Designer

Common Applications and Use Cases

  • 3D Printers: To home the X, Y, and Z axes and define the print bed boundaries.
  • CNC Machines: To establish the working area and prevent over-travel of the tool head.
  • Robotics: To detect the end of a range of motion for robotic arms or other moving parts.
  • Industrial Automation: To ensure safe and accurate operation of conveyor belts, actuators, and other machinery.

Technical Specifications

Key Technical Details

  • Type: Mechanical switch or optical sensor (depending on the model)
  • Operating Voltage: Typically 5V (compatible with most microcontrollers)
  • Current Rating: Up to 300mA (varies by model)
  • Contact Type: Normally Open (NO) or Normally Closed (NC)
  • Switch Life: Up to 1,000,000 cycles (for mechanical switches)
  • Mounting: Screw holes or adhesive backing (varies by design)
  • Connection: 3-pin interface (Signal, VCC, GND)

Pin Configuration and Descriptions

The pinout for a typical 3-pin endstop is as follows:

Pin Name Description Notes
Signal Outputs the state of the switch HIGH or LOW depending on state
VCC Power supply for the endstop Typically 5V
GND Ground connection Connect to system ground

For 2-pin endstops (simpler models), the configuration is:

Pin Name Description Notes
Signal Outputs the state of the switch HIGH or LOW depending on state
GND Ground connection Connect to system ground

Usage Instructions

How to Use the Component in a Circuit

  1. Wiring the Endstop:

    • Connect the Signal pin to a digital input pin on your microcontroller (e.g., Arduino UNO).
    • Connect the VCC pin to a 5V power source.
    • Connect the GND pin to the ground of your circuit.
  2. Placement:

    • Mount the endstop at the desired limit position of the moving part.
    • Ensure the moving part can reliably trigger the switch or sensor without excessive force.
  3. Testing:

    • Use a multimeter or microcontroller to verify the state of the endstop when triggered and untriggered.

Important Considerations and Best Practices

  • Debouncing: Mechanical switches may produce noise or "bouncing" when triggered. Use software debouncing or a capacitor to filter out false signals.
  • Mounting: Secure the endstop firmly to prevent misalignment during operation.
  • Wiring Length: Keep wiring as short as possible to reduce noise and signal degradation.
  • Compatibility: Verify the voltage and current ratings of the endstop match your system requirements.

Example Code for Arduino UNO

The following code demonstrates how to use an endstop with an Arduino UNO:

// Define the pin connected to the endstop signal
const int endstopPin = 2; // Connect the Signal pin to digital pin 2
const int ledPin = 13;    // Built-in LED for status indication

void setup() {
  pinMode(endstopPin, INPUT_PULLUP); // Set endstop pin as input with pull-up resistor
  pinMode(ledPin, OUTPUT);           // Set LED pin as output
  Serial.begin(9600);                // Initialize serial communication
}

void loop() {
  int endstopState = digitalRead(endstopPin); // Read the state of the endstop

  if (endstopState == LOW) { // Endstop triggered (assuming active LOW)
    digitalWrite(ledPin, HIGH); // Turn on LED
    Serial.println("Endstop triggered!");
  } else {
    digitalWrite(ledPin, LOW);  // Turn off LED
    Serial.println("Endstop not triggered.");
  }

  delay(100); // Small delay to avoid spamming the serial monitor
}

Notes:

  • The INPUT_PULLUP mode is used to simplify wiring by enabling the internal pull-up resistor.
  • Adjust the logic in the code if your endstop is active HIGH instead of active LOW.

Troubleshooting and FAQs

Common Issues and Solutions

  1. Endstop Not Triggering:

    • Cause: Misalignment or improper placement.
    • Solution: Reposition the endstop to ensure reliable triggering.
  2. False Triggers:

    • Cause: Electrical noise or bouncing in the mechanical switch.
    • Solution: Use software debouncing or add a capacitor across the signal and ground pins.
  3. No Signal Detected:

    • Cause: Faulty wiring or damaged endstop.
    • Solution: Check all connections and test the endstop with a multimeter.
  4. Microcontroller Not Responding:

    • Cause: Incorrect pin configuration or code error.
    • Solution: Verify the pin number in the code matches the wiring.

FAQs

  • Q: Can I use an endstop with a 3.3V microcontroller?
    A: Yes, but ensure the endstop is compatible with 3.3V logic levels or use a level shifter.

  • Q: How do I know if my endstop is Normally Open (NO) or Normally Closed (NC)?
    A: Use a multimeter to test continuity. In the untriggered state, NO will show no continuity, while NC will show continuity.

  • Q: Can I use an endstop for non-linear motion detection?
    A: Yes, as long as the moving part can reliably trigger the switch or sensor.

  • Q: What is the difference between mechanical and optical endstops?
    A: Mechanical endstops use physical contact to detect motion, while optical endstops use light interruption for detection. Optical endstops are more precise and durable but may require additional circuitry.