How to Use DESPI-C73: Examples, Pinouts, and Specs
Introduction
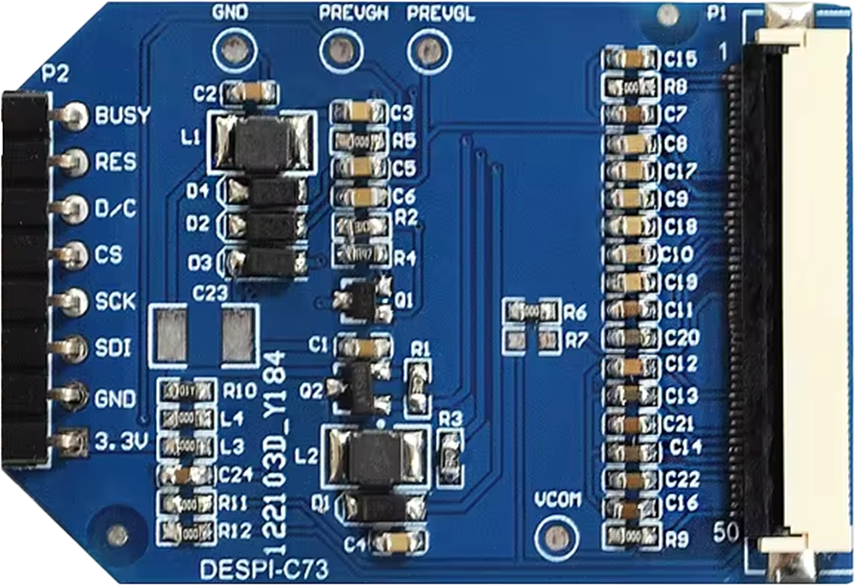
The DESPI-C73, manufactured by GOOD DISPLAY, is a compact, high-performance microcontroller designed for embedded applications. It features integrated Wi-Fi and Bluetooth connectivity, making it an excellent choice for Internet of Things (IoT) projects. With its robust processing capabilities and versatile connectivity options, the DESPI-C73 is suitable for a wide range of applications, including smart home devices, industrial automation, wearable technology, and wireless sensor networks.
Explore Projects Built with DESPI-C73


Explore Projects Built with DESPI-C73
Technical Specifications
The DESPI-C73 microcontroller is engineered to deliver reliable performance in a small form factor. Below are its key technical specifications:
General Specifications
| Parameter | Value |
|---|---|
| Manufacturer | GOOD DISPLAY |
| Part ID | DESPI-C73 |
| Processor | 32-bit ARM Cortex-M4 |
| Clock Speed | Up to 120 MHz |
| Flash Memory | 512 KB |
| RAM | 256 KB |
| Connectivity | Wi-Fi 802.11 b/g/n, Bluetooth 5.0 |
| Operating Voltage | 3.3V |
| Power Consumption | Low-power modes available |
| Operating Temperature | -40°C to 85°C |
| Package Type | QFN-48 |
Pin Configuration and Descriptions
The DESPI-C73 features a 48-pin QFN package. Below is the pin configuration and description:
| Pin Number | Pin Name | Function | Description |
|---|---|---|---|
| 1 | VDD | Power Supply | 3.3V power input |
| 2 | GND | Ground | Ground connection |
| 3 | GPIO1 | General Purpose I/O | Configurable digital I/O pin |
| 4 | GPIO2 | General Purpose I/O | Configurable digital I/O pin |
| 5 | UART_TX | UART Transmit | Serial communication TX |
| 6 | UART_RX | UART Receive | Serial communication RX |
| 7 | SPI_MOSI | SPI Master Out Slave In | SPI data output |
| 8 | SPI_MISO | SPI Master In Slave Out | SPI data input |
| 9 | SPI_CLK | SPI Clock | SPI clock signal |
| 10 | I2C_SCL | I2C Clock | I2C clock signal |
| 11 | I2C_SDA | I2C Data | I2C data signal |
| ... | ... | ... | ... |
| 48 | RESET | Reset | Active-low reset pin |
For a complete pinout, refer to the official datasheet provided by GOOD DISPLAY.
Usage Instructions
The DESPI-C73 is designed to be user-friendly and versatile. Follow these steps to integrate it into your project:
Basic Circuit Setup
- Power Supply: Connect the VDD pin to a stable 3.3V power source and the GND pin to ground.
- Communication Interfaces: Depending on your application, connect the appropriate communication pins (e.g., UART, SPI, or I2C) to your peripherals.
- GPIO Configuration: Configure the GPIO pins as input or output based on your circuit requirements.
- Reset: Connect the RESET pin to a push-button or microcontroller for manual or automatic resets.
Important Considerations
- Ensure the power supply is stable and within the specified voltage range (3.3V ± 5%).
- Use appropriate pull-up or pull-down resistors for I2C and GPIO pins as needed.
- Avoid exposing the microcontroller to temperatures outside the operating range (-40°C to 85°C).
- For wireless communication, ensure the antenna is properly connected and positioned to avoid signal interference.
Example: Connecting to an Arduino UNO
The DESPI-C73 can be interfaced with an Arduino UNO for prototyping. Below is an example of how to send data over UART:
Wiring
- Connect the DESPI-C73's
UART_TXpin to the Arduino'sRXpin. - Connect the DESPI-C73's
UART_RXpin to the Arduino'sTXpin. - Connect the
VDDandGNDpins to the Arduino's 3.3V and GND, respectively.
Arduino Code
// Example code to communicate with DESPI-C73 via UART
// Ensure the baud rate matches the DESPI-C73's configuration

void setup() {
  Serial.begin(9600); // Initialize UART communication at 9600 baud
  delay(1000);        // Wait for the DESPI-C73 to initialize
  Serial.println("Hello, DESPI-C73!"); // Send a test message
}

void loop() {
  if (Serial.available()) { // Check if data is received from DESPI-C73
    String receivedData = Serial.readString(); // Read the incoming data
    Serial.print("Received: ");
    Serial.println(receivedData); // Print the received data
  }
  delay(500); // Add a delay to avoid flooding the serial monitor
}
Best Practices
- Use decoupling capacitors near the power pins to reduce noise.
- For wireless applications, ensure the DESPI-C73 is placed away from sources of electromagnetic interference.
- Regularly update the firmware to benefit from performance improvements and bug fixes.
Troubleshooting and FAQs
Common Issues
No Response from the Microcontroller
- Solution: Verify the power supply and ensure the RESET pin is not held low.
- Tip: Check the UART connections and ensure the baud rate matches.
Wi-Fi or Bluetooth Not Connecting
- Solution: Ensure the antenna is properly connected and the device is within range of the network.
- Tip: Double-check the SSID and password for Wi-Fi connections.
Overheating
- Solution: Ensure the microcontroller is not exposed to temperatures above 85°C.
- Tip: Use a heat sink or improve ventilation if necessary.
Unstable Communication
- Solution: Use shielded cables for communication lines and ensure proper grounding.
- Tip: Add pull-up resistors for I2C lines if communication is unreliable.
FAQs
Q: Can the DESPI-C73 operate at 5V?
A: No, the DESPI-C73 is designed to operate at 3.3V. Using 5V may damage the component.
Q: Is the DESPI-C73 compatible with Arduino libraries?
A: Yes, the DESPI-C73 can be interfaced with Arduino using standard communication protocols like UART, SPI, and I2C.
Q: How do I update the firmware?
A: Firmware updates can be performed via the UART or USB interface. Refer to the manufacturer's documentation for detailed instructions.
Q: Can I use the DESPI-C73 for battery-powered applications?
A: Yes, the DESPI-C73 supports low-power modes, making it suitable for battery-powered projects.