How to Use M5StickC Plus 2: Examples, Pinouts, and Specs
Introduction
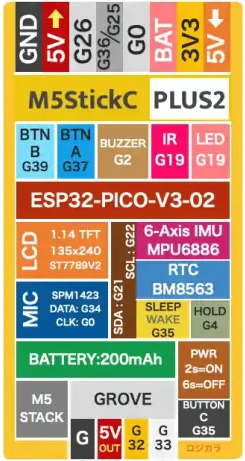
The M5StickC Plus 2 is a compact and versatile development board designed by M5Stack. It features an ESP32 microcontroller, a 1.14-inch color display, and a variety of sensors and interfaces, making it ideal for IoT and wearable applications. This powerful yet small device is perfect for developers looking to create innovative projects with minimal space requirements.
Explore Projects Built with M5StickC Plus 2


Explore Projects Built with M5StickC Plus 2
Common Applications and Use Cases
- IoT Devices: Smart home automation, environmental monitoring, and remote sensing.
- Wearable Technology: Fitness trackers, health monitoring devices, and smart accessories.
- Prototyping: Rapid development and testing of new ideas and concepts.
- Educational Projects: Learning and teaching embedded systems and programming.
Technical Specifications
Key Technical Details
| Specification | Value |
|---|---|
| Microcontroller | ESP32 |
| Display | 1.14-inch color TFT LCD (135x240 resolution) |
| Flash Memory | 4MB |
| RAM | 520KB |
| Battery | 120mAh LiPo |
| Connectivity | Wi-Fi, Bluetooth |
| Sensors | IMU (MPU6886), IR transmitter |
| Interfaces | GPIO, I2C, UART, SPI, Grove connector |
| Power Supply | 5V via USB Type-C |
| Dimensions | 48.2mm x 25.5mm x 13.7mm |
Pin Configuration and Descriptions
| Pin Number | Pin Name | Description |
|---|---|---|
| 1 | GND | Ground |
| 2 | 5V | 5V Power Supply |
| 3 | GPIO0 | General Purpose I/O |
| 4 | GPIO1 | General Purpose I/O |
| 5 | GPIO2 | General Purpose I/O |
| 6 | GPIO3 | General Purpose I/O |
| 7 | GPIO4 | General Purpose I/O |
| 8 | GPIO5 | General Purpose I/O |
| 9 | GPIO6 | General Purpose I/O |
| 10 | GPIO7 | General Purpose I/O |
| 11 | GPIO8 | General Purpose I/O |
| 12 | GPIO9 | General Purpose I/O |
| 13 | GPIO10 | General Purpose I/O |
| 14 | GPIO11 | General Purpose I/O |
| 15 | GPIO12 | General Purpose I/O |
| 16 | GPIO13 | General Purpose I/O |
| 17 | GPIO14 | General Purpose I/O |
| 18 | GPIO15 | General Purpose I/O |
| 19 | GPIO16 | General Purpose I/O |
| 20 | GPIO17 | General Purpose I/O |
| 21 | GPIO18 | General Purpose I/O |
| 22 | GPIO19 | General Purpose I/O |
| 23 | GPIO20 | General Purpose I/O |
| 24 | GPIO21 | General Purpose I/O |
| 25 | GPIO22 | General Purpose I/O |
| 26 | GPIO23 | General Purpose I/O |
| 27 | GPIO24 | General Purpose I/O |
| 28 | GPIO25 | General Purpose I/O |
| 29 | GPIO26 | General Purpose I/O |
| 30 | GPIO27 | General Purpose I/O |
| 31 | GPIO28 | General Purpose I/O |
| 32 | GPIO29 | General Purpose I/O |
| 33 | GPIO30 | General Purpose I/O |
| 34 | GPIO31 | General Purpose I/O |
| 35 | GPIO32 | General Purpose I/O |
| 36 | GPIO33 | General Purpose I/O |
| 37 | GPIO34 | General Purpose I/O |
| 38 | GPIO35 | General Purpose I/O |
| 39 | GPIO36 | General Purpose I/O |
| 40 | GPIO37 | General Purpose I/O |
| 41 | GPIO38 | General Purpose I/O |
| 42 | GPIO39 | General Purpose I/O |
Usage Instructions
How to Use the Component in a Circuit
Powering the Device:
- Connect the M5StickC Plus 2 to a 5V power source using the USB Type-C port.
- Alternatively, use the built-in 120mAh LiPo battery for portable applications.
Programming the Device:
- Use the Arduino IDE or other compatible development environments to write and upload code to the ESP32 microcontroller.
- Ensure the correct board and port are selected in the IDE settings.
Connecting Sensors and Peripherals:
- Utilize the GPIO pins, I2C, UART, SPI, and Grove connector to interface with external sensors and peripherals.
- Refer to the pin configuration table for the correct pin assignments.
Important Considerations and Best Practices
- Power Management: Monitor the battery level and charge the device regularly to prevent unexpected shutdowns.
- Heat Dissipation: Ensure adequate ventilation to prevent overheating during prolonged use.
- Firmware Updates: Keep the firmware up to date to benefit from the latest features and bug fixes.
- Code Optimization: Optimize your code to make efficient use of the ESP32's resources and capabilities.
Troubleshooting and FAQs
Common Issues Users Might Face
Device Not Powering On:
- Ensure the USB cable is properly connected and the power source is functioning.
- Check the battery level and charge if necessary.
Unable to Upload Code:
- Verify the correct board and port are selected in the Arduino IDE.
- Ensure the device is in bootloader mode by pressing the reset button.
Display Not Working:
- Check the connections to the display and ensure the correct libraries are included in your code.
- Verify the display initialization code is correct.
Solutions and Tips for Troubleshooting
- Resetting the Device: Press the reset button to restart the device and clear any temporary issues.
- Checking Connections: Ensure all connections are secure and correctly aligned with the pin configuration.
- Consulting Documentation: Refer to the official M5Stack documentation and community forums for additional support and resources.
Example Code for Arduino UNO
#include <M5StickCPlus.h> // Include the M5StickC Plus library

void setup() {
  M5.begin(); // Initialize the M5StickC Plus
  M5.Lcd.setRotation(1); // Set the display rotation
  M5.Lcd.fillScreen(BLACK); // Clear the display
  M5.Lcd.setTextColor(WHITE); // Set text color to white
  M5.Lcd.setTextSize(2); // Set text size
  M5.Lcd.setCursor(10, 10); // Set cursor position
  M5.Lcd.print("Hello, World!"); // Print message to display
}

void loop() {
  // Add your main code here, to run repeatedly
}
This example code initializes the M5StickC Plus, sets up the display, and prints "Hello, World!" to the screen. Make sure to install the M5StickC Plus library in the Arduino IDE before uploading the code.
By following this documentation, users can effectively utilize the M5StickC Plus 2 in their projects, troubleshoot common issues, and optimize their development process.