
How to Use Bare Conductive Touch Board: Examples, Pinouts, and Specs
 Design with Bare Conductive Touch Board in Cirkit Designer
Introduction
The Bare Conductive Touch Board is a versatile microcontroller designed for creating interactive projects. It features built-in capacitive touch technology, enabling users to transform conductive materials, such as Bare Conductive's Electric Paint, into touch-sensitive inputs. This board is ideal for DIY electronics, art installations, and educational projects, offering a seamless way to integrate touch-based interactivity into creative designs.
Explore Projects Built with Bare Conductive Touch Board
 Open Project in Cirkit Designer
 Open Project in Cirkit Designer
 Open Project in Cirkit Designer
 Open Project in Cirkit Designer
Explore Projects Built with Bare Conductive Touch Board
Open Project in Cirkit DesignerOpen Project in Cirkit DesignerOpen Project in Cirkit DesignerOpen Project in Cirkit DesignerCommon Applications and Use Cases
- Interactive art installations
- Touch-sensitive musical instruments
- Prototyping capacitive touch interfaces
- Educational tools for teaching electronics and programming
- Smart surfaces and IoT projects
Technical Specifications
The Bare Conductive Touch Board is based on the ATmega32U4 microcontroller and includes a variety of features to support creative and technical projects.
Key Technical Details
| Specification | Value |
|---|---|
| Microcontroller | ATmega32U4 |
| Operating Voltage | 3.3V |
| Input Voltage (recommended) | 5V via USB or 3.7V via LiPo battery |
| Touch Inputs | 12 capacitive touch electrodes |
| Audio Output | 3.5mm stereo audio jack |
| Flash Memory | 32 KB (4 KB used by bootloader) |
| SRAM | 2.5 KB |
| EEPROM | 1 KB |
| Communication Interfaces | I2C, SPI, UART |
| USB | Micro USB for programming and power |
| Battery Support | JST connector for LiPo battery |
| Dimensions | 85mm x 62mm x 8mm |
Pin Configuration and Descriptions
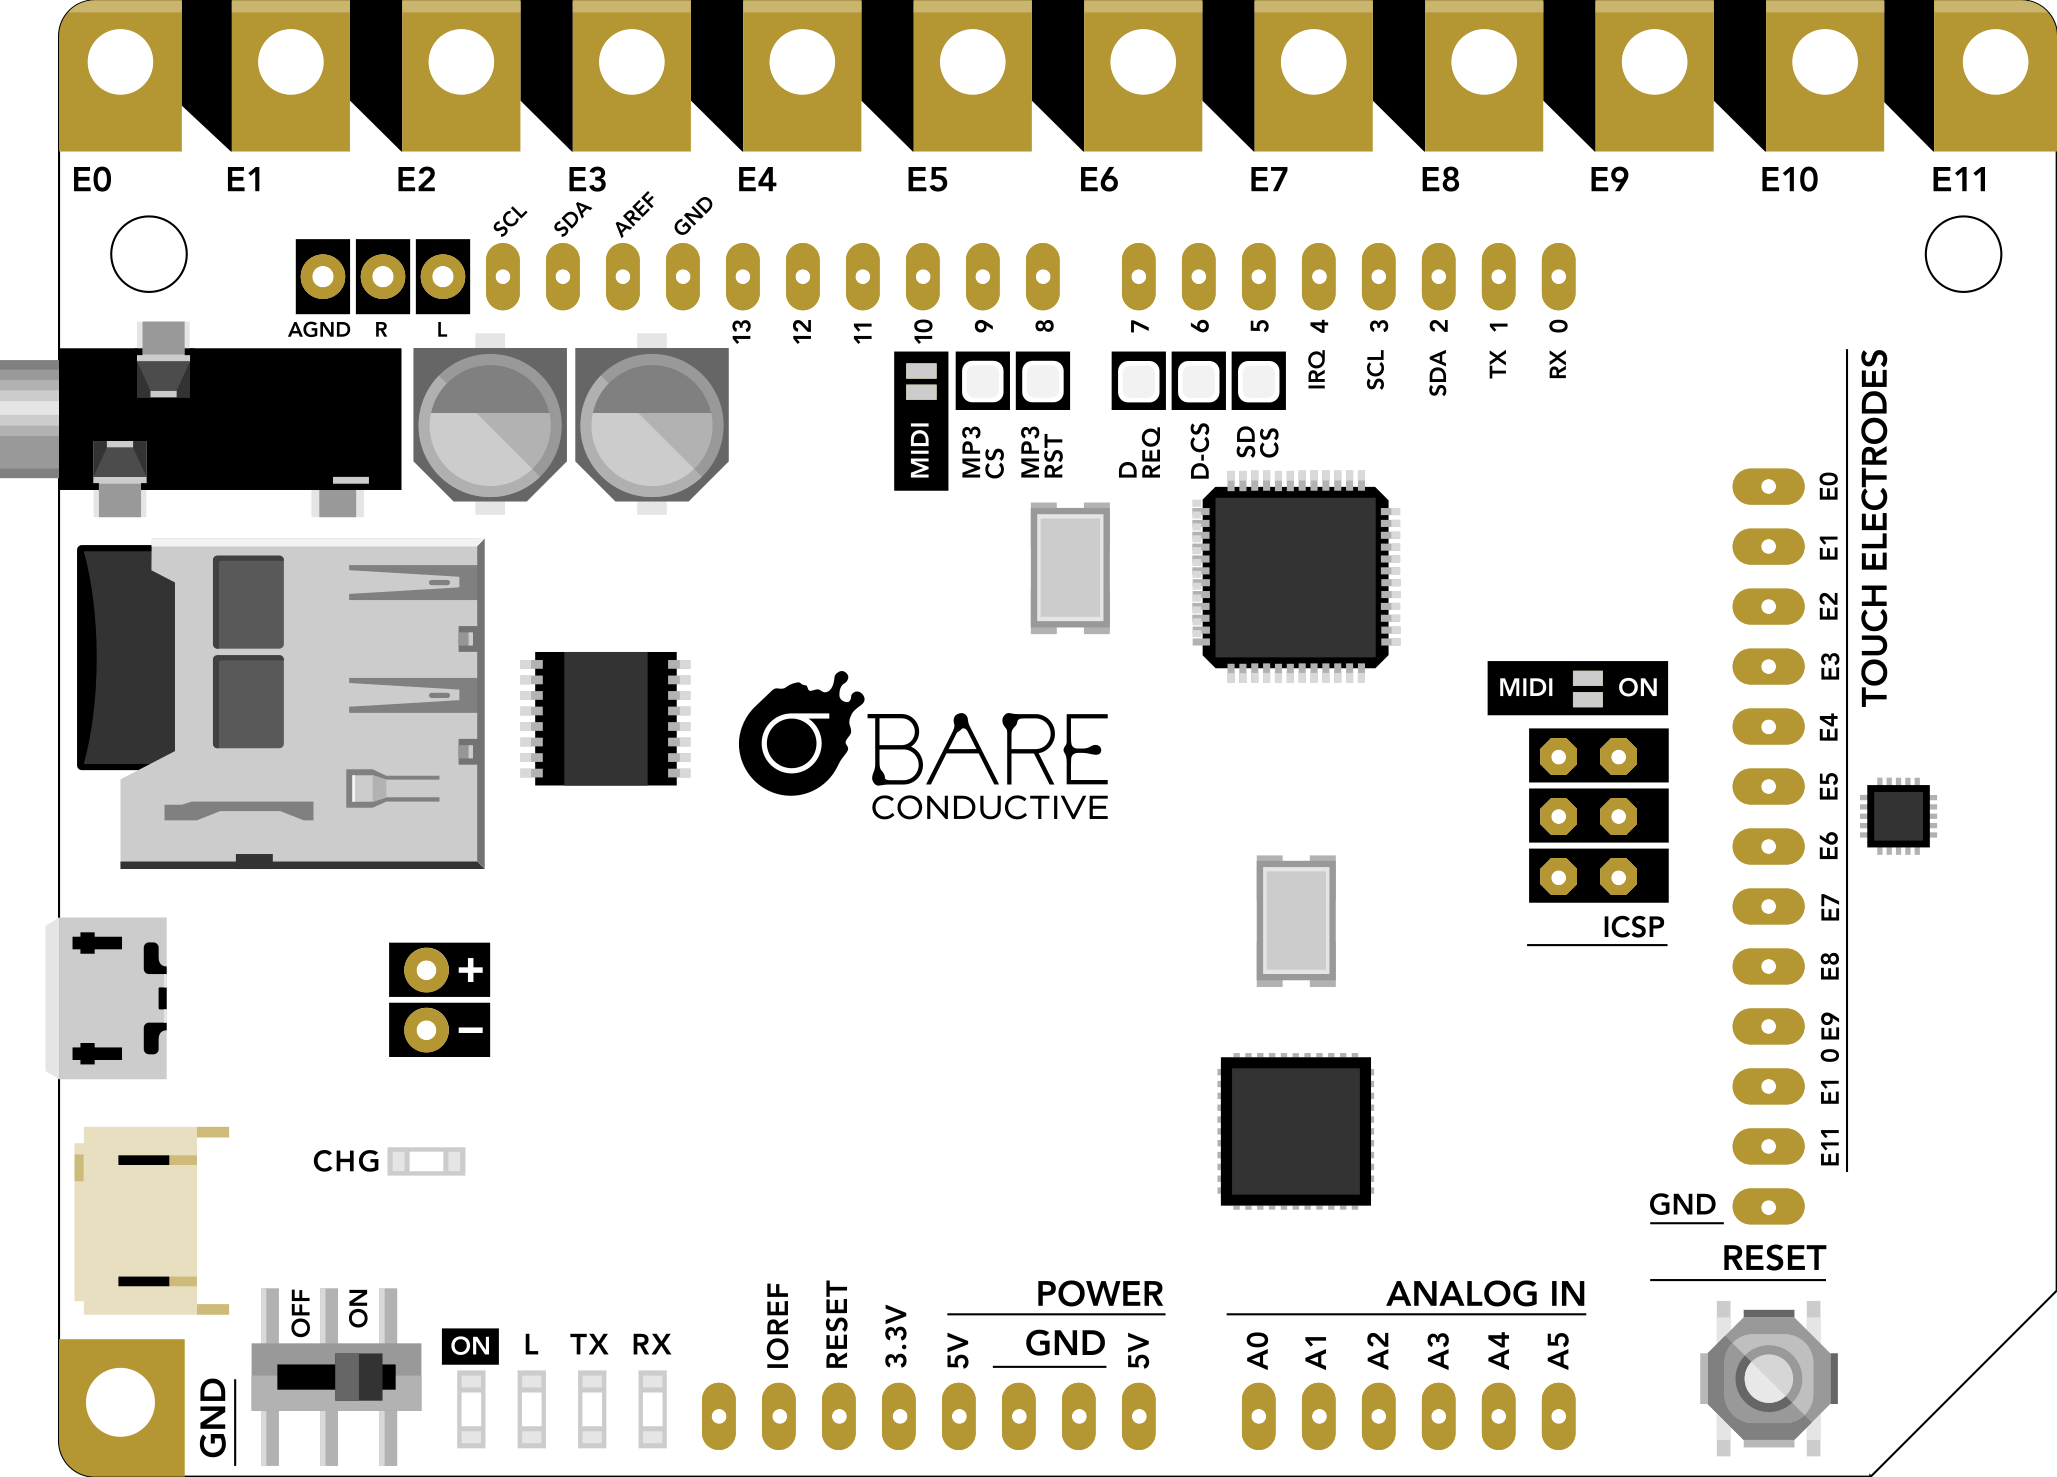
The Bare Conductive Touch Board features 12 touch-sensitive electrodes, as well as additional pins for power, communication, and general-purpose I/O.
| Pin Name | Description |
|---|---|
| E0 - E11 | Capacitive touch electrodes. Can be connected to conductive materials. |
| GND | Ground pin. |
| 3.3V | 3.3V power output. |
| SDA, SCL | I2C communication pins. |
| MOSI, MISO, SCK | SPI communication pins. |
| RX, TX | UART communication pins for serial communication. |
| A0 - A5 | Analog input pins. |
| D0 - D13 | Digital I/O pins. |
| JST Connector | For connecting a LiPo battery. |
| Micro USB | For programming and powering the board. |
Usage Instructions
How to Use the Bare Conductive Touch Board in a Circuit
- Power the Board: Connect the board to a computer via the Micro USB port or use a 3.7V LiPo battery with the JST connector.
- Connect Touch Inputs: Attach conductive materials (e.g., Bare Conductive Electric Paint) to the touch electrodes (E0 - E11).
- Program the Board: Use the Arduino IDE to upload custom code. Select "Arduino Leonardo" as the board type in the IDE, as the Touch Board is based on the ATmega32U4.
- Add Peripherals: Connect sensors, actuators, or other components to the available I/O pins as needed.
- Test and Debug: Use the serial monitor in the Arduino IDE to debug and monitor the board's behavior.
Important Considerations and Best Practices
- Ensure that conductive materials are properly connected to the touch electrodes for reliable touch detection.
- Avoid placing the board near sources of electrical noise, as this may interfere with capacitive touch sensing.
- Use a LiPo battery with the correct voltage rating (3.7V) to avoid damaging the board.
- When using the audio output, ensure that the connected speakers or headphones are compatible with the 3.5mm stereo jack.
Example Code for Arduino IDE
The following example demonstrates how to use the Bare Conductive Touch Board to detect touch inputs and play a sound.
#include <Wire.h>
#include <MPR121.h> // Library for capacitive touch sensing

// Define the I2C address for the MPR121 touch sensor
#define MPR121_ADDR 0x5C

void setup() {
  Serial.begin(9600); // Initialize serial communication
  if (!MPR121.begin(MPR121_ADDR)) {
    Serial.println("Error initializing MPR121. Check connections.");
    while (1); // Halt if initialization fails
  }
  Serial.println("MPR121 initialized successfully.");
}

void loop() {
  // Read touch status from the MPR121
  uint16_t touchStatus = MPR121.touched();

  for (uint8_t i = 0; i < 12; i++) {
    if (touchStatus & (1 << i)) { // Check if electrode i is touched
      Serial.print("Electrode ");
      Serial.print(i);
      Serial.println(" is touched.");
    }
  }
  delay(100); // Add a short delay to avoid flooding the serial monitor
}
Troubleshooting and FAQs
Common Issues and Solutions
Touch Inputs Not Responding
- Ensure that conductive materials are securely connected to the electrodes.
- Check for electrical noise or interference near the board.
- Verify that the board is powered correctly and that the MPR121 library is installed.
Board Not Recognized by Computer
- Confirm that the USB cable is functional and supports data transfer.
- Ensure that the correct board type ("Arduino Leonardo") is selected in the Arduino IDE.
- Try resetting the board by pressing the reset button.
Audio Output Not Working
- Verify that the connected speakers or headphones are functional.
- Check the audio file format and ensure it is compatible with the board.
FAQs
Q: Can I use the Touch Board without conductive paint?
A: Yes, you can use other conductive materials, such as wires, foil, or conductive fabrics, to connect to the touch electrodes.
Q: Is the Touch Board compatible with other Arduino shields?
A: The Touch Board is not directly compatible with standard Arduino shields due to its unique form factor, but you can connect components via the I/O pins.
Q: How do I power the board for portable projects?
A: Use a 3.7V LiPo battery connected to the JST connector for portable applications.