How to Use AC Bulb: Examples, Pinouts, and Specs

Introduction
An AC bulb is a type of light bulb designed to operate on alternating current (AC) electricity, which is the standard form of electrical power supplied to homes and businesses. These bulbs are widely used for general-purpose lighting and are available in various types, such as incandescent, compact fluorescent (CFL), and LED bulbs. AC bulbs convert electrical energy into light, either through a heated filament (in incandescent bulbs) or through gas discharge and phosphor coating (in CFLs and LEDs).
Explore Projects Built with AC Bulb
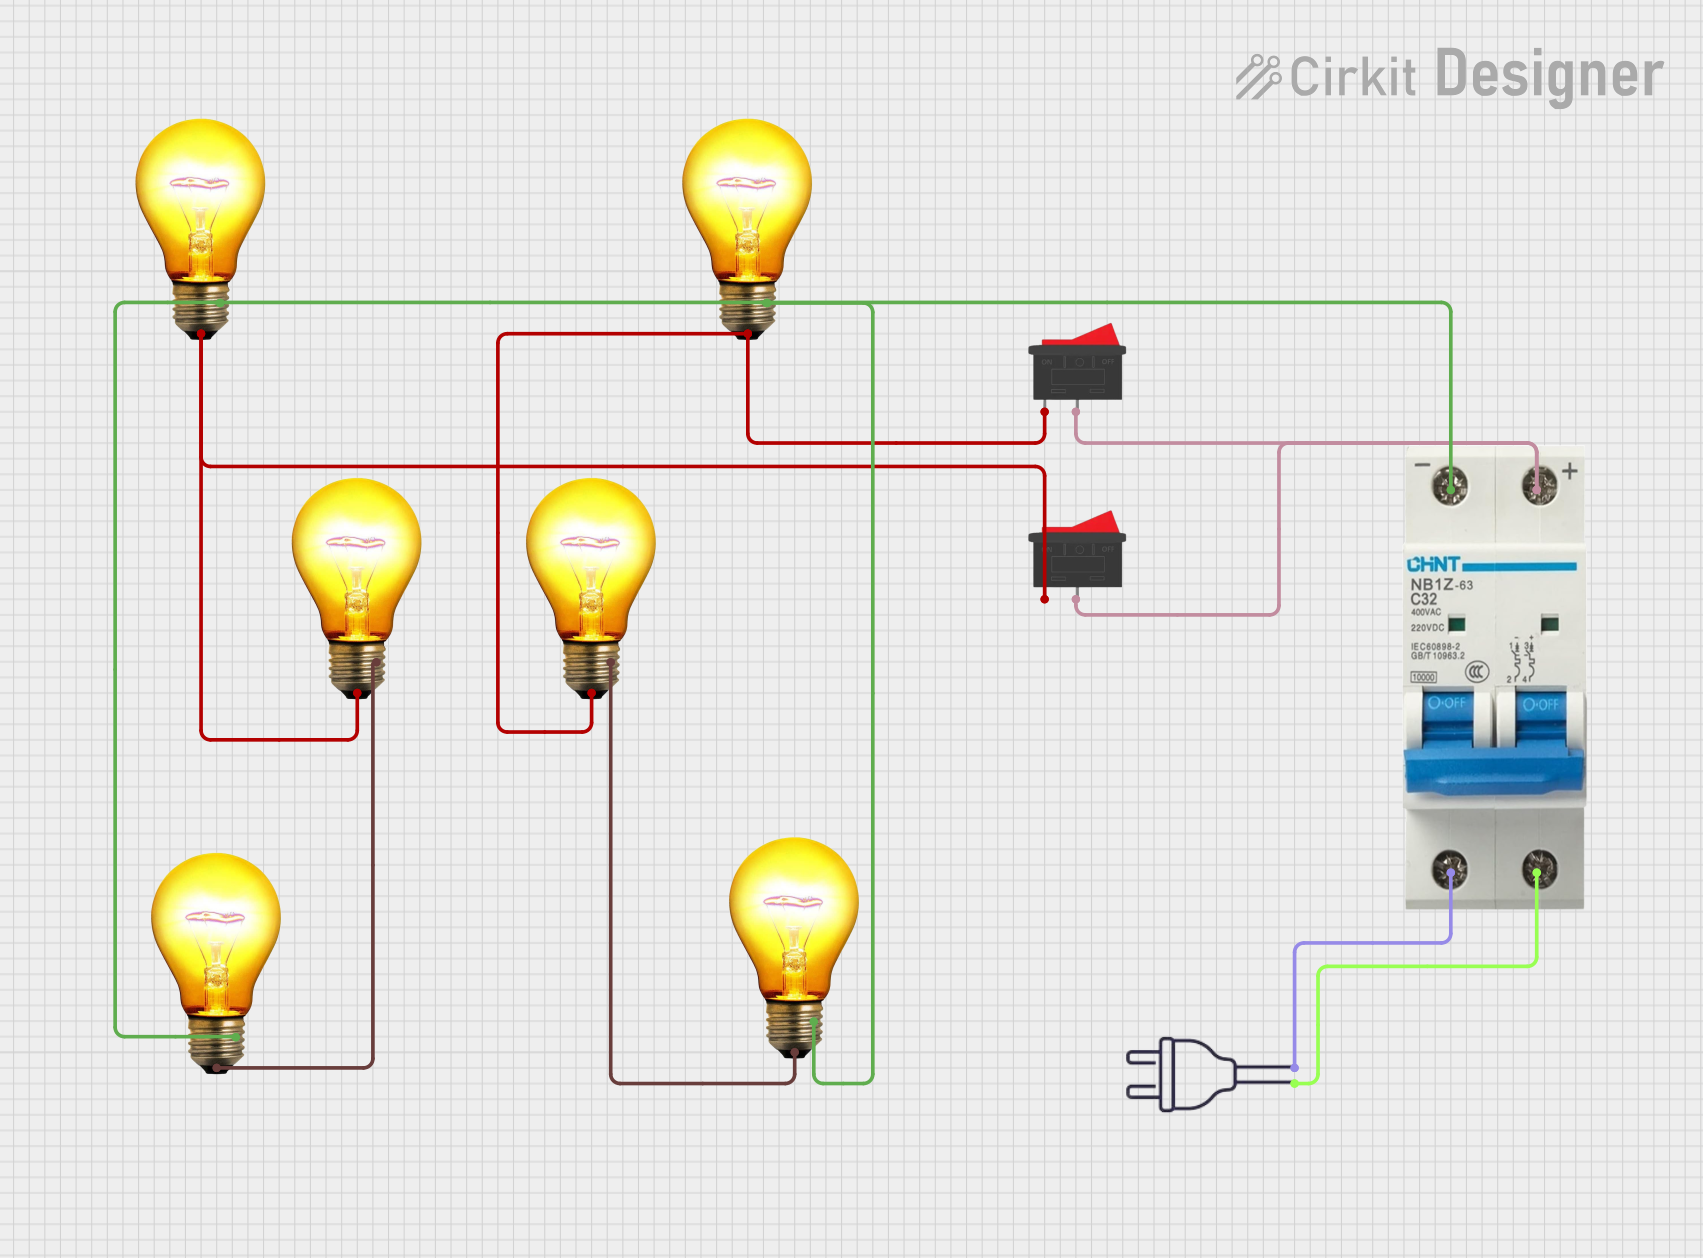
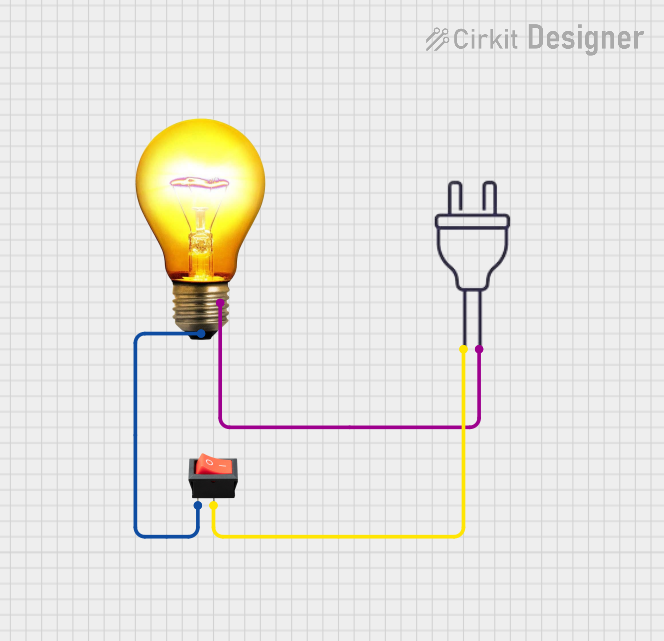
Explore Projects Built with AC Bulb
Common Applications and Use Cases
- Residential lighting (e.g., living rooms, bedrooms, kitchens)
- Commercial lighting (e.g., offices, retail stores, warehouses)
- Outdoor lighting (e.g., streetlights, garden lights)
- Decorative lighting (e.g., chandeliers, string lights)
Technical Specifications
The technical specifications of an AC bulb can vary depending on the type and model. Below are general specifications for a standard AC bulb:
| Parameter | Value |
|---|---|
| Operating Voltage | 110V - 240V AC (region-dependent) |
| Power Rating | 5W - 100W (varies by type) |
| Frequency | 50Hz / 60Hz |
| Light Output | 400 - 1600 lumens (varies by wattage) |
| Color Temperature | 2700K - 6500K (warm to cool white) |
| Lifespan | 1,000 - 25,000 hours (type-dependent) |
| Base Type | E26/E27 (standard), B22, GU10, etc. |
Pin Configuration and Descriptions
AC bulbs typically have a base with two electrical contacts. The configuration depends on the bulb type:
| Base Type | Description |
|---|---|
| E26/E27 | Standard screw base for most household bulbs. |
| B22 | Bayonet base with two side pins, common in some regions. |
| GU10 | Twist-and-lock base, often used in spotlights and recessed lighting fixtures. |
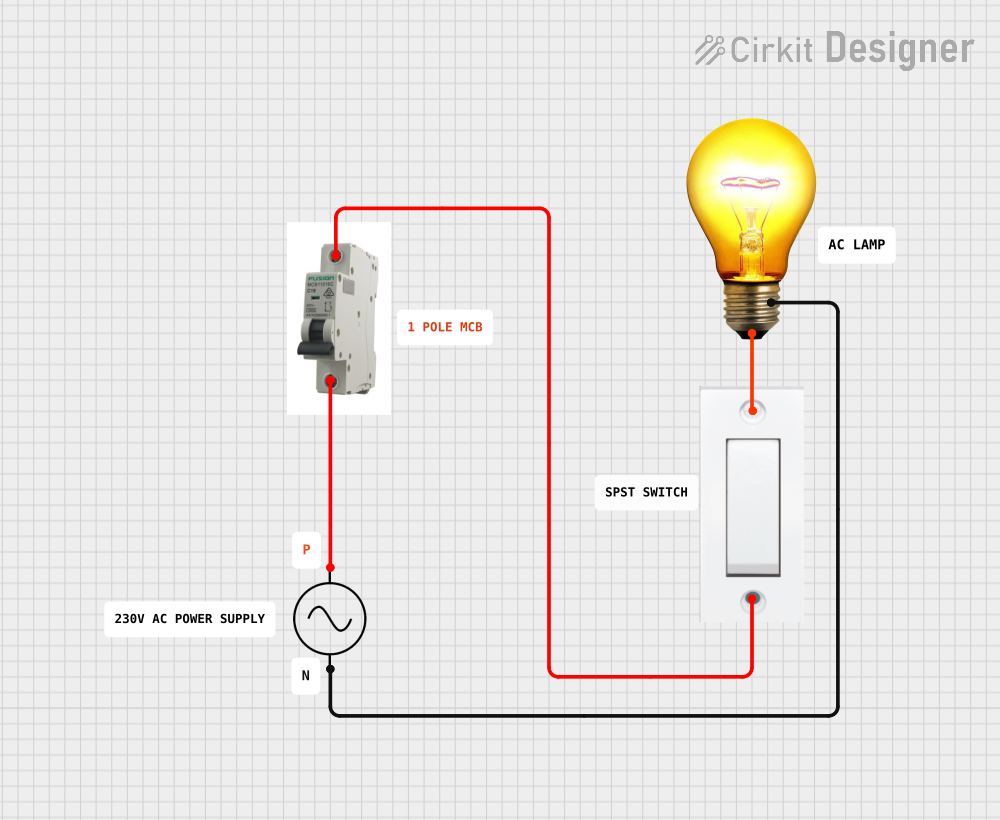
Usage Instructions
How to Use the Component in a Circuit
- Ensure Compatibility: Verify that the AC bulb's voltage and base type are compatible with your fixture and power supply.
- Turn Off Power: Before installing or replacing the bulb, turn off the power to the fixture to avoid electrical shock.
- Install the Bulb:
- For screw bases (E26/E27), gently screw the bulb into the socket until snug.
- For bayonet bases (B22), align the pins with the socket slots, push down, and twist to lock.
- For twist-and-lock bases (GU10), insert the pins into the socket and twist to secure.
- Turn On Power: Restore power to the fixture and test the bulb.
Important Considerations and Best Practices
- Avoid Overloading: Ensure the bulb's wattage does not exceed the fixture's maximum rating.
- Handle with Care: Avoid touching the glass surface of halogen or incandescent bulbs with bare hands, as oils can reduce lifespan.
- Use in Proper Environment: Check if the bulb is rated for indoor or outdoor use, and avoid exposing non-weatherproof bulbs to moisture.
- Dimming Compatibility: If using a dimmer switch, ensure the bulb is dimmable and compatible with the dimmer type.
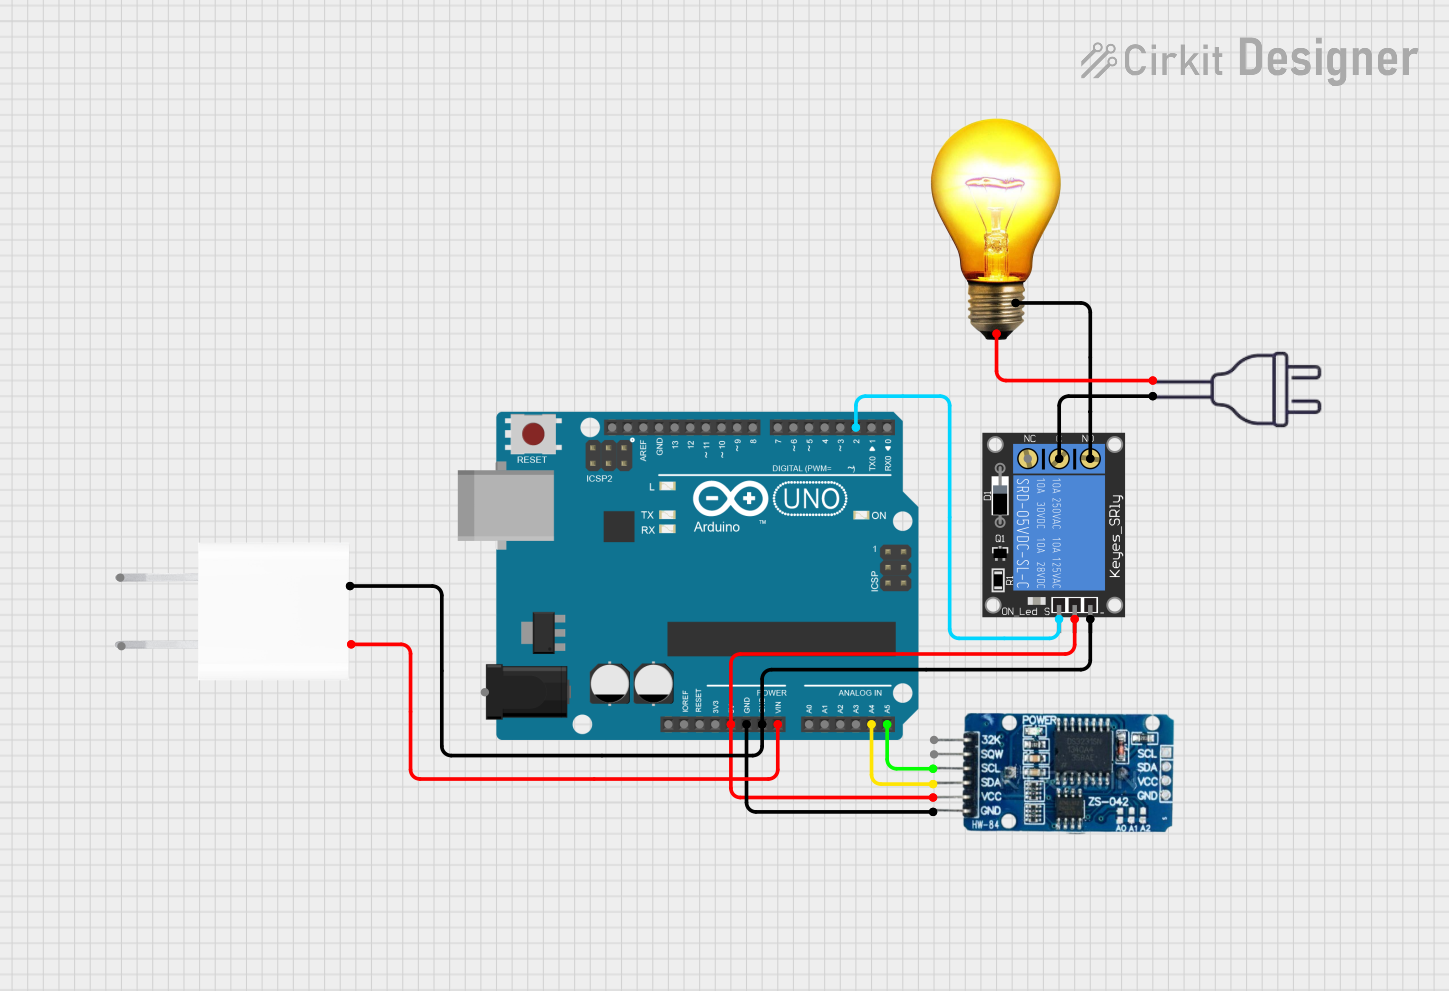
Example: Controlling an AC Bulb with an Arduino UNO
To control an AC bulb using an Arduino UNO, you can use a relay module to safely switch the AC circuit. Below is an example code snippet:
// Example: Controlling an AC bulb with Arduino and a relay module
// Note: Ensure proper isolation and safety when working with AC circuits.

const int relayPin = 7; // Pin connected to the relay module

void setup() {
  pinMode(relayPin, OUTPUT); // Set relay pin as output
  digitalWrite(relayPin, LOW); // Ensure relay is off at startup
}

void loop() {
  digitalWrite(relayPin, HIGH); // Turn on the AC bulb
  delay(5000); // Keep the bulb on for 5 seconds
  digitalWrite(relayPin, LOW); // Turn off the AC bulb
  delay(5000); // Keep the bulb off for 5 seconds
}
Important Notes:
- Use a relay module rated for the AC voltage and current of the bulb.
- Ensure proper insulation and avoid direct contact with live AC wires.
- Always follow safety guidelines when working with high-voltage circuits.
Troubleshooting and FAQs
Common Issues Users Might Face
Bulb Does Not Light Up:
- Check if the bulb is properly installed in the socket.
- Verify that the power supply is turned on and functioning.
- Test the bulb in a different fixture to rule out a faulty socket.
Flickering Light:
- Ensure the bulb is compatible with the dimmer switch (if used).
- Check for loose connections in the fixture or wiring.
- Replace the bulb if it is nearing the end of its lifespan.
Bulb Burns Out Quickly:
- Verify that the bulb's wattage matches the fixture's rating.
- Avoid frequent switching on and off, as this can reduce lifespan.
- Check for voltage fluctuations in the power supply.
Solutions and Tips for Troubleshooting
- Test with a Multimeter: Use a multimeter to check the voltage at the socket and ensure it matches the bulb's rating.
- Inspect the Fixture: Look for signs of damage, corrosion, or loose wiring in the fixture.
- Replace with a Known Good Bulb: Swap the bulb with a new or working one to isolate the issue.
By following these guidelines, you can ensure safe and effective use of AC bulbs in your lighting applications.