How to Use TPA3116 stereo amp 2x 50W: Examples, Pinouts, and Specs
Introduction
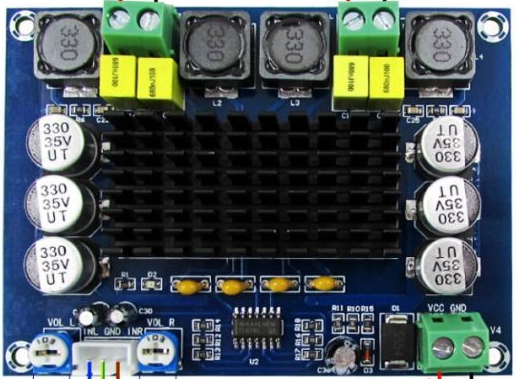
The TPA3116 is a Class D audio amplifier capable of delivering up to 50W per channel in stereo mode. It is designed for high efficiency, low heat generation, and excellent audio performance. This amplifier is widely used in audio systems, home theaters, portable speakers, and other applications requiring high-quality sound output with minimal power loss.
Explore Projects Built with TPA3116 stereo amp 2x 50W


Explore Projects Built with TPA3116 stereo amp 2x 50W
Common Applications and Use Cases
- Home audio systems and soundbars
- DIY stereo speaker projects
- Portable Bluetooth speakers
- Car audio systems
- Multimedia speaker systems
Technical Specifications
Key Technical Details
- Amplifier Type: Class D
- Output Power: 50W per channel (stereo mode)
- Operating Voltage Range: 4.5V to 26V DC
- Efficiency: Up to 90%
- Input Impedance: 30 kΩ
- Output Load: 4Ω to 8Ω speakers
- Frequency Response: 20Hz to 20kHz
- Signal-to-Noise Ratio (SNR): >100 dB
- Total Harmonic Distortion (THD): <0.1% at 1kHz, 50W
- Thermal Protection: Built-in over-temperature and short-circuit protection
Pin Configuration and Descriptions
The TPA3116 is typically used in pre-assembled amplifier boards. Below is a general description of the key pins and terminals found on such boards:
| Pin/Terminal | Description |
|---|---|
+VCC |
Positive power supply input (4.5V to 26V DC). |
GND |
Ground connection for power and signal. |
L_IN |
Left channel audio input (analog signal). |
R_IN |
Right channel audio input (analog signal). |
L_OUT+ |
Positive output for the left speaker. |
L_OUT- |
Negative output for the left speaker. |
R_OUT+ |
Positive output for the right speaker. |
R_OUT- |
Negative output for the right speaker. |
SD |
Shutdown pin (active low). Pull low to disable the amplifier. |
GAIN |
Gain control pin. Used to adjust the amplifier's gain (varies by board design). |
Note: The exact pinout may vary depending on the specific TPA3116 amplifier board. Always refer to the datasheet or documentation provided with your board.
Usage Instructions
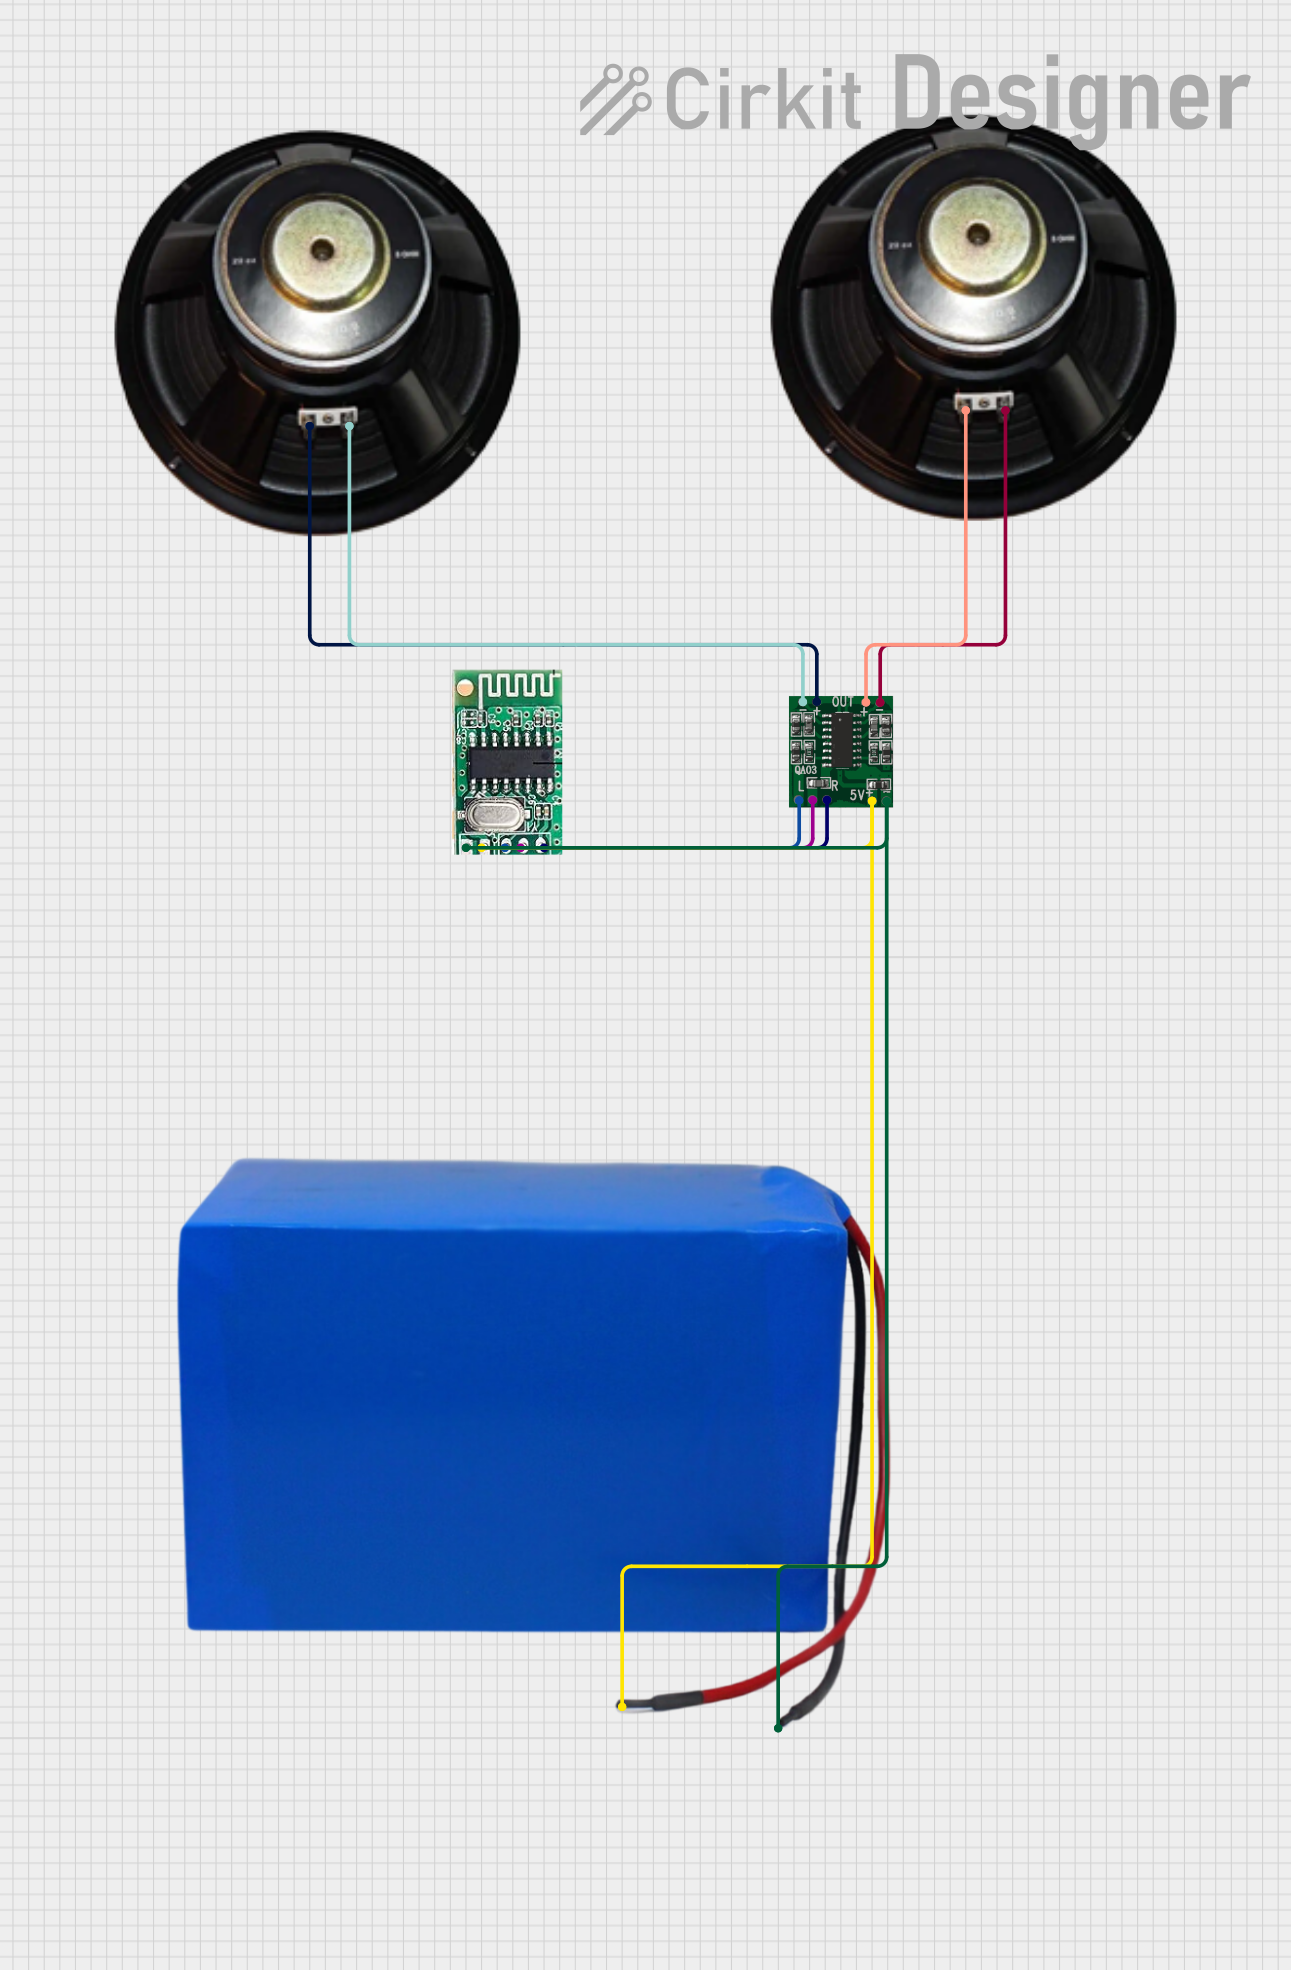
How to Use the TPA3116 in a Circuit
- Power Supply: Connect a DC power supply to the
+VCCandGNDterminals. Ensure the voltage is within the 4.5V to 26V range and matches the power requirements of your speakers. - Audio Input: Connect the left and right audio signals to the
L_INandR_INpins, respectively. Use a preamplifier or audio source with appropriate signal levels. - Speaker Connection: Attach the left and right speakers to the
L_OUT+,L_OUT-,R_OUT+, andR_OUT-terminals. Ensure the speakers have an impedance of 4Ω to 8Ω. - Gain Adjustment: If your board has a gain control pin or potentiometer, adjust it to set the desired amplification level.
- Enable Amplifier: Ensure the
SDpin is pulled high (or left unconnected) to enable the amplifier. Pulling it low will disable the output.
Important Considerations and Best Practices
- Heat Dissipation: Although the TPA3116 is highly efficient, it may still generate heat at high power levels. Use a heatsink or active cooling if necessary.
- Power Supply Selection: Use a stable and adequately rated power supply to avoid noise or distortion.
- Speaker Protection: Ensure proper wiring to prevent short circuits or damage to the speakers.
- Input Signal Levels: Avoid overdriving the input signal to prevent distortion or damage to the amplifier.
Example: Connecting the TPA3116 to an Arduino UNO
The TPA3116 can be used with an Arduino UNO to control audio playback. Below is an example of how to use the Arduino to enable or disable the amplifier via the SD pin.
Arduino Code Example
// Define the shutdown pin connected to the TPA3116 SD pin
const int shutdownPin = 7;

void setup() {
  // Set the shutdown pin as an output
  pinMode(shutdownPin, OUTPUT);

  // Enable the amplifier by setting the SD pin HIGH
  digitalWrite(shutdownPin, HIGH);
}

void loop() {
  // Example: Toggle the amplifier on and off every 5 seconds
  digitalWrite(shutdownPin, HIGH); // Enable amplifier
  delay(5000);                     // Wait for 5 seconds
  digitalWrite(shutdownPin, LOW);  // Disable amplifier
  delay(5000);                     // Wait for 5 seconds
}
Note: Ensure the Arduino's ground (
GND) is connected to the amplifier's ground for proper operation.
Troubleshooting and FAQs
Common Issues and Solutions
No Sound Output
- Cause: Incorrect wiring or insufficient power supply.
- Solution: Double-check all connections and ensure the power supply meets the voltage and current requirements.
Distorted Audio
- Cause: Overdriven input signal or mismatched speaker impedance.
- Solution: Reduce the input signal level and verify the speaker impedance is within the 4Ω to 8Ω range.
Amplifier Overheating
- Cause: High power output without adequate cooling.
- Solution: Add a heatsink or active cooling to the amplifier.
Amplifier Not Powering On
- Cause: SD pin is pulled low or power supply issue.
- Solution: Ensure the SD pin is pulled high and verify the power supply connections.
FAQs
Can I use the TPA3116 with a 12V power supply? Yes, a 12V power supply is suitable for most applications, but ensure it provides enough current for your speakers.
What is the maximum speaker impedance supported? The TPA3116 supports speakers with an impedance of 4Ω to 8Ω.
Can I bridge the outputs for higher power? No, the TPA3116 is designed for stereo operation and does not support bridging.
Is the TPA3116 suitable for battery-powered applications? Yes, its high efficiency makes it ideal for battery-powered systems, provided the battery voltage is within the operating range.
By following this documentation, you can effectively integrate the TPA3116 stereo amplifier into your audio projects and achieve high-quality sound output.