Cirkit Designer Logo
Cirkit Designer
Your all-in-one circuit design IDE
Home / 
Component Documentation

How to Use Nokia 5110 LCD: Examples, Pinouts, and Specs

Image of Nokia 5110 LCD
Cirkit Designer LogoDesign with Nokia 5110 LCD in Cirkit Designer

Introduction

The Nokia 5110 LCD is a versatile, low-power display module originally used in the Nokia 5110 mobile phone. It features a 48x84 pixel monochrome display capable of rendering text, numbers, and simple graphics, making it suitable for a wide range of applications in embedded systems. Common uses include DIY projects, user interfaces for electronic devices, and any application where a simple, efficient display is needed.

Explore Projects Built with Nokia 5110 LCD

Use Cirkit Designer to design, explore, and prototype these projects online. Some projects support real-time simulation. Click "Open Project" to start designing instantly!
Battery-Powered Arduino Nano with Nokia 5110 LCD and Pushbutton Interface
Image of adfg: A project utilizing Nokia 5110 LCD in a practical application
This circuit is a battery-powered system featuring an Arduino Nano that interfaces with a Nokia 5110 LCD and multiple pushbuttons. The TP4056 module charges the 18650 Li-ion batteries, which then power the Arduino through a step-up boost converter. The Arduino controls the LCD display and reads inputs from the pushbuttons for user interaction.
Cirkit Designer LogoOpen Project in Cirkit Designer
Arduino Nano-Based Dino Jump Game with Nokia 5110 LCD Display
Image of gt706: A project utilizing Nokia 5110 LCD in a practical application
This circuit is a simple game setup using an Arduino Nano, three pushbuttons, and a Nokia 5110 LCD. The Arduino Nano reads input from the pushbuttons to control a jumping character displayed on the LCD, with the game logic and display updates handled by the provided embedded code.
Cirkit Designer LogoOpen Project in Cirkit Designer
Arduino Nano Controlled Wireless Joystick Interface with LCD Feedback
Image of gt70: A project utilizing Nokia 5110 LCD in a practical application
This circuit features an Arduino Nano interfaced with a Nokia 5110 LCD, two KY-023 Dual Axis Joystick Modules, an NRF24L01 wireless module, and multiple potentiometers and toggle switches. The joysticks, potentiometers, and switches are likely used for input control, with their signals read by the Arduino's analog and digital pins. The Arduino controls the LCD display and communicates wirelessly using the NRF24L01, possibly to transmit the input control data or receive commands.
Cirkit Designer LogoOpen Project in Cirkit Designer
Arduino Nano and I2C LCD Display Power Supply Project
Image of lcd display: A project utilizing Nokia 5110 LCD in a practical application
This circuit features an Arduino Nano microcontroller interfaced with a 20x4 I2C LCD panel for display purposes. The LCD panel is powered by a 5V AC-DC power supply unit, and the Arduino Nano communicates with the LCD via I2C protocol using its A5 (SDA) and A1 (SCL) pins.
Cirkit Designer LogoOpen Project in Cirkit Designer

Explore Projects Built with Nokia 5110 LCD

Use Cirkit Designer to design, explore, and prototype these projects online. Some projects support real-time simulation. Click "Open Project" to start designing instantly!
Image of adfg: A project utilizing Nokia 5110 LCD in a practical application
Battery-Powered Arduino Nano with Nokia 5110 LCD and Pushbutton Interface
This circuit is a battery-powered system featuring an Arduino Nano that interfaces with a Nokia 5110 LCD and multiple pushbuttons. The TP4056 module charges the 18650 Li-ion batteries, which then power the Arduino through a step-up boost converter. The Arduino controls the LCD display and reads inputs from the pushbuttons for user interaction.
Cirkit Designer LogoOpen Project in Cirkit Designer
Image of gt706: A project utilizing Nokia 5110 LCD in a practical application
Arduino Nano-Based Dino Jump Game with Nokia 5110 LCD Display
This circuit is a simple game setup using an Arduino Nano, three pushbuttons, and a Nokia 5110 LCD. The Arduino Nano reads input from the pushbuttons to control a jumping character displayed on the LCD, with the game logic and display updates handled by the provided embedded code.
Cirkit Designer LogoOpen Project in Cirkit Designer
Image of gt70: A project utilizing Nokia 5110 LCD in a practical application
Arduino Nano Controlled Wireless Joystick Interface with LCD Feedback
This circuit features an Arduino Nano interfaced with a Nokia 5110 LCD, two KY-023 Dual Axis Joystick Modules, an NRF24L01 wireless module, and multiple potentiometers and toggle switches. The joysticks, potentiometers, and switches are likely used for input control, with their signals read by the Arduino's analog and digital pins. The Arduino controls the LCD display and communicates wirelessly using the NRF24L01, possibly to transmit the input control data or receive commands.
Cirkit Designer LogoOpen Project in Cirkit Designer
Image of lcd display: A project utilizing Nokia 5110 LCD in a practical application
Arduino Nano and I2C LCD Display Power Supply Project
This circuit features an Arduino Nano microcontroller interfaced with a 20x4 I2C LCD panel for display purposes. The LCD panel is powered by a 5V AC-DC power supply unit, and the Arduino Nano communicates with the LCD via I2C protocol using its A5 (SDA) and A1 (SCL) pins.
Cirkit Designer LogoOpen Project in Cirkit Designer

Technical Specifications

Key Technical Details

  • Resolution: 48 x 84 pixels
  • Operating Voltage: 2.7V - 3.3V
  • Supply Current: 6mA (typical)
  • Backlight: LED (can be driven with 3.3V)
  • Communication: Serial (SPI compatible)
  • Controller: PCD8544

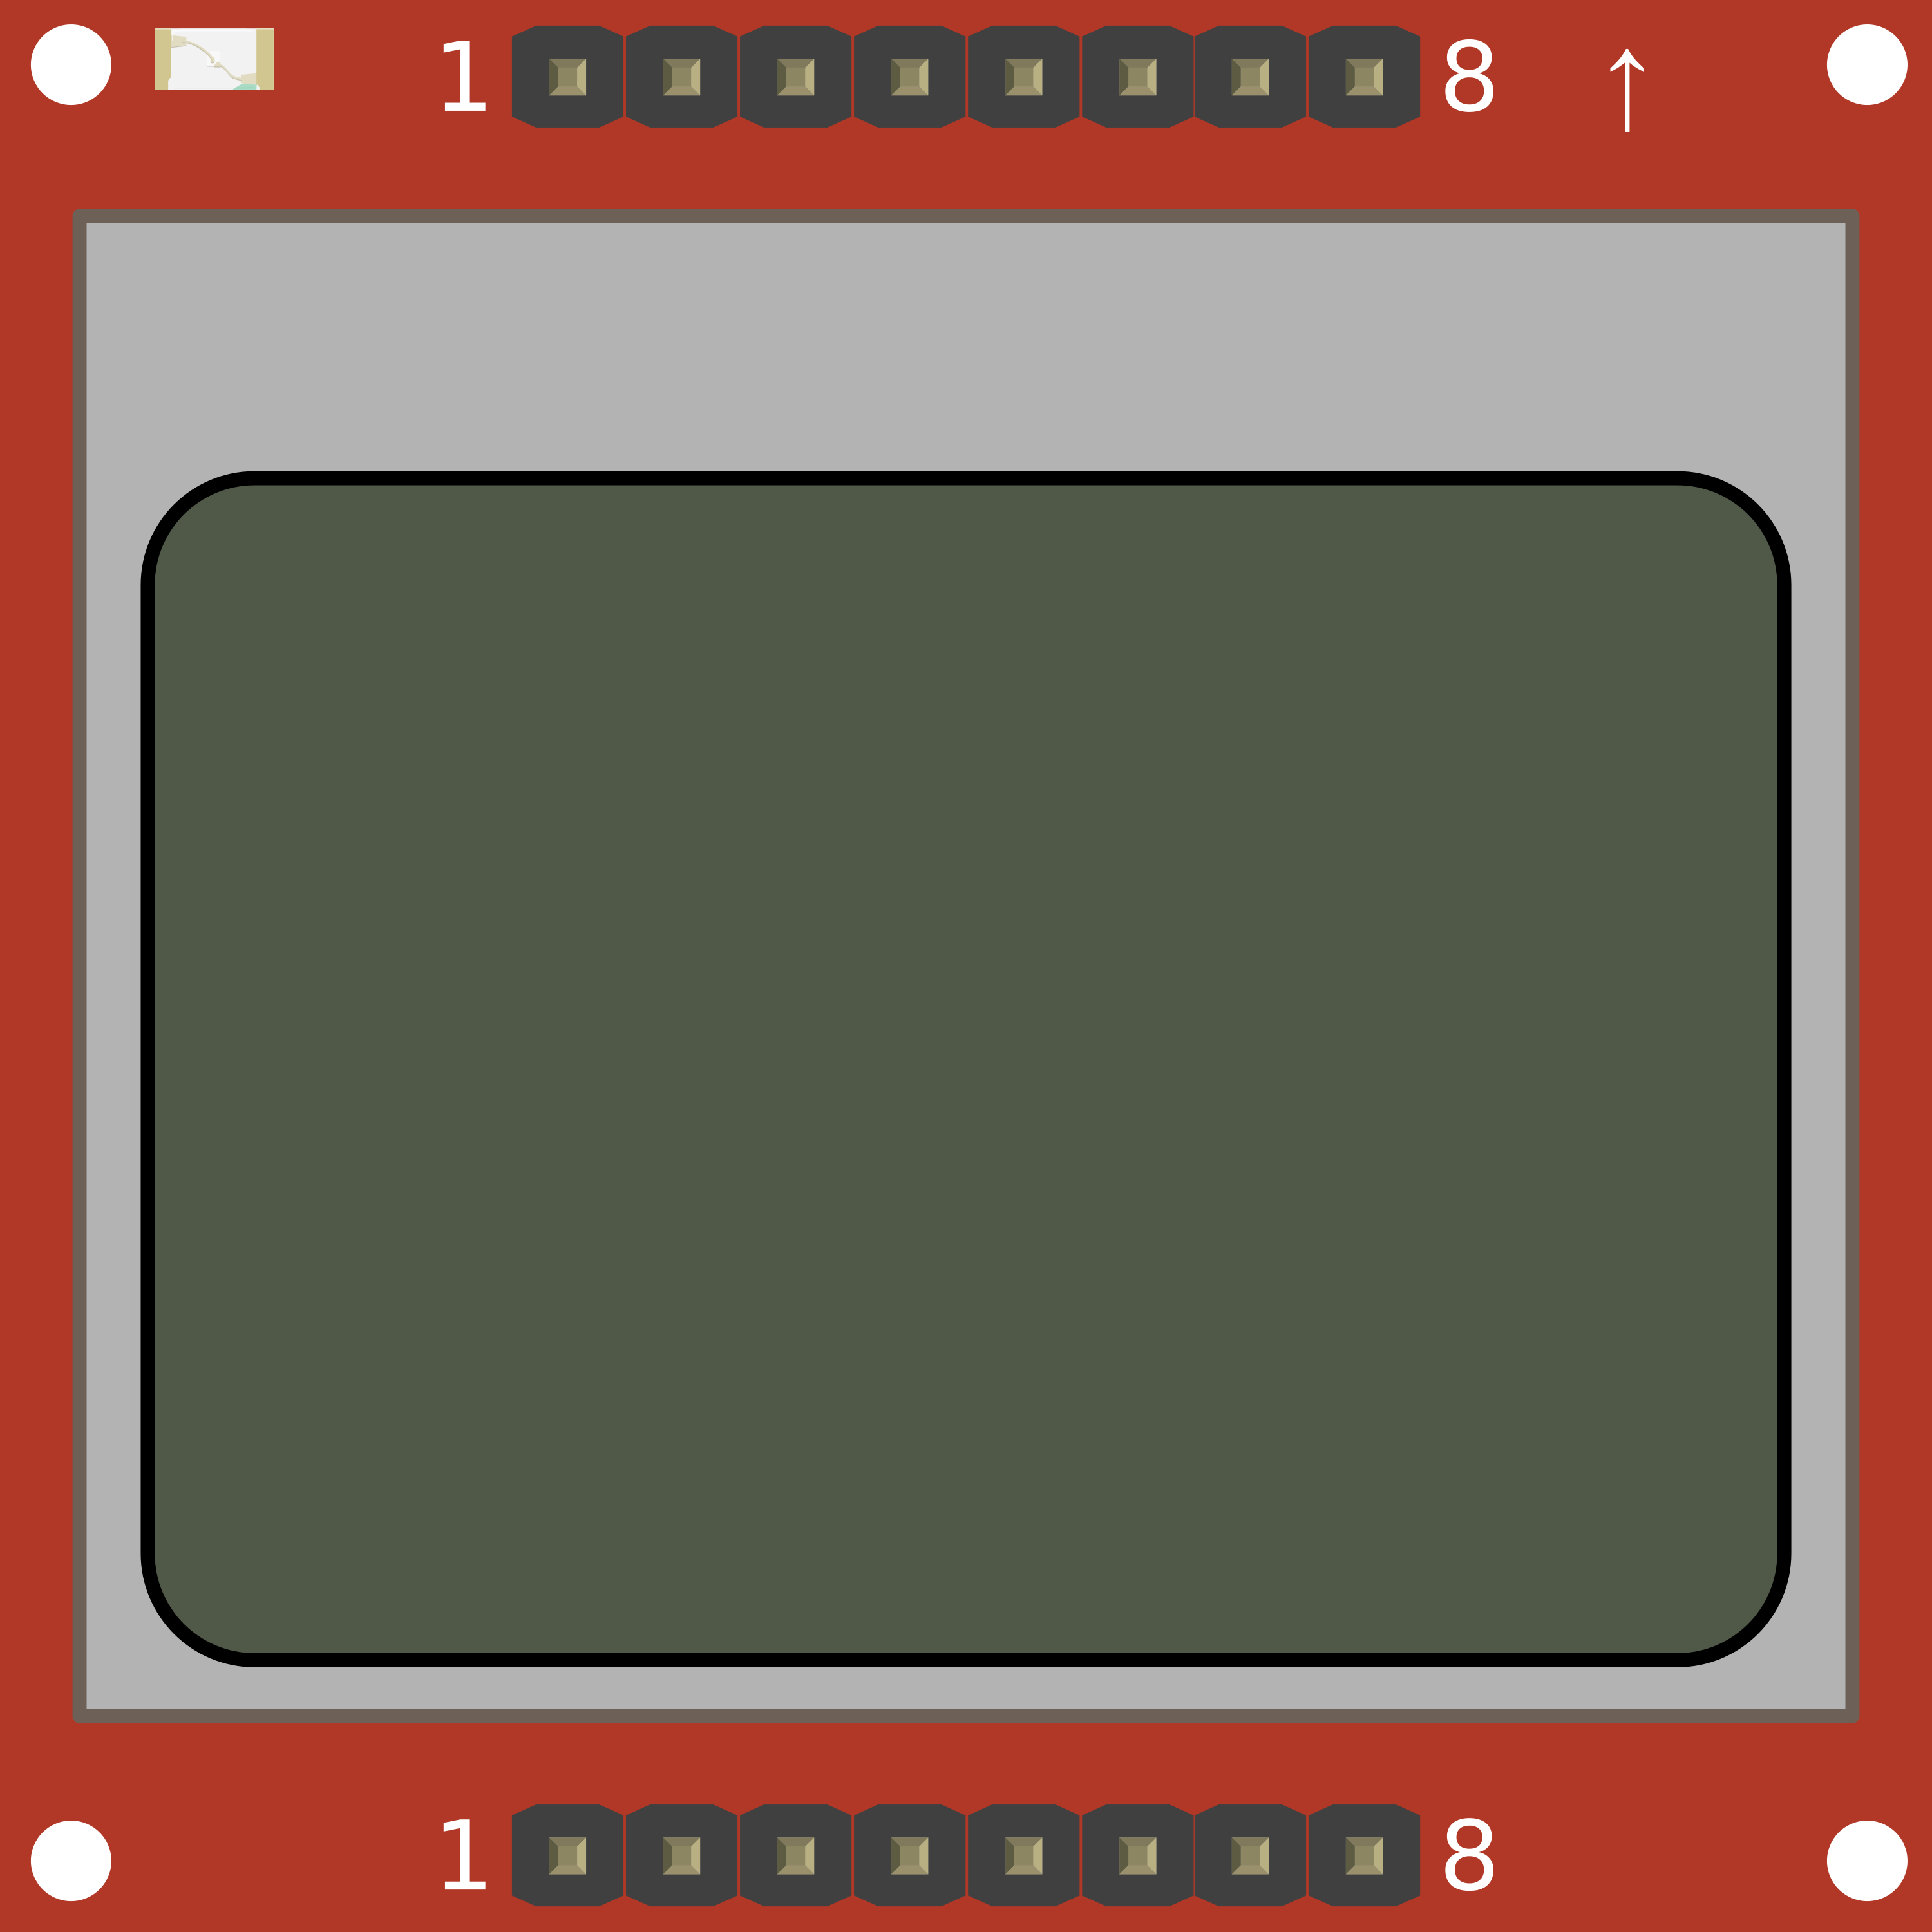
Pin Configuration and Descriptions

Pin Number Name Description
1 RST Reset pin, active low
2 CE Chip Enable (active low)
3 DC Data/Command control pin
4 DIN Serial data in
5 CLK Serial clock
6 VCC Power supply (2.7V - 3.3V)
7 LIGHT Backlight control (active low)
8 GND Ground

Usage Instructions

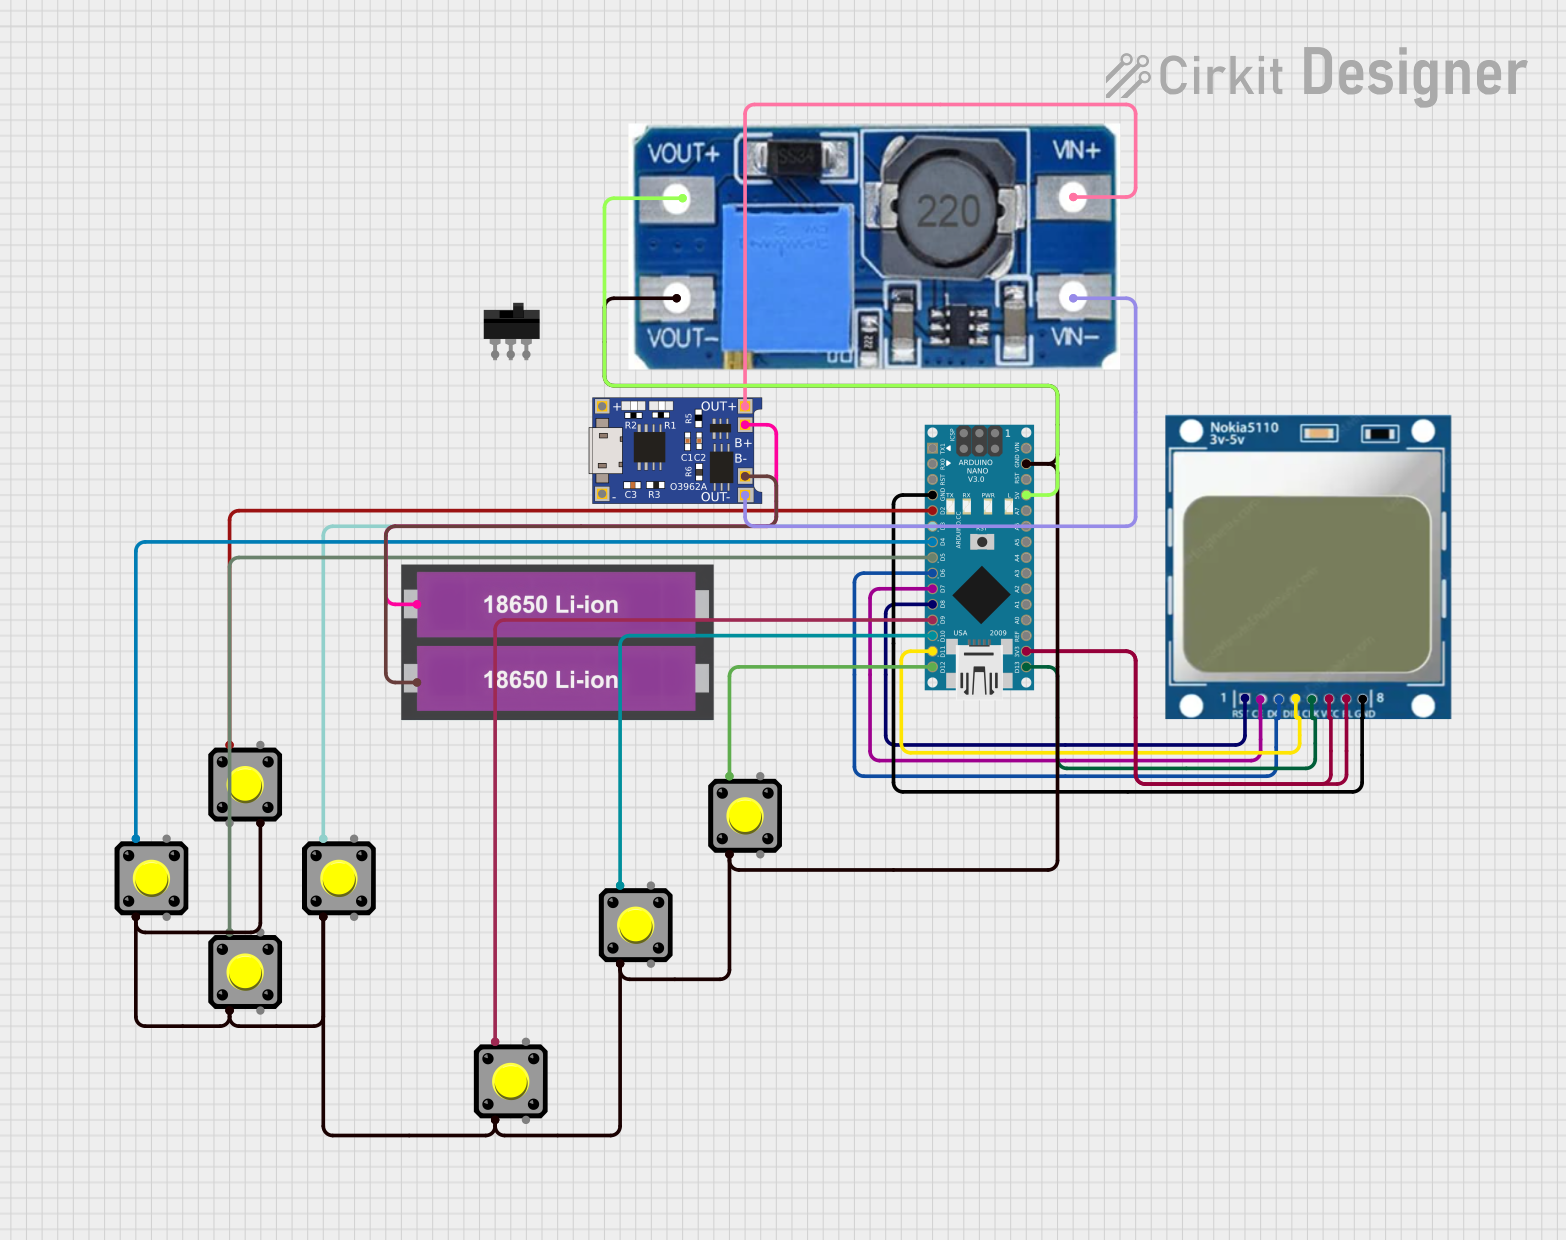
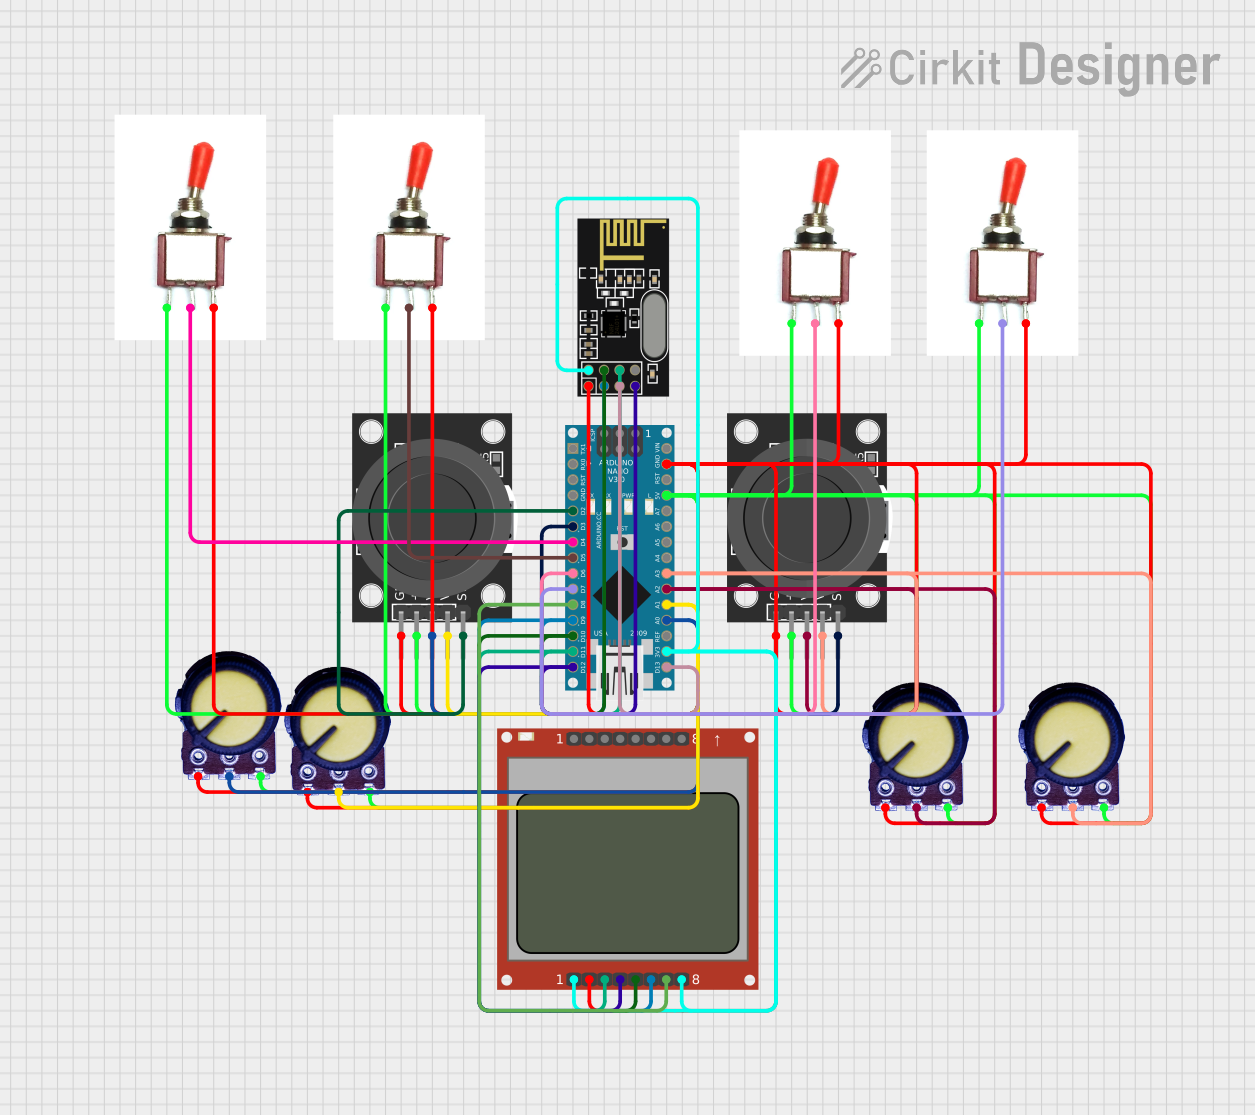
How to Use the Nokia 5110 LCD in a Circuit

  1. Powering the Display: Connect the VCC pin to a 3.3V supply and the GND pin to ground.
  2. Backlight: If backlighting is desired, connect the LIGHT pin to ground. To control the backlight, connect it to a digital pin on your microcontroller.
  3. Data Communication: Connect the RST, CE, DC, DIN, and CLK pins to digital pins on your microcontroller. These will be used for SPI communication.
  4. Resetting the Display: The RST pin must be toggled low briefly to reset the display upon power-up.

Important Considerations and Best Practices

  • Logic Levels: Ensure that the logic levels match the operating voltage to prevent damage.
  • Power Supply: Use a clean and stable 3.3V supply to avoid any display issues.
  • Contrast: Adjust the contrast of the display for clear visibility, which can be done through software commands.
  • Library: Utilize an existing library compatible with the PCD8544 controller for easier programming.

Example Code for Arduino UNO

#include <SPI.h>
#include <Adafruit_GFX.h>
#include <Adafruit_PCD8544.h>

// Pin definitions for the Nokia 5110 LCD
#define PIN_SCE   7  // Chip Enable
#define PIN_RESET 6  // Reset
#define PIN_DC    5  // Data/Command
#define PIN_SDIN  4  // Serial Data In
#define PIN_SCLK  3  // Serial Clock

// Create an instance of the display
Adafruit_PCD8544 display = Adafruit_PCD8544(PIN_SCLK, PIN_SDIN, PIN_DC, PIN_CE, PIN_RESET);

void setup() {
  // Initialize the display with a contrast that suits your particular screen
  display.begin();
  display.setContrast(50);

  // Clear the buffer
  display.clearDisplay();

  // Display a test message
  display.setTextSize(1);
  display.setTextColor(BLACK);
  display.setCursor(0,0);
  display.print("Hello, World!");
  display.display();
}

void loop() {
  // You can add more display logic here
}

Troubleshooting and FAQs

Common Issues

  • Display Not Powering On: Check the power connections and ensure the voltage is within the specified range.
  • Garbled or No Display: Ensure the SPI pins are connected correctly and the contrast is set properly.
  • Dim Backlight: Verify that the backlight pin is connected to ground or being driven by a PWM signal for adjustable brightness.

Solutions and Tips for Troubleshooting

  • Reset the Display: If the display is not responding, try toggling the RST pin to reset it.
  • Contrast Adjustment: If the display is too light or too dark, adjust the contrast in the setup function of your code.
  • Check Connections: Loose or incorrect connections are often the cause of display issues. Double-check all wiring.

FAQs

Q: Can I use the Nokia 5110 LCD with a 5V microcontroller? A: Yes, but level shifters should be used on the data lines to protect the display.

Q: How do I control the backlight brightness? A: Connect the backlight pin to a PWM-capable pin on your microcontroller and use analogWrite to adjust the brightness.

Q: What library should I use for the Arduino? A: The Adafruit PCD8544 Nokia 5110 LCD library is a popular choice and is used in the example code provided.

Q: Can I display images on the Nokia 5110 LCD? A: Yes, the display can show simple bitmaps. You can use the Adafruit GFX library to convert and display images.