Cirkit Designer Logo
Cirkit Designer
Your all-in-one circuit design IDE
Home / 
Component Documentation

How to Use AC source: Examples, Pinouts, and Specs

Image of AC source
Cirkit Designer LogoDesign with AC source in Cirkit Designer

Introduction

An AC source is an electronic component that provides an alternating current (AC) power supply to a circuit. It is a fundamental component in the world of electronics, as it is used to power a wide range of devices that operate with AC power. Common applications include household appliances, industrial machinery, and power supply systems for electronic devices.

Explore Projects Built with AC source

Use Cirkit Designer to design, explore, and prototype these projects online. Some projects support real-time simulation. Click "Open Project" to start designing instantly!
Solar-Powered Battery Backup System with Inverter and ATS
Image of Solar Circuit 100W: A project utilizing AC source in a practical application
This circuit is a solar power system designed to charge a 12V battery using a 380W solar panel, with a solar charge controller managing the charging process. The stored energy is then converted to AC power via a power inverter, which can be used to power an air conditioner through an automatic transfer switch (ATS) and AC circuit breakers for safety.
Cirkit Designer LogoOpen Project in Cirkit Designer
Solar-Powered Air Conditioner with Battery Backup and ATS
Image of Copy of Solar Circuit 380W: A project utilizing AC source in a practical application
This circuit is a solar power system designed to charge a 12V battery using a 380W solar panel and a solar charge controller. The stored energy is then used to power an inverter, which supplies AC power to an air conditioner through an automatic transfer switch (ATS) and circuit breakers for safety.
Cirkit Designer LogoOpen Project in Cirkit Designer
Solar-Powered Battery Backup System with ATS and 120V AC Outlet
Image of solar: A project utilizing AC source in a practical application
This circuit is designed to convert solar energy into usable AC power for standard 120V appliances. It consists of a solar panel connected to a charge controller, which manages power flow to a 12V battery and an inverter. The inverter then converts the stored DC power from the battery into AC power, which is supplied to a 120V outlet through an Automatic Transfer Switch (ATS).
Cirkit Designer LogoOpen Project in Cirkit Designer
AC to DC Power Supply with Voltage Regulation and Multimeter Monitoring
Image of Copy of 8 volt AC to DC convertor (1): A project utilizing AC source in a practical application
This circuit is a power supply that converts AC voltage to a regulated DC output. An AC supply is connected to a transformer, which steps down the voltage to a lower AC voltage. This lower AC voltage is then rectified by a bridge rectifier into pulsating DC, filtered by an electrolytic capacitor to reduce ripple, and finally regulated by a 7808 voltage regulator to provide a stable 8V DC output. A multimeter is connected to measure the output voltage of the regulator.
Cirkit Designer LogoOpen Project in Cirkit Designer

Explore Projects Built with AC source

Use Cirkit Designer to design, explore, and prototype these projects online. Some projects support real-time simulation. Click "Open Project" to start designing instantly!
Image of Solar Circuit 100W: A project utilizing AC source in a practical application
Solar-Powered Battery Backup System with Inverter and ATS
This circuit is a solar power system designed to charge a 12V battery using a 380W solar panel, with a solar charge controller managing the charging process. The stored energy is then converted to AC power via a power inverter, which can be used to power an air conditioner through an automatic transfer switch (ATS) and AC circuit breakers for safety.
Cirkit Designer LogoOpen Project in Cirkit Designer
Image of Copy of Solar Circuit 380W: A project utilizing AC source in a practical application
Solar-Powered Air Conditioner with Battery Backup and ATS
This circuit is a solar power system designed to charge a 12V battery using a 380W solar panel and a solar charge controller. The stored energy is then used to power an inverter, which supplies AC power to an air conditioner through an automatic transfer switch (ATS) and circuit breakers for safety.
Cirkit Designer LogoOpen Project in Cirkit Designer
Image of solar: A project utilizing AC source in a practical application
Solar-Powered Battery Backup System with ATS and 120V AC Outlet
This circuit is designed to convert solar energy into usable AC power for standard 120V appliances. It consists of a solar panel connected to a charge controller, which manages power flow to a 12V battery and an inverter. The inverter then converts the stored DC power from the battery into AC power, which is supplied to a 120V outlet through an Automatic Transfer Switch (ATS).
Cirkit Designer LogoOpen Project in Cirkit Designer
Image of Copy of 8 volt AC to DC convertor (1): A project utilizing AC source in a practical application
AC to DC Power Supply with Voltage Regulation and Multimeter Monitoring
This circuit is a power supply that converts AC voltage to a regulated DC output. An AC supply is connected to a transformer, which steps down the voltage to a lower AC voltage. This lower AC voltage is then rectified by a bridge rectifier into pulsating DC, filtered by an electrolytic capacitor to reduce ripple, and finally regulated by a 7808 voltage regulator to provide a stable 8V DC output. A multimeter is connected to measure the output voltage of the regulator.
Cirkit Designer LogoOpen Project in Cirkit Designer

Technical Specifications

General Characteristics

  • Type of AC Source: Single-phase or Three-phase (specify type)
  • Nominal Voltage: Specify the RMS voltage (e.g., 110V, 220V, etc.)
  • Frequency: Typically 50Hz or 60Hz depending on the region
  • Maximum Power Output: Rated in watts (W) or kilowatts (kW)
  • Waveform: Usually a sine wave, but can be modified sine wave or square wave in some applications

Pin Configuration and Descriptions

Pin Number Description Notes
1 Live (L) Carries the AC voltage
2 Neutral (N) Completes the AC circuit
3 Ground (G) / Earth Safety connection to ground

Note: The pin configuration may vary for three-phase AC sources, which typically have additional live wires (L2, L3).

Usage Instructions

Connecting to a Circuit

  1. Safety First: Ensure that the AC source is turned off or disconnected before making any connections.
  2. Wiring: Connect the live wire to the appropriate terminal of the device or circuit. The neutral wire should be connected to the neutral terminal, and the ground wire should be connected to the earth terminal or grounding point.
  3. Insulation: Use appropriate insulation on all connections to prevent accidental contact.
  4. Testing: Once connections are made, use a multimeter to verify correct voltages before powering on the device.

Best Practices

  • Always adhere to local electrical codes and standards.
  • Use a circuit breaker or fuse to protect the circuit from overcurrent conditions.
  • Ensure that the AC source is capable of supplying the required power for your application.
  • Consider the use of a surge protector to safeguard sensitive electronics from voltage spikes.

Troubleshooting and FAQs

Common Issues

  • No Power: Check if the AC source is plugged in and switched on. Verify circuit breakers and fuses.
  • Incorrect Voltage: Use a multimeter to check the output voltage. Ensure that the AC source is set to the correct voltage for your region.
  • Overheating: Ensure that the AC source is not overloaded. Check for proper ventilation around the component.

FAQs

Q: Can I use an AC source with a different frequency for my device? A: It is not recommended as most devices are designed to operate at a specific frequency. Using a different frequency can cause improper operation or damage.

Q: How can I convert AC to DC? A: Use a rectifier circuit or a power supply that includes rectification and voltage regulation to convert AC to DC.

Q: Is it safe to handle the AC source while it is powered on? A: No, always turn off the power and unplug the AC source before making any adjustments or connections.

Example Connection with Arduino UNO

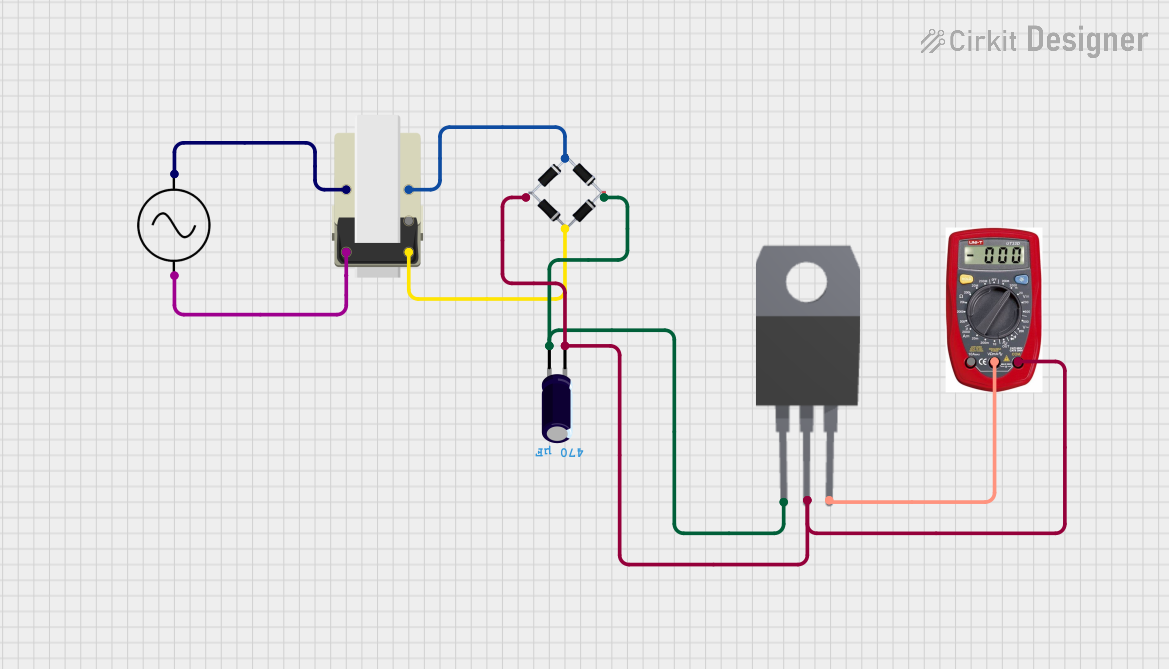
While an Arduino UNO typically operates on DC power, you may want to measure AC voltage or control AC-powered devices using an Arduino. Here's an example of how to interface an AC source with an Arduino for measurement purposes using a transformer and rectifier:

// Code to measure AC voltage using Arduino UNO
// Note: This is a simplified example and additional components such as a voltage divider
// and proper filtering may be required for accurate measurements.

void setup() {
  Serial.begin(9600);
}

void loop() {
  int sensorValue = analogRead(A0); // Read the analog input on pin A0
  float voltage = sensorValue * (5.0 / 1023.0); // Convert to voltage
  Serial.println(voltage); // Print the voltage to the Serial Monitor
  delay(1000); // Wait for a second
}

Note: This code assumes the use of a transformer and rectifier to step down and convert the AC voltage to a safe level for the Arduino analog input. Always ensure that any AC circuitry is isolated from the low-voltage DC control electronics to prevent hazards.

Remember, working with AC power can be dangerous. Always follow safety protocols and consult with a professional if you are unsure about working with high voltage AC power.