Cirkit Designer Logo
Cirkit Designer
Your all-in-one circuit design IDE
Home / 
Component Documentation

How to Use LilyPad Simple Power: Examples, Pinouts, and Specs

Image of LilyPad Simple Power
Cirkit Designer LogoDesign with LilyPad Simple Power in Cirkit Designer

Introduction

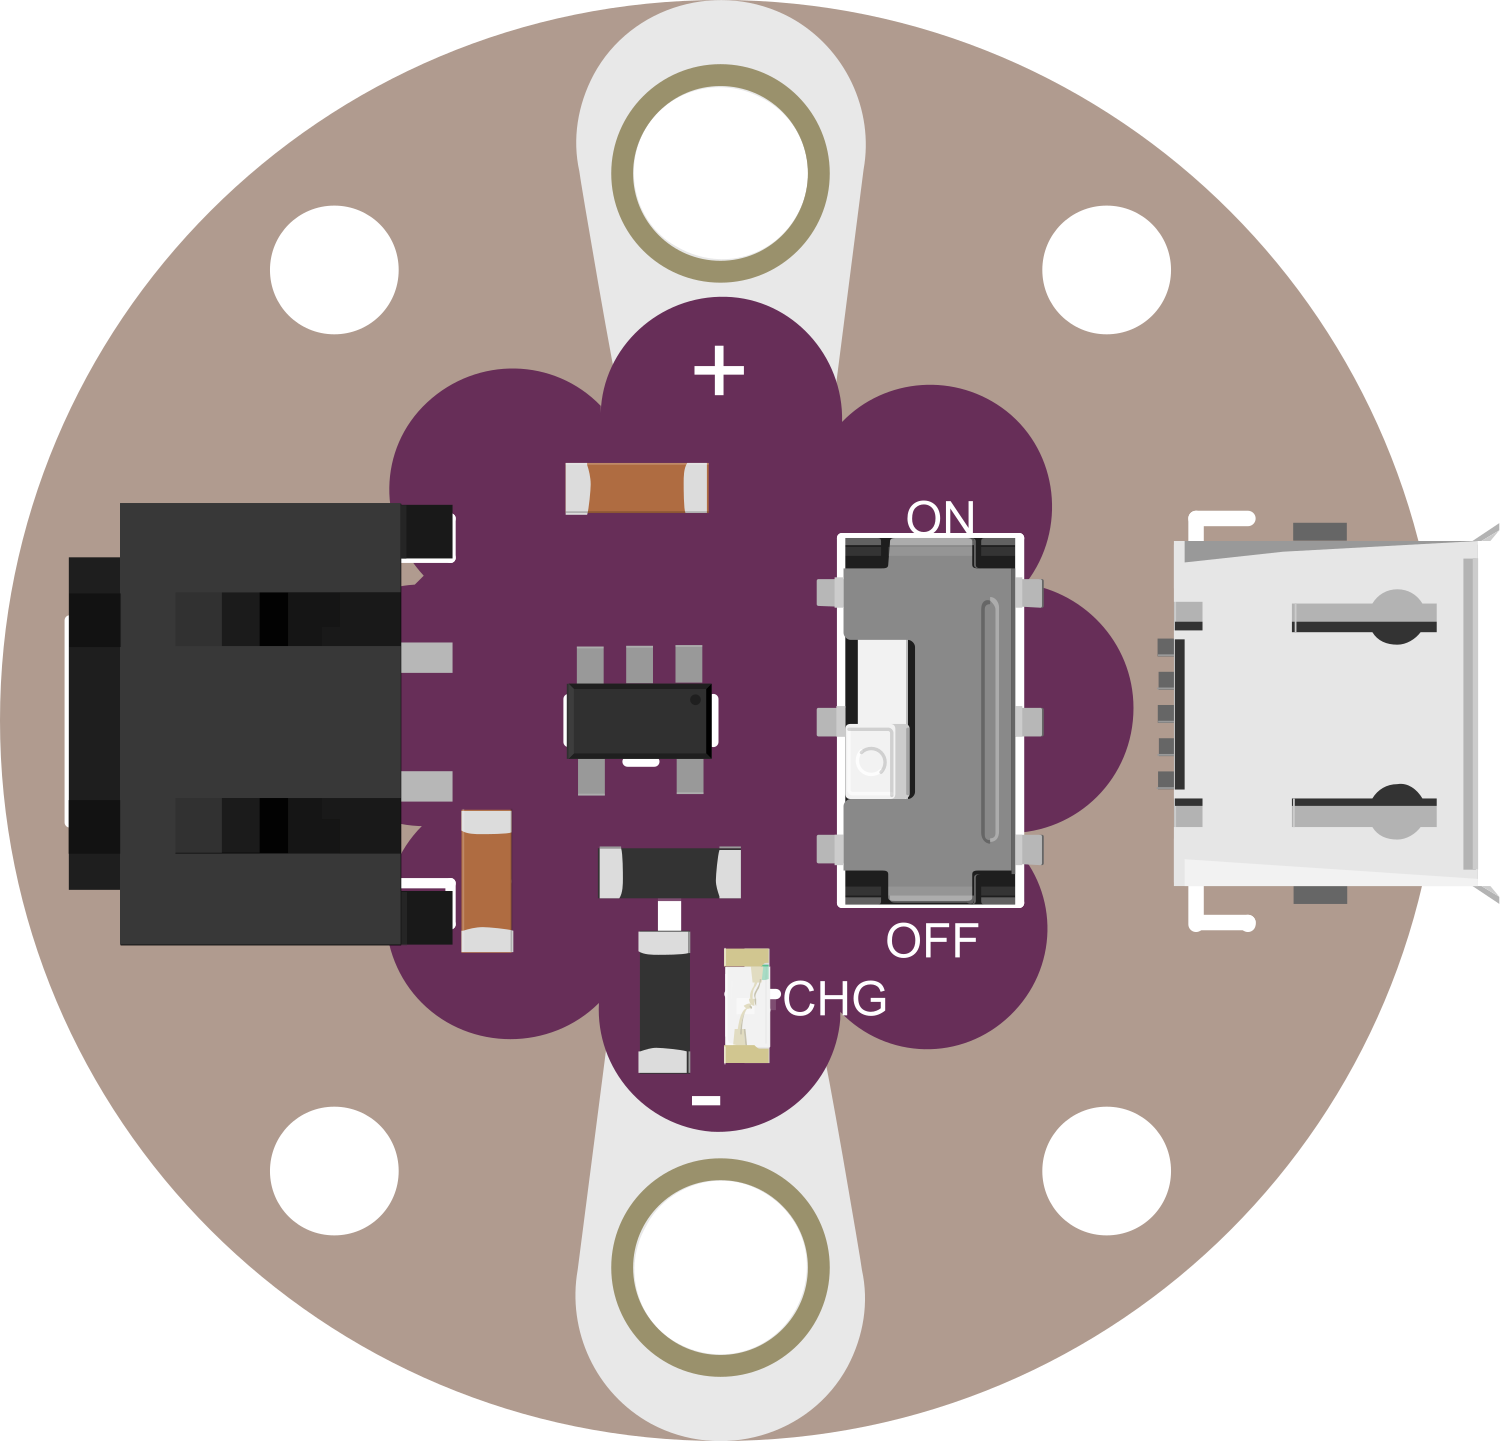
The LilyPad Simple Power is a compact power supply module designed for use with LilyPad wearable electronics. It provides a stable and regulated voltage, which is essential for the delicate electronic components used in wearable projects. This module is ideal for powering a wide range of LilyPad components and sensors, making it a versatile addition to any wearable electronics toolkit.

Common applications include:

  • Wearable devices
  • E-textiles and smart garments
  • Interactive art installations
  • Educational projects and prototypes

Explore Projects Built with LilyPad Simple Power

Use Cirkit Designer to design, explore, and prototype these projects online. Some projects support real-time simulation. Click "Open Project" to start designing instantly!
LilyPad Arduino and Accelerometer-Based Wearable Fitness Tracker with Heart Rate Monitoring
Image of proj2: A project utilizing LilyPad Simple Power in a practical application
This circuit is designed for wearable applications, featuring a LilyPad Arduino USB microcontroller that controls a chain of LED Pixel Boards and reads data from a Heart Pulse Sensor and a three-axis Accelerometer. It is capable of interactive LED displays synchronized with motion and heart rate data, suitable for dynamic wearable projects.
Cirkit Designer LogoOpen Project in Cirkit Designer
Battery-Powered Raspberry Pi Zero with OLED Display and EmStat Pico for Portable Data Acquisition
Image of RPI Zero Prototype: A project utilizing LilyPad Simple Power in a practical application
This circuit is a portable system powered by a 3.7V LiPo battery, which is boosted to 5V using an Adafruit PowerBoost 1000C to power a Raspberry Pi Zero and an EmStat Pico. The Raspberry Pi Zero interfaces with an OLED display via I2C and a tactile switch for user input, while the EmStat Pico communicates with the Raspberry Pi over UART for data acquisition or control purposes.
Cirkit Designer LogoOpen Project in Cirkit Designer
Cellular-Enabled IoT Device with Real-Time Clock and Power Management
Image of LRCM PHASE 2 BASIC: A project utilizing LilyPad Simple Power in a practical application
This circuit features a LilyGo-SIM7000G module for cellular communication and GPS functionality, interfaced with an RTC DS3231 for real-time clock capabilities. It includes voltage sensing through two voltage sensor modules, and uses an 8-channel opto-coupler for isolating different parts of the circuit. Power management is handled by a buck converter connected to a DC power source and batteries, with a fuse for protection and a rocker switch for on/off control. Additionally, there's an LED for indication purposes.
Cirkit Designer LogoOpen Project in Cirkit Designer
Battery-Powered Lora G2 Node Station with 18650 Li-ion Batteries and Boost Converter
Image of Custom-Lora-G2-Node: A project utilizing LilyPad Simple Power in a practical application
This circuit is a portable power supply system that uses multiple 18650 Li-ion batteries to provide a stable 5V output through a boost converter. It includes a fast charging module with a USB-C input for recharging the batteries and a battery indicator for monitoring the battery status. The system powers a Lora G2 Node Station, making it suitable for wireless communication applications.
Cirkit Designer LogoOpen Project in Cirkit Designer

Explore Projects Built with LilyPad Simple Power

Use Cirkit Designer to design, explore, and prototype these projects online. Some projects support real-time simulation. Click "Open Project" to start designing instantly!
Image of proj2: A project utilizing LilyPad Simple Power in a practical application
LilyPad Arduino and Accelerometer-Based Wearable Fitness Tracker with Heart Rate Monitoring
This circuit is designed for wearable applications, featuring a LilyPad Arduino USB microcontroller that controls a chain of LED Pixel Boards and reads data from a Heart Pulse Sensor and a three-axis Accelerometer. It is capable of interactive LED displays synchronized with motion and heart rate data, suitable for dynamic wearable projects.
Cirkit Designer LogoOpen Project in Cirkit Designer
Image of RPI Zero Prototype: A project utilizing LilyPad Simple Power in a practical application
Battery-Powered Raspberry Pi Zero with OLED Display and EmStat Pico for Portable Data Acquisition
This circuit is a portable system powered by a 3.7V LiPo battery, which is boosted to 5V using an Adafruit PowerBoost 1000C to power a Raspberry Pi Zero and an EmStat Pico. The Raspberry Pi Zero interfaces with an OLED display via I2C and a tactile switch for user input, while the EmStat Pico communicates with the Raspberry Pi over UART for data acquisition or control purposes.
Cirkit Designer LogoOpen Project in Cirkit Designer
Image of LRCM PHASE 2 BASIC: A project utilizing LilyPad Simple Power in a practical application
Cellular-Enabled IoT Device with Real-Time Clock and Power Management
This circuit features a LilyGo-SIM7000G module for cellular communication and GPS functionality, interfaced with an RTC DS3231 for real-time clock capabilities. It includes voltage sensing through two voltage sensor modules, and uses an 8-channel opto-coupler for isolating different parts of the circuit. Power management is handled by a buck converter connected to a DC power source and batteries, with a fuse for protection and a rocker switch for on/off control. Additionally, there's an LED for indication purposes.
Cirkit Designer LogoOpen Project in Cirkit Designer
Image of Custom-Lora-G2-Node: A project utilizing LilyPad Simple Power in a practical application
Battery-Powered Lora G2 Node Station with 18650 Li-ion Batteries and Boost Converter
This circuit is a portable power supply system that uses multiple 18650 Li-ion batteries to provide a stable 5V output through a boost converter. It includes a fast charging module with a USB-C input for recharging the batteries and a battery indicator for monitoring the battery status. The system powers a Lora G2 Node Station, making it suitable for wireless communication applications.
Cirkit Designer LogoOpen Project in Cirkit Designer

Technical Specifications

Key Technical Details

  • Input Voltage: 2.7V to 5.5V
  • Output Voltage: 3.3V (regulated)
  • Maximum Output Current: 150mA
  • Quiescent Current: 5μA (typical)
  • Dimensions: 18mm outer diameter
  • Weight: 1.1 grams

Pin Configuration and Descriptions

Pin Number Name Description
1 + Connects to the positive side of the power source (battery or USB)
2 - Connects to the ground of the power source
3 + Regulated 3.3V output to power LilyPad components
4 - Ground connection for the output side

Usage Instructions

Integrating with a Circuit

  1. Connect the positive side of your power source to the '+' input pin on the LilyPad Simple Power.
  2. Connect the ground of your power source to the '-' input pin.
  3. Use the '+' and '-' output pins to provide power to your LilyPad components.

Important Considerations and Best Practices

  • Ensure that the input voltage does not exceed 5.5V to prevent damage to the module.
  • The maximum output current is 150mA; do not overload the module by connecting components that draw more current.
  • When designing wearable projects, ensure that all connections are secure and insulated to prevent short circuits.
  • Avoid placing the module in areas where it may be subjected to excessive force or bending.

Example Code for Arduino UNO

// Example code to demonstrate how to power a LilyPad Arduino using the LilyPad Simple Power

void setup() {
  // Initialize the serial communication to debug and monitor the power status
  Serial.begin(9600);
  Serial.println("LilyPad Simple Power is now powering the Arduino.");
}

void loop() {
  // Perform tasks or put the Arduino into a low-power state if needed
  // No specific code is required for the power module itself
}

Troubleshooting and FAQs

Common Issues

  • The LilyPad components are not powering on: Ensure that the connections to the '+' and '-' input pins are secure and that the power source is functional.
  • The output voltage is unstable or too low: Check if the power source is within the specified range and that the total current draw of the connected components does not exceed 150mA.

Solutions and Tips for Troubleshooting

  • If the module is not working as expected, double-check all connections, especially the polarity of the power source.
  • Measure the input voltage to ensure it falls within the specified range.
  • If the output voltage is incorrect, disconnect all components and test the output voltage without load to determine if the module is functioning properly.

FAQs

Q: Can I wash my project with the LilyPad Simple Power attached? A: It is not recommended to wash electronic components. Remove the power module before washing your project.

Q: How do I recharge the battery connected to the LilyPad Simple Power? A: The LilyPad Simple Power does not include charging circuitry. You will need to recharge the battery using an appropriate charger for your battery type.

Q: Is the LilyPad Simple Power compatible with all LilyPad components? A: Yes, it is designed to be compatible with all LilyPad components that operate at 3.3V. Make sure the total current draw is within the module's limit.

Remember to always follow safety guidelines when working with electronics and to consult the manufacturer's datasheet for detailed information about the component.