How to Use KY-028: Examples, Pinouts, and Specs
Introduction
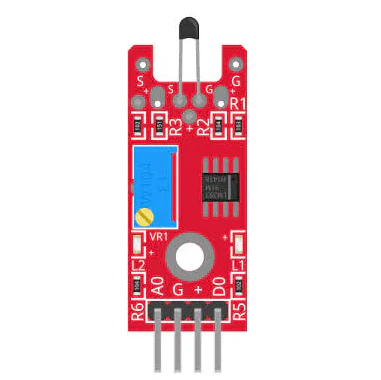
The KY-028 is a temperature sensor module that utilizes the LM35 temperature sensor to measure ambient temperature. It provides an analog output proportional to the temperature, making it suitable for a wide range of applications. The module also includes a digital output that can be triggered when the temperature exceeds a user-defined threshold, adjustable via an onboard potentiometer.
Explore Projects Built with KY-028


Explore Projects Built with KY-028
Common Applications
- Environmental monitoring systems
- Temperature-controlled devices
- Home automation projects
- Educational and prototyping purposes
- Arduino and microcontroller-based projects
Technical Specifications
- Operating Voltage: 3.3V to 5V DC
- Temperature Range: -55°C to +150°C
- Analog Output Voltage: 10mV per °C (from the LM35 sensor)
- Digital Output: High/Low signal based on threshold
- Adjustable Threshold: Via onboard potentiometer
- Dimensions: 32mm x 14mm x 8mm
Pin Configuration and Descriptions
The KY-028 module has four pins, as described in the table below:
| Pin Name | Description |
|---|---|
| VCC | Power supply input (3.3V to 5V DC) |
| GND | Ground connection |
| A0 | Analog output from the LM35 sensor, proportional to the measured temperature |
| D0 | Digital output, HIGH when temperature exceeds the threshold, LOW otherwise |
Usage Instructions
How to Use the KY-028 in a Circuit
- Power the Module: Connect the
VCCpin to a 3.3V or 5V power source and theGNDpin to ground. - Read Analog Temperature: Connect the
A0pin to an analog input pin on your microcontroller to read the temperature as a voltage. - Set Threshold for Digital Output:
- Use the onboard potentiometer to adjust the temperature threshold.
- The
D0pin will output a HIGH signal when the temperature exceeds the set threshold.
- Monitor Digital Output: Connect the
D0pin to a digital input pin on your microcontroller to detect threshold crossings.
Important Considerations and Best Practices
- Ensure the module is powered within its operating voltage range (3.3V to 5V).
- Avoid exposing the sensor to extreme temperatures beyond its specified range (-55°C to +150°C).
- For accurate temperature readings, place the module in an environment free from rapid temperature fluctuations or direct heat sources.
- When using the analog output, consider adding a capacitor between the
A0pin and ground to reduce noise.
Example: Connecting KY-028 to Arduino UNO
Below is an example of how to use the KY-028 with an Arduino UNO to read the analog temperature and monitor the digital output.
// Define pin connections
const int analogPin = A0;  // Analog pin connected to A0 of KY-028
const int digitalPin = 2;  // Digital pin connected to D0 of KY-028

void setup() {
  Serial.begin(9600);       // Initialize serial communication
  pinMode(digitalPin, INPUT); // Set digital pin as input
}

void loop() {
  // Read analog temperature value
  int analogValue = analogRead(analogPin);
  float temperature = (analogValue * 5.0 / 1023.0) * 100.0;
  // Convert analog value to temperature in °C
  Serial.print("Temperature: ");
  Serial.print(temperature);
  Serial.println(" °C");

  // Read digital output
  int digitalValue = digitalRead(digitalPin);
  if (digitalValue == HIGH) {
    Serial.println("Temperature exceeds threshold!");
  } else {
    Serial.println("Temperature is below threshold.");
  }

  delay(1000); // Wait for 1 second before next reading
}
Troubleshooting and FAQs
Common Issues and Solutions
No Output from the Module:
- Ensure the module is powered correctly (3.3V to 5V).
- Verify all connections are secure and correctly wired.
Inaccurate Temperature Readings:
- Check for noise in the analog signal. Add a capacitor between
A0and ground if necessary. - Ensure the module is not exposed to direct heat sources or rapid temperature changes.
- Check for noise in the analog signal. Add a capacitor between
Digital Output Not Triggering:
- Adjust the potentiometer to set the desired temperature threshold.
- Verify the
D0pin is connected to the correct digital input pin on your microcontroller.
Arduino Code Not Working:
- Double-check the pin assignments in the code.
- Ensure the Arduino is properly powered and the serial monitor is set to the correct baud rate (9600 in the example).
FAQs
Q: Can the KY-028 measure negative temperatures?
A: Yes, the LM35 sensor on the KY-028 can measure temperatures as low as -55°C. However, the analog output may require additional calibration for accurate readings in the negative range.
Q: How do I calibrate the sensor for more accurate readings?
A: You can use a known temperature source (e.g., an ice bath or boiling water) to compare the sensor's output and adjust your calculations in the code accordingly.
Q: Can I use the KY-028 with a 3.3V microcontroller like the ESP32?
A: Yes, the KY-028 operates at 3.3V to 5V, making it compatible with 3.3V microcontrollers. However, ensure the analog input range of your microcontroller matches the sensor's output.
Q: What is the purpose of the potentiometer on the module?
A: The potentiometer is used to set the temperature threshold for the digital output (D0 pin).