Cirkit Designer
Your all-in-one circuit design IDE
Home /
Component Documentation
How to Use Pushbutton: Examples, Pinouts, and Specs
Introduction
A pushbutton is a fundamental electronic component that operates as a simple switch to control an electrical circuit. It is a momentary switch mechanism that, when pressed, either completes or interrupts a circuit. Pushbuttons are ubiquitous in electronic devices, serving as inputs for a wide range of applications, from simple household gadgets to complex industrial machinery.
Explore Projects Built with Pushbutton
Pushbutton-Controlled Interface with 40-Pin Connector and UBS Power Supply

This circuit consists of a 40-pin connector interfacing with four pushbuttons and a UBS power supply. The pushbuttons are used as inputs to the connector, which then relays the signals to other components or systems. The UBS power supply provides the necessary 24V power to the pushbuttons and the common ground for the circuit.
Raspberry Pi 5 Pushbutton Input Circuit
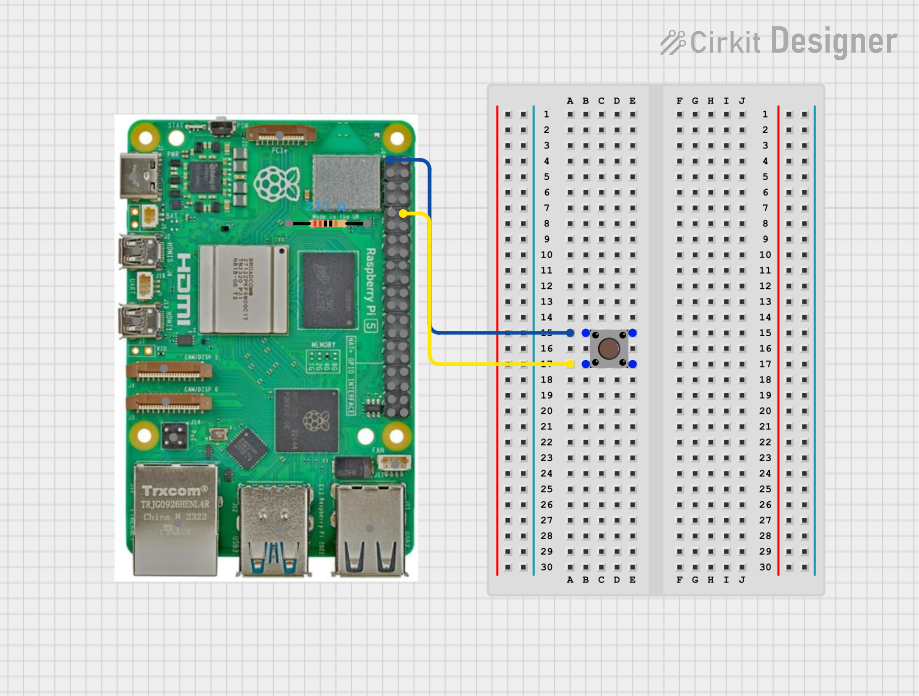
This circuit features a Raspberry Pi 5 connected to a pushbutton. The pushbutton is powered by the 3.3V pin of the Raspberry Pi and its output is connected to GPIO 15, allowing the Raspberry Pi to detect button presses.
Arduino UNO Pushbutton Input with 10k Ohm Resistor

This circuit features an Arduino UNO microcontroller connected to a pushbutton and a 10k Ohm resistor. The pushbutton is powered by the 5V pin of the Arduino, and its state is read through digital pin D2, with the resistor providing a pull-down to ground.
Battery-Powered Multi-Button Controller with Seeed Studio nRF52840
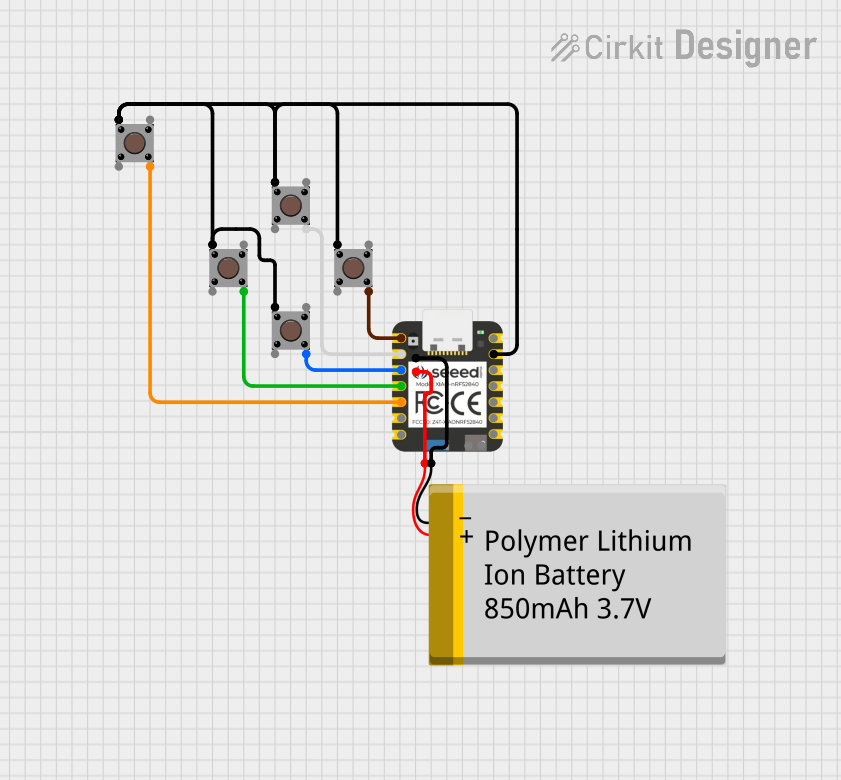
This circuit consists of five pushbuttons connected to a Seeed Studio nRF52840 microcontroller, which is powered by a Polymer Lithium Ion Battery. Each pushbutton is connected to a different GPIO pin on the microcontroller, allowing for individual button press detection and processing.
Explore Projects Built with Pushbutton
Pushbutton-Controlled Interface with 40-Pin Connector and UBS Power Supply
This circuit consists of a 40-pin connector interfacing with four pushbuttons and a UBS power supply. The pushbuttons are used as inputs to the connector, which then relays the signals to other components or systems. The UBS power supply provides the necessary 24V power to the pushbuttons and the common ground for the circuit.
Raspberry Pi 5 Pushbutton Input Circuit
This circuit features a Raspberry Pi 5 connected to a pushbutton. The pushbutton is powered by the 3.3V pin of the Raspberry Pi and its output is connected to GPIO 15, allowing the Raspberry Pi to detect button presses.
Arduino UNO Pushbutton Input with 10k Ohm Resistor
This circuit features an Arduino UNO microcontroller connected to a pushbutton and a 10k Ohm resistor. The pushbutton is powered by the 5V pin of the Arduino, and its state is read through digital pin D2, with the resistor providing a pull-down to ground.
Battery-Powered Multi-Button Controller with Seeed Studio nRF52840
This circuit consists of five pushbuttons connected to a Seeed Studio nRF52840 microcontroller, which is powered by a Polymer Lithium Ion Battery. Each pushbutton is connected to a different GPIO pin on the microcontroller, allowing for individual button press detection and processing.
Common Applications and Use Cases
- User interfaces (e.g., start/stop buttons on machinery)
- Interactive projects (e.g., game controllers, keyboards)
- Input devices for microcontrollers (e.g., Arduino projects)
- Prototyping and educational kits
Technical Specifications
Key Technical Details
- Voltage Rating: Typically 3.3V to 5V for logic-level circuits
- Current Rating: Varies, often around 10mA to 50mA for signal-level circuits
- Contact Resistance: Usually less than 10Ω when closed
- Mechanical Life: Can range from 10,000 to 1,000,000 cycles depending on quality
- Operating Force: The force required to activate the switch, typically around 100g to 300g
Pin Configuration and Descriptions
| Pin Number | Description |
|---|---|
| 1 | Terminal 1 (Contact) |
| 2 | Terminal 2 (Contact) |
Note: Some pushbuttons may have more than two pins for additional features such as built-in LEDs or multiple contacts.
Usage Instructions
How to Use the Pushbutton in a Circuit
- Identify the Pins: Determine which pins are the contacts that close the circuit when the button is pressed.
- Connect to Power: Connect one terminal to the power supply (e.g., 5V).
- Connect to Ground: Connect the other terminal through a pull-down resistor to ground. This ensures a stable LOW signal when the button is not pressed.
- Signal Line: Connect the same terminal as the pull-down resistor to an input pin on your microcontroller.
- Debounce: Implement a debounce algorithm in software to account for mechanical noise when the button is pressed or released.
Important Considerations and Best Practices
- Debouncing: Pushbuttons often produce a noisy signal due to mechanical bounce. It's important to debounce the signal either through hardware (e.g., RC filter) or software to ensure reliable operation.
- Pull-up/Pull-down Resistors: Use pull-up or pull-down resistors to define the default state of the button and prevent floating inputs.
- Current Limiting: If the pushbutton includes an LED or other component, ensure to use a current-limiting resistor to prevent damage.
Example Code for Arduino UNO
// Define the pushbutton pin
const int buttonPin = 2;

// Variable for reading the pushbutton status
int buttonState = 0;

void setup() {
  // Initialize the pushbutton pin as an input
  pinMode(buttonPin, INPUT);
}

void loop() {
  // Read the state of the pushbutton value
  buttonState = digitalRead(buttonPin);

  // Check if the pushbutton is pressed
  // if it is, the buttonState is HIGH
  if (buttonState == HIGH) {
    // Turn on the LED (assuming an LED is connected to pin 13)
    digitalWrite(13, HIGH);
  } else {
    // Turn off the LED
    digitalWrite(13, LOW);
  }
}
Note: The above code assumes the use of an internal pull-up resistor. If an external pull-down resistor is used, the pinMode should be set to INPUT instead of INPUT_PULLUP, and the logic would be inverted.
Troubleshooting and FAQs
Common Issues Users Might Face
- Button Does Not Respond: Ensure the button is properly connected and the pull-up/pull-down resistor is in place.
- Noisy Signal: If the input signal is noisy, implement a debounce algorithm or hardware debouncing.
- Always High or Low: Check for solder bridges or shorts that may cause the button to be always pressed or released.
Solutions and Tips for Troubleshooting
- Check Connections: Verify all connections are secure and correct.
- Test the Button: Use a multimeter to test the continuity of the button when pressed.
- Debounce: Implement debouncing in your code or add an RC filter to the button circuit.
FAQs
- Q: Can I use a pushbutton with a higher voltage rating in a 5V circuit?
- A: Yes, a pushbutton with a higher voltage rating will work fine in a 5V circuit.
- Q: How do I know if my pushbutton is normally open or normally closed?
- A: A normally open (NO) pushbutton does not make contact until it is pressed, while a normally closed (NC) button is always making contact until pressed. You can test this with a multimeter.
- Q: What size pull-up/pull-down resistor should I use?
- A: A common value is 10kΩ, but anything from 1kΩ to 100kΩ is typically acceptable.