How to Use Solar Panel 100Wp: Examples, Pinouts, and Specs
Introduction
The Solar Panel 100Wp is a photovoltaic module designed to convert sunlight into electrical energy with a peak power output of 100 watts. It is an efficient and eco-friendly solution for powering small to medium-scale applications. This solar panel is ideal for residential, commercial, and off-grid systems, providing a reliable source of renewable energy. Its compact design and robust construction make it suitable for outdoor installations in various environmental conditions.
Explore Projects Built with Solar Panel 100Wp

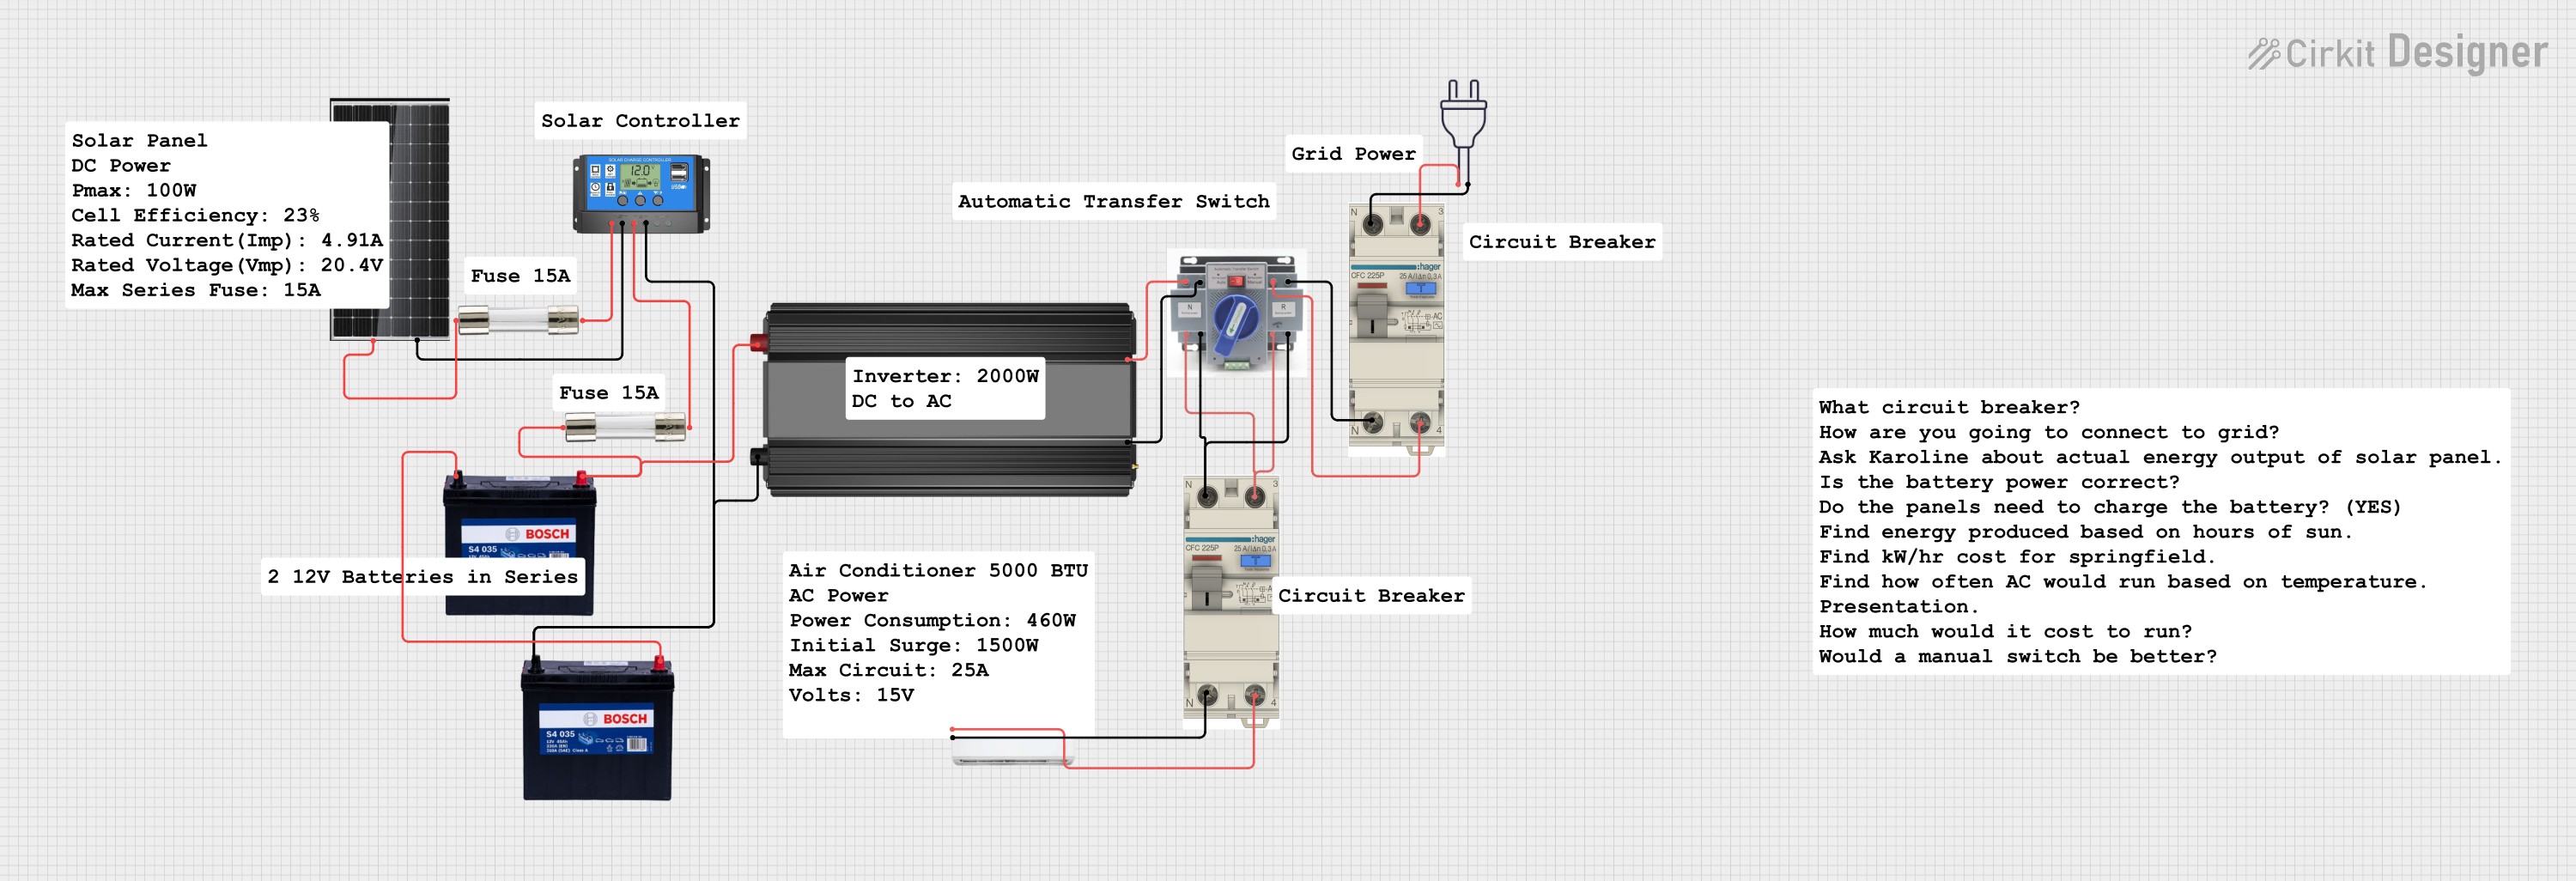
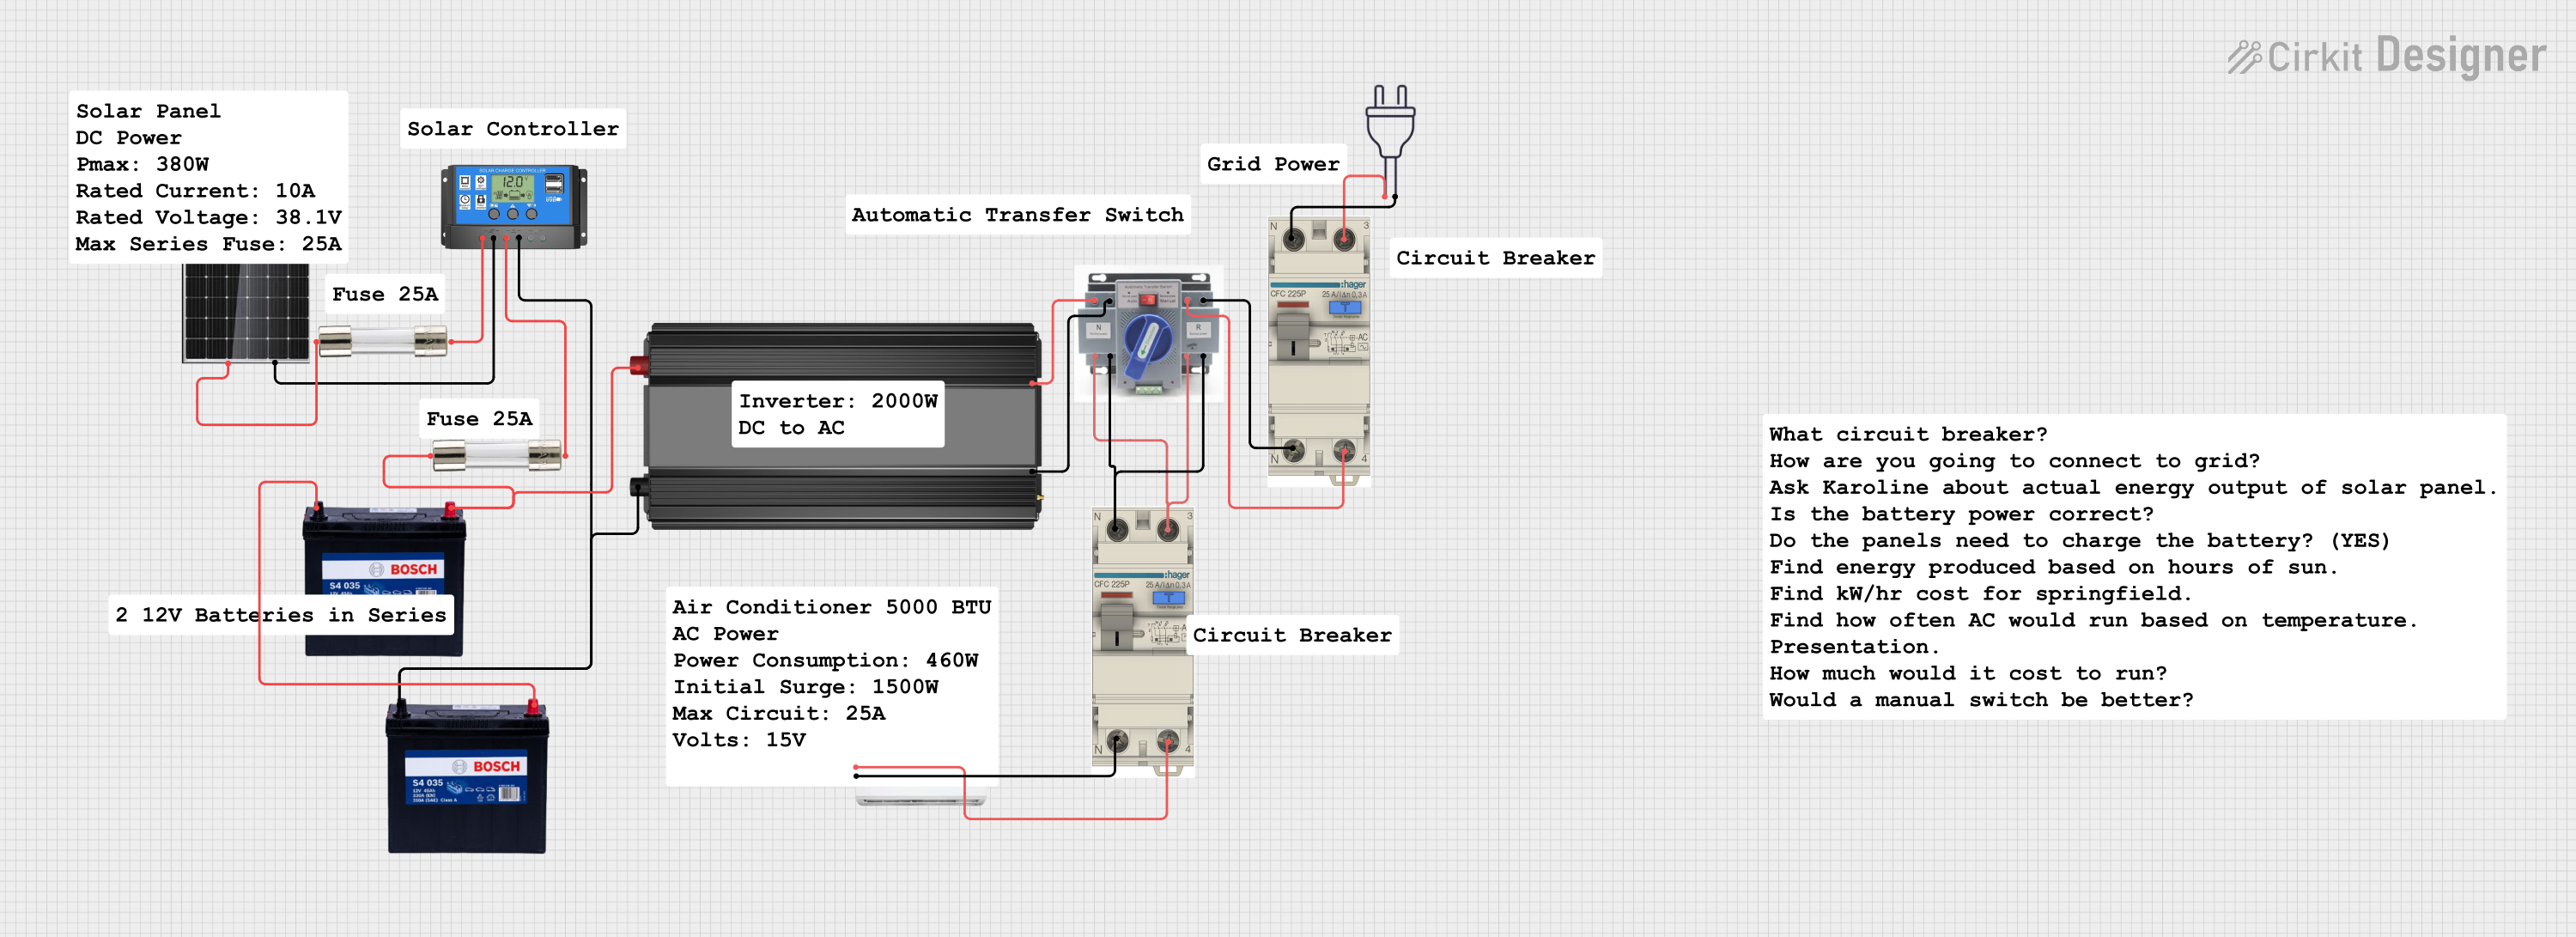
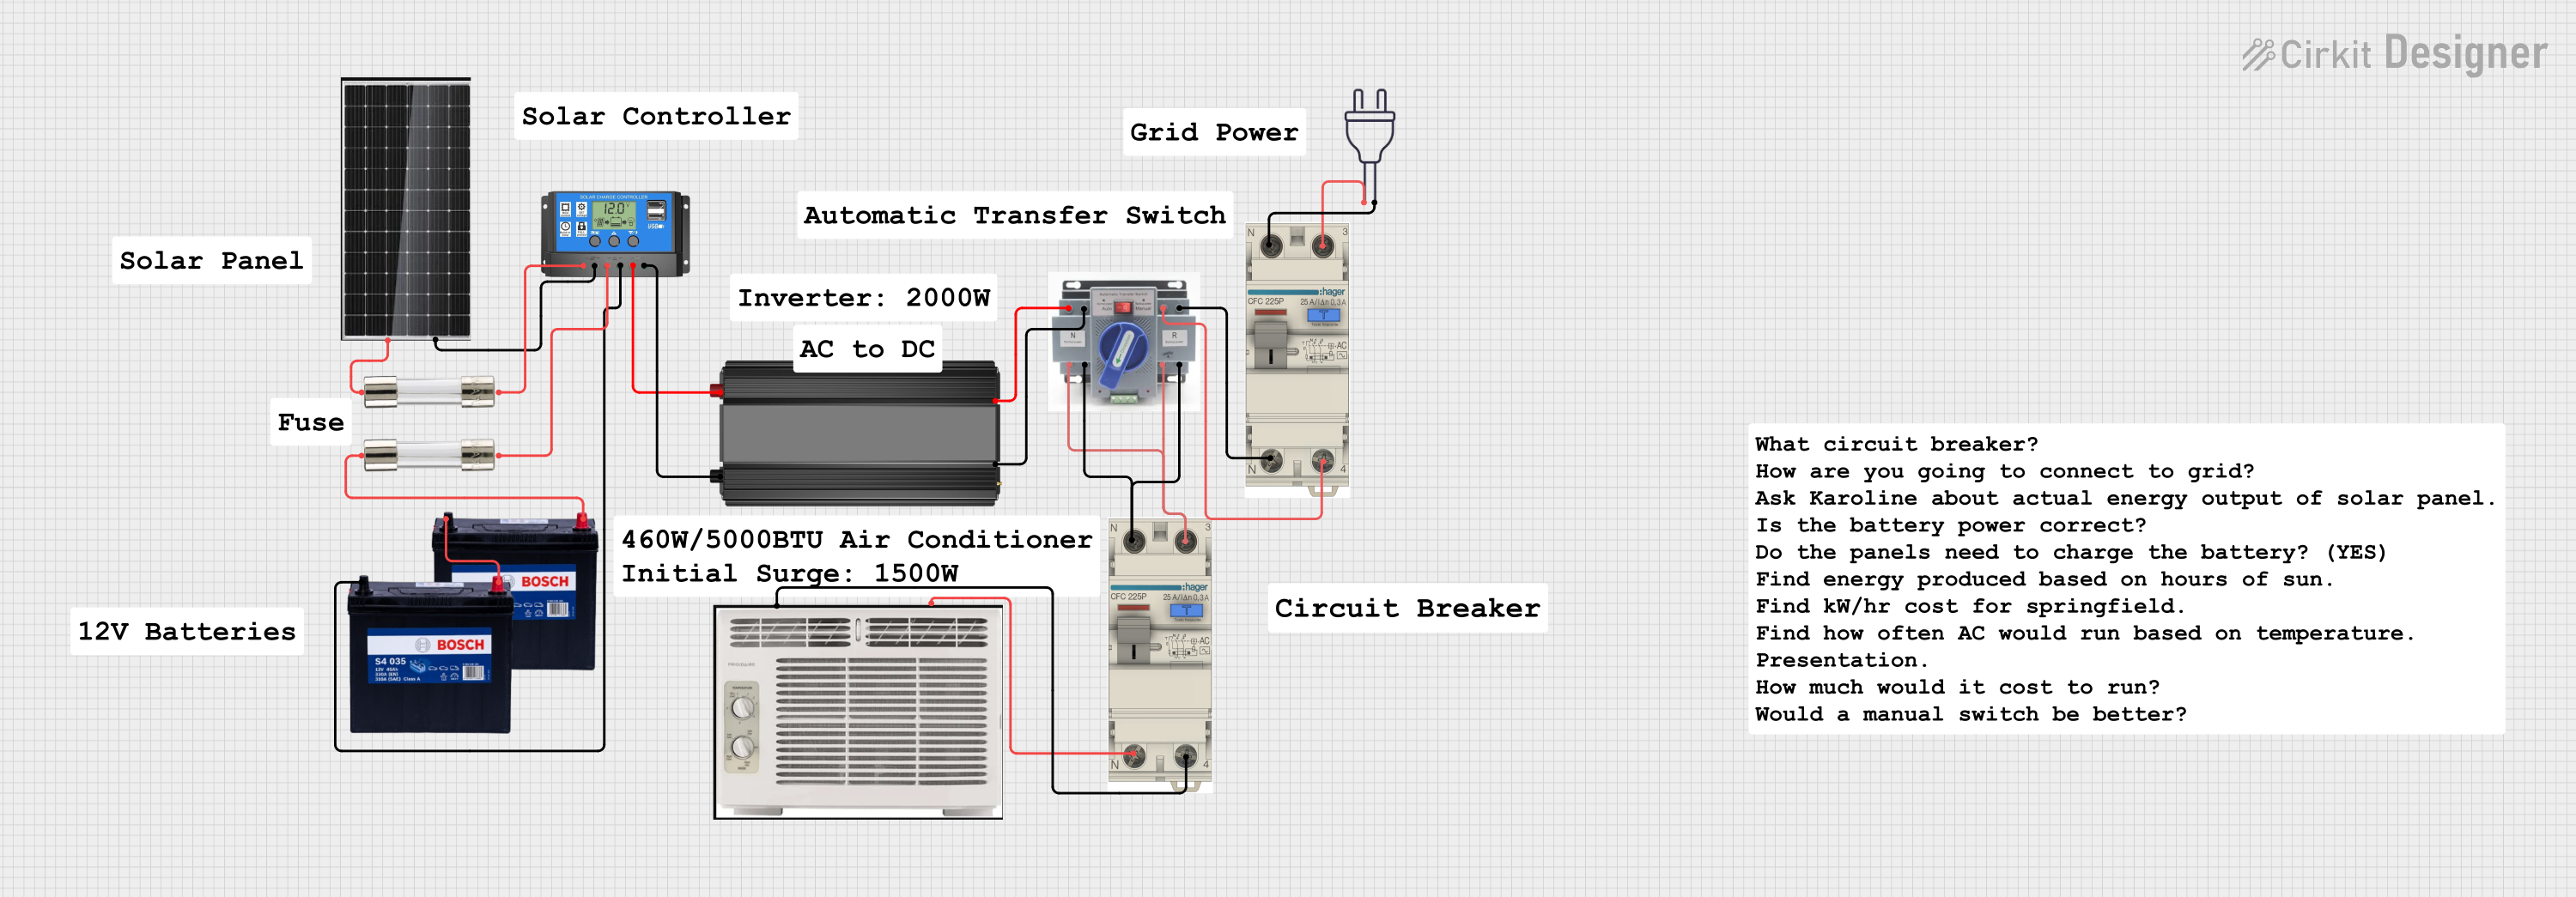
Explore Projects Built with Solar Panel 100Wp
Common Applications and Use Cases
- Off-grid solar power systems for cabins, RVs, and boats
- Residential rooftop solar installations
- Backup power systems with battery storage
- Solar-powered lighting and irrigation systems
- Charging stations for small electronic devices
Technical Specifications
Below are the key technical details of the Solar Panel 100Wp:
| Parameter | Specification |
|---|---|
| Maximum Power (Pmax) | 100 Wp |
| Voltage at Pmax (Vmp) | 18 V |
| Current at Pmax (Imp) | 5.56 A |
| Open Circuit Voltage (Voc) | 21.6 V |
| Short Circuit Current (Isc) | 5.95 A |
| Module Efficiency | ~18% |
| Dimensions | 1200 mm x 540 mm x 35 mm |
| Weight | 8 kg |
| Operating Temperature | -40°C to +85°C |
| Connector Type | MC4 or compatible |
| Cable Length | 900 mm |
| Frame Material | Anodized aluminum alloy |
| Glass Type | Tempered, anti-reflective coating |
| IP Rating | IP65 (junction box) |
Pin Configuration and Descriptions
The Solar Panel 100Wp typically has two output cables terminated with MC4 connectors:
| Pin/Connector | Description |
|---|---|
| Positive (+) | Positive terminal for DC output |
| Negative (-) | Negative terminal for DC output |
Usage Instructions
How to Use the Solar Panel in a Circuit
Positioning the Panel:
- Install the solar panel in a location with maximum sunlight exposure.
- Ensure the panel is tilted at an angle appropriate for your geographic location to optimize energy generation.
Connecting to a Charge Controller:
- Connect the positive (+) terminal of the solar panel to the positive input of the charge controller.
- Connect the negative (-) terminal of the solar panel to the negative input of the charge controller.
- Use MC4-compatible connectors for secure and reliable connections.
Connecting to a Battery (if applicable):
- Connect the charge controller's output terminals to the battery terminals (positive to positive, negative to negative).
- Ensure the charge controller is compatible with the battery type (e.g., lead-acid, lithium-ion).
Connecting to a Load:
- Connect the load (e.g., lights, appliances) to the output terminals of the charge controller or inverter, depending on the system design.
Monitoring and Maintenance:
- Regularly clean the panel surface to remove dust and debris for optimal performance.
- Inspect the wiring and connectors periodically for signs of wear or damage.
Important Considerations and Best Practices
- Avoid Shading: Even partial shading can significantly reduce the panel's output.
- Overcurrent Protection: Use appropriate fuses or circuit breakers to protect the system.
- Voltage Matching: Ensure the panel's voltage and current ratings are compatible with the charge controller and battery.
- Series or Parallel Connections: For higher voltage or current requirements, connect multiple panels in series or parallel, ensuring proper polarity.
Example: Connecting to an Arduino UNO
The Solar Panel 100Wp can be used to power an Arduino UNO indirectly through a charge controller and a 12V battery. Below is an example code to read the battery voltage using the Arduino:
// Example code to read battery voltage using Arduino UNO
const int analogPin = A0; // Analog pin connected to voltage divider
const float voltageDividerRatio = 5.7; // Adjust based on resistor values
const float referenceVoltage = 5.0; // Arduino reference voltage (5V)

void setup() {
  Serial.begin(9600); // Initialize serial communication
}

void loop() {
  int sensorValue = analogRead(analogPin); // Read analog input
  float voltage = (sensorValue / 1023.0) * referenceVoltage * voltageDividerRatio;

  // Print the battery voltage to the Serial Monitor
  Serial.print("Battery Voltage: ");
  Serial.print(voltage);
  Serial.println(" V");

  delay(1000); // Wait for 1 second before next reading
}
Note: Use a voltage divider circuit to step down the battery voltage to a safe level for the Arduino's analog input (0-5V).
Troubleshooting and FAQs
Common Issues and Solutions
Low Power Output:
- Cause: Shading, dirt, or incorrect panel orientation.
- Solution: Clean the panel surface and adjust its position for maximum sunlight exposure.
No Output Voltage:
- Cause: Loose or damaged connections.
- Solution: Inspect and secure all connections, and check for damaged cables or connectors.
Overheating:
- Cause: Poor ventilation or excessive ambient temperature.
- Solution: Ensure proper airflow around the panel and avoid installing it in enclosed spaces.
Inconsistent Output:
- Cause: Fluctuating sunlight or faulty charge controller.
- Solution: Use a solar tracker for consistent sunlight exposure and verify the charge controller's functionality.
FAQs
Q1: Can I connect the Solar Panel 100Wp directly to a battery?
A1: No, it is recommended to use a charge controller to regulate the voltage and prevent overcharging the battery.
Q2: How do I calculate the number of panels needed for my system?
A2: Determine your daily energy consumption (in watt-hours) and divide it by the panel's daily energy output, considering sunlight hours in your location.
Q3: Is the panel waterproof?
A3: Yes, the panel is designed for outdoor use and has an IP65-rated junction box, making it resistant to water and dust.
Q4: Can I use this panel with an inverter?
A4: Yes, connect the panel to a battery through a charge controller, and then connect the battery to an inverter for AC power output.