How to Use HLK LD2450: Examples, Pinouts, and Specs
Introduction
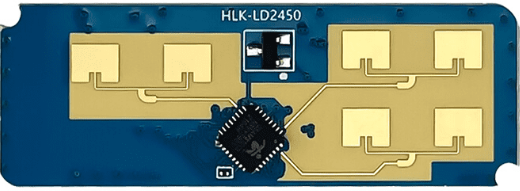
The HLK LD2450 is a compact and efficient AC-DC power supply module manufactured by Hi-Link Electronics. It is designed to convert a wide range of AC input voltages (85-265V AC) into a stable 5V DC output, making it ideal for powering low-power electronic devices. With its high efficiency, low ripple, and integrated protection features, the HLK LD2450 is a reliable choice for various applications.
Explore Projects Built with HLK LD2450


Explore Projects Built with HLK LD2450
Common Applications and Use Cases
- Powering microcontrollers (e.g., Arduino, ESP32, Raspberry Pi Pico)
- IoT devices and smart home systems
- Industrial control systems
- Low-power sensors and actuators
- Embedded systems requiring a stable 5V DC supply
Technical Specifications
The HLK LD2450 is designed to meet the needs of modern electronic systems with the following specifications:
| Parameter | Value |
|---|---|
| Input Voltage Range | 85-265V AC |
| Output Voltage | 5V DC |
| Output Current | 0-450mA |
| Output Power | 2.25W |
| Efficiency | ≥ 75% |
| Ripple and Noise | ≤ 50mV |
| Operating Temperature | -25°C to +70°C |
| Storage Temperature | -40°C to +85°C |
| Protection Features | Over-voltage, Over-current, Short-circuit |
| Dimensions | 35mm x 18mm x 15mm |
| Weight | ~10g |
Pin Configuration and Descriptions
The HLK LD2450 module has six pins, as described in the table below:
| Pin Number | Pin Name | Description |
|---|---|---|
| 1 | AC IN (L) | Live input for AC voltage (85-265V AC) |
| 2 | AC IN (N) | Neutral input for AC voltage |
| 3 | GND | Ground connection for the DC output |
| 4 | +5V OUT | 5V DC output |
| 5 | NC | Not connected (leave unconnected) |
| 6 | NC | Not connected (leave unconnected) |
Usage Instructions
How to Use the HLK LD2450 in a Circuit
Connect the AC Input:
- Connect the
AC IN (L)pin to the live wire of the AC mains supply. - Connect the
AC IN (N)pin to the neutral wire of the AC mains supply. - Ensure proper insulation and safety precautions when working with high-voltage AC.
- Connect the
Connect the DC Output:
- Connect the
+5V OUTpin to the positive terminal of your load or circuit. - Connect the
GNDpin to the ground terminal of your load or circuit.
- Connect the
Mounting and Placement:
- Place the module in a well-ventilated area to prevent overheating.
- Avoid placing the module near sources of electromagnetic interference (EMI).
Safety Precautions:
- Do not touch the module while it is powered, as it handles high-voltage AC.
- Use a fuse or circuit breaker on the AC input for added protection.
Important Considerations and Best Practices
- Load Requirements: Ensure the connected load does not exceed the maximum output current of 450mA.
- Heat Dissipation: If the module operates near its maximum power rating, consider adding heat sinks or improving ventilation.
- Isolation: For safety, ensure proper isolation between the AC and DC sides of the circuit.
- Testing: Before connecting the module to your final circuit, test it with a dummy load to verify its performance.
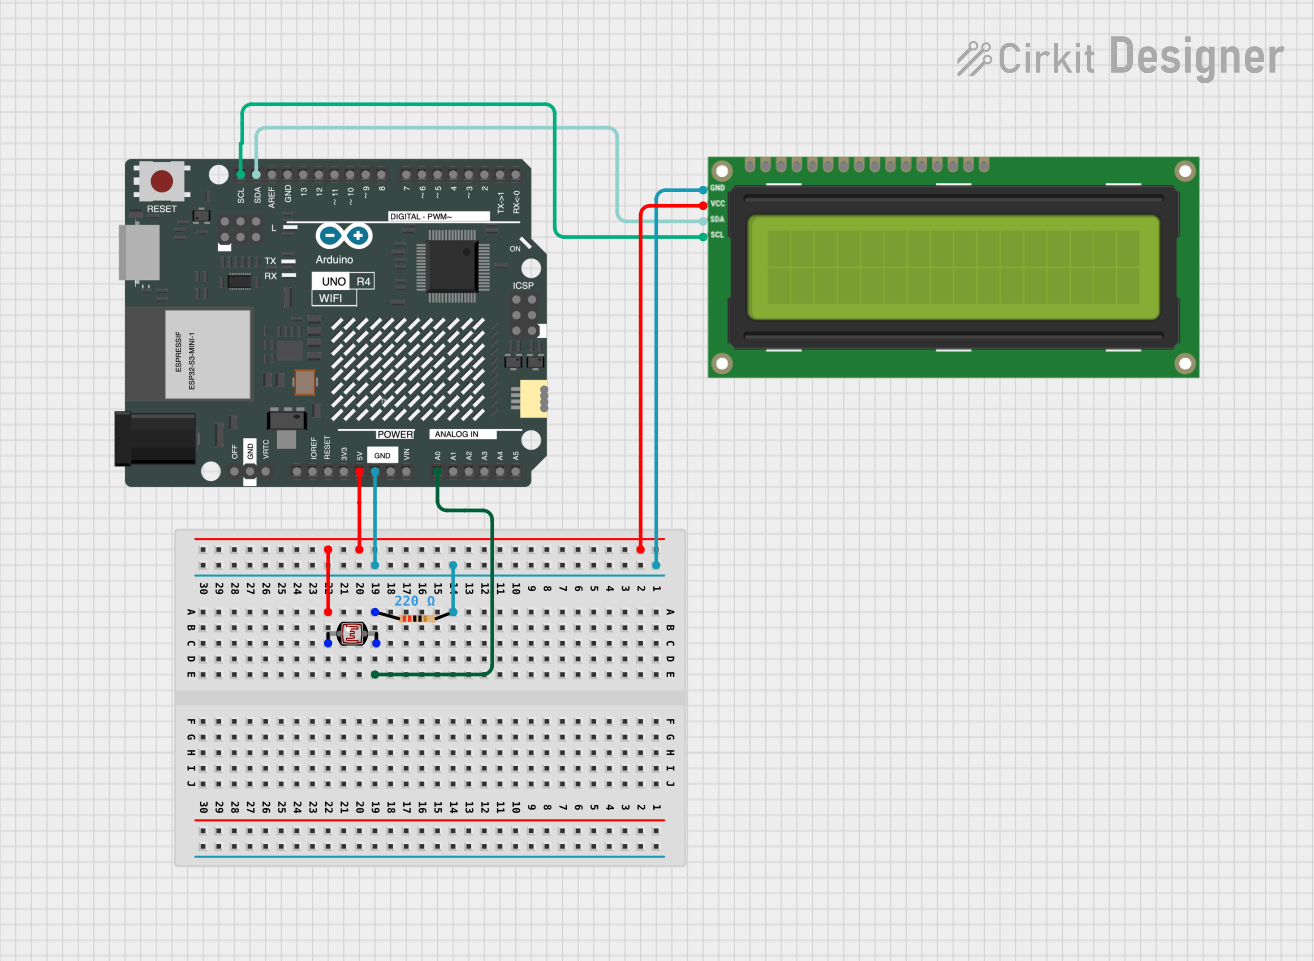
Example: Using HLK LD2450 with Arduino UNO
The HLK LD2450 can be used to power an Arduino UNO by providing a stable 5V DC supply. Below is an example circuit and Arduino code:
Circuit Diagram
- Connect the
+5V OUTpin of the HLK LD2450 to the5Vpin of the Arduino UNO. - Connect the
GNDpin of the HLK LD2450 to theGNDpin of the Arduino UNO. - Connect the
AC IN (L)andAC IN (N)pins to the AC mains supply (ensure safety precautions).
Arduino Code Example
// Example code to blink an LED using Arduino UNO powered by HLK LD2450

const int ledPin = 13; // Pin connected to the built-in LED on Arduino UNO

void setup() {
  pinMode(ledPin, OUTPUT); // Set the LED pin as an output
}

void loop() {
  digitalWrite(ledPin, HIGH); // Turn the LED on
  delay(1000);                // Wait for 1 second
  digitalWrite(ledPin, LOW);  // Turn the LED off
  delay(1000);                // Wait for 1 second
}
Troubleshooting and FAQs
Common Issues and Solutions
No Output Voltage:
- Cause: Incorrect AC input connections or no AC power supply.
- Solution: Verify the AC input connections and ensure the mains supply is active.
Output Voltage Too Low or Unstable:
- Cause: Overloading the module or insufficient ventilation.
- Solution: Reduce the load to within the module's rated current (450mA) and improve ventilation.
Module Overheating:
- Cause: Operating near maximum power rating for extended periods.
- Solution: Add heat sinks or improve airflow around the module.
Noise or Ripple in Output Voltage:
- Cause: Poor filtering or interference from nearby components.
- Solution: Add a capacitor (e.g., 100µF electrolytic) across the output terminals to reduce noise.
FAQs
Q1: Can the HLK LD2450 be used with a 12V DC input?
A1: No, the HLK LD2450 is designed to work with an AC input voltage range of 85-265V. It cannot operate with a DC input.
Q2: Is the module safe to use in outdoor environments?
A2: The HLK LD2450 is not waterproof or weatherproof. It should be used in indoor environments or enclosed in a protective casing for outdoor use.
Q3: Can I use the HLK LD2450 to power a Raspberry Pi?
A3: The HLK LD2450 provides a maximum current of 450mA, which may not be sufficient for a Raspberry Pi. It is better suited for low-power devices like microcontrollers or sensors.
Q4: What is the lifespan of the HLK LD2450?
A4: The module is designed for long-term use under normal operating conditions. However, factors like overheating or overloading can reduce its lifespan.