How to Use Temt6000: Examples, Pinouts, and Specs

 Design with Temt6000 in Cirkit Designer
Introduction
The TEMT6000 is a light sensor designed to detect ambient light levels. It outputs an analog voltage proportional to the intensity of light, making it an ideal choice for applications requiring light-sensitive functionality. This sensor is commonly used in automatic lighting control systems, display brightness adjustment, and other devices that respond to environmental light conditions. Its compact size and ease of use make it a popular choice for hobbyists and professionals alike.
Explore Projects Built with Temt6000

 Open Project in Cirkit Designer
 Open Project in Cirkit Designer
 Open Project in Cirkit Designer
 Open Project in Cirkit Designer
Explore Projects Built with Temt6000

 Open Project in Cirkit Designer
 Open Project in Cirkit Designer
 Open Project in Cirkit Designer
 Open Project in Cirkit Designer
Common Applications
- Automatic lighting control systems
- Display brightness adjustment
- Light-sensitive alarms and triggers
- Energy-saving devices
- Robotics and IoT projects
Technical Specifications
The TEMT6000 is a phototransistor-based sensor with the following key specifications:
| Parameter | Value |
|---|---|
| Supply Voltage (Vcc) | 3.3V to 5V |
| Output Voltage Range | 0V to Vcc (proportional to light) |
| Spectral Sensitivity | 570 nm (peak sensitivity) |
| Operating Temperature | -40°C to +85°C |
| Current Consumption | ~0.5 mA |
| Light Intensity Range | 0 to ~1000 lux |
Pin Configuration
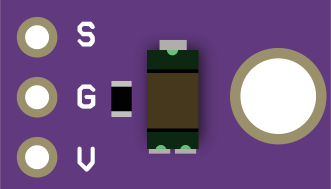
The TEMT6000 sensor typically comes with three pins. Below is the pinout description:
| Pin | Name | Description |
|---|---|---|
| 1 | Vcc | Power supply pin (3.3V to 5V) |
| 2 | GND | Ground connection |
| 3 | OUT | Analog output pin (voltage proportional to light) |
Usage Instructions
Connecting the TEMT6000
To use the TEMT6000 in a circuit, follow these steps:
- Connect the Vcc pin to a 3.3V or 5V power source.
- Connect the GND pin to the ground of your circuit.
- Connect the OUT pin to an analog input pin of your microcontroller or ADC (Analog-to-Digital Converter).
Important Considerations
- Ensure the supply voltage does not exceed 5V to avoid damaging the sensor.
- Place the sensor in an area where it can receive ambient light without obstruction.
- Avoid exposing the sensor to direct sunlight for extended periods, as this may affect its accuracy.
- Use a pull-down resistor on the output pin if the signal is noisy.
Example: Using TEMT6000 with Arduino UNO
Below is an example of how to connect and read data from the TEMT6000 using an Arduino UNO:
Circuit Diagram
- Vcc → Arduino 5V
- GND → Arduino GND
- OUT → Arduino A0 (Analog Pin 0)
Arduino Code
// TEMT6000 Light Sensor Example
// Reads the analog output of the TEMT6000 and prints the light intensity
// to the Serial Monitor.

const int sensorPin = A0; // Analog pin connected to TEMT6000 OUT pin
int sensorValue = 0;      // Variable to store the sensor reading

void setup() {
  Serial.begin(9600); // Initialize serial communication at 9600 baud
}

void loop() {
  // Read the analog value from the sensor
  sensorValue = analogRead(sensorPin);

  // Convert the analog value to a voltage (assuming 5V reference)
  float voltage = sensorValue * (5.0 / 1023.0);

  // Print the sensor value and voltage to the Serial Monitor
  Serial.print("Sensor Value: ");
  Serial.print(sensorValue);
  Serial.print(" | Voltage: ");
  Serial.print(voltage);
  Serial.println(" V");

  delay(500); // Wait for 500ms before the next reading
}
Notes
- The
analogRead()function returns a value between 0 and 1023, corresponding to 0V to 5V. - You can adjust the delay in the
loop()function to change the frequency of readings.
Troubleshooting and FAQs
Common Issues
No Output or Incorrect Readings
- Cause: Incorrect wiring or loose connections.
- Solution: Double-check the wiring and ensure all connections are secure.
Output Voltage Stuck at Maximum or Minimum
- Cause: Sensor is exposed to extreme light or complete darkness.
- Solution: Test the sensor in a moderate lighting environment.
Noisy Output Signal
- Cause: Electrical noise in the circuit.
- Solution: Add a capacitor (e.g., 0.1 µF) between the OUT pin and GND to filter noise.
Sensor Not Responding to Light Changes
- Cause: Sensor may be damaged or blocked.
- Solution: Inspect the sensor for physical damage and ensure it is not obstructed.
FAQs
Q: Can the TEMT6000 detect infrared light?
A: No, the TEMT6000 is designed to detect visible light, with peak sensitivity at 570 nm. It is not suitable for detecting infrared light.
Q: Can I use the TEMT6000 with a 3.3V microcontroller?
A: Yes, the TEMT6000 operates with a supply voltage as low as 3.3V, making it compatible with 3.3V microcontrollers like the ESP32 or Raspberry Pi Pico.
Q: How do I calibrate the sensor for specific lighting conditions?
A: You can map the sensor's output voltage to your desired light intensity range using software. For example, use the map() function in Arduino to scale the readings.
Q: Is the TEMT6000 suitable for outdoor use?
A: While the TEMT6000 can operate in a wide temperature range, it is not waterproof. Use a protective enclosure if deploying it outdoors.
By following this documentation, you can effectively integrate the TEMT6000 light sensor into your projects and troubleshoot common issues with ease.